Buttons HONDA ODYSSEY 2009 RB3-RB4 / 4.G Navigation Manual
[x] Cancel search | Manufacturer: HONDA, Model Year: 2009, Model line: ODYSSEY, Model: HONDA ODYSSEY 2009 RB3-RB4 / 4.GPages: 153, PDF Size: 4.75 MB
Page 10 of 153
10Navigation System
Getting Started
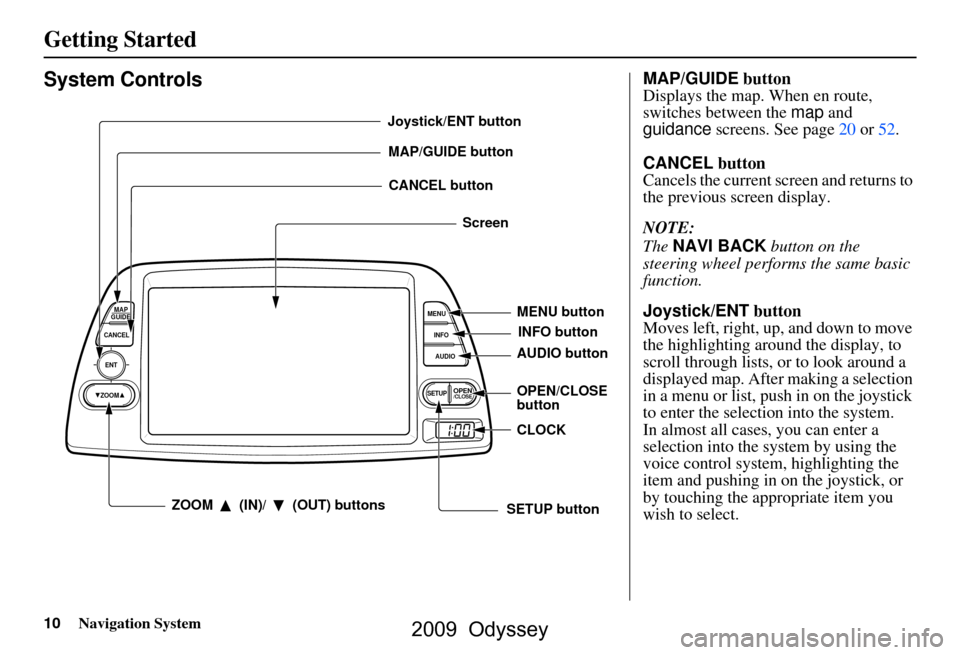
System Controls
ENT
CANCELMAP
GUIDE
MENU
INFO
AUDIO
SETUPOPEN/CLOSEZOOM
MAP/GUIDE buttonCANCEL button
Screen
MENU button
AUDIO button INFO button
ZOOM (IN)/ (OUT) buttons
Joystick/ENT button
OPEN/CLOSE
buttonCLOCK
SETUP button
MAP/GUIDE button
Displays the map. When en route,
switches between the map and
guidance screens. See page
20 or 52.
CANCEL button
Cancels the current screen and returns to
the previous screen display.
NOTE:
The NAVI BACK button on the
steering wheel perfor ms the same basic
function.
Joystick/ENT button
Moves left, right, up, and down to move
the highlighting around the display, to
scroll through lists, or to look around a
displayed map. After making a selection
in a menu or list, push in on the joystick
to enter the selectio n into the system.
In almost all cases, you can enter a
selection into the system by using the
voice control system, highlighting the
item and pushing in on the joystick, or
by touching the appropriate item you
wish to select.
2009 Odyssey
Page 11 of 153
Navigation System11
Getting Started
ZOOM (IN)/ (OUT) buttons
Press ZOOM to zoom in (to show
more detail), or ZOOM to zoom out
(to show more area and less detail)
while a map screen is displayed.
ZOOM IN reduces the scale (showing
less area with greater detail). ZOOM
OUT increases the scale (showing more
area with less detail).
MENU button
Displays the Enter destination by
screen. When en r oute, displays the
Change route by screen.
INFO button
Displays the screen for selecting
Cellular Phonebook , Calendar,
Calculator , Voice Command Help ,
Map Legend , and Key to Zagat
Ratings . See page70.
AUDIO button
Press to display the audio screen.
For information on audio system
features, see the Audio section of the
vehicle Owner’s manual. SETUP button
Displays the
Setup screens to change
and update informa tion in the system.
See page76.
OPEN/CLOSE button
Tilts the screen down to access the CD
changer.
CLOCK
Both the screen clock* and console
clock are controlled by the navigation
system and automatically compensate
for daylight saving and time zone
changes during vehicle operation. They
can be adjusted in Setup mode. See
page96.
* For the screen clock, see page18.
Screen
All selections and instructions are
displayed on the screen. In addition, the
display is a “touch screen” – you can
enter information into the system by
touching the images (icons) on the
screen with your finger. For example, if you need to enter a
street name, a keyboard will be
displayed. You can type in the street
name by saying or selecting the
individual character
s on the screen.
Clean the screen with a soft damp cloth.
You may use a mild cl eaner intended for
use on liquid crystal displays (LCDs).
Harsher chemicals may damage the
screen.
NOTE:
Whenever you shift to R (Reverse), the
rear view behind the vehicle is shown on
the navigation system screen.
2009 Odyssey
Page 12 of 153
12Navigation System
Getting Started
Voice Control Basics
Your vehicle has a voice control system
that allows hands-free operation of most
of the navigation system functions. You
can also control the audio system and
the climate control system. The voice
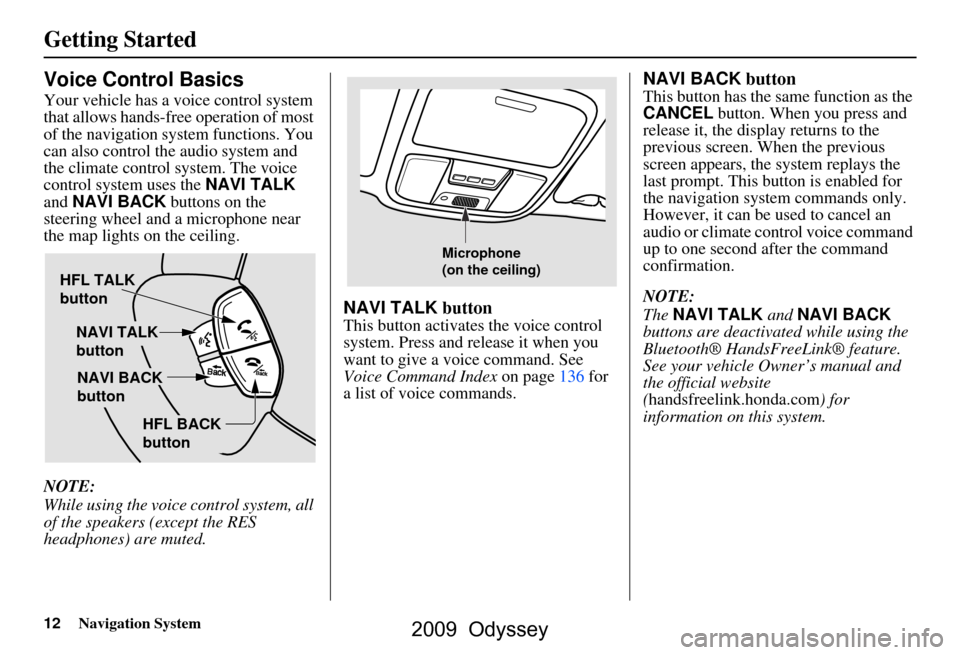
control system uses the NAVI TALK
and NAVI BACK buttons on the
steering wheel and a microphone near
the map lights on the ceiling.
NOTE:
While using the voice control system, all
of the speakers (except the RES
headphones) are muted.
NAVI TALK button
This button activates the voice control
system. Press and release it when you
want to give a voice command. See
Voice Command Index on page136 for
a list of voice commands.
NAVI BACK button
This button has the same function as the
CANCEL button. When you press and
release it, the disp lay returns to the
previous screen. When the previous
screen appears, the system replays the
last prompt. This button is enabled for
the navigation system commands only.
However, it can be used to cancel an
audio or climate control voice command
up to one second after the command
confirmation.
NOTE:
The NAVI TALK and NAVI BACK
buttons are deactivated while using the
Bluetooth® HandsFreeLink® feature.
See your vehicle Owner’s manual and
the official website
(handsfreelink.honda.com ) for
information on this system.
HFL TALK
button
NAVI TALK
button
HFL BACK
button
NAVI BACK
button
Microphone
(on the ceiling)
2009 Odyssey
Page 14 of 153
14Navigation System
Getting Started
Improving Voice Recognition
To achieve optimum voice recognition
when using either the navigation or
Bluetooth® HandsFreeLink® voice
control system, the following guidelines
should be followed:
NOTE:
Make sure the correct screen is
displayed for the voice command that
you are using. See Voice Command
Index on page136.
Lower the A/C fan speed during voice recognition operation, and
adjust the airflow from both the
dashboard and side vents so they do
not blow against the microphone on
the ceiling.
Close the windows and the sunroof.
If more than one pe rson is speaking at
the same time, the system may
misinterpret your command.
After pressing and releasing the NAVI TALK button, wait for the
beep, then give a voice command. Give a voice command in a clear,
natural speaking voice without
pausing between words.
If the system cannot recognize your command because of background
noise, speak louder.
If you are still having trouble with the voice control system, refer to Voice
Command Help on the
Information screen.
Selecting an Item (Button)
on the Screen
On most screens, there are items that
can be selected (lik e buttons with titles
such as OK or Return ). To select an
item on any screen, do one of the
following:
Use the voice control system and say the name of the desired item. Almost
all selectable items on the screen,
including some listed items, are
recognized by the voice control
system.
Touch the desired item on the screen.
Move the highlightin g to the desired
item with the joystick, then push in
on the joystick.
Tip:
If items are grayed out, this means that
they cannot be selected.
2009 Odyssey
Page 15 of 153
Navigation System15
Getting Started
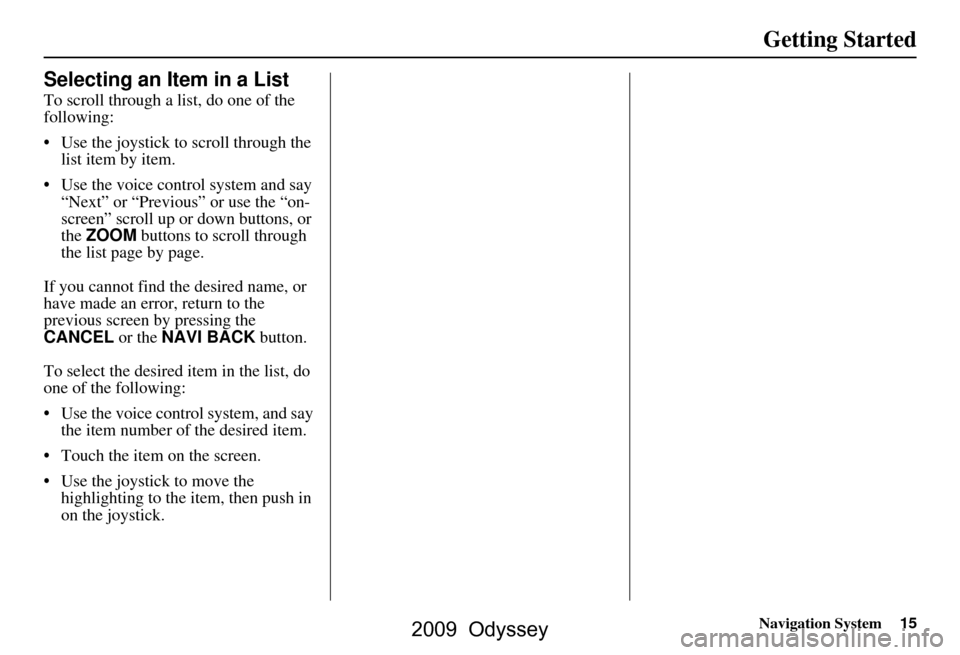
Selecting an Item in a List
To scroll through a list, do one of the
following:
Use the joystick to scroll through the
list item by item.
Use the voice cont rol system and say
“Next” or “Previous” or use the “on-
screen” scroll up or down buttons, or
the ZOOM buttons to scroll through
the list page by page.
If you cannot find the desired name, or
have made an error, return to the
previous screen by pressing the
CANCEL or the NAVI BACK button.
To select the desired item in the list, do
one of the following:
Use the voice control system, and say the item number of the desired item.
Touch the item on the screen.
Use the joystick to move the highlighting to the ite m, then push in
on the joystick.
2009 Odyssey
Page 18 of 153
18Navigation System
Getting Started
Read this disclaimer carefully so you
understand it before continuing. Push in
on the joystick, or touch OK, and the
map screen will appear on the display.
The “OK” cannot be activated by voice.
NOTE:
If you do not select OK, and then enter
the Setup or Information screens, some
items are not available and will show up
as darkened buttons (grayed out). See
System Function Diagram on page22.
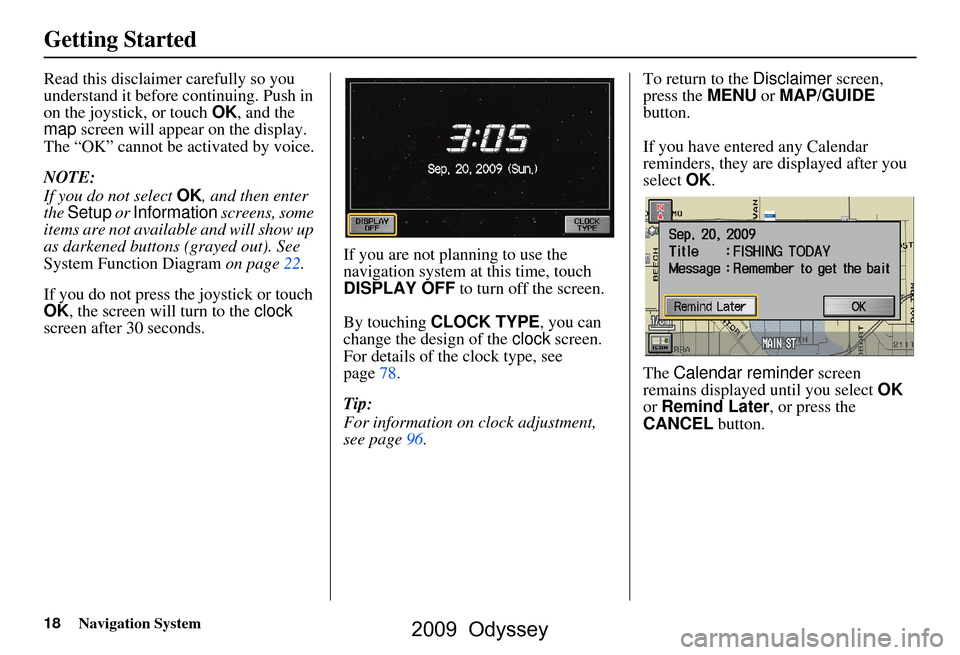
If you do not press the joystick or touch
OK , the screen will turn to the clock
screen after 30 seconds. If you are not planning to use the
navigation system at this time, touch
DISPLAY OFF
to turn off the screen.
By touching CLOCK TYPE , you can
change the design of the clock screen.
For details of the clock type, see
page78.
Tip:
For information on clock adjustment,
see page96. To return to the
Disclaimer screen,
press the MENU or MAP/GUIDE
button.
If you have entered any Calendar
reminders, they are displayed after you
select OK.
The Calendar reminder screen
remains displayed until you select OK
or Remind Later , or press the
CANCEL button.
2009 Odyssey
Page 21 of 153
Navigation System21
Getting Started
Map Screen Description
Zoom In/Out
Use the ZOOM buttons to change the
scale of the map. Zooming in increases
the detail, while zooming out gives you
a wide area view. After changing the
scale, give the system a few moments to
update the display.
Map Scrolling
To view other areas on the map, move
the joystick left, right, up, or down. The
map will shift in that direction. To
return the map to your current location,
press either the MAP/GUIDE, the
CANCEL , or the NAVI BACK button.
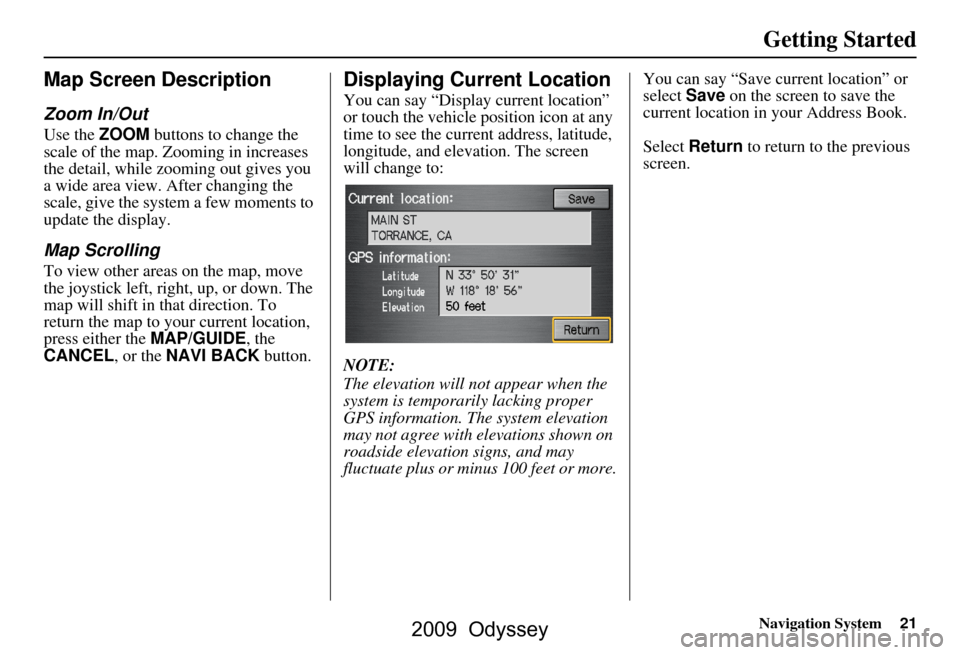
Displaying Current Location
You can say “Display current location”
or touch the vehicle position icon at any
time to see the current address, latitude,
longitude, and elevation. The screen
will change to:
NOTE:
The elevation will not appear when the
system is temporarily lacking proper
GPS information. The system elevation
may not agree with elevations shown on
roadside elevation signs, and may
fluctuate plus or minus 100 feet or more. You can say “Save current location” or
select
Save on the screen to save the
current location in your Address Book.
Select Return to return to the previous
screen.
2009 Odyssey
Page 34 of 153
34Navigation System
Auto Service
The subcategories are Acura Dealers,
Honda Dealers, Gas Stations, etc.
Banking
The subcategories are ATM, Bank, etc.
Community
The subcategories are City Hall, Civic/
Community Center, Convention/
Exhibition Center, Court House, Higher
Education, Library, Post Office, School,
etc.
Emergency
The subcategories are Hospital, Police
Station, Roadside Assistance, etc.
Lodging
The subcategories are Bed & Breakfast,
Hotel/Motel, etc.
Leisure
The subcategories are Amusement Park,
Golf Course, Historical Monument,
Marina, Movie Theater, Museum, Park/
Recreation Area, Performing Arts,
Sports Complex, and Tourist Attraction.Restaurant
This category is broken down into types
of food, giving you
a selection by each
type: All Types, American, French,
Japanese, etc.
The ZAGAT SURVEY for some
restaurants is available in the system.
See the Information screen “Key to
Zagat Ratings” for an explanation of
these ratings (see page75).
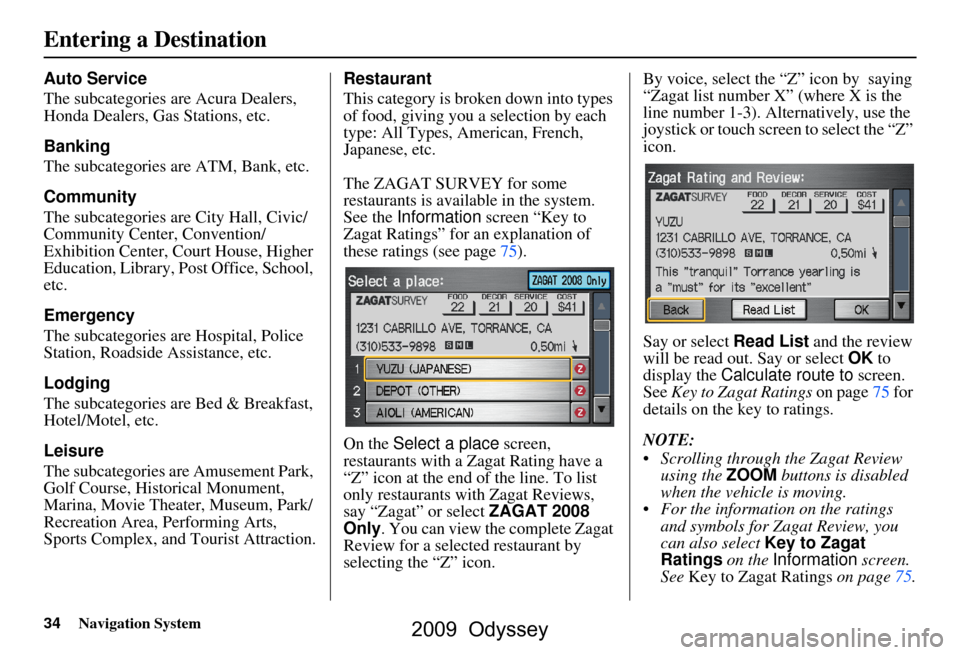
On the Select a place screen,
restaurants with a Zagat Rating have a
“Z” icon at the end of the line. To list
only restaurants with Zagat Reviews,
say “Zagat” or select ZAGAT 2008
Only . You can view the complete Zagat
Review for a select ed restaurant by
selecting the “Z” icon. By voice, select the “Z” icon by saying
“Zagat list number X” (where X is the
line number 1-3). Alternatively, use the
joystick or touch screen to select the “Z”
icon.
Say or select
Read List and the review
will be read out. Say or select OK to
display the Calculate route to screen.
See Key to Zagat Ratings on page75 for
details on the key to ratings.
NOTE:
Scrolling through the Zagat Review using the ZOOM buttons is disabled
when the vehicle is moving.
For the information on the ratings and symbols for Zagat Review, you
can also select Key to Zagat
Ratings on the Information screen.
See Key to Zagat Ratings on page75.
Entering a Destination
2009 Odyssey
Page 39 of 153
Navigation System39
By Map Input
After you select Map Input from the
Enter destination by screen, the
display changes to:
NOTE:
Prior to departure, you can set areas to avoid. The system then includes
them in its calculations for the
destination you have entered. See
Edit Avoid Area on page90.
For information on the available voice commands, see Voice
Command Index on page136.
Showing the Map of Current
Position
The Current Position selection
assumes that you are looking for a
destination in the immediate area. The
display changes to:
The red arrow indicates your vehicle
position. Find your desired destination
by moving the joystick left, right, up, or
down. The map and crosshairs will
move in the same direction.
The yellow box indi cates the area you
will see when you click on the current
map with the joystick. The scale will
decrease each time you push in on the
joystick, until Select a destination
appears at the top of the screen. If desired, use the
ZOOM buttons to
change the map scale. When you have
the crosshairs on the desired icon, map
feature, or road, push in on the joystick.
The address of the location will appear
at the top of the screen.
NOTE:
The selected icon or road segment is
displayed on the 1/2 mile (800 meter) or
less map scale.
If this is the desired destination, push in
on the joystick again. If not, use the
joystick to reposition the crosshairs,
then push in on th e joystick again to
display the new address.
Entering a Destination
2009 Odyssey
Page 41 of 153
Navigation System41
Use the joystick to move the crosshairs
to the area of the state close to your
intended destination. If desired, use the
ZOOM buttons to change the map scale.
When you have the crosshairs in the
desired area, push in on the joystick.
The address of the location you have
selected will appear at the top of the
screen.
NOTE:
The selected icon or road segment is
displayed on the 1/2 mile (800 meter) or
less map scale. If this is the desired address, push in on
the joystick again. If not, use the
joystick to reposition the crosshairs,
then push in on the joystick again to
display the new address.
If you selected a single icon or road
segment, push in on
the joystick again to
select the new address. If you selected
multiple icons within the cursor radius,
select an item from the list on the
screen.
Once you select an address, the system
then displays the Calculate route to
screen (see Driving to Your Destination
on page47).Showing the Map of Continental
USA
With the Continental USA selection,
the display changes to:
The yellow box indicates the area you
will see when you click on the current
map with the joystick. The scale will
decrease each time you push in on the
joystick, until Select a destination
appears at the top of the screen.
Use the joystick to move the crosshairs
to the area of the country for your
intended destination. Then push in on
the joystick.
Entering a Destination
2009 Odyssey