display HONDA ODYSSEY 2012 RB3-RB4 / 4.G Owners Manual
[x] Cancel search | Manufacturer: HONDA, Model Year: 2012, Model line: ODYSSEY, Model: HONDA ODYSSEY 2012 RB3-RB4 / 4.GPages: 441, PDF Size: 14.07 MB
Page 261 of 441
uuBluetooth
® HandsFreeLink
®*uUsing HFL
260Features
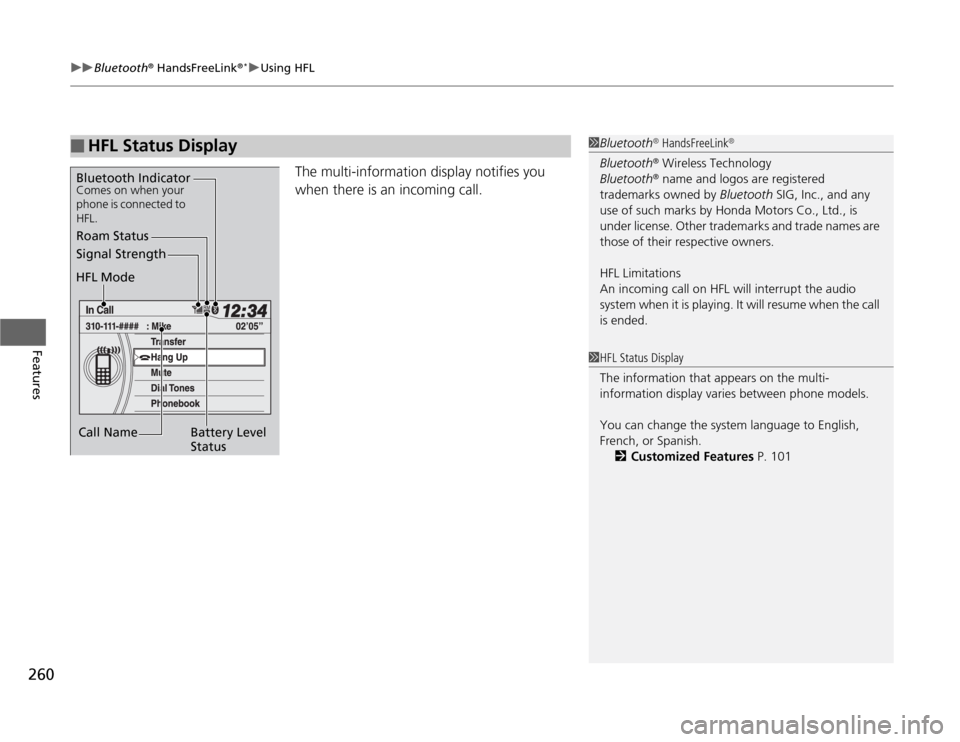
The multi-information display notifies you
when there is an incoming call.
■
HFL Status Display
1Bluetooth
® HandsFreeLink
®
Bluetooth
® Wireless Technology
Bluetooth® name and logos are registered
trademarks owned by Bluetooth SIG, Inc., and any
use of such marks by Honda Motors Co., Ltd., is
under license. Other trademarks and trade names are
those of their respective owners.
HFL Limitations
An incoming call on HFL will interrupt the audio
system when it is playing. It will resume when the call
is ended.
Signal Strength
HFL Mode
Battery Level
Status Roam Status
Call NameBluetooth IndicatorComes on when your
phone is connected to
HFL.
1HFL Status Display
The information that appears on the multi-
information display varies between phone models.
You can change the system language to English,
French, or Spanish.
2Customized Features P. 101
Page 262 of 441
261
uuBluetooth
® HandsFreeLink
®*uHFL Menus
Continued
Features
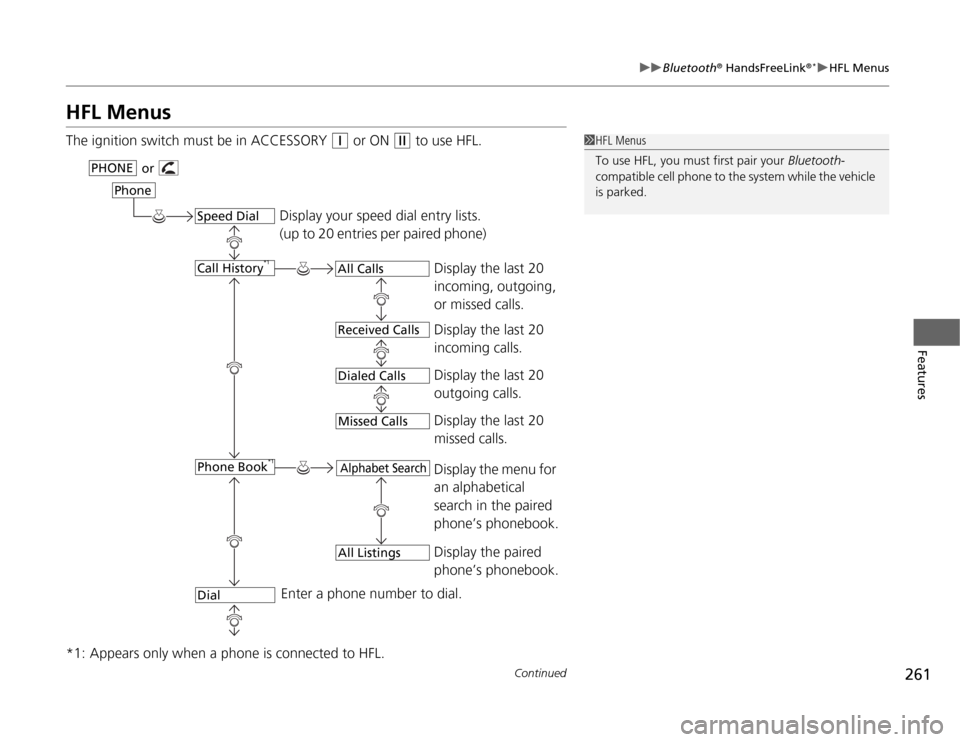
HFL MenusThe ignition switch must be in ACCESSORY
(q
or ON
(w
to use HFL.
*1: Appears only when a phone is connected to HFL.
1HFL Menus
To use HFL, you must first pair your Bluetooth-
compatible cell phone to the system while the vehicle
is parked.
Display your speed dial entry lists.
(up to 20 entries per paired phone)
Display the last 20
incoming, outgoing,
or missed calls.
Display the last 20
incoming calls.
Display the last 20
outgoing calls.
Enter a phone number to dial.
or
PHONE
Phone
Speed DialCall History
*1
Phone Book
*1
Dial
All CallsReceived CallsDialed Calls
Display the last 20
missed calls.
Missed Calls
Display the menu for
an alphabetical
search in the paired
phone’s phonebook.
Alphabet Search
Display the paired
phone’s phonebook.
All Listings
Page 280 of 441
Continued
279
uuBluetooth
® HandsFreeLink
®*uHFL Menus
Features
■
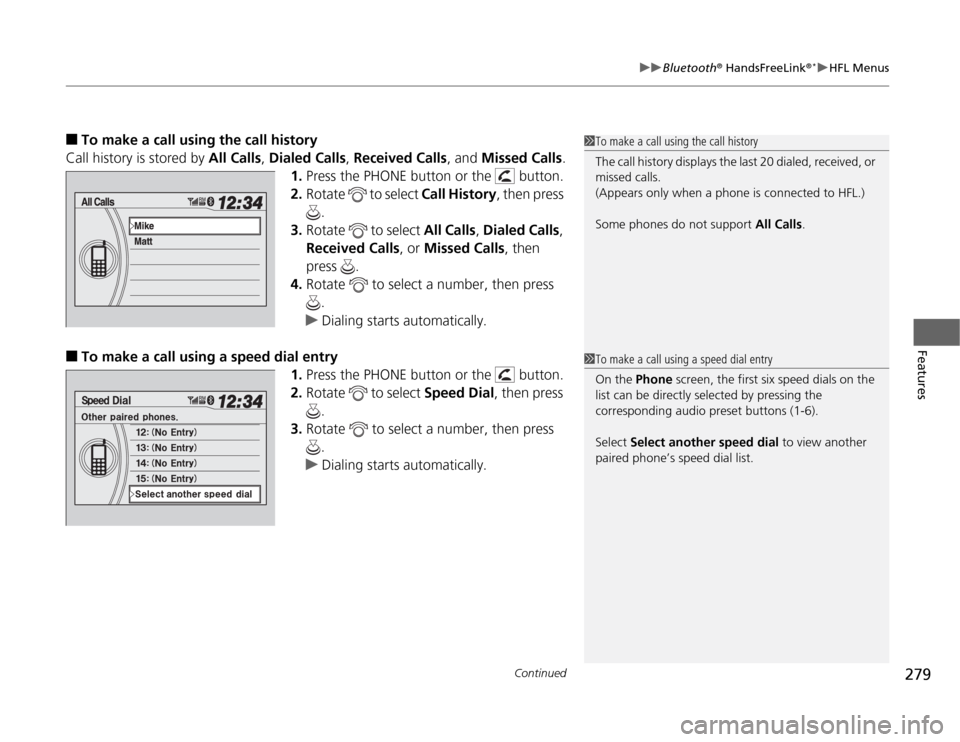
To make a call using the call history
Call history is stored by All Calls, Dialed Calls, Received Calls, and Missed Calls.
1.Press the PHONE button or the button.
2.Rotate to select Call History, then press
.
3.Rotate to select All Calls, Dialed Calls,
Received Calls, or Missed Calls, then
press .
4.Rotate to select a number, then press
.
uDialing starts automatically.
■
To make a call using a speed dial entry
1.Press the PHONE button or the button.
2.Rotate to select Speed Dial, then press
.
3.Rotate to select a number, then press
.
uDialing starts automatically.
1To make a call using the call history
The call history displays the last 20 dialed, received, or
missed calls.
(Appears only when a phone is connected to HFL.)
Some phones do not support All Calls.1To make a call using a speed dial entry
On the Phone screen, the first six speed dials on the
list can be directly selected by pressing the
corresponding audio preset buttons (1-6).
Select Select another speed dial to view another
paired phone’s speed dial list.
Page 283 of 441
282Features
Compass
*
When you turn the ignition switch to ON
(w
, the compass self-calibrates, and the
compass display appears.
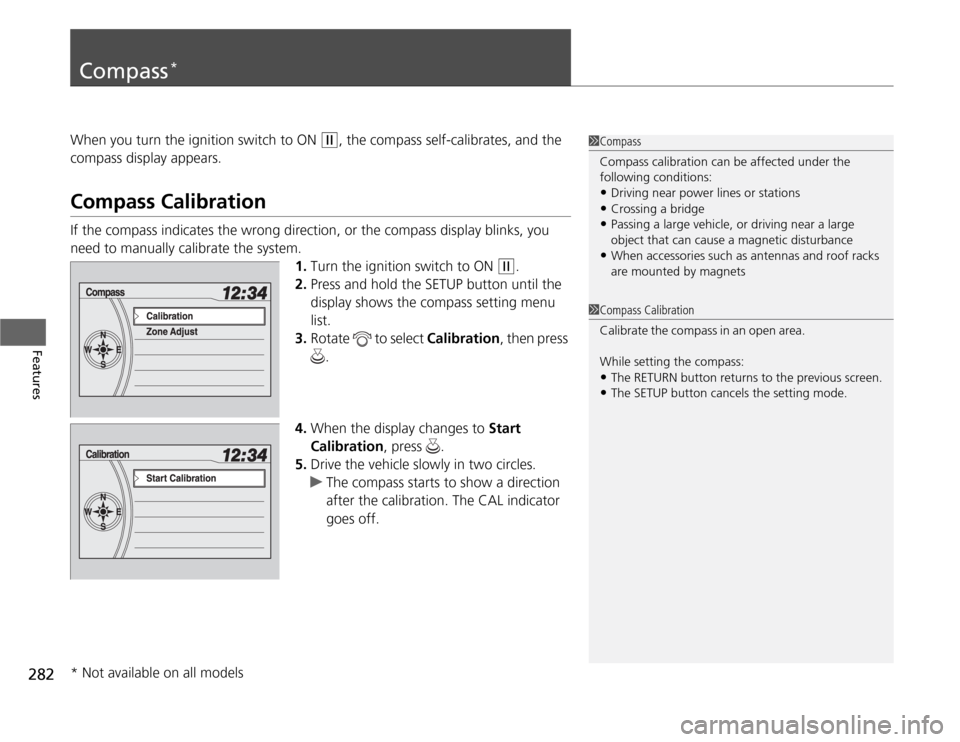
Compass CalibrationIf the compass indicates the wrong direction, or the compass display blinks, you
need to manually calibrate the system.
1.Turn the ignition switch to ON
(w
.
2.Press and hold the SETUP button until the
display shows the compass setting menu
list.
3.Rotate to select Calibration, then press
.
4.When the display changes to Start
Calibration, press .
5.Drive the vehicle slowly in two circles.
uThe compass starts to show a direction
after the calibration. The CAL indicator
goes off.
1Compass
Compass calibration can be affected under the
following conditions:•Driving near power lines or stations•Crossing a bridge•Passing a large vehicle, or driving near a large
object that can cause a magnetic disturbance•When accessories such as antennas and roof racks
are mounted by magnets
1Compass Calibration
C al i b r a t e t h e c o m p as s i n a n o p en ar ea .
While setting the compass:•The RETURN button returns to the previous screen.•The SETUP button cancels the setting mode.
* Not available on all models
Page 284 of 441
283
uuCompass
*uCompass Zone Selection
Features
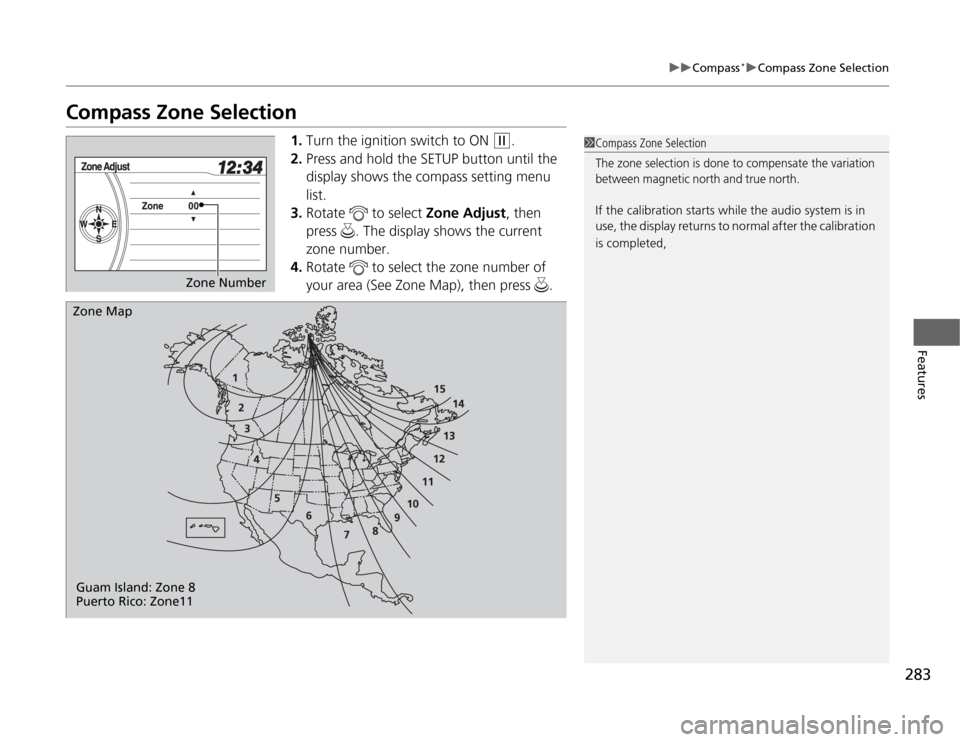
Compass Zone Selection
1.Turn the ignition switch to ON
(w
.
2.Press and hold the SETUP button until the
display shows the compass setting menu
list.
3.Rotate to select Zone Adjust, then
press . The display shows the current
zone number.
4.Rotate to select the zone number of
your area (See Zone Map), then press .
1Compass Zone SelectionThe zone selection is done to compensate the variation
between magnetic north and true north. If the calibration starts while the audio system is in
use, the display returns to normal after the calibration
is completed,
Zone Number
Zone Map
Guam Island: Zone 8
Puerto Rico: Zone11
Page 286 of 441
285
Driving
This chapter discusses driving, refueling, and information on items such as accessories.
Before Driving
Driving Preparation .......................... 286
Maximum Load Limit........................ 289
Towing a Trailer
Towing Preparation .......................... 291
Driving Safely with a Trailer .............. 295
Towing Your Vehicle ........................ 296
When Driving
Starting the Engine .......................... 297
Precautions While Driving................. 299
Automatic Transmission ................... 300
Shifting ............................................ 301Cruise Control ................................. 303
VSA
® (Vehicle Stability Assist), aka ESC
(Electronic Stability Control), System ...... 306
TPMS (Tire Pressure Monitoring System) ... 308
Tire Pressure Monitoring System (TPMS) -
Required Federal Explanation ......... 309BSI (Blind Spot Information) System
*.... 312
Braking
Brake System ................................... 314
ABS (Anti-lock Brake System) ........... 316
Brake Assist System.......................... 317
Parking Your Vehicle
When Stopped................................. 318Parking ............................................ 318
Parking Sensor System
*................... 319
Rearview Camera
*............................ 323
Rearview Display Image ................... 324
Refueling
Fuel Information .............................. 325
How to Refuel ................................. 326
Fuel Economy.................................... 328
Improving Fuel Economy .................. 328
Accessories and Modifications
Accessories ...................................... 329
Modifications................................... 329
* Not available on all models
Page 309 of 441
308
uuWhen DrivinguTPMS (Tire Pressure Monitoring System)
Driving
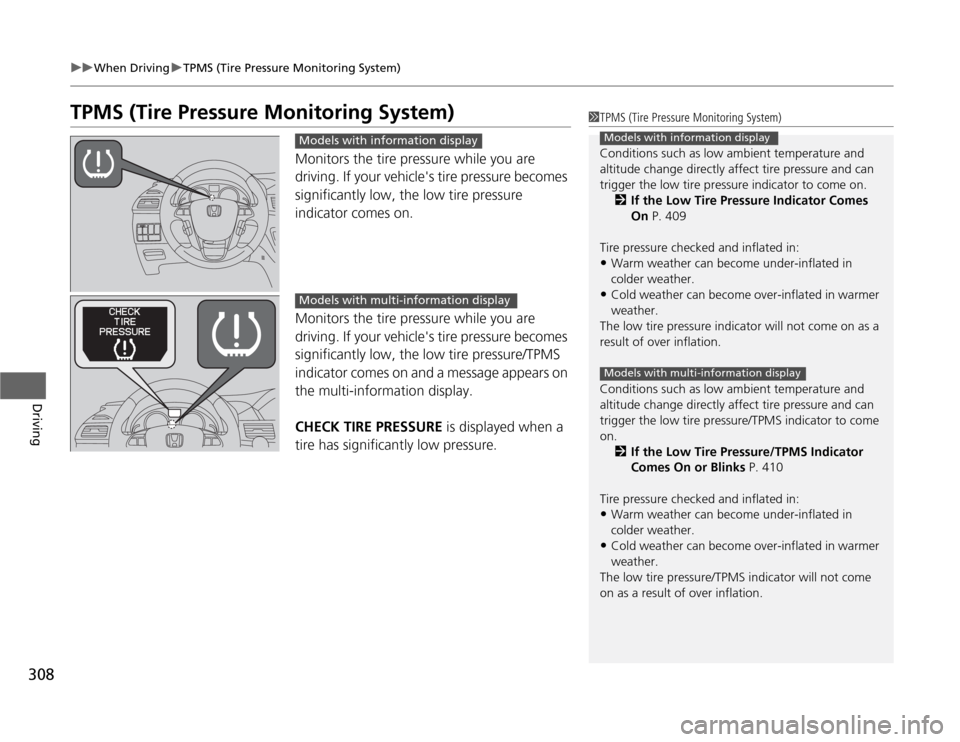
TPMS (Tire Pressure Monitoring System)
Monitors the tire pressure while you are
driving. If your vehicle's tire pressure becomes
significantly low, the low tire pressure
indicator comes on.
Monitors the tire pressure while you are
driving. If your vehicle's tire pressure becomes
significantly low, the low tire pressure/TPMS
indicator comes on and a message appears on
the multi-information display.
CHECK TIRE PRESSURE is displayed when a
tire has significantly low pressure.
1TPMS (Tire Pressure Monitoring System)
Conditions such as low ambient temperature and
altitude change directly affect tire pressure and can
trigger the low tire pressure indicator to come on.
2If the Low Tire Pressure Indicator Comes
On P. 409
Tire pressure checked and inflated in:•Warm weather can become under-inflated in
colder weather.•Cold weather can become over-inflated in warmer
weather.
The low tire pressure indicator will not come on as a
result of over inflation.
Conditions such as low ambient temperature and
altitude change directly affect tire pressure and can
trigger the low tire pressure/TPMS indicator to come
on.
2If the Low Tire Pressure/TPMS Indicator
Comes On or Blinks P. 410
Tire pressure checked and inflated in:•Warm weather can become under-inflated in
colder weather.•Cold weather can become over-inflated in warmer
weather.
The low tire pressure/TPMS indicator will not come
on as a result of over inflation.Models with information displayModels with multi-information display
Models with information displayModels with multi-information display
Page 311 of 441
310
uuWhen DrivinguTire Pressure Monitoring System (TPMS) - Required Federal Explanation
Driving
Please note that the TPMS is not a substitute for proper tire
maintenance, and it is the driver's responsibility to maintain
correct tire pressure, even if under-inflation has not reached the
level to trigger illumination of the TPMS low tire pressure telltale.
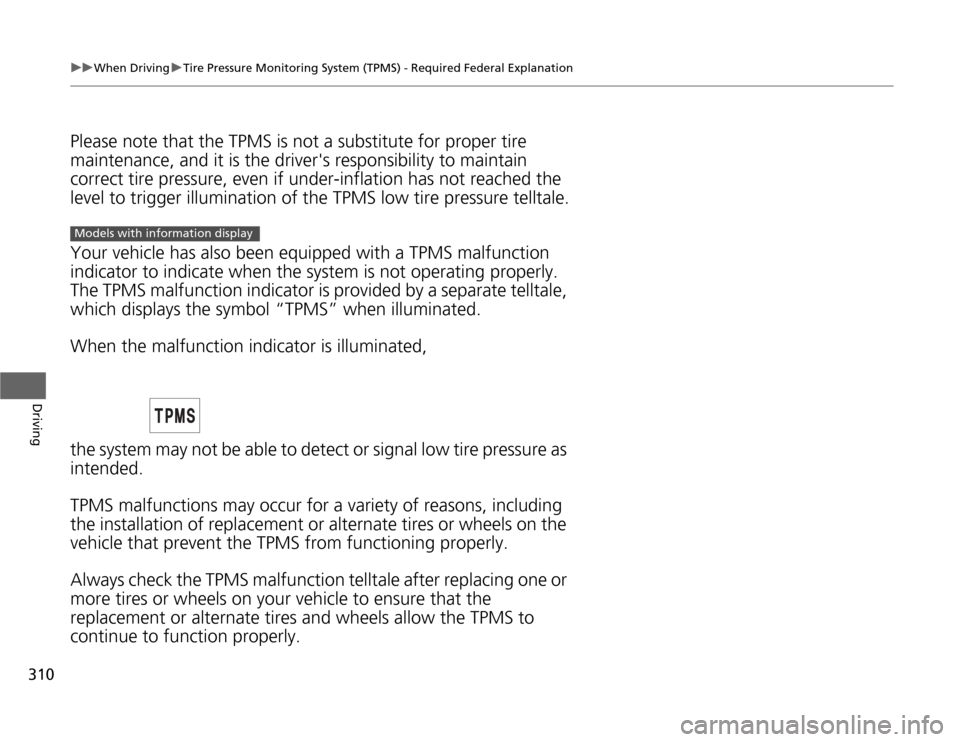
Your vehicle has also been equipped with a TPMS malfunction
indicator to indicate when the system is not operating properly.
The TPMS malfunction indicator is provided by a separate telltale,
which displays the symbol “TPMS” when illuminated.
When the malfunction indicator is illuminated,
the system may not be able to detect or signal low tire pressure as
intended.
TPMS malfunctions may occur for a variety of reasons, including
the installation of replacement or alternate tires or wheels on the
vehicle that prevent the TPMS from functioning properly.
Always check the TPMS malfunction telltale after replacing one or
more tires or wheels on your vehicle to ensure that the
replacement or alternate tires and wheels allow the TPMS to
continue to function properly.Models with information display
Page 312 of 441

311
uuWhen DrivinguTire Pressure Monitoring System (TPMS) - Required Federal Explanation
Driving
Your vehicle has also been equipped with a TPMS malfunction
indicator to indicate when the system is not operating properly.
The TPMS malfunction indicator is combined with the low tire
pressure telltale. When the system detects a malfunction, the
telltale will flash for approximately one minute and then remain
continuously illuminated. This sequence will continue upon
subsequent vehicle start-ups as long as the malfunction exists.
When the malfunction indicator is illuminated, the system may
not be able to detect or signal low tire pressure as intended.
TPMS malfunctions may occur for a variety of reasons, including
the installation of replacement or alternate tires or wheels on the
vehicle that prevent the TPMS from functioning properly.
Always check the TPMS malfunction telltale after replacing one or
more tires or wheels on your vehicle to ensure that the
replacement or alternate tires and wheels allow the TPMS to
continue to function properly.Models with multi-information display
Page 313 of 441
312
uuWhen DrivinguBSI (Blind Spot Information) System
*
Driving
BSI (Blind Spot Information) System
*
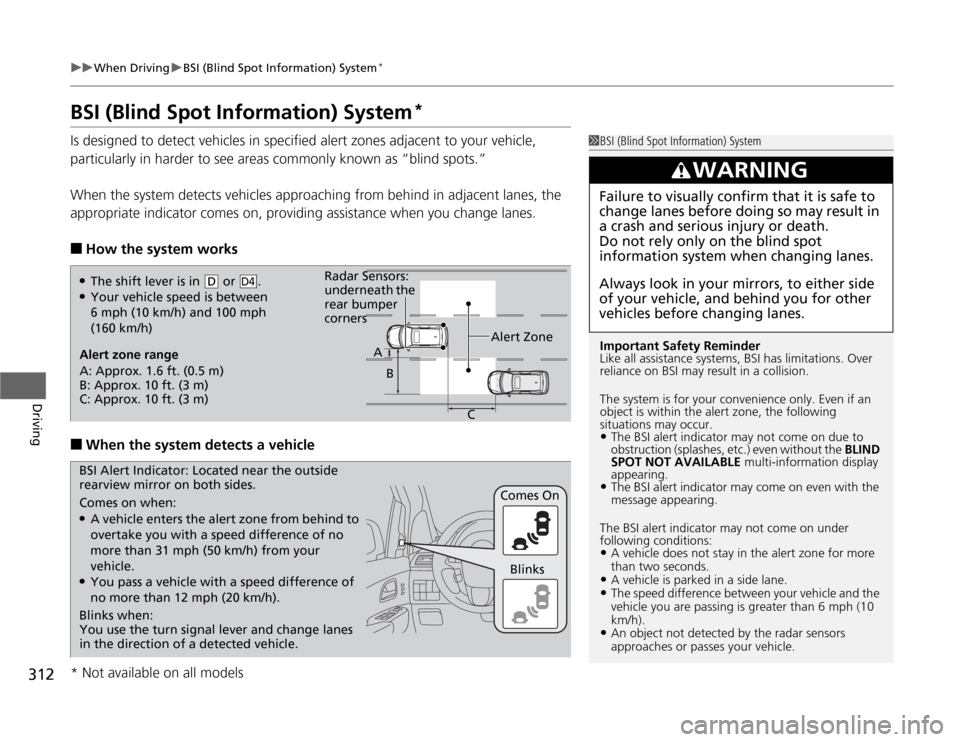
Is designed to detect vehicles in specified alert zones adjacent to your vehicle,
particularly in harder to see areas commonly known as “blind spots.”
When the system detects vehicles approaching from behind in adjacent lanes, the
appropriate indicator comes on, providing assistance when you change lanes.■
How the system works
■
When the system detects a vehicle
1BSI (Blind Spot Information) System
Important Safety Reminder
Like all assistance systems, BSI has limitations. Over
reliance on BSI may result in a collision.
The system is for your convenience only. Even if an
object is within the alert zone, the following
situations may occur.•The BSI alert indicator may not come on due to
obstruction (splashes, etc.) even without the BLIND
SPOT NOT AVAILABLE multi-information display
appearing.•The BSI alert indicator may come on even with the
message appearing.
The BSI alert indicator may not come on under
following conditions:•A vehicle does not stay in the alert zone for more
than two seconds.•A vehicle is parked in a side lane.•The speed difference between your vehicle and the
vehicle you are passing is greater than 6 mph (10
km/h).•An object not detected by the radar sensors
approaches or passes your vehicle.
3
WARNING
Failure to visually confirm that it is safe to
change lanes before doing so may result in
a crash and serious injury or death.
Do not rely only on the blind spot
information system when changing lanes.
Always look in your mirrors, to either side
of your vehicle, and behind you for other
vehicles before changing lanes.
●The shift lever is in
(D
or .
●Your vehicle speed is between
6 mph (10 km/h) and 100 mph
(160 km/h)
D4
Alert zone range
A: Approx. 1.6 ft. (0.5 m)
B: Approx. 10 ft. (3 m)
C: Approx. 10 ft. (3 m)Alert Zone Radar Sensors:
underneath the
rear bumper
corners
A
B
C
Comes on when:●A vehicle enters the alert zone from behind to
overtake you with a speed difference of no
more than 31 mph (50 km/h) from your
vehicle.●You pass a vehicle with a speed difference of
no more than 12 mph (20 km/h).Comes On BSI Alert Indicator: Located near the outside
rearview mirror on both sides.
Blinks when:
You use the turn signal lever and change lanes
in the direction of a detected vehicle.Blinks
* Not available on all models