HONDA ODYSSEY 2012 RB3-RB4 / 4.G User Guide
Manufacturer: HONDA, Model Year: 2012, Model line: ODYSSEY, Model: HONDA ODYSSEY 2012 RB3-RB4 / 4.GPages: 441, PDF Size: 14.07 MB
Page 11 of 441
10Quick Reference Guide
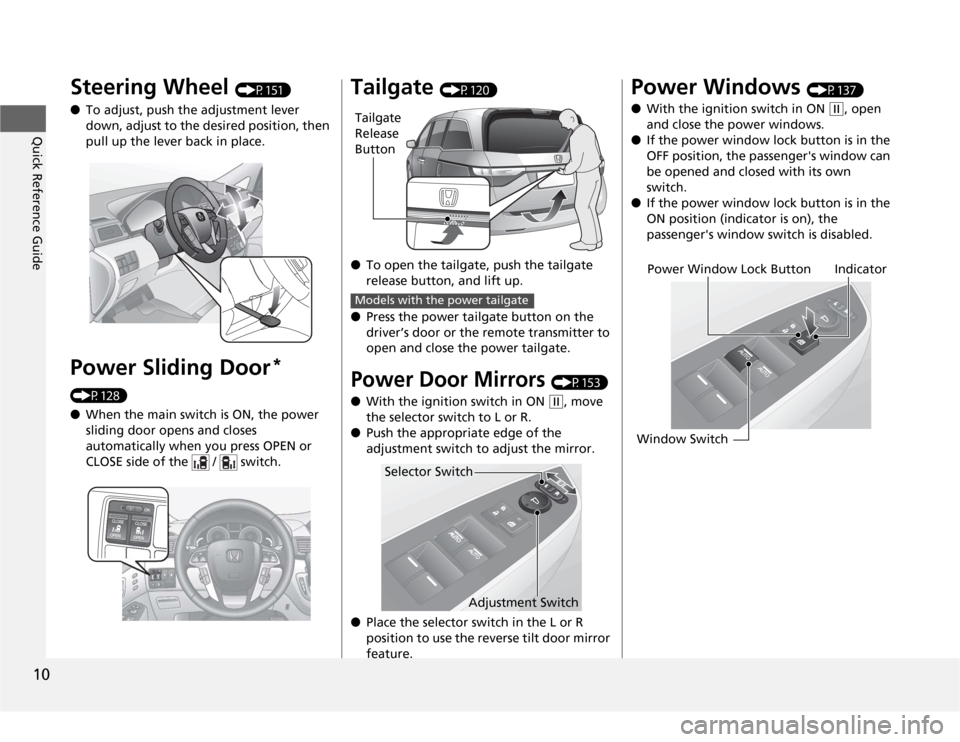
Steering Wheel
(P151)
●To adjust, push the adjustment lever
down, adjust to the desired position, then
pull up the lever back in place.
Power Sliding Door
*
(P128)
●When the main switch is ON, the power
sliding door opens and closes
automatically when you press OPEN or
CLOSE side of the / switch.
Tailgate
(P120)
●To open the tailgate, push the tailgate
release button, and lift up.
●Press the power tailgate button on the
driver’s door or the remote transmitter to
open and close the power tailgate.
Power Door Mirrors
(P153)
●With the ignition switch in ON (w
, move
the selector switch to L or R.
●Push the appropriate edge of the
adjustment switch to adjust the mirror.
●Place the selector switch in the L or R
position to use the reverse tilt door mirror
feature.
Tailgate
Release
ButtonModels with the power tailgate
Selector Switch
Adjustment Switch
Power Windows
(P137)
●With the ignition switch in ON
(w
, open
and close the power windows.
●If the power window lock button is in the
OFF position, the passenger's window can
be opened and closed with its own
switch.
●If the power window lock button is in the
ON position (indicator is on), the
passenger's window switch is disabled.
Power Window Lock Button
Window SwitchIndicator
Page 12 of 441
11Quick Reference Guide
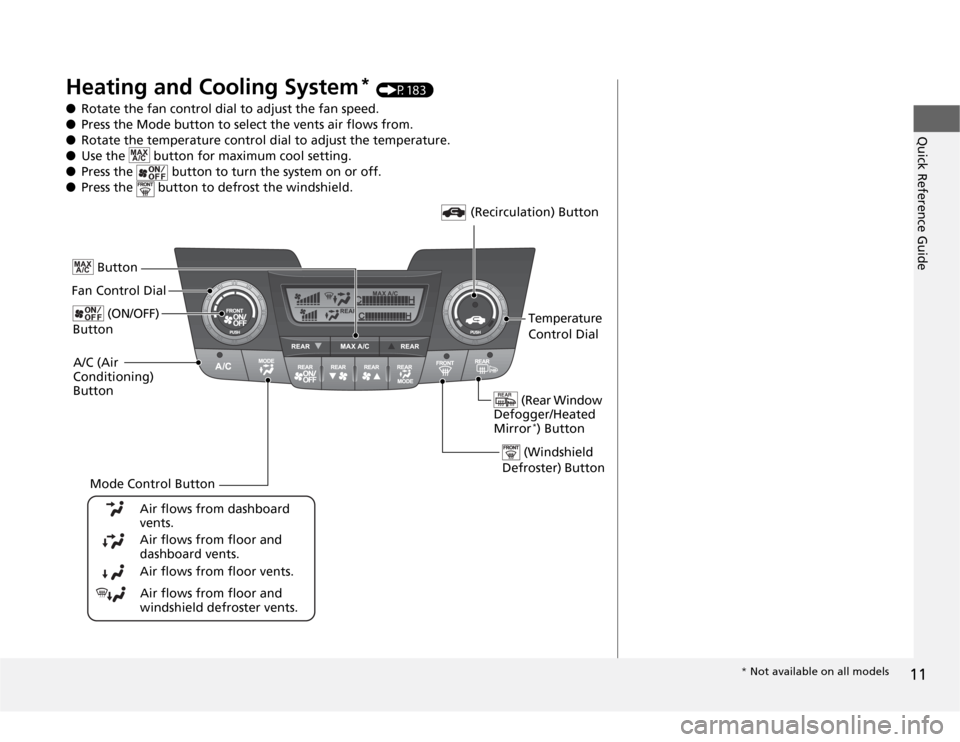
Heating and Cooling System
* (P183)
●Rotate the fan control dial to adjust the fan speed.
●Press the Mode button to select the vents air flows from.
●Rotate the temperature control dial to adjust the temperature.
●Use the button for maximum cool setting.
●Press the button to turn the system on or off.
●Press the button to defrost the windshield.
Fan Control Dial
(Rear Window
Defogger/Heated
Mirror
*) Button
(Windshield
Defroster) Button
A/C (Air
Conditioning)
Button
Air flows from floor and
windshield defroster vents. Air flows from floor vents. Air flows from floor and
dashboard vents. Air flows from dashboard
vents.
Button
(Recirculation) Button
Temperature
Control Dial (ON/OFF)
Button
Mode Control Button
* Not available on all models
Page 13 of 441
12Quick Reference Guide
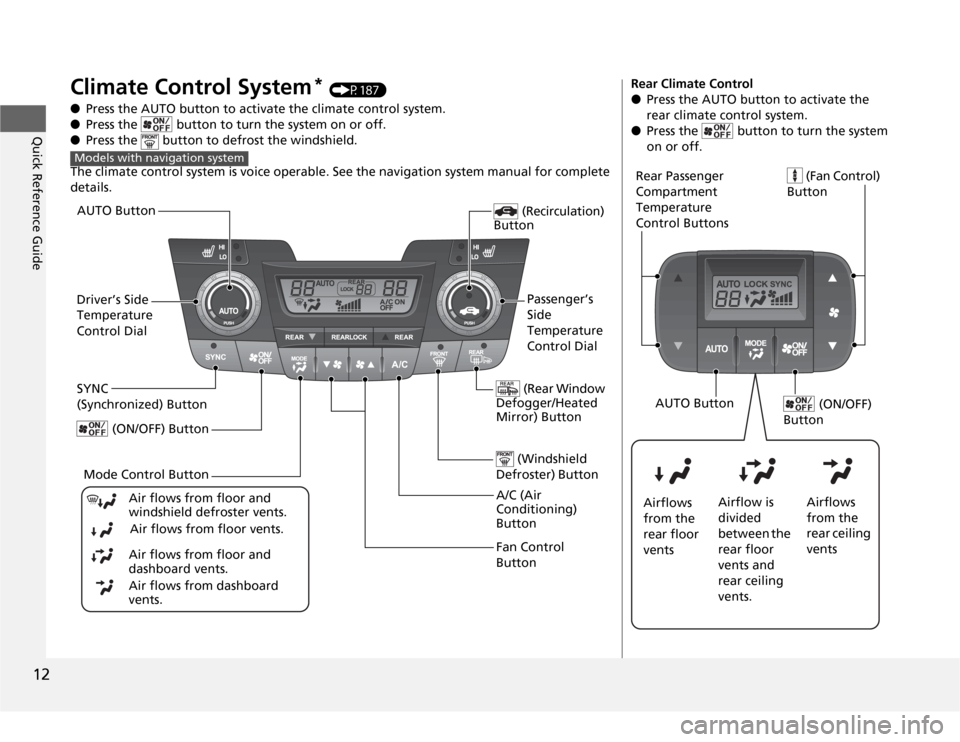
Climate Control System
* (P187)
●Press the AUTO button to activate the climate control system.
●Press the button to turn the system on or off.
●Press the button to defrost the windshield.
The climate control system is voice operable. See the navigation system manual for complete
details.
Models with navigation system
Fan Control
Button (Rear Window
Defogger/Heated
Mirror) Button
(Windshield
Defroster) Button
A/C (Air
Conditioning)
Button Air flows from floor and
windshield defroster vents.
Air flows from floor vents.
Air flows from floor and
dashboard vents.
Air flows from dashboard
vents.
(Recirculation)
ButtonPassenger’s
Side
Temperature
Control Dial AUTO Button
Driver’s Side
Temperature
Control Dial
Mode Control Button SYNC
(Synchronized) Button
(ON/OFF) Button
Rear Climate Control
●Press the AUTO button to activate the
rear climate control system.
●Press the button to turn the system
on or off.Rear Passenger
Compartment
Temperature
Control Buttons (Fan Control)
ButtonAirflows
from the
rear floor
ventsAirflow is
divided
between the
rear floor
vents and
rear ceiling
vents.Airflows
from the
rear ceiling
vents (ON/OFF)
ButtonAUTO Button
Page 14 of 441
13Quick Reference Guide
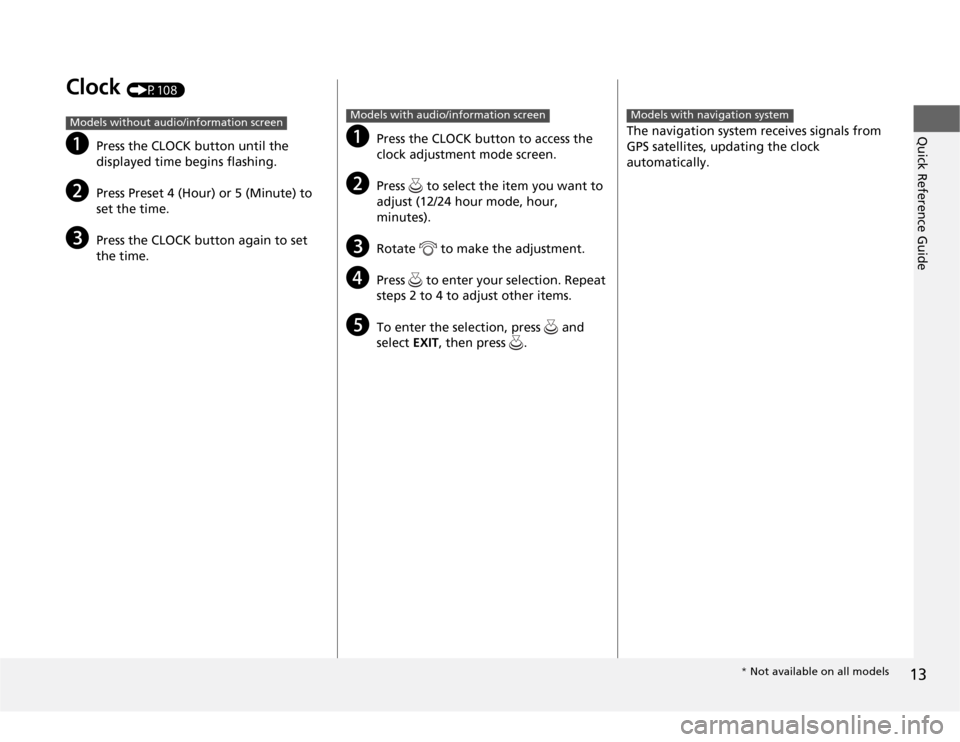
Clock
(P108)
a
Press the CLOCK button until the
displayed time begins flashing.
b
Press Preset 4 (Hour) or 5 (Minute) to
set the time.
c
Press the CLOCK button again to set
the time.
Models without audio/information screen
a
Press the CLOCK button to access the
clock adjustment mode screen.
b
Press to select the item you want to
adjust (12/24 hour mode, hour,
minutes).
c
Rotate to make the adjustment.
d
Press to enter your selection. Repeat
steps 2 to 4 to adjust other items.
e
To enter the selection, press and
select EXIT, then press .
Models with audio/information screen
The navigation system receives signals from
GPS satellites, updating the clock
automatically.Models with navigation system
* Not available on all models
Page 15 of 441
14Quick Reference Guide
Features
(P193)
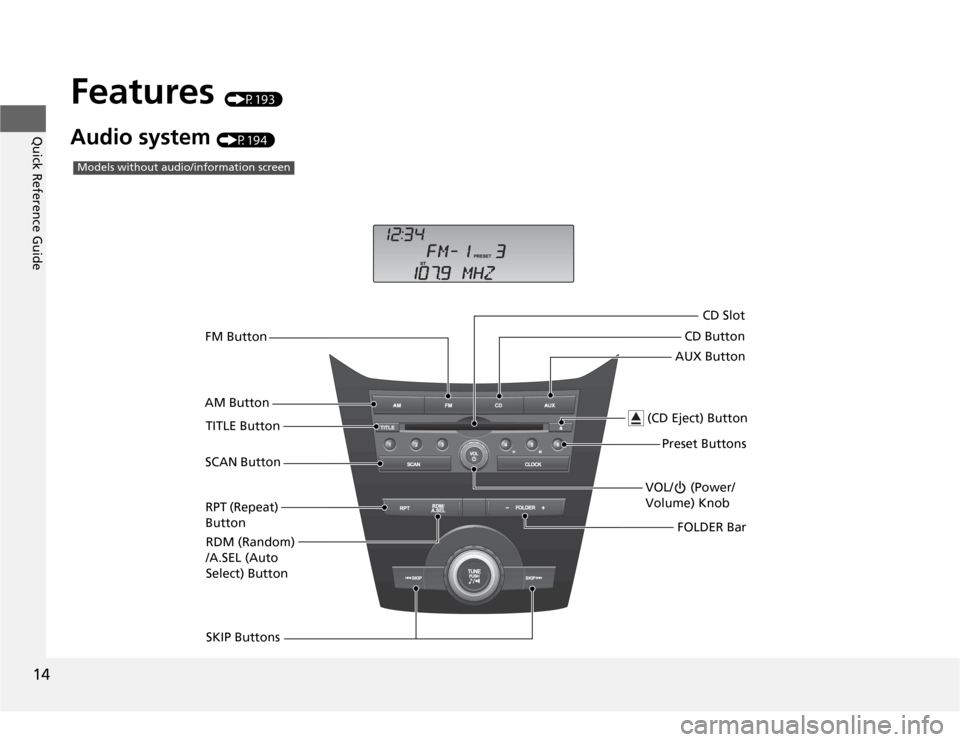
Audio system
(P194)AM ButtonFM Button
VOL/ (Power/
Volume) Knob
(CD Eject) Button
TITLE Button
SKIP ButtonsPreset Buttons
Models without audio/information screen
AUX ButtonCD ButtonCD Slot
SCAN Button
RPT (Repeat)
Button
RDM (Random)
/A.SEL (Auto
Select) ButtonFOLDER Bar
Page 16 of 441
15Quick Reference Guide
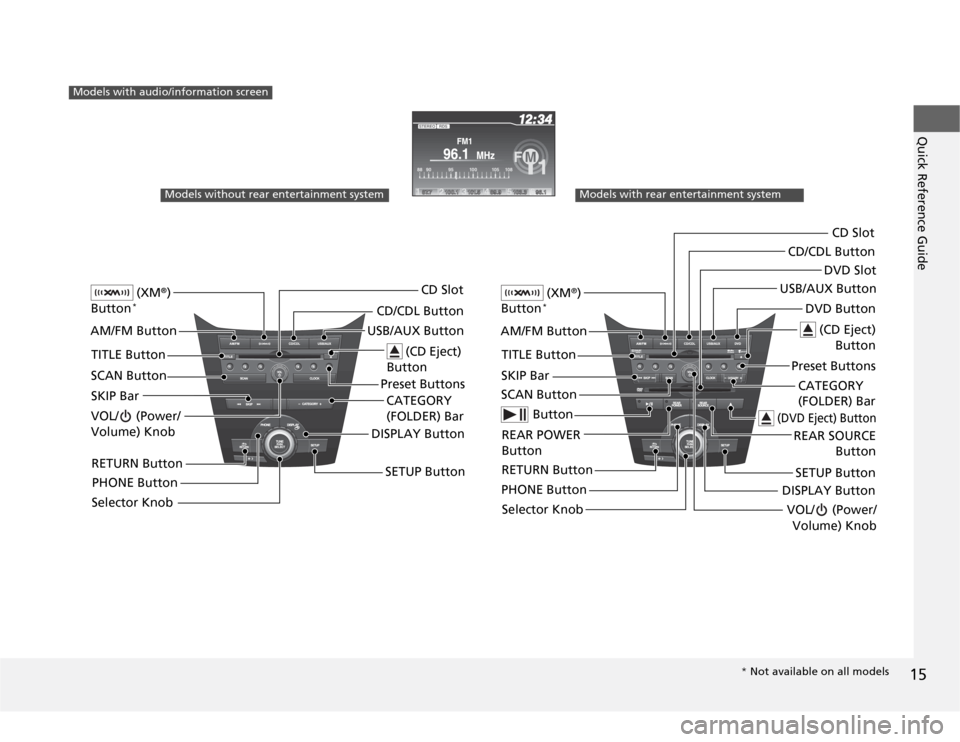
Models with audio/information screen
Models without rear entertainment system
(XM
®)
Button
*
AM/FM Button
VOL/ (Power/
Volume) Knob
(CD Eject)
Button
TITLE Button
Selector KnobPreset Buttons USB/AUX ButtonCD/CDL ButtonCD Slot
SCAN Button
SKIP Bar
RETURN ButtonCATEGORY
(FOLDER) Bar
SETUP Button
(XM
®)
Button
*
AM/FM Button
VOL/ (Power/
Volume) Knob
(CD Eject)
Button
TITLE Button
Selector KnobPreset ButtonsDVD Button USB/AUX ButtonCD/CDL Button
SCAN ButtonSKIP Bar
REAR POWER
ButtonCATEGORY
(FOLDER) Bar
SETUP Button
Models with rear entertainment system
Button
RETURN ButtonPHONE Button
CD Slot
DISPLAY Button
REAR SOURCE
Button
(DVD Eject) Button
DVD Slot
DISPLAY Button
PHONE Button
* Not available on all models
Page 17 of 441
16Quick Reference Guide
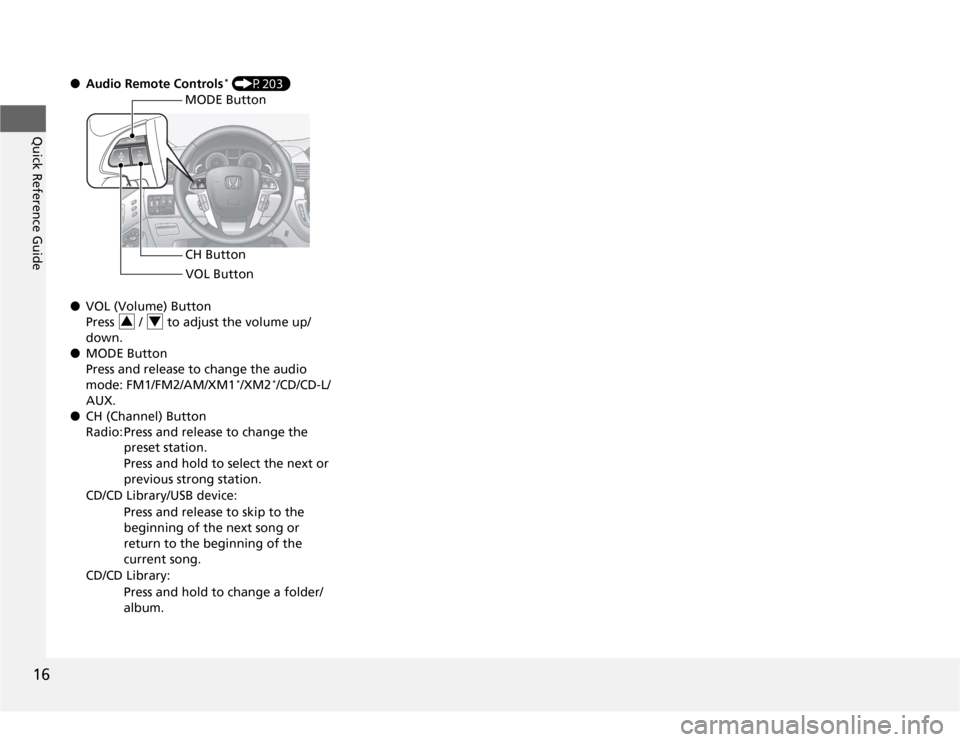
●Audio Remote Controls
* (P203)
●VOL (Volume) Button
Press / to adjust the volume up/
down.
●MODE Button
Press and release to change the audio
mode: FM1/FM2/AM/XM1*/XM2
*/CD/CD-L/
AUX.
●CH (Channel) Button
Radio: Press and release to change the
preset station.
Press and hold to select the next or
previous strong station.
CD/CD Library/USB device:
Press and release to skip to the
beginning of the next song or
return to the beginning of the
current song.
CD/CD Library:
Press and hold to change a folder/
album.
MODE Button
CH Button
VOL Button
3
4
Page 18 of 441
17Quick Reference Guide
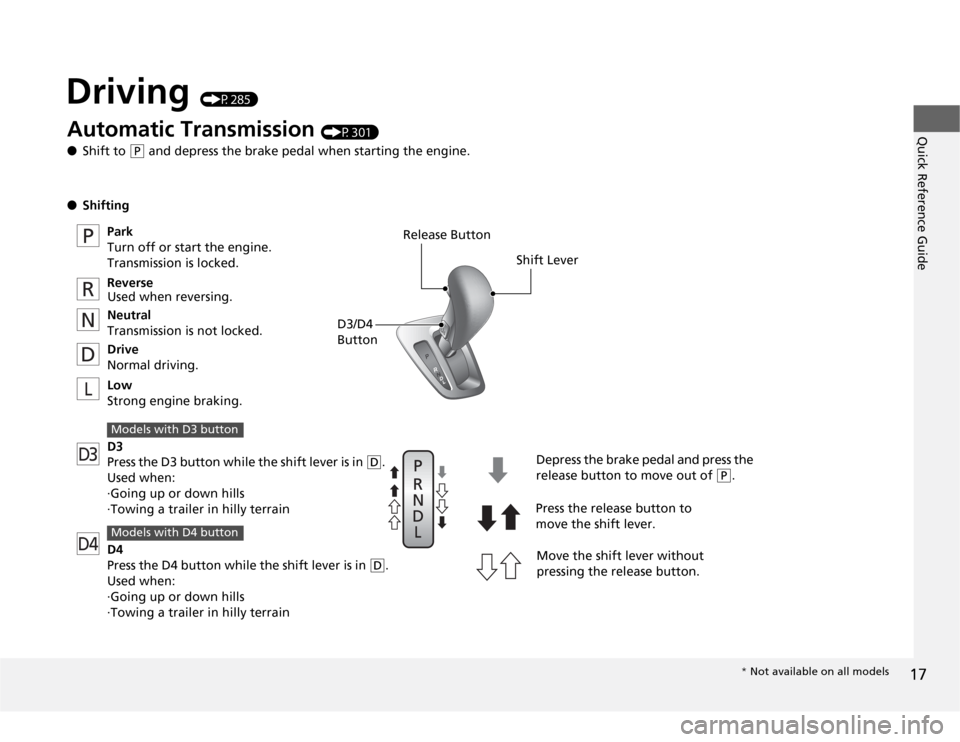
Driving
(P285)
D4L
D3P
R
N
D
Release Button
Shift Lever
Depress the brake pedal and press the
release button to move out of
(P
.
Move the shift lever without
pressing the release button. Press the release button to
move the shift lever.
Automat
ic Transm
iss
ion
(P301)
●Shift to
(P
and depress the brake pedal when starting the engine.
●Shifting
Park
Turn off or start the engine.
Transmission is locked.
Reverse
Used when reversing.
Neutral
Transmission is not locked.
Drive
Normal driving.
Low
Strong engine braking.
D3
Press the D3 button while the shift lever is in
(D
.
Used when:
·Going up or down hills
·Towing a trailer in hilly terrain
Models with D3 buttonD4
Press the D4 button while the shift lever is in
(D
.
Used when:
·Going up or down hills
·Towing a trailer in hilly terrain
Models with D4 button
D3/D4
Button
* Not available on all models
Page 19 of 441
18Quick Reference Guide
VSA
® OFF Button
(P307)
●The vehicle stability assist (VSA
®) system
helps stabilize the vehicle during
cornering, and helps maintain traction
while accelerating on loose or slippery
road surfaces.
●VSA
® comes on automatically every time
you start the engine.
●To turn VSA
® on or off, press and hold
the button until you hear a beep.
Cruise Control
(P303)
●Cruise control allows you to maintain a
set speed without keeping your foot on
the accelerator pedal.
●To use cruise control, press the CRUISE
button, then press once you
have received the desired speed (above
25 mph or 40 km/h).
Tire Pressure Monitoring
System (TPMS)
(P308)
●TPMS monitors tire pressure.
●TPMS is turned on automatically every
time you start the engine.
DECEL/SET
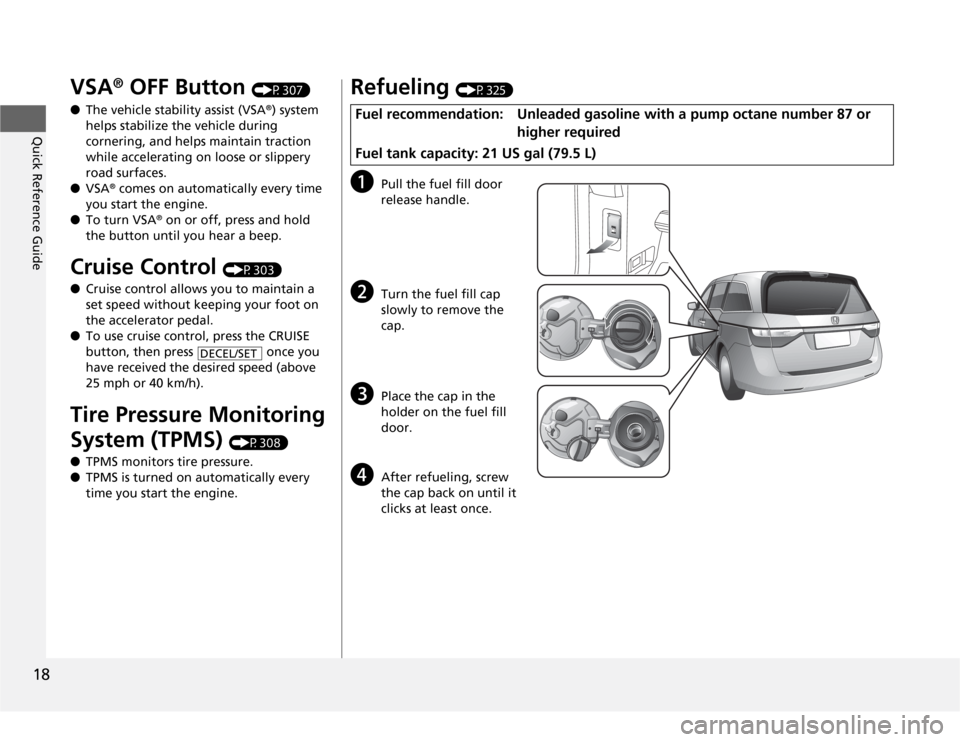
Refueling
(P325)
a
Pull the fuel fill door
release handle.
b
Turn the fuel fill cap
slowly to remove the
cap.
c
Place the cap in the
holder on the fuel fill
door.
d
After refueling, screw
the cap back on until it
clicks at least once.
Fuel recommendation: Unleaded gasoline with a pump octane number 87 or
higher required
Fuel tank capacity: 21 US gal (79.5 L)
Page 20 of 441
19Quick Reference Guide
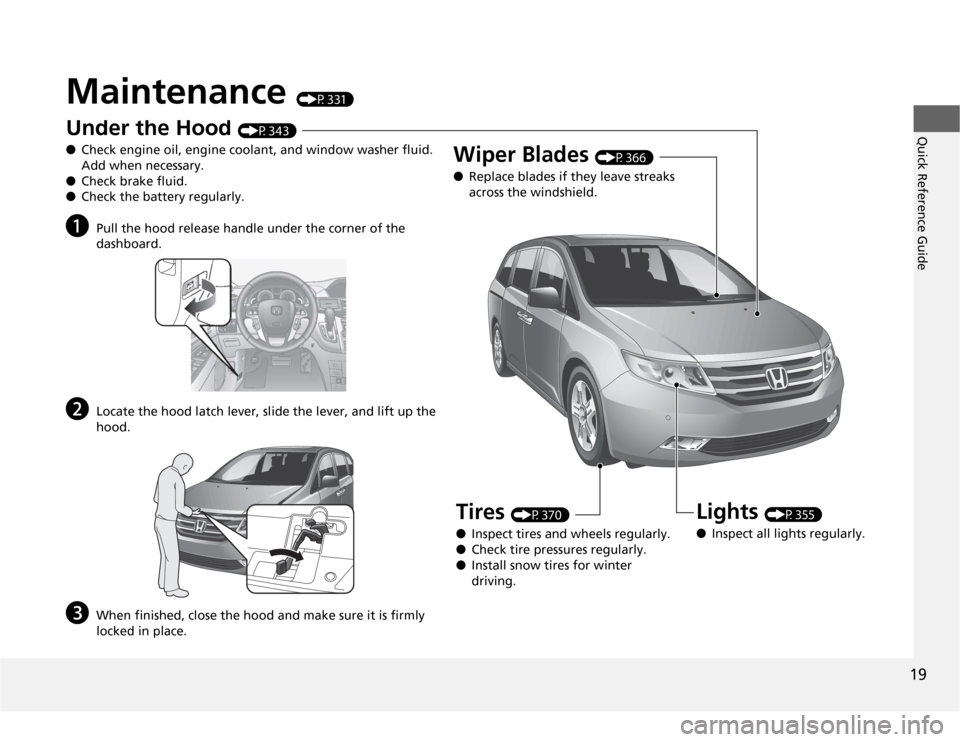
Maintenance
(P331)
U
n
d
er t
h
e
H
oo
d
(P343)
●Check engine oil, engine coolant, and window washer fluid.
Add when necessary.
●Check brake fluid.
●Check the battery regularly.
a
Pull the hood release handle under the corner of the
dashboard.
b
Locate the hood latch lever, slide the lever, and lift up the
hood.
c
When finished, close the hood and make sure it is firmly
locked in place.
Lights
(P355)
●Inspect all lights regularly.
Wiper Blades
(P366)
●Replace blades if they leave streaks
across the windshield.
Tires
(P370)
●Inspect tires and wheels regularly.
●Check tire pressures regularly.
●Install snow tires for winter
driving.