02 sensors HONDA ODYSSEY 2012 RB3-RB4 / 4.G User Guide
[x] Cancel search | Manufacturer: HONDA, Model Year: 2012, Model line: ODYSSEY, Model: HONDA ODYSSEY 2012 RB3-RB4 / 4.GPages: 441, PDF Size: 14.07 MB
Page 124 of 441
Continued
123
uuOpening and Closing the TailgateuOpening/Closing the Power Tailgate
*
Controls
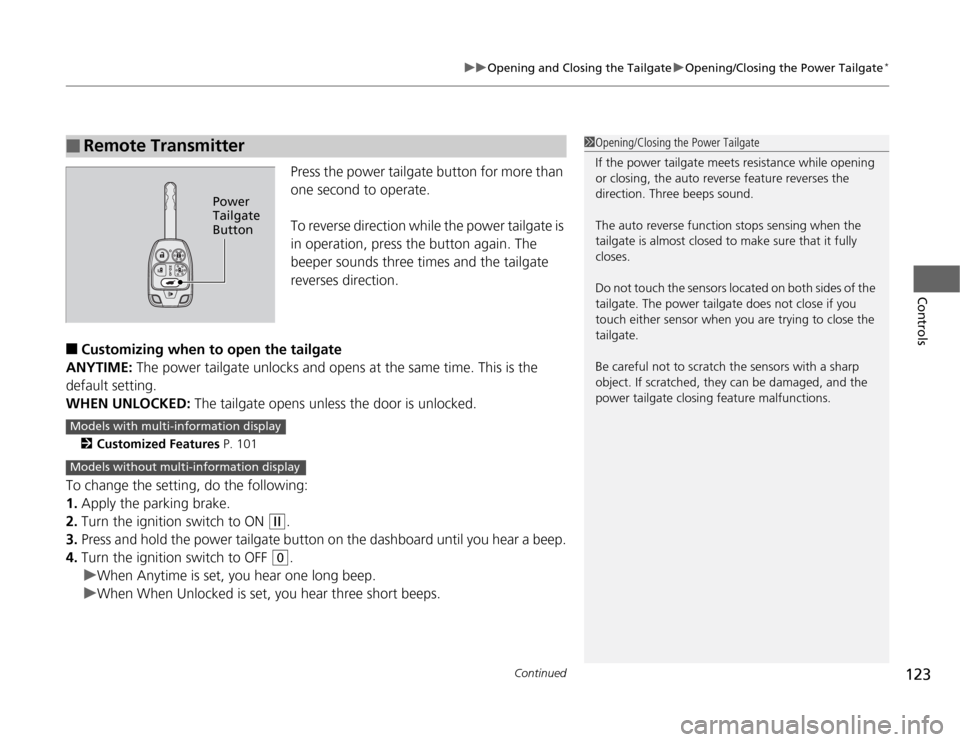
Press the power tailgate button for more than
one second to operate.
To reverse direction while the power tailgate is
in operation, press the button again. The
beeper sounds three times and the tailgate
reverses direction.
■
Customizing when to open the tailgate
ANYTIME: The power tailgate unlocks and opens at the same time. This is the
default setting.
WHEN UNLOCKED: The tailgate opens unless the door is unlocked.2Customized Features P. 101
To change the setting, do the following:
1.Apply the parking brake.
2.Turn the ignition switch to ON
(w
.
3.Press and hold the power tailgate button on the dashboard until you hear a beep.
4.Turn the ignition switch to OFF
(0
.
uWhen Anytime is set, you hear one long beep.
uWhen When Unlocked is set, you hear three short beeps.
■
Remote Transmitter
1Opening/Closing the Power Tailgate
If the power tailgate meets resistance while opening
or closing, the auto reverse feature reverses the
direction. Three beeps sound.
The auto reverse function stops sensing when the
tailgate is almost closed to make sure that it fully
closes.
Do not touch the sensors located on both sides of the
tailgate. The power tailgate does not close if you
touch either sensor when you are trying to close the
tailgate.
Be careful not to scratch the sensors with a sharp
object. If scratched, they can be damaged, and the
power tailgate closing feature malfunctions.
Power
Tailgate
Button
Models with multi-information displayModels without multi-information display
Page 193 of 441
192
uuClimate Control System
*uAutomatic Climate Control Sensors
Controls
Automatic Climate Control Sensors
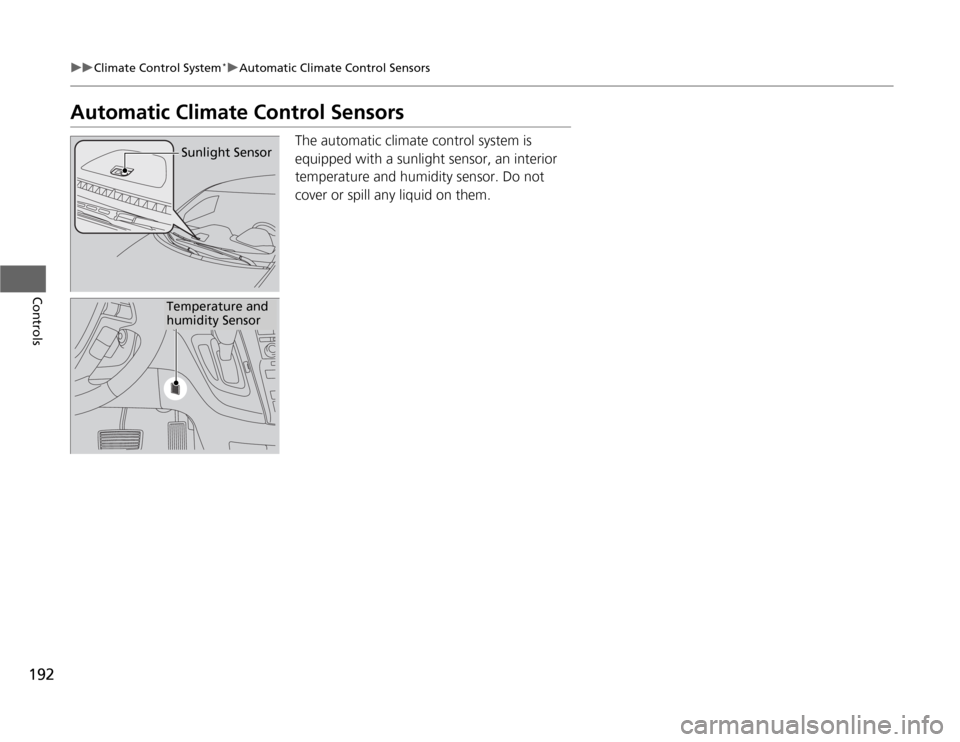
The automatic climate control system is
equipped with a sunlight sensor, an interior
temperature and humidity sensor. Do not
cover or spill any liquid on them.
Sunlight Sensor
Temperature and
humidity Sensor
Page 289 of 441

288
uuBefore DrivinguDriving Preparation
Driving
•Be sure items placed on the floor behind the front seats cannot roll under the
seats.
uThey can interfere with the driver's ability to operate the pedals, the operation
of the seats, or the operation of the sensors under the seats.
•Everyone in the vehicle must fasten their seat belt.
2Fastening a Seat Belt P. 33
•Make sure that the indicators in the instrument panel come on when you start the
vehicle, and go off soon after.
uAlways have a dealer check the vehicle if a problem is indicated.
2Indicators P. 72
Page 313 of 441
312
uuWhen DrivinguBSI (Blind Spot Information) System
*
Driving
BSI (Blind Spot Information) System
*
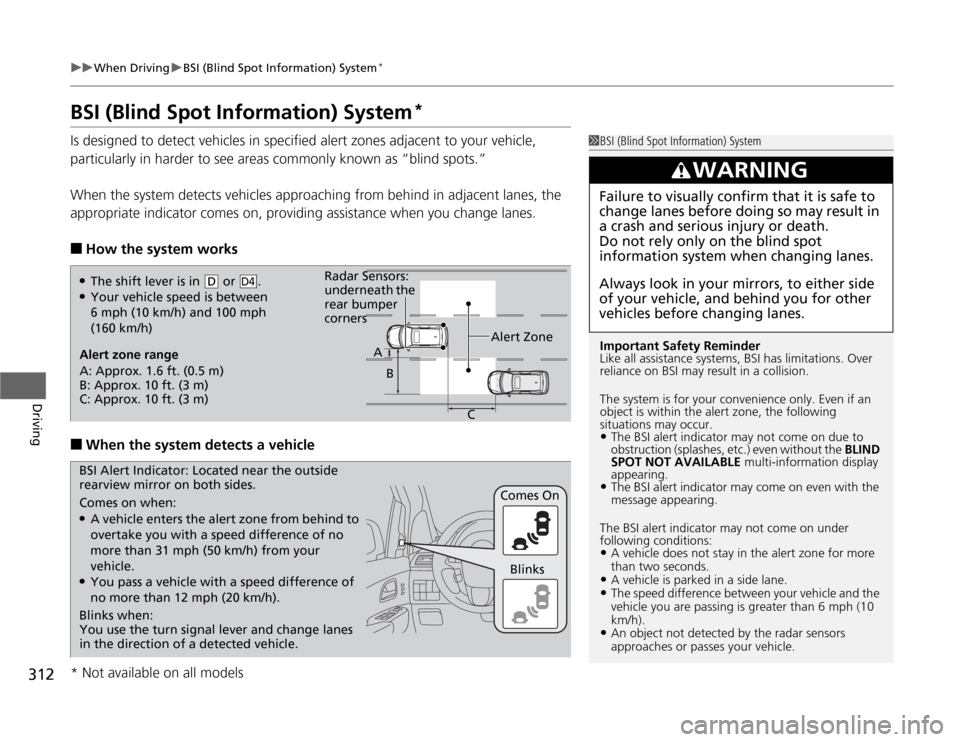
Is designed to detect vehicles in specified alert zones adjacent to your vehicle,
particularly in harder to see areas commonly known as “blind spots.”
When the system detects vehicles approaching from behind in adjacent lanes, the
appropriate indicator comes on, providing assistance when you change lanes.■
How the system works
■
When the system detects a vehicle
1BSI (Blind Spot Information) System
Important Safety Reminder
Like all assistance systems, BSI has limitations. Over
reliance on BSI may result in a collision.
The system is for your convenience only. Even if an
object is within the alert zone, the following
situations may occur.•The BSI alert indicator may not come on due to
obstruction (splashes, etc.) even without the BLIND
SPOT NOT AVAILABLE multi-information display
appearing.•The BSI alert indicator may come on even with the
message appearing.
The BSI alert indicator may not come on under
following conditions:•A vehicle does not stay in the alert zone for more
than two seconds.•A vehicle is parked in a side lane.•The speed difference between your vehicle and the
vehicle you are passing is greater than 6 mph (10
km/h).•An object not detected by the radar sensors
approaches or passes your vehicle.
3
WARNING
Failure to visually confirm that it is safe to
change lanes before doing so may result in
a crash and serious injury or death.
Do not rely only on the blind spot
information system when changing lanes.
Always look in your mirrors, to either side
of your vehicle, and behind you for other
vehicles before changing lanes.
●The shift lever is in
(D
or .
●Your vehicle speed is between
6 mph (10 km/h) and 100 mph
(160 km/h)
D4
Alert zone range
A: Approx. 1.6 ft. (0.5 m)
B: Approx. 10 ft. (3 m)
C: Approx. 10 ft. (3 m)Alert Zone Radar Sensors:
underneath the
rear bumper
corners
A
B
C
Comes on when:●A vehicle enters the alert zone from behind to
overtake you with a speed difference of no
more than 31 mph (50 km/h) from your
vehicle.●You pass a vehicle with a speed difference of
no more than 12 mph (20 km/h).Comes On BSI Alert Indicator: Located near the outside
rearview mirror on both sides.
Blinks when:
You use the turn signal lever and change lanes
in the direction of a detected vehicle.Blinks
* Not available on all models
Page 314 of 441
313
uuWhen DrivinguBSI (Blind Spot Information) System
*
Driving
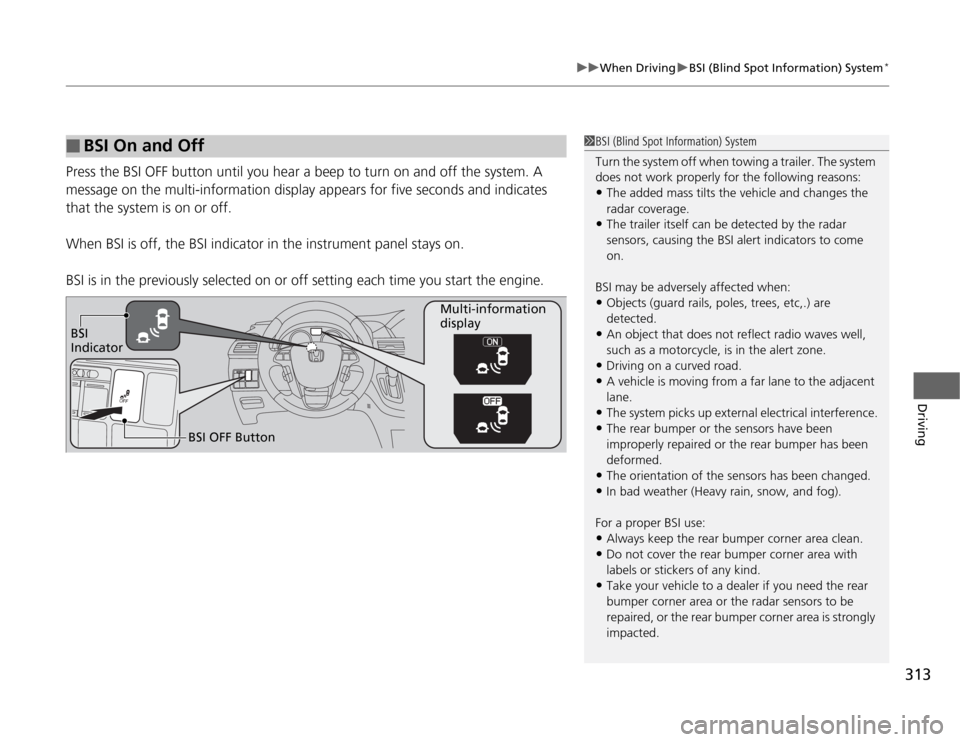
Press the BSI OFF button until you hear a beep to turn on and off the system. A
message on the multi-information display appears for five seconds and indicates
that the system is on or off.
When BSI is off, the BSI indicator in the instrument panel stays on.
BSI is in the previously selected on or off setting each time you start the engine.■
BSI On and Off
1BSI (Blind Spot Information) System
Turn the system off when towing a trailer. The system
does not work properly for the following reasons:•The added mass tilts the vehicle and changes the
radar coverage.•The trailer itself can be detected by the radar
sensors, causing the BSI alert indicators to come
on.
BSI may be adversely affected when:•Objects (guard rails, poles, trees, etc,.) are
detected.•An object that does not reflect radio waves well,
such as a motorcycle, is in the alert zone.•Driving on a curved road.•A vehicle is moving from a far lane to the adjacent
lane.•The system picks up external electrical interference.•The rear bumper or the sensors have been
improperly repaired or the rear bumper has been
deformed.•The orientation of the sensors has been changed.•In bad weather (Heavy rain, snow, and fog).
For a proper BSI use:•Always keep the rear bumper corner area clean.•Do not cover the rear bumper corner area with
labels or stickers of any kind. •Take your vehicle to a dealer if you need the rear
bumper corner area or the radar sensors to be
repaired, or the rear bumper corner area is strongly
impacted.
BSI
IndicatorMulti-information
display
BSI OFF Button
Page 320 of 441
319
uuParking Your VehicleuParking Sensor System
*
Continued
Driving
Parking Sensor System
*
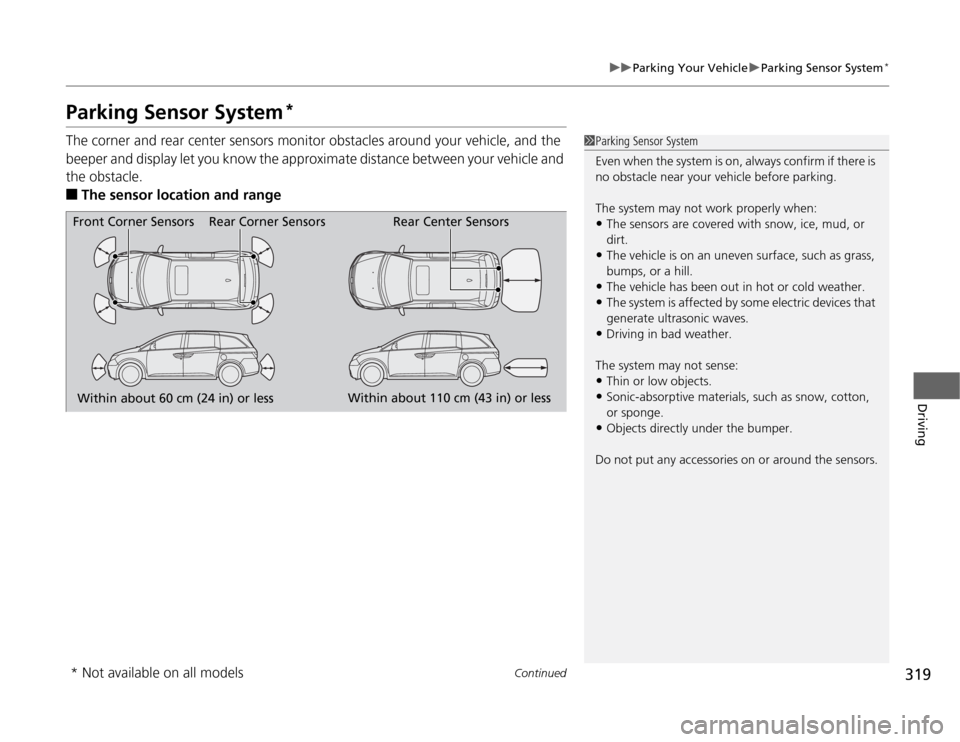
The corner and rear center sensors monitor obstacles around your vehicle, and the
beeper and display let you know the approximate distance between your vehicle and
the obstacle.■
The sensor location and range
1Parking Sensor System
Even when the system is on, always confirm if there is
no obstacle near your vehicle before parking.
The system may not work properly when:•The sensors are covered with snow, ice, mud, or
dirt.•The vehicle is on an uneven surface, such as grass,
bumps, or a hill.•The vehicle has been out in hot or cold weather.•The system is affected by some electric devices that
generate ultrasonic waves.•Driving in bad weather.
The system may not sense:•Thin or low objects.•Sonic-absorptive materials, such as snow, cotton,
or sponge.•Objects directly under the bumper.
Do not put any accessories on or around the sensors.
Within about 60 cm (24 in) or lessWithin about 110 cm (43 in) or less Front Corner Sensors Rear Center Sensors
Rear Corner Sensors
* Not available on all models
Page 321 of 441
uuParking Your VehicleuParking Sensor System
*
320Driving
■
When you activate the system
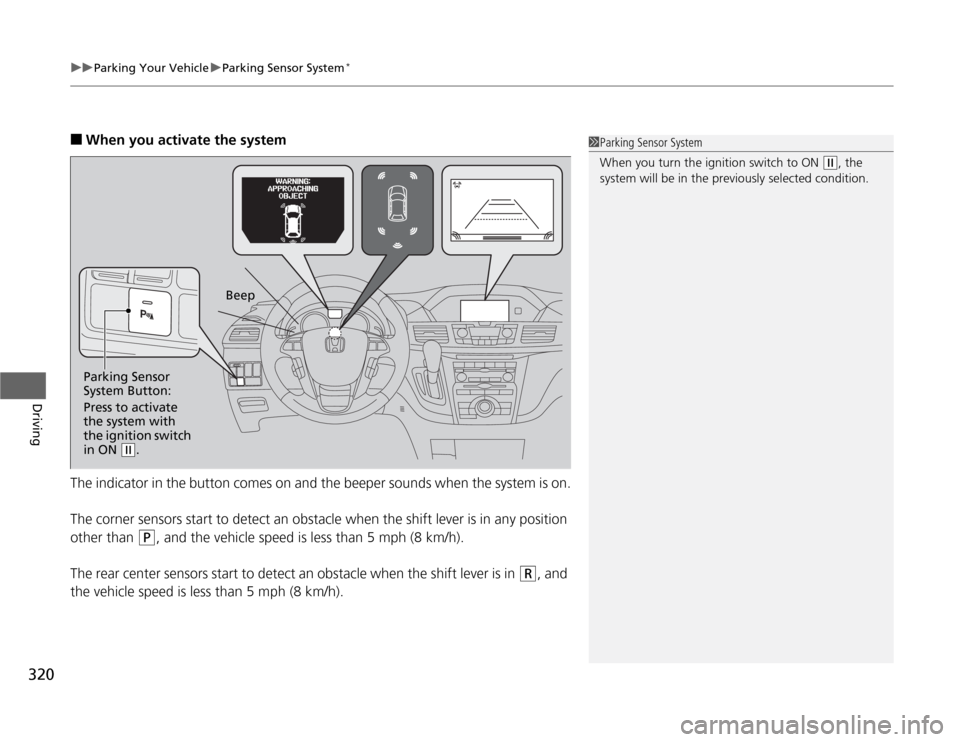
The indicator in the button comes on and the beeper sounds when the system is on.
The corner sensors start to detect an obstacle when the shift lever is in any position
other than
(P
, and the vehicle speed is less than 5 mph (8 km/h).
The rear center sensors start to detect an obstacle when the shift lever is in
(R
, and
the vehicle speed is less than 5 mph (8 km/h).
1Parking Sensor System
When you turn the ignition switch to ON
(w
, the
system will be in the previously selected condition.
Parking Sensor
System Button:
Press to activate
the system with
the ignition switch
in ON
(w
.Beep
Page 322 of 441
321
uuParking Your VehicleuParking Sensor System
*
Continued
Driving
■
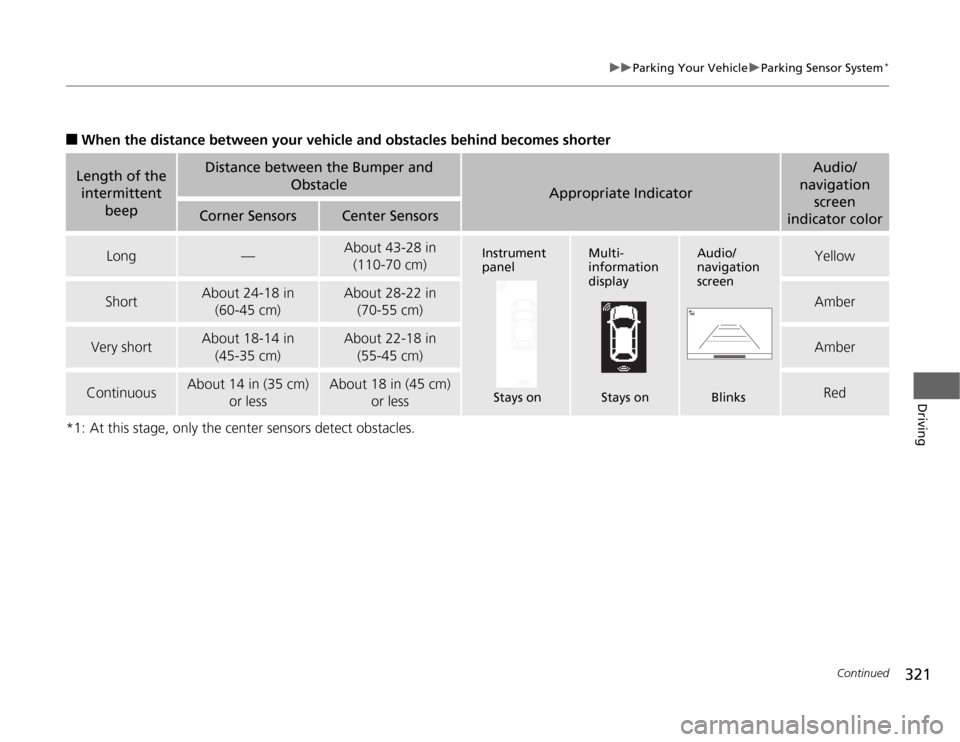
When the distance between your vehicle and obstacles behind becomes shorter
*1: At this stage, only the center sensors detect obstacles.Length of the
intermittent
beep
Distance between the Bumper and
Obstacle
Appropriate Indicator
Audio/
navigation
screen
indicator color
Corner Sensors
Center Sensors
Long
—
About 43-28 in
(110-70 cm)
Yellow
Short
About 24-18 in
(60-45 cm)
About 28-22 in
(70-55 cm)
Amber
Very short
About 18-14 in
(45-35 cm)
About 22-18 in
(55-45 cm)
Amber
Continuous
About 14 in (35 cm)
or less
About 18 in (45 cm)
or less
Red
Instrument
panel
Stays on
Multi-
information
display
Stays on
Audio/
navigation
screen
Blinks
Page 323 of 441
uuParking Your VehicleuParking Sensor System
*
322Driving
■
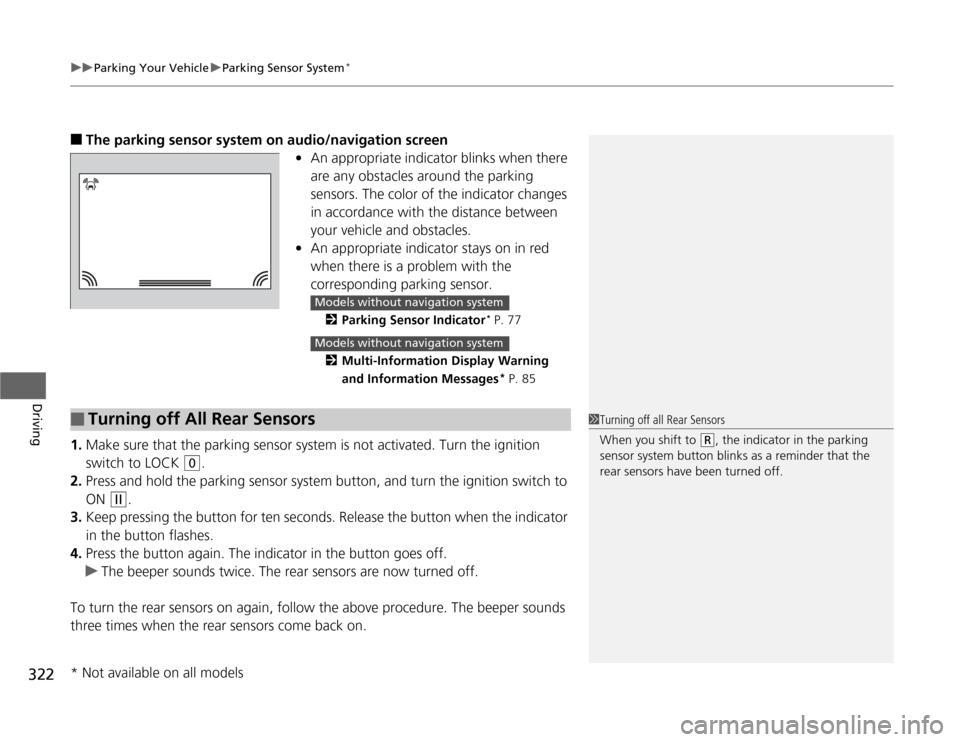
The parking sensor system on audio/navigation screen
•An appropriate indicator blinks when there
are any obstacles around the parking
sensors. The color of the indicator changes
in accordance with the distance between
your vehicle and obstacles.
•An appropriate indicator stays on in red
when there is a problem with the
corresponding parking sensor.
2Parking Sensor Indicator
* P. 77
2Multi-Information Display Warning
and Information Messages* P. 85
1.Make sure that the parking sensor system is not activated. Turn the ignition
switch to LOCK
(0
.
2.Press and hold the parking sensor system button, and turn the ignition switch to
ON
(w
.
3.Keep pressing the button for ten seconds. Release the button when the indicator
in the button flashes.
4.Press the button again. The indicator in the button goes off.
uThe beeper sounds twice. The rear sensors are now turned off.
To turn the rear sensors on again, follow the above procedure. The beeper sounds
three times when the rear sensors come back on.
Models without navigation systemModels without navigation system
■
Turning off All Rear Sensors
1Turning off all Rear Sensors
When you shift to
(R
, the indicator in the parking
sensor system button blinks as a reminder that the
rear sensors have been turned off.
* Not available on all models
Page 434 of 441

Index
433
Index
Index
AABS (Anti-lock Brake System).................. 316
AC Power Outlet...................................... 177
Accessories and Modifications................ 329
Accessory Power Sockets......................... 176
Additives
Coolant .................................................. 350
Engine Oil ............................................... 345
Washer ................................................... 354
Additives, Engine Oil............................... 345
Adjusting
Armrest .................................................. 168
Front Seats.............................................. 154
Head Restraints ....................................... 157
Mirrors.................................................... 152
Rear Seats ............................................... 162
Steering Wheel ....................................... 151
Temperature ........................................... 100
Air Conditioning System
(Climate Control System)....................... 187
Changing the Mode................................ 187
Defrosting the Windshield
and Windows........................................ 188
Dust and Pollen Filter .............................. 384
Recirculation/Fresh Air Mode................... 187
Sensors ................................................... 192
Using Automatic Climate Control............ 187
Air Conditioning System (Heating and
Cooling System)...................................... 183
Cooling................................................... 185Defrosting the Windshield
and Windows ........................................ 185
Dust and Pollen Filter ............................... 384
Heating ................................................... 184
Air Pressure....................................... 371, 421
Airbags........................................................ 39
Advanced Airbags ..................................... 45
After a Collision ......................................... 43
Airbag Care ............................................... 53
Event Data Recorder .................................. 23
Front Airbags (SRS) .................................... 42
Indicator ........................................ 50, 76, 80
Passenger Airbag Off Indicator .................. 51
Sensors ...................................................... 39
Side Airbag Cutoff System ......................... 48
Side Airbag Off Indicator ........................... 52
Side Airbags .............................................. 46
Side Curtain Airbags .................................. 49
AM/FM Radio.................................... 198, 205
Anti-lock Brake System (ABS).................. 316
Indicator .................................................... 75
Armrest..................................................... 168
Audio Remote Controls............................ 203
Audio System............................................ 194
Adjusting the Sound ........................ 197, 204
Auxiliary Input Jack .................................. 195
Error Messages ........................................ 235
General Information ................................ 237
MP3/WMA/AAC ...................................... 226
Reactivating ............................................. 196
Recommended CDs ................................. 238Recommended Devices............................ 240
Remote Controls ..................................... 203
Security Code .......................................... 196
Theft Protection ...................................... 196
USB Adapter Cable.................................. 195
USB Flash Drives ...................................... 240
Audio/Information Display........................ 91
Authorized Manuals................................ 429
Auto Door Locking/Unlocking................. 116
Customize ............................................... 117
Automatic Lighting.................................. 143
Automatic Transmission........................... 300
Creeping ................................................. 300
Fluid ........................................................ 352
Kickdown ................................................ 300
Operating the Shift Lever................... 17, 302
Shift Lever Does Not Move ...................... 403
Shifting ................................................... 301
Auxiliary Input Jack.................................. 195
Average Fuel Economy.................. 88, 92, 99
Average Speed................................... 92, 100
BBattery...................................................... 379
Charging System Indicator................. 73, 406
Jump Starting .......................................... 401
Maintenance (Checking the Battery) ........ 379
Maintenance (Replacing) ................. 380, 382
Belts (Seat).................................................. 30
Beverage Holders..................................... 174