HONDA ODYSSEY 2012 RB3-RB4 / 4.G Owners Manual
Manufacturer: HONDA, Model Year: 2012, Model line: ODYSSEY, Model: HONDA ODYSSEY 2012 RB3-RB4 / 4.GPages: 441, PDF Size: 14.07 MB
Page 191 of 441
190
uuClimate Control System
*uRear Climate Control System
Controls
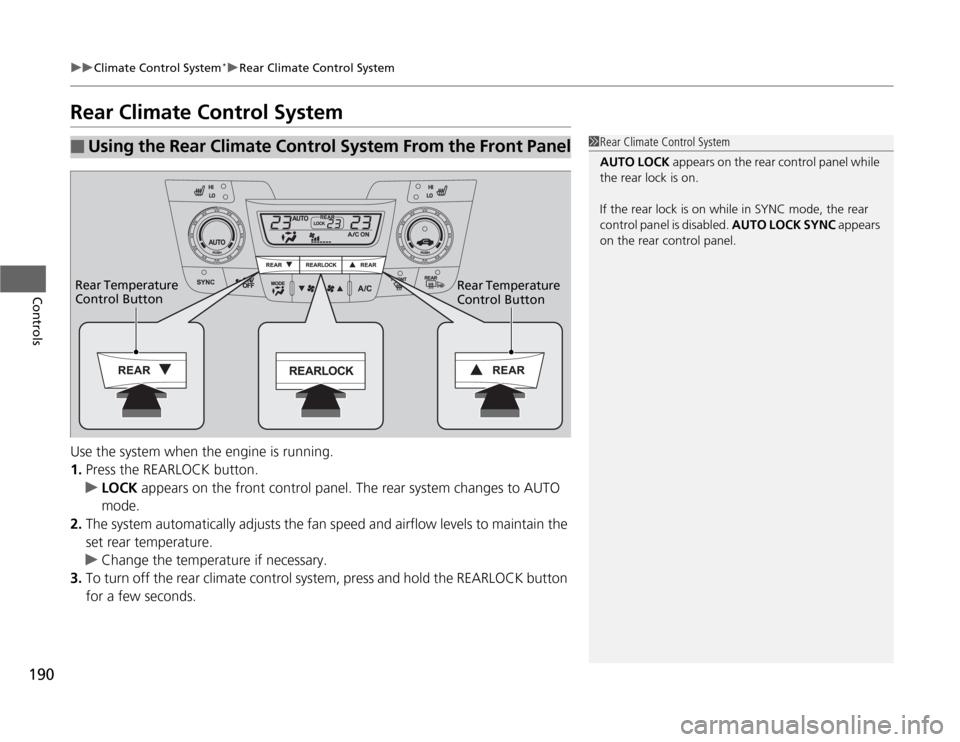
Rear Climate Control SystemUse the system when the engine is running.
1.Press the REARLOCK button.
uLOCK appears on the front control panel. The rear system changes to AUTO
mode.
2.The system automatically adjusts the fan speed and airflow levels to maintain the
set rear temperature.
uChange the temperature if necessary.
3.To turn off the rear climate control system, press and hold the REARLOCK button
for a few seconds.■
Using the Rear Climate Control System From the Front Panel
1Rear Climate Control System
AUTO LOCK appears on the rear control panel while
the rear lock is on.
If the rear lock is on while in SYNC mode, the rear
control panel is disabled. AUTO LOCK SYNC appears
on the rear control panel.
Rear Temperature
Control Button Rear Temperature
Control Button
Page 192 of 441
191
uuClimate Control System
*uRear Climate Control System
Controls
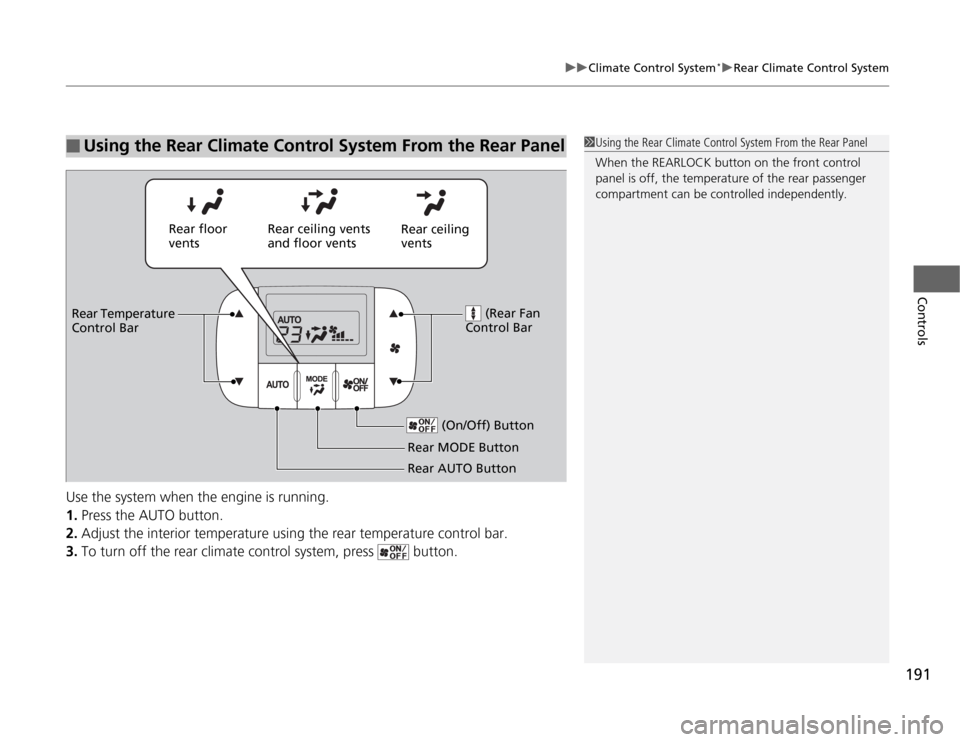
Use the system when the engine is running.
1.Press the AUTO button.
2.Adjust the interior temperature using the rear temperature control bar.
3.To turn off the rear climate control system, press button.■
Using the Rear Climate Control System From the Rear Panel
1Using the Rear Climate Control System From the Rear Panel
When the REARLOCK button on the front control
panel is off, the temperature of the rear passenger
compartment can be controlled independently.
Rear ceiling
vents Rear floor
ventsRear ceiling vents
and floor vents
(Rear Fan
Control Bar
Rear Temperature
Control Bar
(On/Off) Button
Rear MODE Button
Rear AUTO Button
Page 193 of 441
192
uuClimate Control System
*uAutomatic Climate Control Sensors
Controls
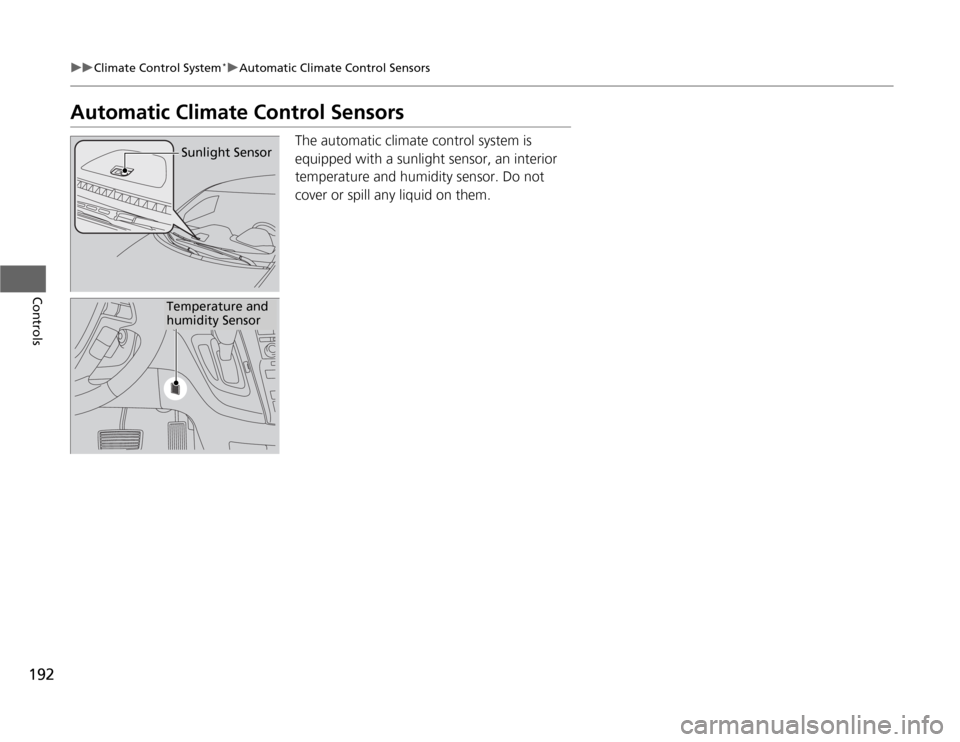
Automatic Climate Control Sensors
The automatic climate control system is
equipped with a sunlight sensor, an interior
temperature and humidity sensor. Do not
cover or spill any liquid on them.
Sunlight Sensor
Temperature and
humidity Sensor
Page 194 of 441
193
Features
This chapter describes how to operate technology features on models without the navigation system.
Audio System
About Your Audio System ................ 194
USB Adapter Cable
*........................ 195
Auxiliary Input Jack .......................... 195
Audio System Theft Protection
*....... 196
Audio System Basic Operation....... 197
Adjusting the Sound ........................ 197
Playing the AM/FM Radio ................. 198
Playing a CD .................................... 200
Models without audio/information screen
Audio System Basic Operation...... 202
Audio Remote Controls.................... 203
Adjusting the Sound ........................ 204
Playing the AM/FM Radio ................. 205
Playing the XM
® Radio ..................... 209
Playing a CD .................................... 212
Playing CD Library ............................ 216
Playing an iPod®............................... 222
Playing a USB Flash Drive ................. 226
Playing Bluetooth® Audio................. 230
Audio Error Messages
CD Player ......................................... 235
Models with audio/information screen
iPod
®/USB Flash Drive
*..................... 236
General Information on the Audio
System
XM
® Radio Service
*......................... 237
Recommended CDs ......................... 238
Compatible iPod
®* and USB Flash Drives
*........ 240
Rear Entertainment System
*........... 241
HomeLink
® Universal Transceiver
*.. 257
Bluetooth
® HandsFreeLink
®*
Using HFL ........................................ 259
HFL Menus ...................................... 261
Compass
*.......................................... 282
* Not available on all models
Page 195 of 441
194Features
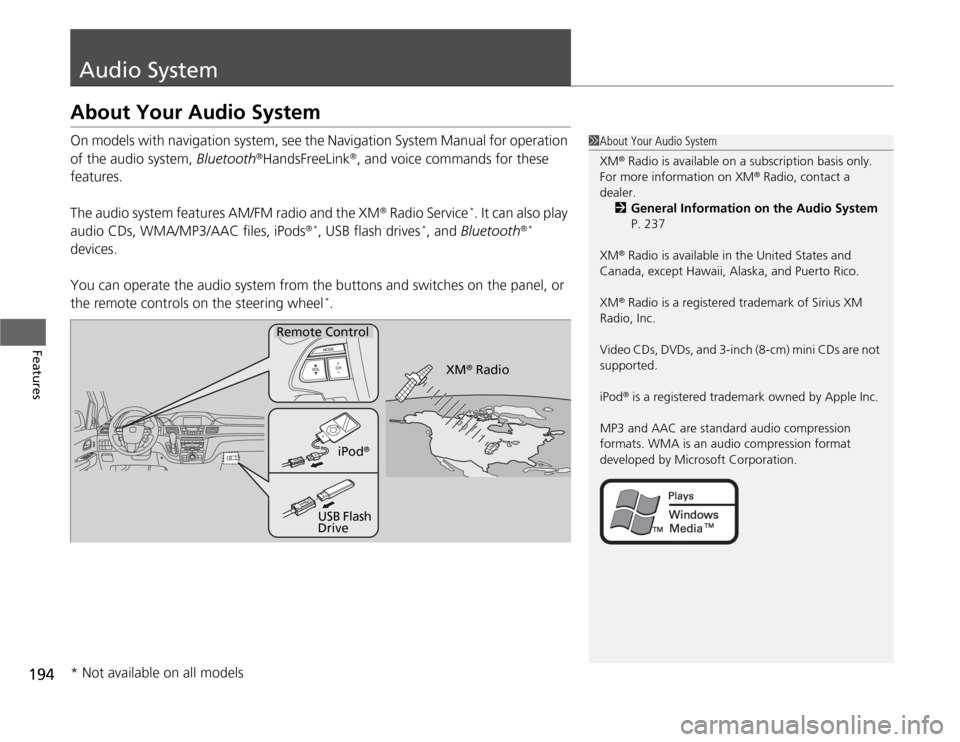
Audio SystemAbout Your Audio SystemOn models with navigation system, see the Navigation System Manual for operation
of the audio system, Bluetooth
®HandsFreeLink
®, and voice commands for these
features.
The audio system features AM/FM radio and the XM
® Radio Service
*. It can also play
audio CDs, WMA/MP3/AAC files, iPods
®*
, USB flash drives
*, and Bluetooth
®*
devices.
You can operate the audio system from the buttons and switches on the panel, or
the remote controls on the steering wheel
*.
1About Your Audio System
XM
® Radio is available on a subscription basis only.
For more information on XM
® Radio, contact a
dealer.
2General Information on the Audio System
P. 237
XM
® Radio is available in the United States and
Canada, except Hawaii, Alaska, and Puerto Rico.
XM® Radio is a registered trademark of Sirius XM
Radio, Inc.
Video CDs, DVDs, and 3-inch (8-cm) mini CDs are not
supported.
iPod® is a registered trademark owned by Apple Inc.
MP3 and AAC are standard audio compression
formats. WMA is an audio compression format
developed by Microsoft Corporation.
Remote Control
iPod
®
USB Flash
DriveXM
® Radio
* Not available on all models
Page 196 of 441
195
uuAudio SystemuUSB Adapter Cable
*
Features
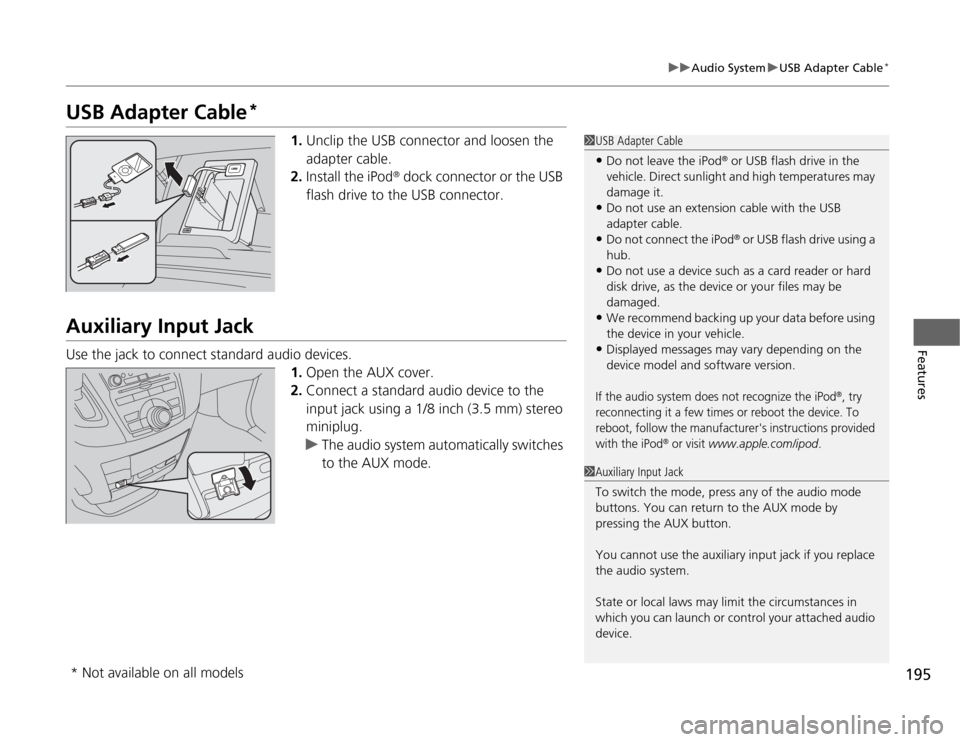
USB Adapter Cable
*
1.Unclip the USB connector and loosen the
adapter cable.
2.Install the iPod
® dock connector or the USB
flash drive to the USB connector.
Auxiliary Input JackUse the jack to connect standard audio devices.
1.Open the AUX cover.
2.Connect a standard audio device to the
input jack using a 1/8 inch (3.5 mm) stereo
miniplug.
uThe audio system automatically switches
to the AUX mode.
1USB Adapter Cable•Do not leave the iPod
® or USB flash drive in the
vehicle. Direct sunlight and high temperatures may
damage it.
•Do not use an extension cable with the USB
adapter cable.•Do not connect the iPod
® or USB flash drive using a
hub.
•Do not use a device such as a card reader or hard
disk drive, as the device or your files may be
damaged.•We recommend backing up your data before using
the device in your vehicle.•Displayed messages may vary depending on the
device model and software version.If the audio system does not recognize the iPod
®, try
reconnecting it a few times or reboot the device. To
reboot, follow the manufacturer's instructions provided
with the iPod
® or visit
www.apple.com/ipod
.
1Auxiliary Input Jack
To switch the mode, press any of the audio mode
buttons. You can return to the AUX mode by
pressing the AUX button.
You cannot use the auxiliary input jack if you replace
the audio system.
State or local laws may limit the circumstances in
which you can launch or control your attached audio
device.
* Not available on all models
Page 197 of 441
196
uuAudio SystemuAudio System Theft Protection
*
Features
Audio System Theft Protection
*
The audio system is disabled when it is disconnected from the power source, such as
when the battery is disconnected or goes dead.■
Reactivating the audio system
1.Turn the ignition switch to ON
(w
, and turn on the audio system.
uIf you turn the ignition switch to ACCESSORY
(q
, you will be requested to
enter the audio security code. See step 3.
2.Press and hold the power volume knob again for more than two seconds.
uThe audio system is reactivated when the system’s control unit recognizes that
the system is in your vehicle.
If the control unit fails to recognize, ENTER CODE appears on the audio/
information screen.
3.Enter the audio security code using the preset buttons. If you enter an incorrect
digit, continue to the last digit, then try again. If you do not enter the code
correctly after 10 tries, leave the system for one hour before trying again, or visit
a dealer to have the system reset.
1Audio System Theft Protection
Find the audio system's security code and serial
number label in your owner’s manual kit.
We recommend that you write down the serial
number in this owner’s manual.
Do not store the label in your vehicle. If you lose the
label, you must first retrieve the serial number, and
then obtain the code.
You can find out about your serial number and
security code from a dealer.
You can register the security code at Owner Link
(owners.honda.com.), and find information on how
to retrieve the serial number and obtain the code at
radio-navicode.honda.com.
U.S. models
* Not available on all models
Page 198 of 441
197
Features
Audio System Basic OperationTo use the audio system function, the ignition switch must be in ACCESSORY
(q
or
ON
(w
.
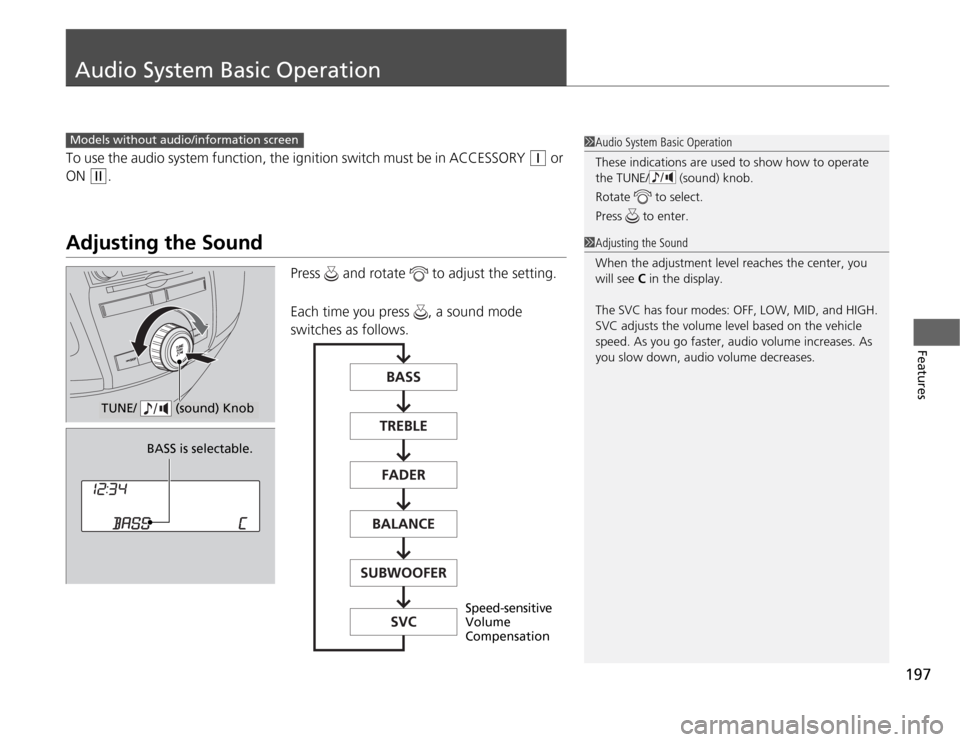
Adjusting the Sound
Press and rotate to adjust the setting.
Each time you press , a sound mode
switches as follows.
1Audio System Basic Operation
These indications are used to show how to operate
the TUNE/ (sound) knob.
Rotate to select.
Press to enter.
Models without audio/information screen
1Adjusting the Sound
When the adjustment level reaches the center, you
will see C in the display.
The SVC has four modes: OFF, LOW, MID, and HIGH.
SVC adjusts the volume level based on the vehicle
speed. As you go faster, audio volume increases. As
you slow down, audio volume decreases.
TUNE/ (sound) Knob
BASS is selectable.
Speed-sensitive
Volume
Compensation
Page 199 of 441
198
uuAudio System Basic OperationuPlaying the AM/FM Radio
Features
Playing the AM/FM Radio
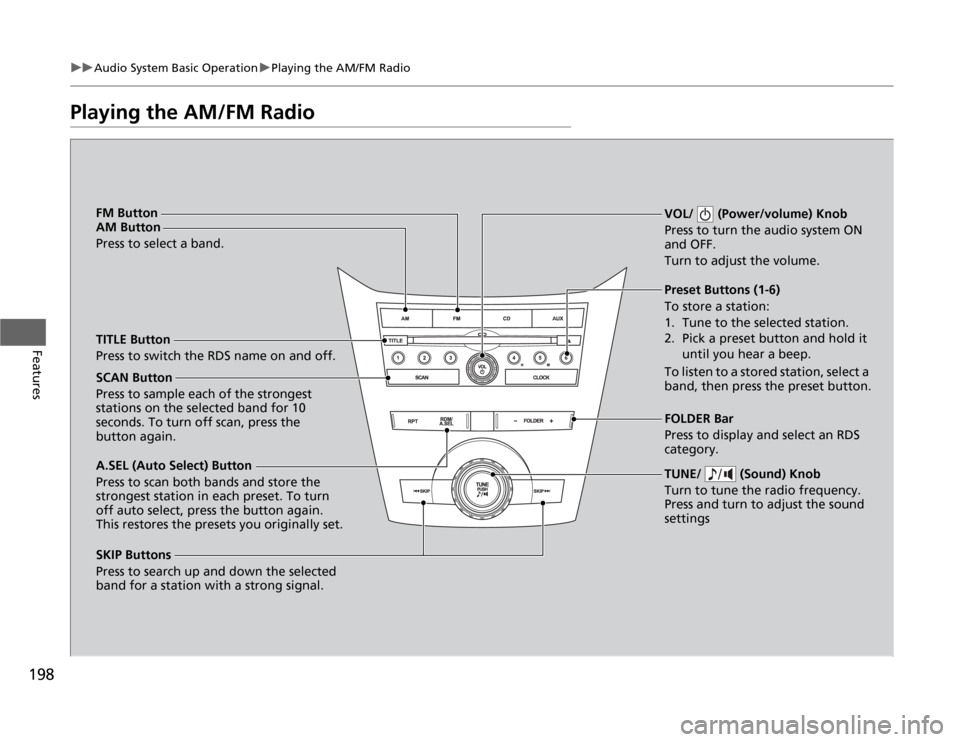
SCAN Button
Press to sample each of the strongest
stations on the selected band for 10
seconds. To turn off scan, press the
button again.VOL/ (Power/volume) Knob
Press to turn the audio system ON
and OFF.
Turn to adjust the volume.
Preset Buttons (1-6)
To store a station:
1. Tune to the selected station.
2. Pick a preset button and hold it
until you hear a beep.
To listen to a stored station, select a
band, then press the preset button.
SKIP Buttons
Press to search up and down the selected
band for a station with a strong signal.TUNE/ (Sound) Knob
Turn to tune the radio frequency.
Press and turn to adjust the sound
settingsFOLDER Bar
Press to display and select an RDS
category. TITLE Button
Press to switch the RDS name on and off. FM Button
AM Button
Press to select a band.
A.SEL (Auto Select) Button
Press to scan both bands and store the
strongest station in each preset. To turn
off auto select, press the button again.
This restores the presets you originally set.
Page 200 of 441
199
uuAudio System Basic OperationuPlaying the AM/FM Radio
Features
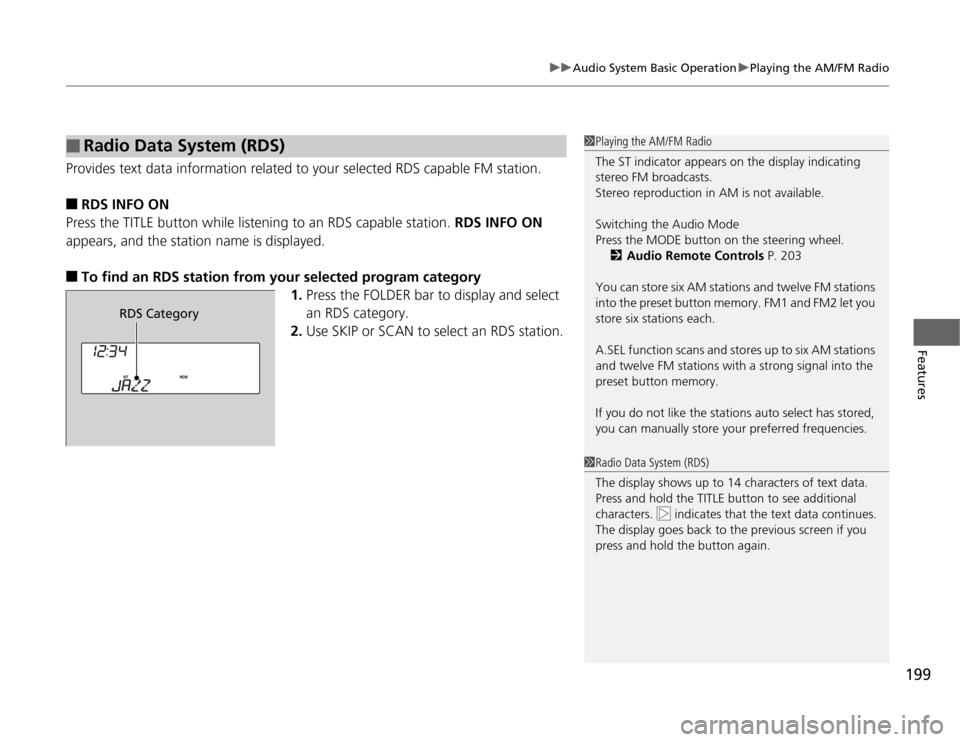
Provides text data information related to your selected RDS capable FM station.■
RDS INFO ON
Press the TITLE button while listening to an RDS capable station. RDS INFO ON
appears, and the station name is displayed.
■
To find an RDS station from your selected program category
1.Press the FOLDER bar to display and select
an RDS category.
2.Use SKIP or SCAN to select an RDS station.
■
Radio Data System (RDS)
1Playing the AM/FM Radio
The ST indicator appears on the display indicating
stereo FM broadcasts.
Stereo reproduction in AM is not available.
Switching the Audio Mode
Press the MODE button on the steering wheel.
2Audio Remote Controls P. 203
You can store six AM stations and twelve FM stations
into the preset button memory. FM1 and FM2 let you
store six stations each.
A.SEL function scans and stores up to six AM stations
and twelve FM stations with a strong signal into the
preset button memory.
If you do not like the stations auto select has stored,
you can manually store your preferred frequencies.1Radio Data System (RDS)
The display shows up to 14 characters of text data.
Press and hold the TITLE button to see additional
characters. indicates that the text data continues.
The display goes back to the previous screen if you
press and hold the button again.
RDS Category