air condition HONDA ODYSSEY 2013 RC1-RC2 / 5.G User Guide
[x] Cancel search | Manufacturer: HONDA, Model Year: 2013, Model line: ODYSSEY, Model: HONDA ODYSSEY 2013 RC1-RC2 / 5.GPages: 433, PDF Size: 12.35 MB
Page 185 of 433
uuHeating and Cooling
*uUsing Vents, Heating and A/C
184Controls
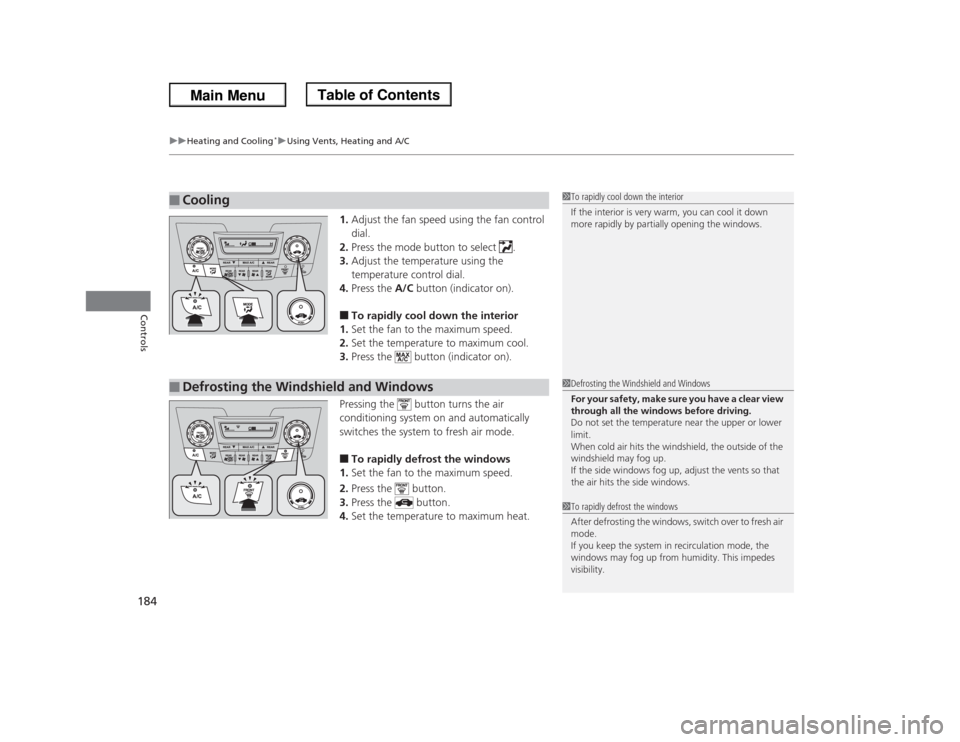
1.Adjust the fan speed using the fan control
dial.
2.Press the mode button to select .
3.Adjust the temperature using the
temperature control dial.
4.Press the A/C button (indicator on).■To rapidly cool down the interior
1.Set the fan to the maximum speed.
2.Set the temperature to maximum cool.
3.Press the button (indicator on).
Pressing the button turns the air
conditioning system on and automatically
switches the system to fresh air mode.■To rapidly defrost the windows
1.Set the fan to the maximum speed.
2.Press the button.
3.Press the button.
4.Set the temperature to maximum heat.
■
Cooling
1To rapidly cool down the interior
If the interior is very warm, you can cool it down
more rapidly by partially opening the windows.
■
Defrosting the Windshield and Windows
1Defrosting the Windshield and Windows
For your safety, make sure you have a clear view
through all the windows before driving.
Do not set the temperature near the upper or lower
limit.
When cold air hits the windshield, the outside of the
windshield may fog up.
If the side windows fog up, adjust the vents so that
the air hits the side windows.1To rapidly defrost the windows
After defrosting the windows, switch over to fresh air
mode.
If you keep the system in recirculation mode, the
windows may fog up from humidity. This impedes
visibility.
Page 187 of 433
186Controls
Climate Control System
*
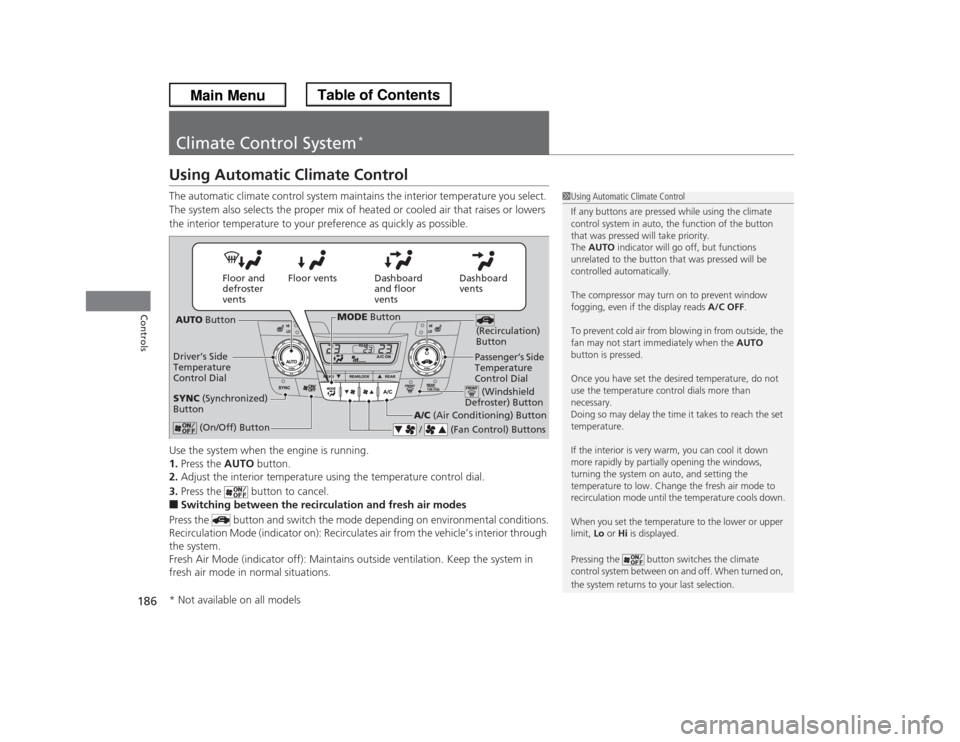
Using Automatic Climate ControlThe automatic climate control system maintains the interior temperature you select.
The system also selects the proper mix of heated or cooled air that raises or lowers
the interior temperature to your preference as quickly as possible.
Use the system when the engine is running.
1.Press the AUTO button.
2.Adjust the interior temperature using the temperature control dial.
3.Press the button to cancel.■Switching between the recirculation and fresh air modes
Press the button and switch the mode depending on environmental conditions.
Recirculation Mode (indicator on): Recirculates air from the vehicle’s interior through
the system.
Fresh Air Mode (indicator off): Maintains outside ventilation. Keep the system in
fresh air mode in normal situations.
1Using Automatic Climate Control
If any buttons are pressed while using the climate
control system in auto, the function of the button
that was pressed will take priority.
The AUTO indicator will go off, but functions
unrelated to the button that was pressed will be
controlled automatically.
The compressor may turn on to prevent window
fogging, even if the display reads A/C OFF.
To prevent cold air from blowing in from outside, the
fan may not start immediately when the AUTO
button is pressed.
Once you have set the desired temperature, do not
use the temperature control dials more than
necessary.
Doing so may delay the time it takes to reach the set
temperature.
If the interior is very warm, you can cool it down
more rapidly by partially opening the windows,
turning the system on auto, and setting the
temperature to low. Change the fresh air mode to
recirculation mode until the temperature cools down.
When you set the temperature to the lower or upper
limit, Lo or Hi is displayed.
Pressing the button switches the climate
control system between on and off. When turned on,
the system returns to your last selection.
Dashboard
vents Dashboard
and floor
vents Floor vents Floor and
defroster
vents
AUTO Button
Driver’s Side
Temperature
Control Dial
A/C (Air Conditioning) Button
/ (Fan Control) Buttons
(Recirculation)
Button
(On/Off) Button
SYNC (Synchronized)
Button
Passenger’s Side
Temperature
Control Dial (Windshield
Defroster) Button
MODE Button
* Not available on all models
Page 188 of 433
187
uuClimate Control System
*uUsing Automatic Climate Control
Controls
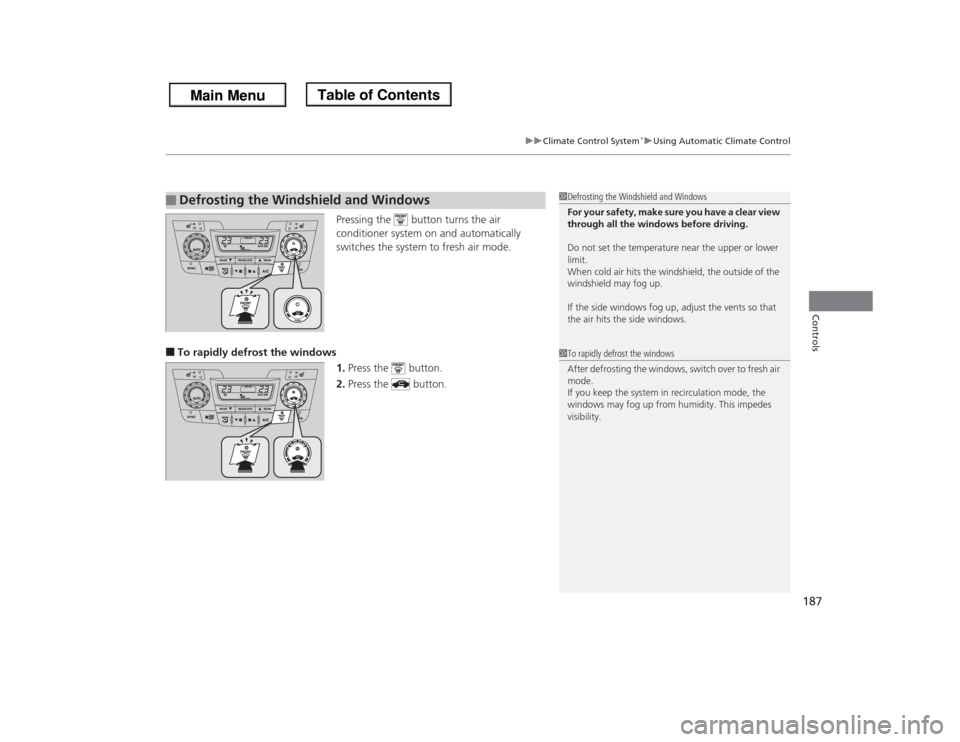
Pressing the button turns the air
conditioner system on and automatically
switches the system to fresh air mode.
■To rapidly defrost the windows
1.Press the button.
2.Press the button.■
Defrosting the Windshield and Windows
1Defrosting the Windshield and Windows
For your safety, make sure you have a clear view
through all the windows before driving.
Do not set the temperature near the upper or lower
limit.
When cold air hits the windshield, the outside of the
windshield may fog up.
If the side windows fog up, adjust the vents so that
the air hits the side windows.1To rapidly defrost the windows
After defrosting the windows, switch over to fresh air
mode.
If you keep the system in recirculation mode, the
windows may fog up from humidity. This impedes
visibility.
Page 281 of 433
280Driving
Before DrivingDriving PreparationCheck the following items before you start driving.
•Make sure there are no obstructions on the windows, door mirrors, exterior
lights, or other parts of the vehicle.
uRemove any frost, snow, or ice.
uRemove any snow on the roof, as this can slip down and obstruct your field of
vision while driving. If frozen solid, remove ice once it has softened.
uWhen removing ice from around the wheels, be sure not to damage the wheel
or wheel components.
•Make sure the hood is securely closed.
uIf the hood opens while driving, your front view will be blocked.
•Make sure the tires are in good condition.
uCheck air pressure, and check for damage and excessive wear.
2Checking and Maintaining Tires P. 362
•Make sure there are no people or objects behind or around the vehicle.
uThere are blind spots from the inside.■
Exterior Checks
1Exterior ChecksNOTICEWhen doors are frozen shut, use warm water around
the door edges to melt any ice. Do not try to force
them open, as this can damage the rubber trim
around the doors. When done, wipe dry to avoid
further freezing.
Do not pour warm water into the key cylinder.
You will be unable to insert key if the water freezes in
the hole.
Heat from the engine and exhaust can ignite
flammable materials left under the hood, causing a
fire. If you've parked your vehicle for an extended
period, inspect and remove any debris that may have
collected, such as dried grass and leaves that have
fallen or have been carried in for use as a nest by a
small animal.
Also check under the hood for leftover flammable
materials after you or someone else has performed
maintenance on your vehicle.
Page 301 of 433
300
uuWhen DrivinguVSA® (Vehicle Stability Assist), aka ESC (Electronic Stability Control), System
Driving
VSA® (Vehicle Stability Assist), aka ESC (Electronic Stability Control), SystemVSA® helps to stabilize the vehicle during cornering if the vehicle turns more or less
than what was intended. It also assists in maintaining traction on slippery surfaces.
It does so by regulating engine output and selectively applying the brakes.
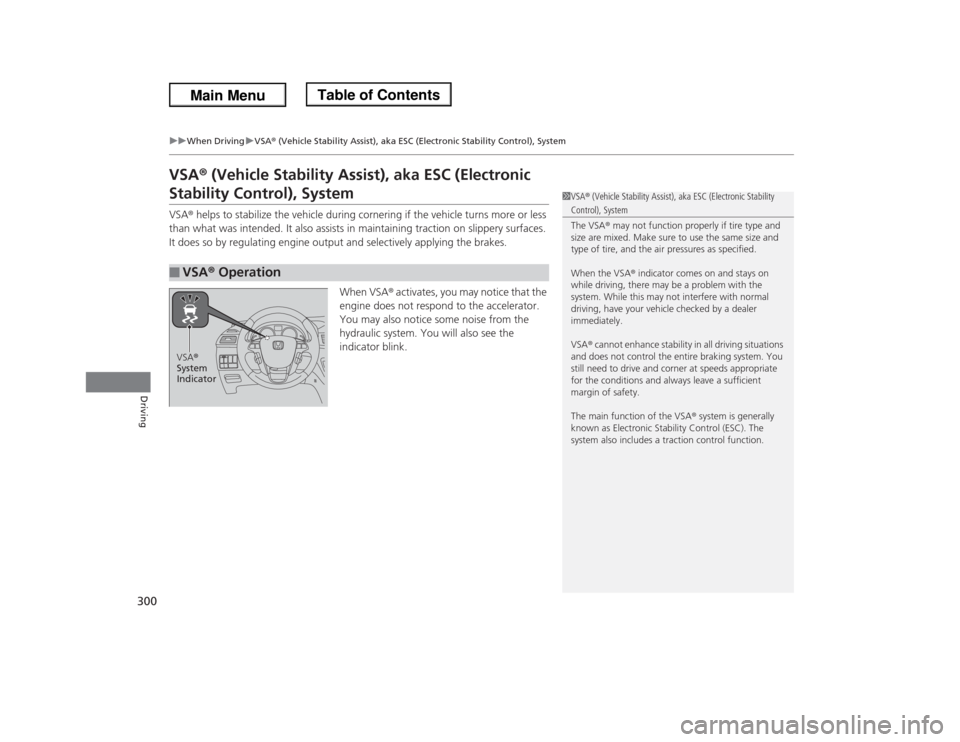
When VSA® activates, you may notice that the
engine does not respond to the accelerator.
You may also notice some noise from the
hydraulic system. You will also see the
indicator blink.■
VSA® Operation
1VSA® (Vehicle Stability Assist), aka ESC (Electronic Stability Control), System
The VSA® may not function properly if tire type and
size are mixed. Make sure to use the same size and
type of tire, and the air pressures as specified.
When the VSA® indicator comes on and stays on
while driving, there may be a problem with the
system. While this may not interfere with normal
driving, have your vehicle checked by a dealer
immediately.
VSA® cannot enhance stability in all driving situations
and does not control the entire braking system. You
still need to drive and corner at speeds appropriate
for the conditions and always leave a sufficient
margin of safety.
The main function of the VSA® system is generally
known as Electronic Stability Control (ESC). The
system also includes a traction control function.
VSA®
System
Indicator
Page 323 of 433
322Driving
Accessories and ModificationsAccessoriesWhen installing accessories, check the following:
•Do not install accessories on the windshield. They can obstruct your view and
delay your reaction to driving conditions.
•Do not install accessories on the side pillars or across the side windows.
Accessories installed in these areas may interfere with proper operation of the
side curtain airbags.
•Be sure electronic accessories do not overload electrical circuits or interfere with
proper operation of your vehicle.
2Fuses P. 403
•Before installing any electronic accessory, have the installer contact a dealer for
assistance. If possible, have a dealer inspect the final installation.ModificationsDo not modify your vehicle or use non-Honda components that can affect its
handling, stability, and reliability.
Overall vehicle performance can be affected. Always make sure all equipment is
properly installed and maintained, and that it meets federal, state, province,
territory, and local regulations.
1Accessories and Modifications
Honda Genuine accessories are recommended to
ensure proper operation on your vehicle.
3
WARNING
Improper accessories or modifications can
affect your vehicle's handling, stability, and
performance, and cause a crash in which
you can be seriously hurt or killed.
Follow all instructions in this owner's
manual regarding accessories and
modifications.
Page 325 of 433
324Maintenance
Before Performing MaintenanceInspection and MaintenanceFor your safety, perform all listed inspections and maintenance to keep your vehicle
in good condition. If you become aware of any abnormality (noise, smell, insufficient
brake fluid, oil residue on the ground, etc.), have your vehicle inspected by a dealer.
(Note, however, that service at a dealer is not mandatory to keep your warranties in
effect.) Refer to the separate maintenance booklet for detailed maintenance and
inspection information.■Daily inspections
Perform inspections before long distance trips, when washing the vehicle, or when
refueling.■Periodic inspections
•Check the automatic transmission fluid level monthly.2Automatic Transmission Fluid P. 344
•Check the brake fluid level monthly.
2Brake Fluid P. 345
•Check the tire pressure monthly. Examine the tread for wear and foreign objects.
2Checking and Maintaining Tires P. 362
•Check the operation of the exterior lights monthly.
2Replacing Light Bulbs P. 347
•Check the condition of the wiper blades at least every six months.
2Checking and Maintaining Wiper Blades P. 358
■
Types of Inspection and Maintenance
1Inspection and Maintenance
Maintenance, replacement, or repair of
emissions control devices and systems may be
done by any automotive repair establishment or
individuals using parts that are “certified” to
EPA standards.
According to state and federal regulations, failure to
perform maintenance on the maintenance main
items marked with # will not void your emissions
warranties. However, all maintenance services should
be performed in accordance with the intervals
indicated by the information display
*/multi-
information display
*.
2Maintenance Service Items P. 329, 333
If you want to perform complex maintenance tasks
that require more skills and tools, you can purchase a
subscription to the Service Express website at
www.techinfo.honda.com.
2Authorized Manuals P. 421
If you want to perform maintenance yourself, make
sure that you have the necessary tools and skills first.
After performing maintenance, update the records in
the separate maintenance booklet.
U.S. models
* Not available on all models
Page 326 of 433
325
uuBefore Performing MaintenanceuSafety When Performing Maintenance
Maintenance
Safety When Performing MaintenanceSome of the most important safety precautions are given here.
However, we cannot warn you of every conceivable hazard that can arise in
performing maintenance. Only you can decide whether or not you should perform
a given task.
•To reduce the possibility of fire or explosion, keep cigarettes, sparks, and flames
away from the battery and all fuel related parts.
•Never leave rags, towels, or other flammable objects under the hood.
uHeat from the engine and exhaust can ignite them causing a fire.
•To clean parts, use a commercially available degreaser or parts cleaner, not
gasoline.
•Wear eye protection and protective clothing when working with the battery or
compressed air.
•Engine exhaust contains carbon monoxide, which is poisonous and can kill you.
uOnly operate the engine if there is sufficient ventilation.
•The vehicle must be in a stationary condition.
uMake sure your vehicle is parked on level ground, the parking brake is set, and
the engine is off.
•Be aware that hot parts can burn you.
uMake sure to let the engine and exhaust system cool thoroughly before
touching vehicle parts.
•Be aware that moving parts can injure you.
uDo not start the engine unless instructed, and keep your hands and limbs away
from moving parts.■
Maintenance Safety
■
Vehicle Safety
1Safety When Performing Maintenance
3
WARNING
Improperly maintaining this vehicle or
failing to correct a problem before driving
can cause a crash in which you can be
seriously hurt or killed.
Always follow the inspection and
maintenance recommendations according
to the schedules in this owner's manual.
3
WARNING
Failure to properly follow maintenance
instructions and precautions can cause you
to be seriously hurt or killed.
Always follow the procedures and
precautions in this owner's manual.
Page 330 of 433
329
uuMaintenance Minder™uTo Use Maintenance Minder
TM
Continued
Maintenance
■
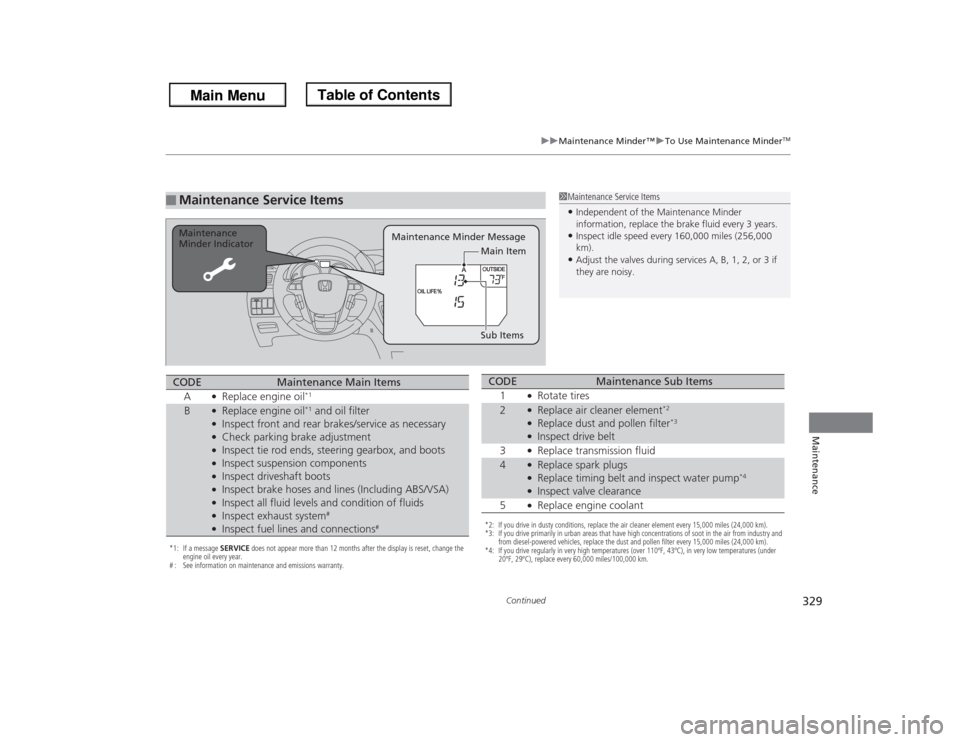
Maintenance Service Items
1Maintenance Service Items•Independent of the Maintenance Minder
information, replace the brake fluid every 3 years.•Inspect idle speed every 160,000 miles (256,000
km).•Adjust the valves during services A, B, 1, 2, or 3 if
they are noisy.
Maintenance Minder Message Maintenance
Minder Indicator
Sub Items Main Item
*1: If a message SERVICE does not appear more than 12 months after the display is reset, change the
engine oil every year.
# : See information on maintenance and emissions warranty.CODE
Maintenance Main Items
A
●Replace engine oil
*1
B
●Replace engine oil
*1 and oil filter
●Inspect front and rear brakes/service as necessary●Check parking brake adjustment●Inspect tie rod ends, steering gearbox, and boots●Inspect suspension components●Inspect driveshaft boots●Inspect brake hoses and lines (Including ABS/VSA)●Inspect all fluid levels and condition of fluids●Inspect exhaust system
#
●Inspect fuel lines and connections
#
*2: If you drive in dusty conditions, replace the air cleaner element every 15,000 miles (24,000 km).
*3: If you drive primarily in urban areas that have high concentrations of soot in the air from industry and
from diesel-powered vehicles, replace the dust and pollen filter every 15,000 miles (24,000 km).
*4: If you drive regularly in very high temperatures (over 110ºF, 43ºC), in very low temperatures (under
20ºF, 29ºC), replace every 60,000 miles/100,000 km.CODE
Maintenance Sub Items
1
●Rotate tires
2
●Replace air cleaner element
*2
●Replace dust and pollen filter
*3
●Inspect drive belt
3●Replace transmission fluid
4
●Replace spark plugs●Replace timing belt and inspect water pump
*4
●Inspect valve clearance
5●Replace engine coolant
Page 334 of 433
333
uuMaintenance Minder™uTo Use Maintenance Minder
TM
Continued
Maintenance
■
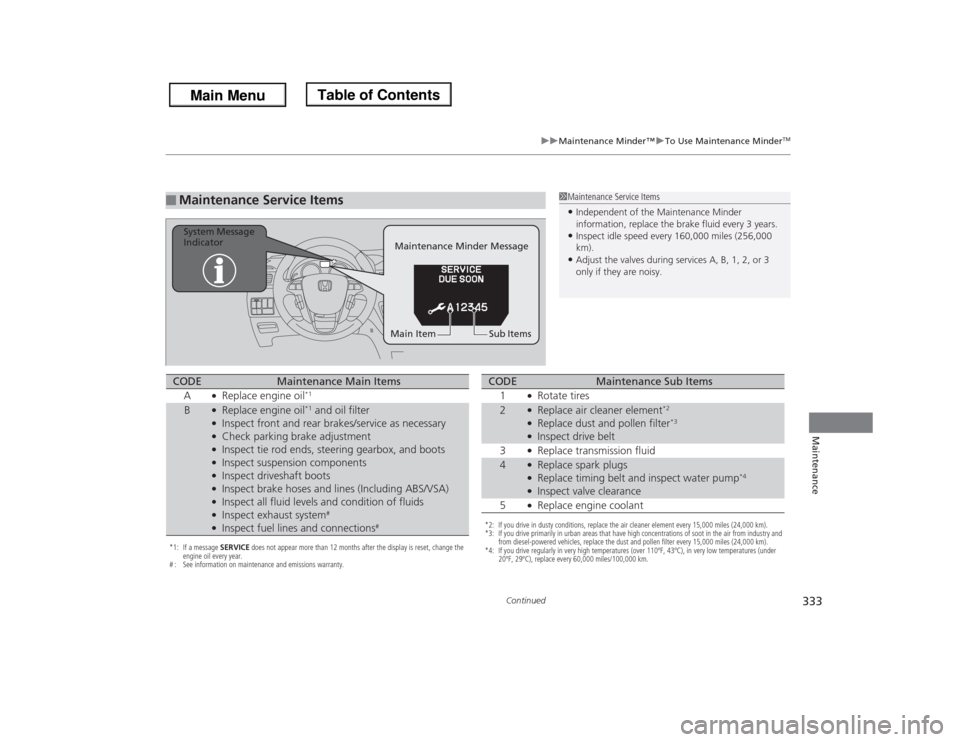
Maintenance Service Items
1Maintenance Service Items•Independent of the Maintenance Minder
information, replace the brake fluid every 3 years.•Inspect idle speed every 160,000 miles (256,000
km).•Adjust the valves during services A, B, 1, 2, or 3
only if they are noisy.
Maintenance Minder Message System Message
Indicator
Sub Items Main Item
*1: If a message SERVICE does not appear more than 12 months after the display is reset, change the
engine oil every year.
# : See information on maintenance and emissions warranty.CODE
Maintenance Main Items
A
●Replace engine oil
*1
B
●Replace engine oil
*1 and oil filter
●Inspect front and rear brakes/service as necessary●Check parking brake adjustment●Inspect tie rod ends, steering gearbox, and boots●Inspect suspension components●Inspect driveshaft boots●Inspect brake hoses and lines (Including ABS/VSA)●Inspect all fluid levels and condition of fluids●Inspect exhaust system
#
●Inspect fuel lines and connections
#
*2: If you drive in dusty conditions, replace the air cleaner element every 15,000 miles (24,000 km).
*3: If you drive primarily in urban areas that have high concentrations of soot in the air from industry and
from diesel-powered vehicles, replace the dust and pollen filter every 15,000 miles (24,000 km).
*4: If you drive regularly in very high temperatures (over 110ºF, 43ºC), in very low temperatures (under
20ºF, 29ºC), replace every 60,000 miles/100,000 km.CODE
Maintenance Sub Items
1
●Rotate tires
2
●Replace air cleaner element
*2
●Replace dust and pollen filter
*3
●Inspect drive belt
3●Replace transmission fluid
4
●Replace spark plugs●Replace timing belt and inspect water pump
*4
●Inspect valve clearance
5●Replace engine coolant