engine oil HONDA ODYSSEY 2013 RC1-RC2 / 5.G Owner's Manual
[x] Cancel search | Manufacturer: HONDA, Model Year: 2013, Model line: ODYSSEY, Model: HONDA ODYSSEY 2013 RC1-RC2 / 5.GPages: 433, PDF Size: 12.35 MB
Page 339 of 433
338
uuMaintenance Under the HooduOil Check
Maintenance
Oil CheckWe recommend that you check the engine oil level every time you refuel.
Park the vehicle on level ground.
Wait approximately three minutes after turning the engine off before you check the
oil.
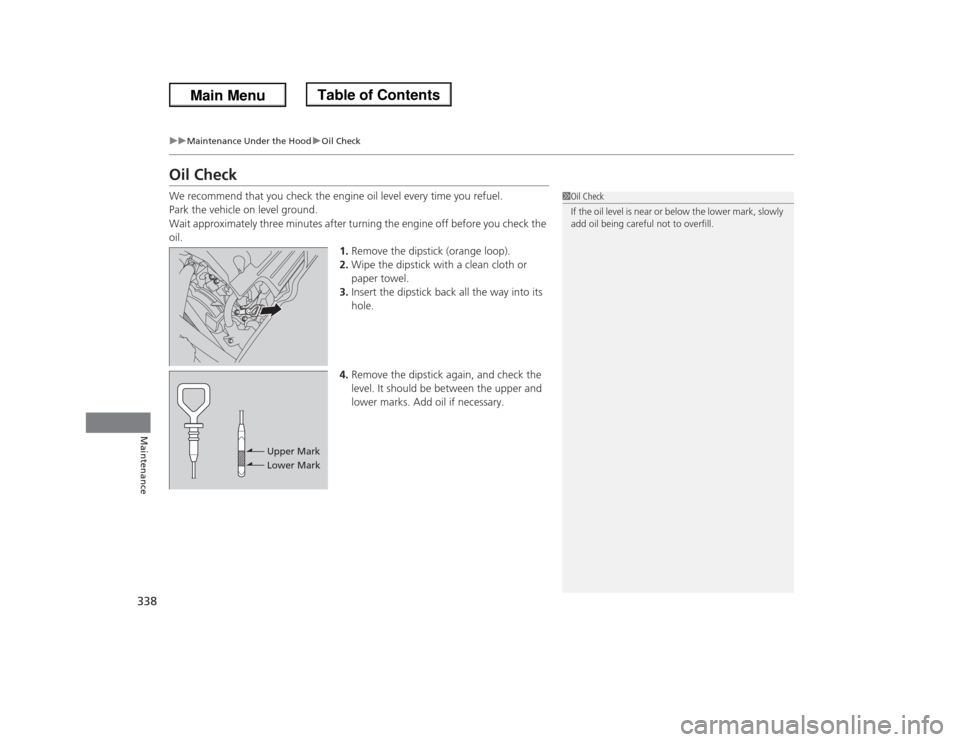
1.Remove the dipstick (orange loop).
2.Wipe the dipstick with a clean cloth or
paper towel.
3.Insert the dipstick back all the way into its
hole.
4.Remove the dipstick again, and check the
level. It should be between the upper and
lower marks. Add oil if necessary.
1Oil Check
If the oil level is near or below the lower mark, slowly
add oil being careful not to overfill.
Upper Mark
Lower Mark
Page 340 of 433
339
uuMaintenance Under the HooduAdding Engine Oil
Maintenance
Adding Engine Oil
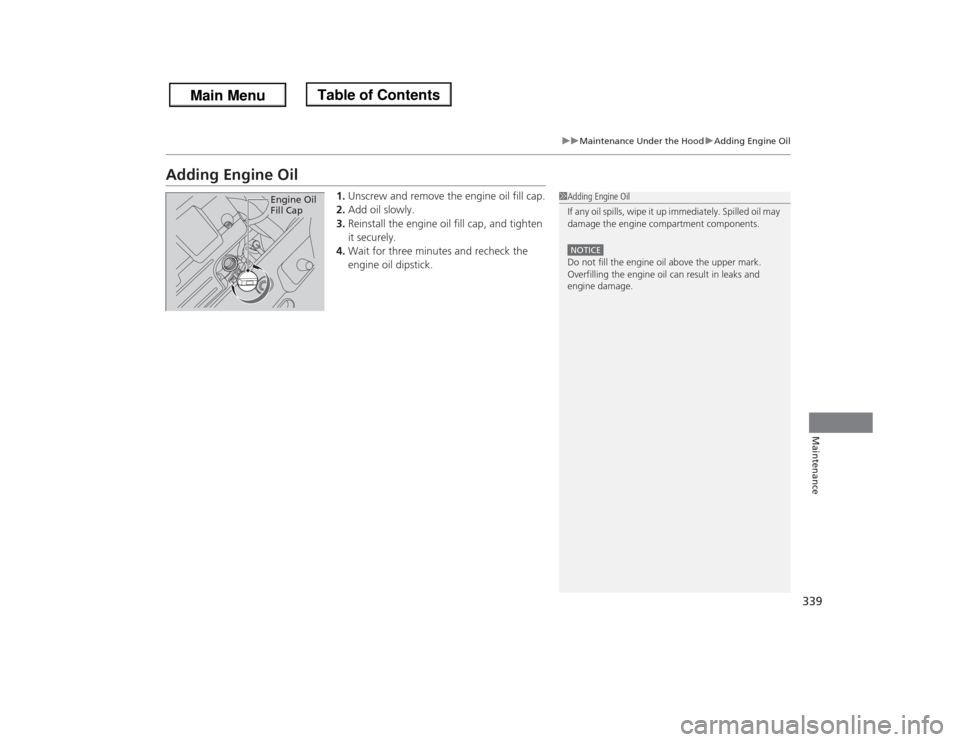
1.Unscrew and remove the engine oil fill cap.
2.Add oil slowly.
3.Reinstall the engine oil fill cap, and tighten
it securely.
4.Wait for three minutes and recheck the
engine oil dipstick.
1Adding Engine Oil
If any oil spills, wipe it up immediately. Spilled oil may
damage the engine compartment components.NOTICEDo not fill the engine oil above the upper mark.
Overfilling the engine oil can result in leaks and
engine damage.
Engine Oil
Fill Cap
Page 341 of 433
340
uuMaintenance Under the HooduChanging the Engine Oil and Oil Filter
Maintenance
Changing the Engine Oil and Oil FilterYou must change the engine oil and oil filter regularly in order to maintain the
engine's lubrication. The engine may be damaged if they are not changed regularly.
Change the oil and filter in accordance with the maintenance message on the
information display
*/multi-information display
*.
1.Run the engine until it reaches normal
operating temperature, and then turn the
engine off.
2.Open the hood and remove the engine oil
fill cap.
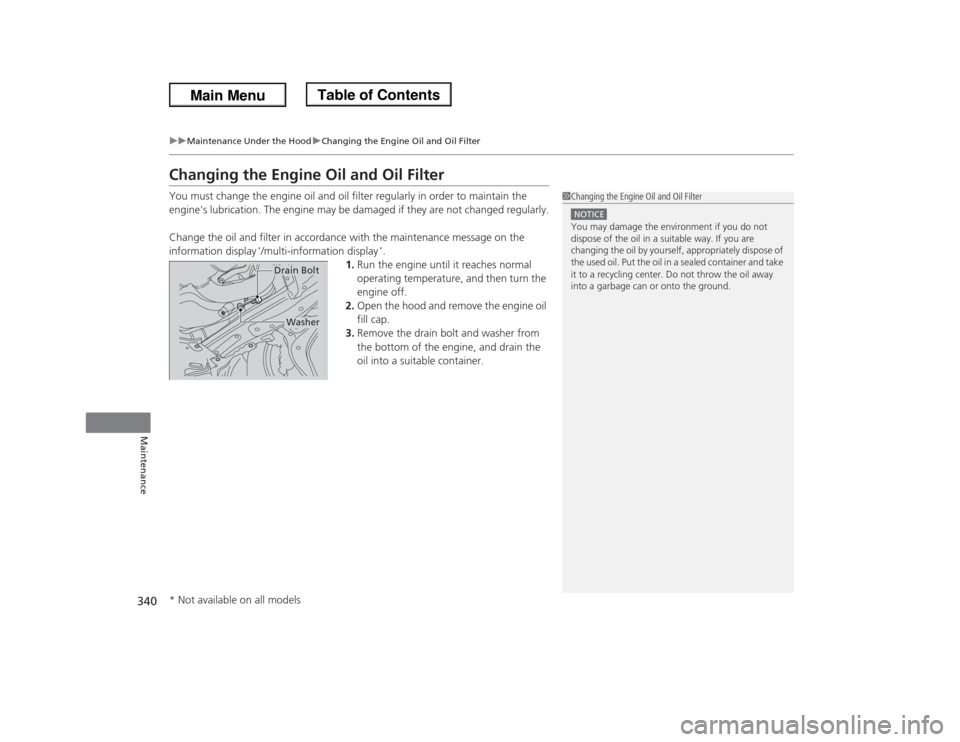
3.Remove the drain bolt and washer from
the bottom of the engine, and drain the
oil into a suitable container.
1Changing the Engine Oil and Oil FilterNOTICEYou may damage the environment if you do not
dispose of the oil in a suitable way. If you are
changing the oil by yourself, appropriately dispose of
the used oil. Put the oil in a sealed container and take
it to a recycling center. Do not throw the oil away
into a garbage can or onto the ground.
WasherDrain Bolt
* Not available on all models
Page 342 of 433
341
uuMaintenance Under the HooduChanging the Engine Oil and Oil Filter
Maintenance
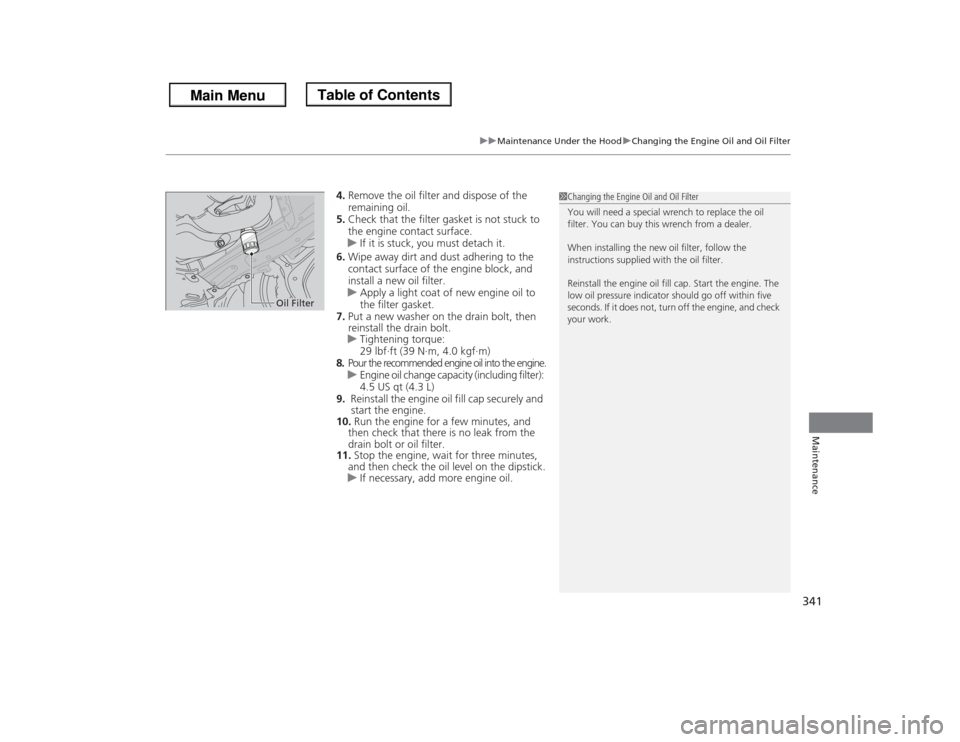
4.Remove the oil filter and dispose of the
remaining oil.
5.Check that the filter gasket is not stuck to
the engine contact surface.
uIf it is stuck, you must detach it.
6.Wipe away dirt and dust adhering to the
contact surface of the engine block, and
install a new oil filter.
uApply a light coat of new engine oil to
the filter gasket.
7.Put a new washer on the drain bolt, then
reinstall the drain bolt.
uTightening torque:
29 lbf∙ft (39 N∙m, 4.0 kgf∙m)
8.Pour the recommended engine oil into the engine.
uEngine oil change capacity (including filter):
4.5 US qt (4.3 L)
9. Reinstall the engine oil fill cap securely and
start the engine.
10. Run the engine for a few minutes, and
then check that there is no leak from the
drain bolt or oil filter.
11. Stop the engine, wait for three minutes,
and then check the oil level on the dipstick.
uIf necessary, add more engine oil.
1Changing the Engine Oil and Oil Filter
You will need a special wrench to replace the oil
filter. You can buy this wrench from a dealer.
When installing the new oil filter, follow the
instructions supplied with the oil filter.
Reinstall the engine oil fill cap. Start the engine. The
low oil pressure indicator should go off within five
seconds. If it does not, turn off the engine, and check
your work.
Oil Filter
Page 381 of 433
uuCleaninguExterior Care
380Maintenance
A good coat of automotive body wax helps protect your vehicle’s paint from the
elements. Wax will wear off over time and expose your vehicle’s paint to the
elements, so reapply as necessary.
If you get gasoline, oil, engine coolant, or battery fluid on resin coated parts, they
may be stained or the coating may peel. Promptly wipe it away using a soft cloth and
clean water.
Wipe using a glass cleaner.
Aluminum is susceptible to deterioration caused by salt and other road
contaminants. Use a sponge and mild detergent to wipe away promptly.
Be careful not to use harsh chemicals (including some commercial wheel cleaners) or
a stiff brush. They can damage the clear coat of the aluminum alloy wheels that
helps keep the aluminum from corroding and tarnishing.■
Applying Wax
■
Maintaining the Bumpers and Other Resin Coated Parts
■
Cleaning the Window
■
Maintaining Aluminum Wheels
*
1Applying WaxNOTICEChemical solvents and strong cleaners can damage
the paint, metal, and plastic on your vehicle. Wipe up
spills immediately.1Maintaining the Bumpers and Other Resin Coated Parts
Ask a dealer about the correct coating material when
you want to repair the painted surface of the parts
made of resin.1Cleaning the Window
Wires are mounted to the inside of the rear window.
Wipe along the same direction as the wires with a
soft cloth so as not to damage them.
* Not available on all models
Page 382 of 433
381
Handling the Unexpected
This chapter explains how to handle unexpected troubles.
Tools
Types of Tools .................................. 382
If a Tire Goes Flat
Changing a Flat Tire ......................... 383
Engine Does Not Start
Checking the Engine ........................ 392
Jump Starting.................................... 393
Shift Lever Does Not Move.............. 395
Overheating
How to Handle Overheating ............. 396Indicator, Coming On/Blinking
If the Low Oil Pressure Indicator Comes
On ............................................. 398If the Charging System Indicator Comes
On ................................................. 398
If the Malfunction Indicator Lamp Comes
On or Blinks ................................... 399If the Brake System Indicator Comes On ....... 400If the Low Tire Pressure Indicator Comes
On ................................................. 401
If the TPMS Indicator Comes On ...... 401If the Low Tire Pressure/TPMS Indicator
Comes On or Blinks ....................... 402
Fuses
Fuse Locations ................................. 403
Inspecting and Changing Fuses ........ 408
Emergency Towing........................... 409
When You Cannot Open or Close the
Tailgate............................................ 410
Page 399 of 433
398Handling the Unexpected
Indicator, Coming On/BlinkingIf the Low Oil Pressure Indicator Comes On
■Reasons for the indicator to come on
Comes on when the engine oil pressure is low.■What to do as soon as the indicator comes on
1.Immediately park the vehicle on level ground in a safe place.
2.If necessary, turn the hazard warning lights on.■What to do after parking the vehicle
1.Stop the engine and let it sit for about three minutes.
2.Open the hood and check the oil level.
uAdd oil as necessary.2Oil Check P. 338
3.Start the engine and check the low oil pressure indicator.
uThe light goes out: Start driving again.
uThe light does not go out within 10 seconds: Stop the engine and
contact a dealer for repairs immediately.
If the Charging System Indicator Comes On
■Reasons for the indicator to come on
Comes on when the battery is not being charged.■What to do when the indicator comes on
Turn off the heating and cooling system
*/climate control system
*, rear
defogger, and other electrical systems, and immediately contact a dealer
for repairs.
1If the Low Oil Pressure Indicator Comes OnNOTICERunning the engine with low oil pressure can cause
serious mechanical damage almost immediately.1If the Charging System Indicator Comes On
If you need to stop temporarily, do not turn off the
engine. Restarting the engine may rapidly discharge
the battery.
* Not available on all models
Page 404 of 433
403
Continued
Handling the Unexpected
FusesFuse LocationsIf any electrical devices are not working,
turn the ignition switch to LOCK
(0
and
check to see if any applicable fuse is blown.
Fuse locations are shown on the fuse box
cover. Locate the fuse in question by the
fuse number and box cover number.
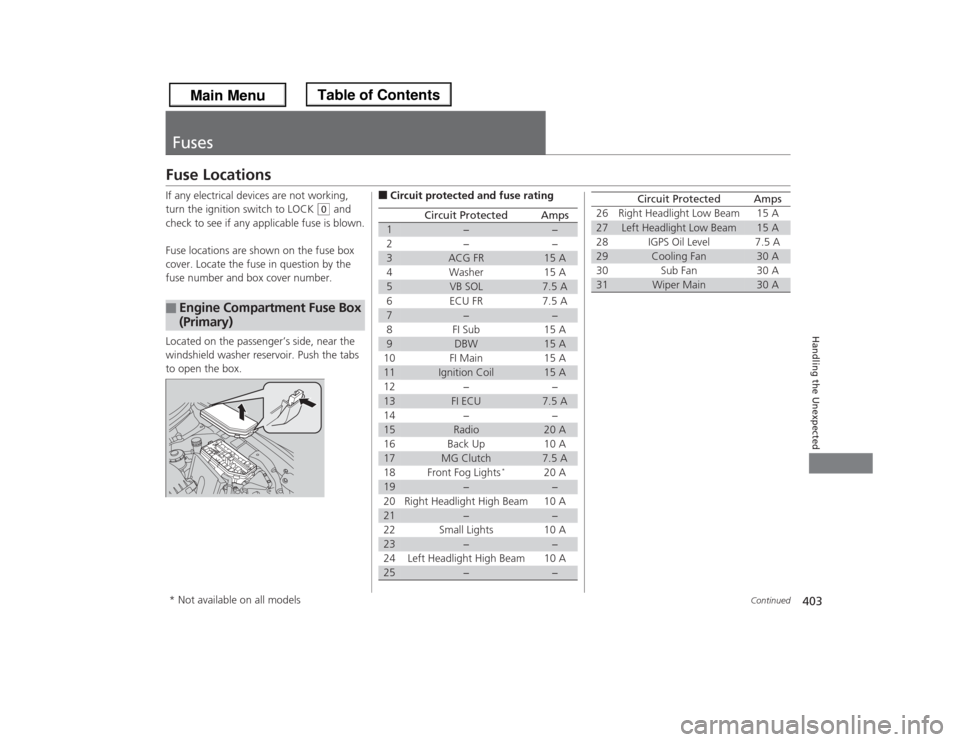
Located on the passenger’s side, near the
windshield washer reservoir. Push the tabs
to open the box.
■
Engine Compartment Fuse Box
(Primary)
■Circuit protected and fuse rating
Circuit Protected
Amps
1
−
−
2− −
3
ACG FR
15 A
4 Washer 15 A
5
VB SOL
7.5 A
6 ECU FR 7.5 A
7
−
−
8FI Sub 15A
9
DBW
15 A
10 FI Main 15 A11
Ignition Coil
15 A
12 − −13
FI ECU
7.5 A
14 − −15
Radio
20 A
16 Back Up 10 A17
MG Clutch
7.5 A
18 Front Fog Lights
*
20 A
19
−
−
20 Right Headlight High Beam 10 A
21
−
−
22 Small Lights 10 A
23
−
−
24 Left Headlight High Beam 10 A
25
−
−
26 Right Headlight Low Beam 15 A27
Left Headlight Low Beam
15 A
28 IGPS Oil Level 7.5 A
29
Cooling Fan
30 A
30 Sub Fan 30 A
31
Wiper Main
30 A
Circuit Protected
Amps
* Not available on all models
Page 413 of 433
412Information
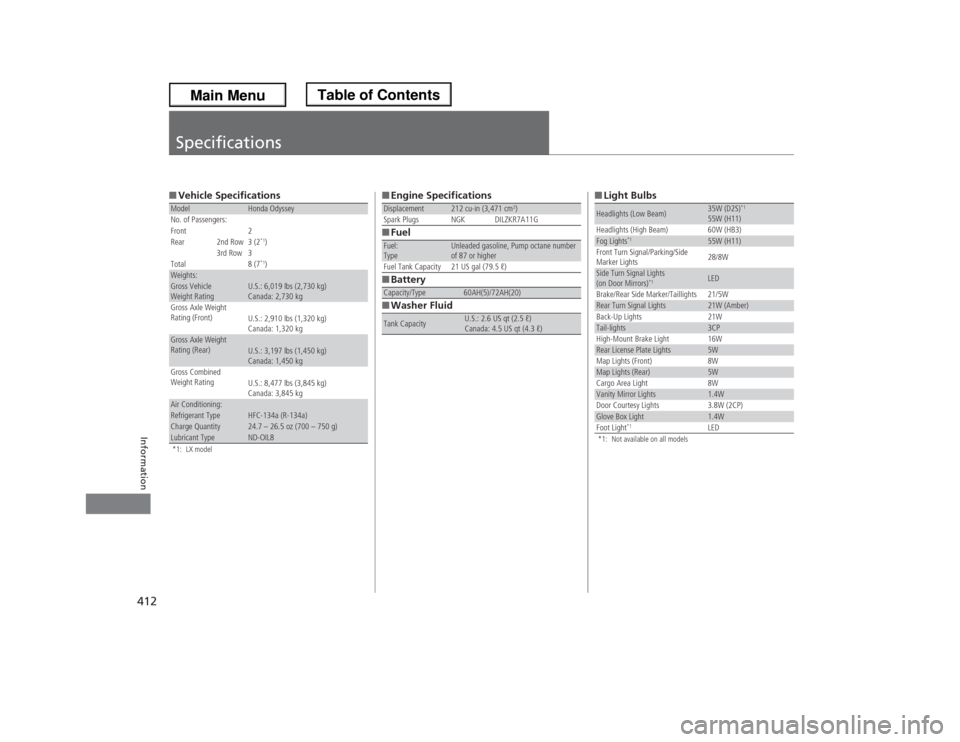
Specifications■Vehicle Specifications*1: LX modelModel
Honda Odyssey
No. of Passengers:
Front 2
Rear 2nd Row 3 (2*1)
3rd Row 3
Total 8 (7*1)
Weights:Gross Vehicle
Weight Rating
U.S.: 6,019 lbs (2,730 kg)
Canada: 2,730 kg
Gross Axle Weight
Rating (Front)
U.S.: 2,910 lbs (1,320 kg)
Canada: 1,320 kg
Gross Axle Weight
Rating (Rear)
U.S.: 3,197 lbs (1,450 kg)
Canada: 1,450 kg
Gross Combined
Weight Rating
U.S.: 8,477 lbs (3,845 kg)
Canada: 3,845 kg
Air Conditioning:Refrigerant Type
HFC-134a (R-134a)
Charge Quantity
24.7 – 26.5 oz (700 – 750 g)
Lubricant Type
ND-OIL8
■Engine Specifications
■Fuel
■Battery
■Washer FluidDisplacement
212 cu-in (3,471 cm
3)
Spark Plugs NGK DILZKR7A11G
Fuel:
Type
Unleaded gasoline, Pump octane number
of 87 or higher
Fuel Tank Capacity 21 US gal (79.5 ℓ)
Capacity/Type
60AH(5)/72AH(20)
Tank Capacity
U.S.: 2.6 US qt (2.5 ℓ)
Canada: 4.5 US qt (4.3 ℓ)
■Light Bulbs*1: Not available on all modelsHeadlights (Low Beam)
35W (D2S)
*1
55W (H11)
Headlights (High Beam) 60W (HB3)
Fog Lights
*1
55W (H11)
Front Turn Signal/Parking/Side
Marker Lights28/8W
Side Turn Signal Lights
(on Door Mirrors)
*1
LED
Brake/Rear Side Marker/Taillights 21/5W
Rear Turn Signal Lights
21W (Amber)
Back-Up Lights 21W
Tail-lights
3CP
High-Mount Brake Light 16W
Rear License Plate Lights
5W
Map Lights (Front) 8W
Map Lights (Rear)
5W
Cargo Area Light 8W
Vanity Mirror Lights
1.4W
Door Courtesy Lights 3.8W (2CP)
Glove Box Light
1.4W
Foot Light
*1
LED
Page 414 of 433
413
uuSpecificationsu
Information
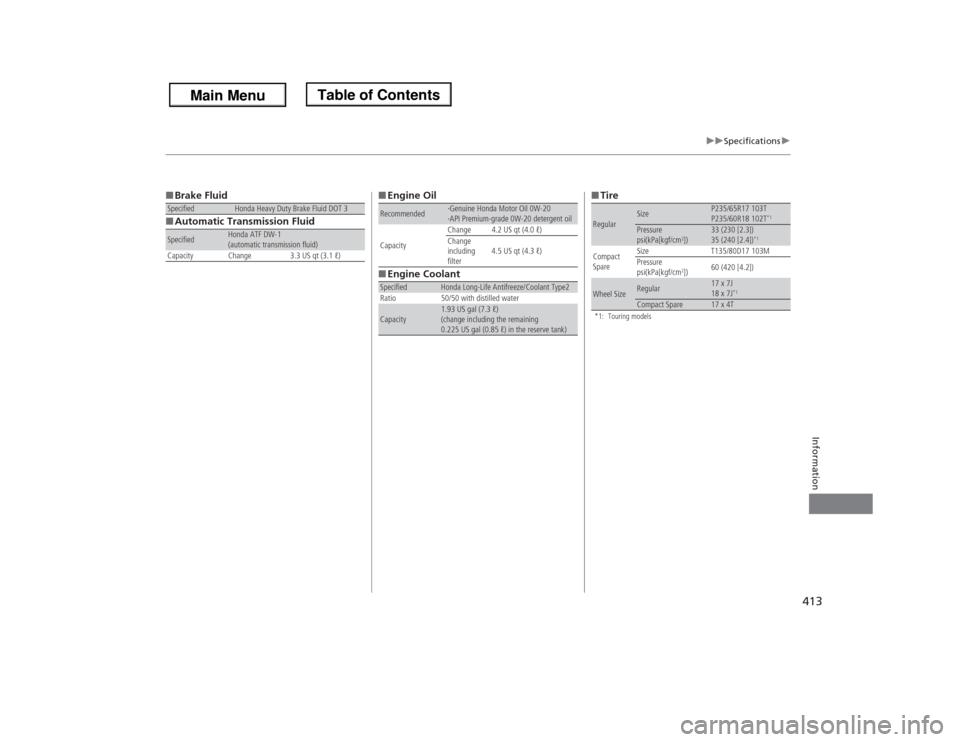
■Brake Fluid
■Automatic Transmission FluidSpecified
Honda Heavy Duty Brake Fluid DOT 3
Specified
Honda ATF DW-1
(automatic transmission fluid)
Capacity Change 3.3 US qt (3.1 ℓ)
■Engine Oil
■Engine CoolantRecommended
·Genuine Honda Motor Oil 0W-20
·API Premium-grade 0W-20 detergent oil
CapacityChange 4.2 US qt (4.0 ℓ)
Change
including
filter4.5 US qt (4.3 ℓ)
Specified
Honda Long-Life Antifreeze/Coolant Type2
Ratio 50/50 with distilled water
Capacity
1.93 US gal (7.3 ℓ)
(change including the remaining
0.225 US gal (0.85 ℓ) in the reserve tank)
■Tire*1: Touring modelsRegular
Size
P235/65R17 103T
P235/60R18 102T
*1
Pressure
psi(kPa[kgf/cm
2])
33 (230 [2.3])
35 (240 [2.4])
*1
Compact
SpareSize T135/80D17 103M
Pressure
psi(kPa[kgf/cm
2])60 (420 [4.2])
Wheel Size
Regular
17 x 7J
18 x 7J
*1
Compact Spare
17 x 4T