buttons HONDA ODYSSEY 2014 RC1-RC2 / 5.G Navigation Manual
[x] Cancel search | Manufacturer: HONDA, Model Year: 2014, Model line: ODYSSEY, Model: HONDA ODYSSEY 2014 RC1-RC2 / 5.GPages: 327, PDF Size: 19.96 MB
Page 15 of 327
14Quick Reference Guide
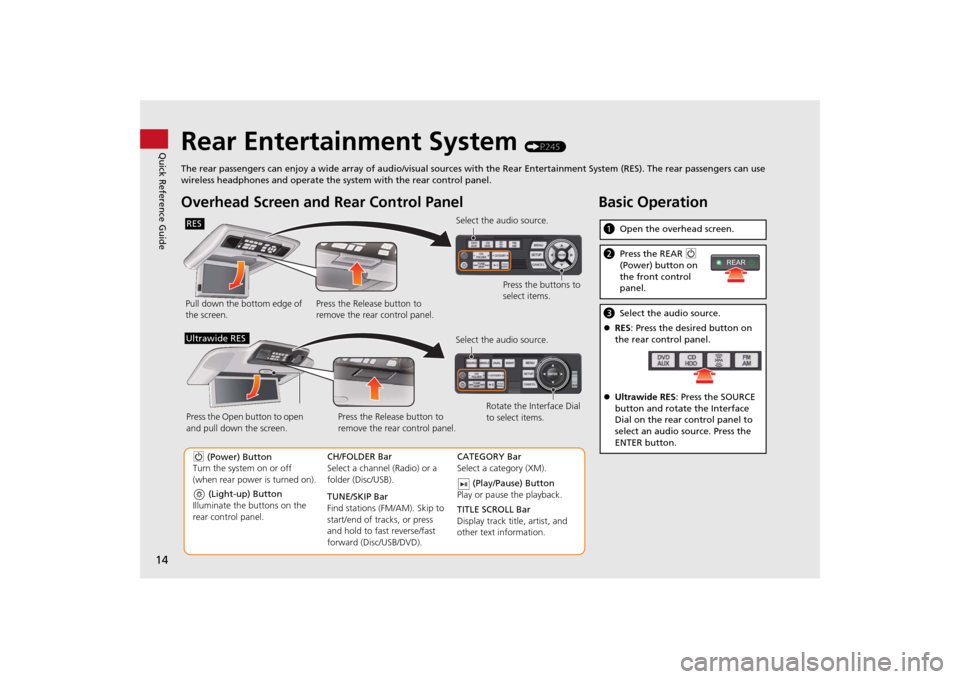
Rear Entertainment System
(P245)
The rear passengers can enjoy a wide array of audio/visual sources with the Rear Entertainment System (RES). The rear passengers can use
wireless headphones and operate the system with the rear control panel.
Overhead Screen and Rear Control PanelPull down the bottom edge of
the screen.Select the audio source.
Press the buttons to
select items.
Press the Release button to
remove the rear control panel.RES
(Light-up) Button
Illuminate the buttons on the
rear control panel.
9 (Power) Button
Turn the system on or off
(when rear power is turned on).CH/FOLDER Bar
Select a channel (Radio) or a
folder (Disc/USB).
TUNE/SKIP Bar
Find stations (FM/AM). Skip to
start/end of tracks, or press
and hold to fast reverse/fast
forward (Disc/USB/DVD).CATEGORY Bar
Select a category (XM).
(Play/Pause) Button
Play or pause the playback.
TITLE SCROLL Bar
Display track title, artist, and
other text information. Select the audio source.
Rotate the Interface Dial
to select items. Press the Release button to
remove the rear control panel. Press the Open button to open
and pull down the screen.
Ultrawide RES
Basic OperationaOpen the overhead screen.bPress the REAR 9
(Power) button on
the front control
panel.cSelect the audio source.
RES: Press the desired button on
the rear control panel.
Ultrawide RES: Press the SOURCE
button and rotate the Interface
Dial on the rear control panel to
select an audio source. Press the
ENTER button.
REAR
Page 23 of 327
22System Setup
Voice Control SystemYour vehicle has a voice control system that allows hands-free operation of most of
the navigation system functions.
The voice control system uses the d (Talk) and J (Hang-Up/Back) buttons on
the steering wheel and a microphone near the map lights on the ceiling.
A “Getting Started” feature provides a tutorial that explains how to use the voice
control system.
2Getting Started Tutorial
P. 15
Command InputIf the system does not understand a command or you wait too long to give a
command, the system asks you to repeat the command.
When you give a command, the system generally either repeats the command as a
confirmation or asks you for further information. If you do not wish to hear this
feedback, you can turn it off. However, listening to the feedback will help familiarize
you with the way the system expects commands to be phrased.
If the system cannot perform a command or the command is not appropriate for the
screen you are on, the system beeps.
On character input screens, a list of possible characters is displayed if the system
does not recognize your command.
You can find out which voice commands are available for a particular screen using
the d “Voice Help” command. The system will display and read the list of available
commands to you.
2Voice Help
P. 15
1d (Talk) Button
When you press the d (Talk) button, the system
prompts you to say a voice command and gives
examples. Press and release the d (Talk) button
again to bypass this prompt and give a
command.1Command Input
The audio system is muted while using the voice
control system.
Page 72 of 327
71
Map
Color
System Setup
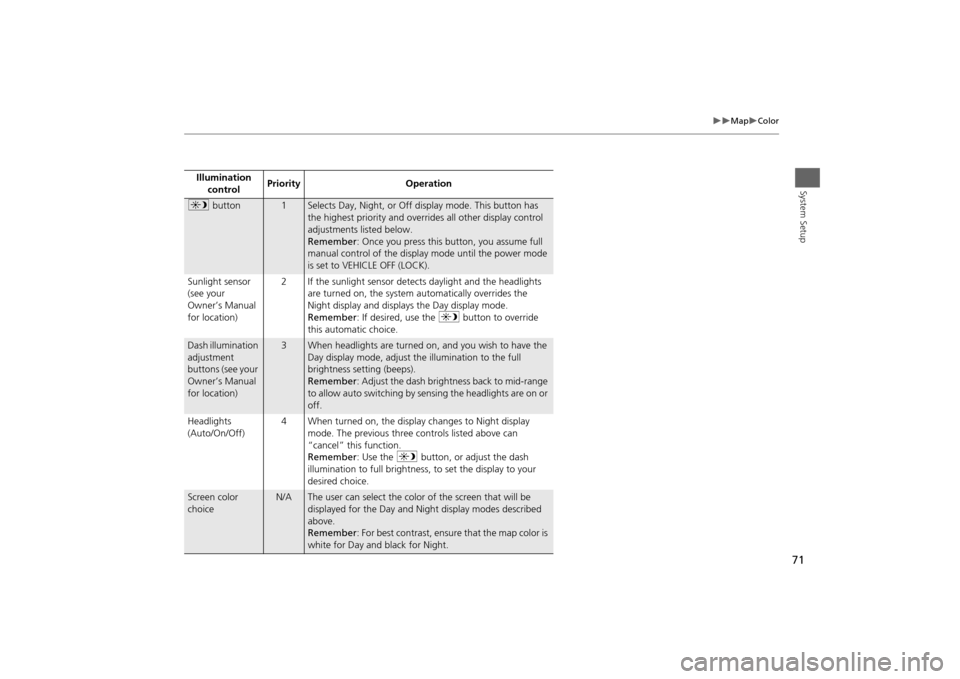
Illumination
controlPriority Operationa button
1
Selects Day, Night, or Off display mode. This button has
the highest priority and overrides all other display control
adjustments listed below.
Remember: Once you press this button, you assume full
manual control of the display mode until the power mode
is set to VEHICLE OFF (LOCK).
Sunlight sensor
(see your
Owner’s Manual
for location)2 If the sunlight sensor detects daylight and the headlights
are turned on, the system automatically overrides the
Night display and displays the Day display mode.
Remember: If desired, use the a button to override
this automatic choice.
Dash illumination
adjustment
buttons (see your
Owner’s Manual
for location)
3
When headlights are turned on, and you wish to have the
Day display mode, adjust the illumination to the full
brightness setting (beeps).
Remember: Adjust the dash brightness back to mid-range
to allow auto switching by sensing the headlights are on or
off.
Headlights
(Auto/On/Off)4 When turned on, the display changes to Night display
mode. The previous three controls listed above can
“cancel” this function.
Remember: Use the a button, or adjust the dash
illumination to full brightness, to set the display to your
desired choice.
Screen color
choice
N/A
The user can select the color of the screen that will be
displayed for the Day and Night display modes described
above.
Remember: For best contrast, ensure that the map color is
white for Day and black for Night.
Page 136 of 327
135
Audio
This section describes how to operate the audio system. You can play
music from a wide array of media sources, and control the audio system
using the audio buttons, the Interface Dial, or voice control.
Audio System.................................................. 136
About Your Audio System .............................. 136
USB Port ........................................................ 137
Auxiliary Input Jack ........................................ 138
Audio System Theft Protection ....................... 139
Setting Audio Shortcuts ................................. 140
Audio Remote Controls.................................. 142
Steering Wheel Controls ................................ 142
Audio Settings................................................. 143
Adjusting the Sound ...................................... 145
Playing FM/AM Radio..................................... 147
Selecting FM/AM Mode.................................. 147
Audio Screen Control ..................................... 147
Audio Menu .................................................. 149
Playing XM® Radio......................................... 153
Selecting XM® Mode..................................... 153
Audio Screen Control ..................................... 153
Audio Menu .................................................. 155XM® Radio Service......................................... 157
Playing a Disc................................................... 158
Selecting Disc Mode ....................................... 158
Audio Screen Control ..................................... 159
Audio Menu ................................................... 160
Recommended CDs ........................................ 163
Playing Hard Disc Drive (HDD) Audio............ 165
Selecting HDD Mode ...................................... 165
Recording a Music CD to HDD........................ 166
Audio Screen Control ..................................... 167
Audio Menu ................................................... 168
Playing an iPod®............................................. 177
Selecting iPod® Mode .................................... 178
Audio Screen Control ..................................... 179
Audio Menu ................................................... 181
Song By Voice
TM (SBV) .................................... 184
Playing Internet Radio..................................... 189
Selecting Internet Radio Mode........................ 189Pandora® Menu ............................................ 190
Aha
TM Radio Menu ......................................... 191
Playing a USB Flash Drive............................... 193
Selecting USB Mode....................................... 194
Audio Screen Control..................................... 195
Audio Menu .................................................. 196
Playing Bluetooth® Audio............................. 199
Selecting Bluetooth® Audio Mode ................ 199
Audio Screen Control..................................... 200
Page 137 of 327
136Audio
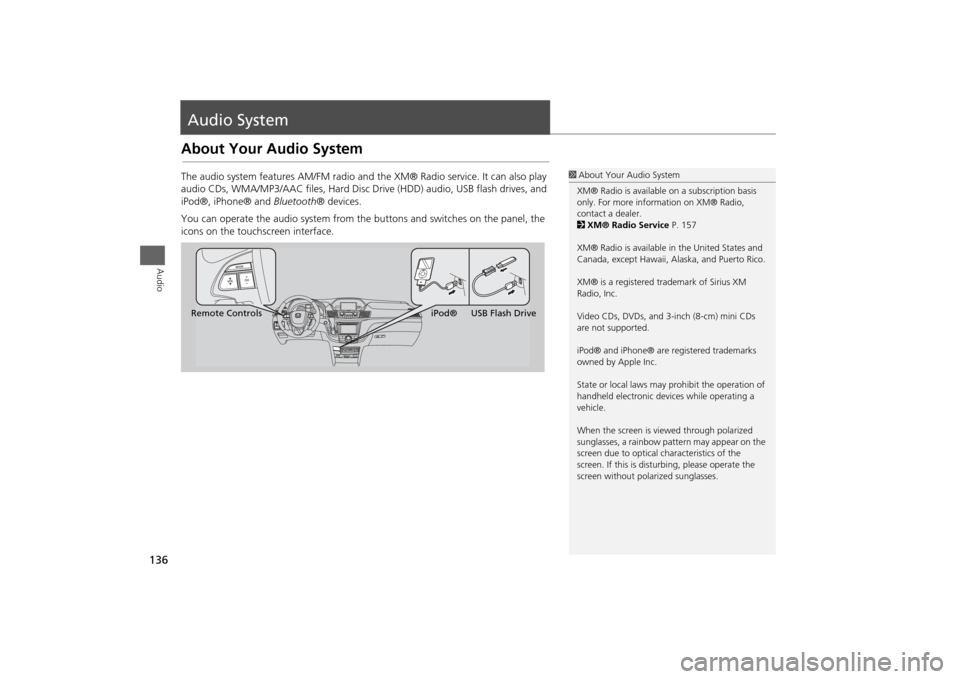
Audio SystemAbout Your Audio SystemThe audio system features AM/FM radio and the XM® Radio service. It can also play
audio CDs, WMA/MP3/AAC files, Hard Disc Drive (HDD) audio, USB flash drives, and
iPod®, iPhone® and Bluetooth® devices.
You can operate the audio system from the buttons and switches on the panel, the
icons on the touchscreen interface.
1About Your Audio System
XM® Radio is available on a subscription basis
only. For more information on XM® Radio,
contact a dealer.
2XM® Radio Service P. 157
XM® Radio is available in the United States and
Canada, except Hawaii, Alaska, and Puerto Rico.
XM® is a registered trademark of Sirius XM
Radio, Inc.
Video CDs, DVDs, and 3-inch (8-cm) mini CDs
are not supported.
iPod® and iPhone® are registered trademarks
owned by Apple Inc.
State or local laws may prohibit the operation of
handheld electronic devices while operating a
vehicle.
When the screen is viewed through polarized
sunglasses, a rainbow pattern may appear on the
screen due to optical characteristics of the
screen. If this is disturbing, please operate the
screen without polarized sunglasses.
Remote ControlsiPod® USB Flash Drive
Page 205 of 327
204Bluetooth® HandsFreeLink®
Bluetooth® HandsFreeLink®Bluetooth® HandsFreeLink® (HFL) allows you to place and receive phone calls using
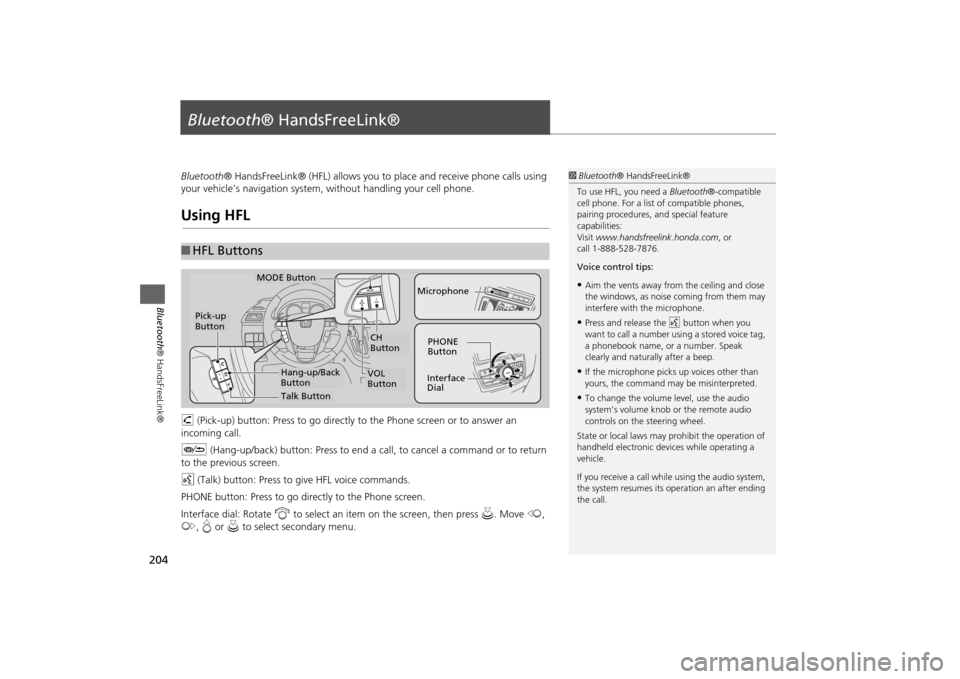
your vehicle’s navigation system, without handling your cell phone.Using HFLh (Pick-up) button: Press to go directly to the Phone screen or to answer an
incoming call.
J (Hang-up/back) button: Press to end a call, to cancel a command or to return
to the previous screen.
d (Talk) button: Press to give HFL voice commands.
PHONE button: Press to go directly to the Phone screen.
Interface dial: Rotate i to select an item on the screen, then press u. Move w,
y, e or u to select secondary menu.■HFL Buttons
1Bluetooth® HandsFreeLink®
To use HFL, you need a Bluetooth®-compatible
cell phone. For a list of compatible phones,
pairing procedures, and special feature
capabilities:
Visit www.handsfreelink.honda.com, or
call 1-888-528-7876.
Voice control tips:•Aim the vents away from the ceiling and close
the windows, as noise coming from them may
interfere with the microphone.•Press and release the d button when you
want to call a number using a stored voice tag,
a phonebook name, or a number. Speak
clearly and naturally after a beep.•If the microphone picks up voices other than
yours, the command may be misinterpreted.•To change the volume level, use the audio
system’s volume knob or the remote audio
controls on the steering wheel.
State or local laws may prohibit the operation of
handheld electronic devices while operating a
vehicle.
If you receive a call while using the audio system,
the system resumes its operation an after ending
the call.
NAV
CH
Button
MODE Button
Pick-up
Button
PHONE
ButtonInterface
DialMicrophone
VOL
Button
Talk ButtonHang-up/Back
Button
Page 251 of 327
250Rear Entertainment System
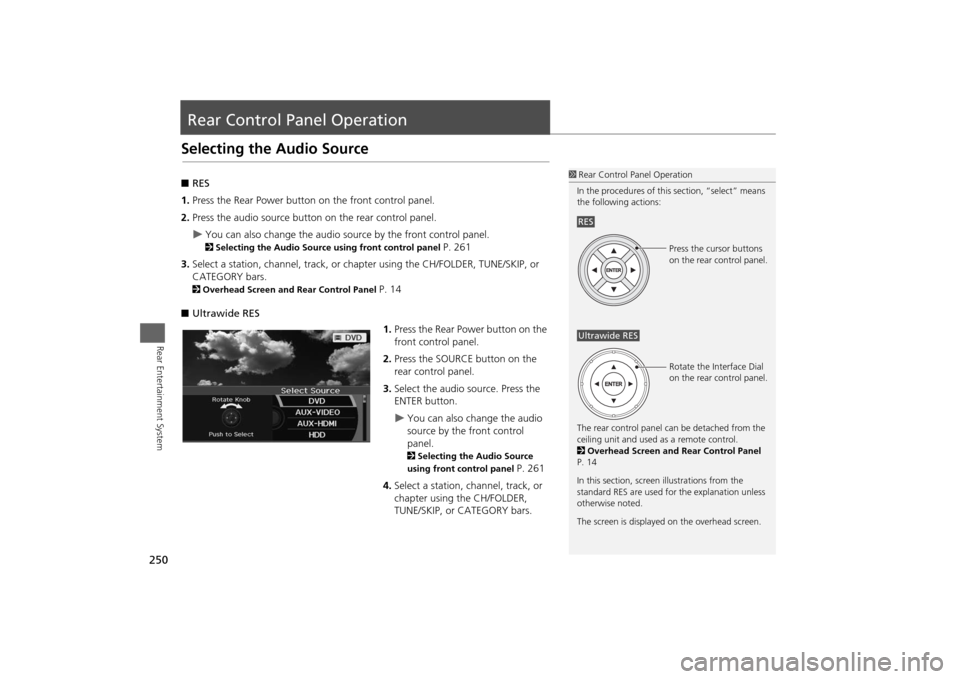
Rear Control Panel OperationSelecting the Audio Source■RES
1.Press the Rear Power button on the front control panel.
2.Press the audio source button on the rear control panel.
You can also change the audio source by the front control panel. 2Selecting the Audio Source using front control panel
P. 261
3.Select a station, channel, track, or chapter using the CH/FOLDER, TUNE/SKIP, or
CATEGORY bars.
2Overhead Screen and Rear Control Panel
P. 14
■Ultrawide RES
1.Press the Rear Power button on the
front control panel.
2.Press the SOURCE button on the
rear control panel.
3.Select the audio source. Press the
ENTER button.
You can also change the audio
source by the front control
panel. 2Selecting the Audio Source
using front control panel
P. 261
4.Select a station, channel, track, or
chapter using the CH/FOLDER,
TUNE/SKIP, or CATEGORY bars.
1Rear Control Panel Operation
In the procedures of this section, “select” means
the following actions:
The rear control panel can be detached from the
ceiling unit and used as a remote control.
2Overhead Screen and Rear Control Panel
P. 14
In this section, screen illustrations from the
standard RES are used for the explanation unless
otherwise noted.
The screen is displayed on the overhead screen.RES
Press the cursor buttons
on the rear control panel.
Ultrawide RES
Rotate the Interface Dial
on the rear control panel.