USB port HONDA ODYSSEY 2016 RC1-RC2 / 5.G Navigation Manual
[x] Cancel search | Manufacturer: HONDA, Model Year: 2016, Model line: ODYSSEY, Model: HONDA ODYSSEY 2016 RC1-RC2 / 5.GPages: 325, PDF Size: 8.63 MB
Page 30 of 325
29
Interface SettingsWallpaper Settings
System Setup
Wallpaper Settings
Select, delete, and import wallpaper pictures for display on the screen.
HSETTINGS button
System Settings Clock Clock/Wallpaper Type
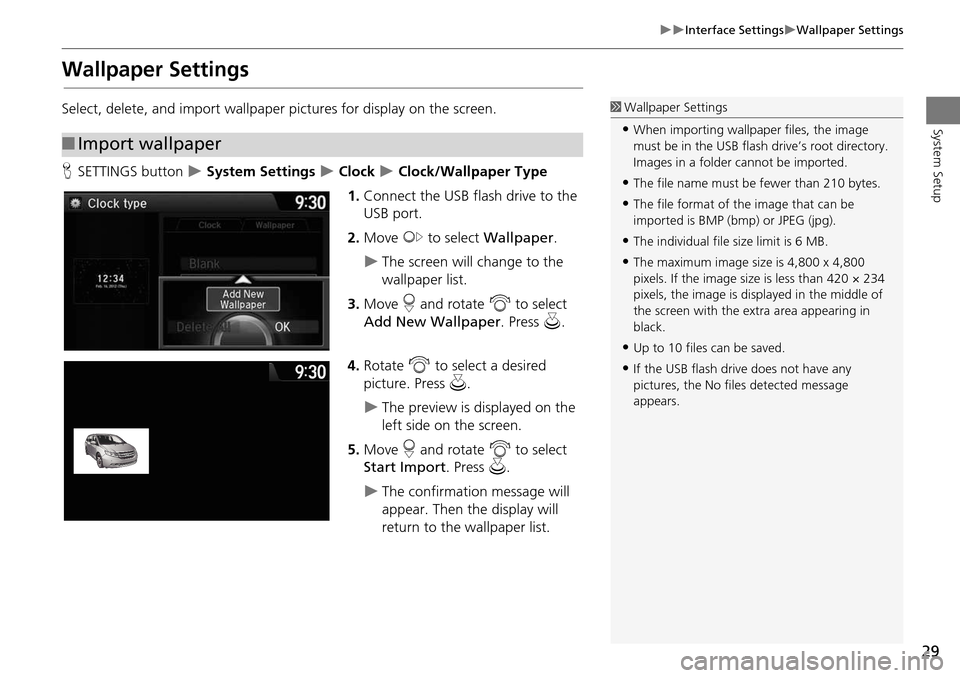
1. Connect the USB flash drive to the
USB port.
2. Move y to select Wallpaper .
The screen will change to the
wallpaper list.
3. Move r and rotate i to select
Add New Wallpaper. Press u.
4. Rotate i to select a desired
picture. Press u.
The preview is displayed on the
left side on the screen.
5. Move r and rotate i to select
Start Import . Press u.
The confirmation message will
appear. Then the display will
return to the wallpaper list.
■Import wallpaper
1 Wallpaper Settings
•When importing wallpaper files, the image
must be in the USB flash drive’s root directory.
Images in a folder cannot be imported.
•The file name must be fewer than 210 bytes.
•The file format of the image that can be
imported is BMP (bmp) or JPEG (jpg).
•The individual file size limit is 6 MB.
•The maximum image size is 4,800 x 4,800
pixels. If the image size is less than 420 × 234
pixels, the image is displayed in the middle of
the screen with the extra area appearing in
black.
•Up to 10 files can be saved.
•If the USB flash driv e does not have any
pictures, the No file s detected message
appears.
Page 47 of 325
46
Personal InformationDownload POI
System Setup
Download POI
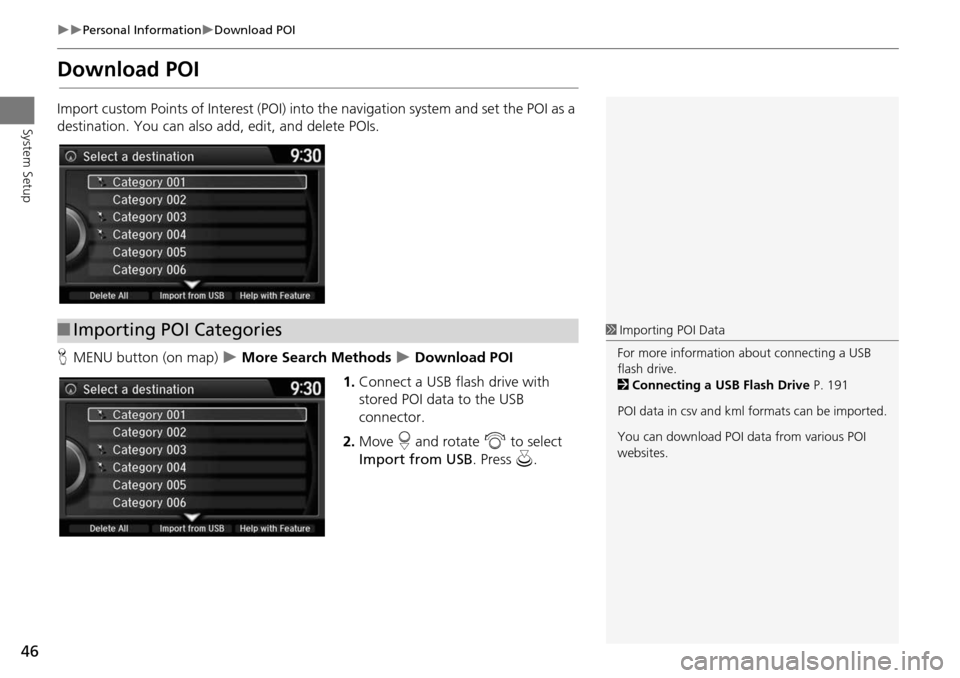
Import custom Points of Interest (POI) into the navigation system and set the POI as a
destination. You can also ad d, edit, and delete POIs.
H MENU button (on map)
More Search Methods Download POI
1. Connect a USB flash drive with
stored POI data to the USB
connector.
2. Move r and rotate i to select
Import from USB . Press u.
■Importing POI Categories1 Importing POI Data
For more information about connecting a USB
flash drive.
2 Connecting a USB Flash Drive P. 191
POI data in csv and kml formats can be imported.
You can download POI data from various POI
websites.
Page 101 of 325
100
Entering a DestinationDownload POI
Navigation
Download POI
HMENU button More Search Methods Download POI
Select a place imported into the navi gation system as the destination.
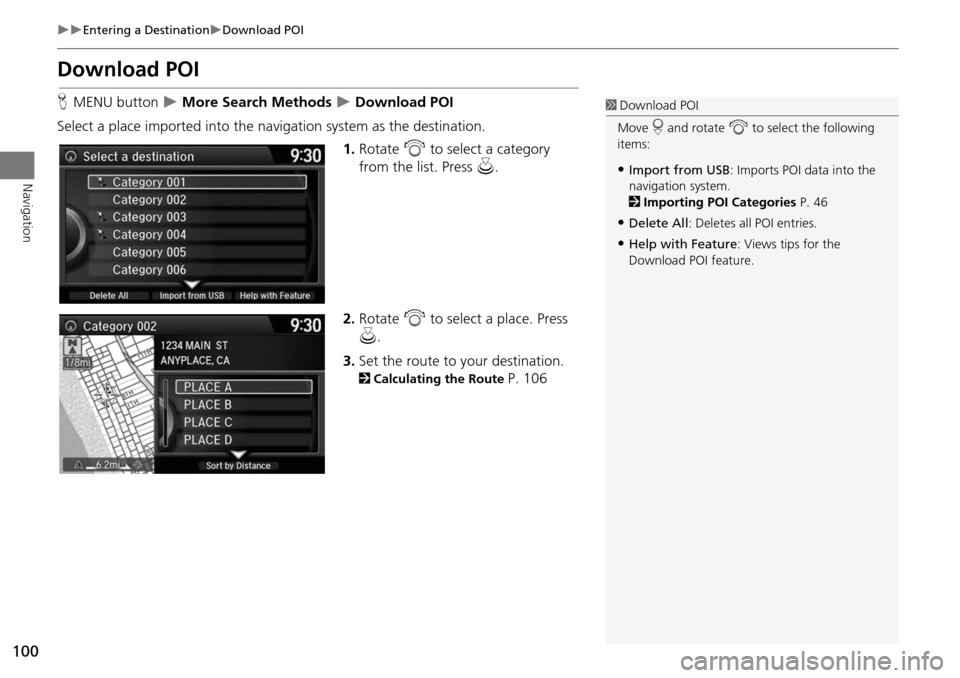
1.Rotate i to select a category
from the list. Press u.
2. Rotate i to select a place. Press
u .
3. Set the route to your destination.
2 Calculating the Route P. 106
1Download POI
Move r and rotate i to select the following
items:
•Import from USB : Imports POI data into the
navigation system.
2 Importing POI Categories P. 46
•Delete All: Deletes all POI entries.
•Help with Feature : Views tips for the
Download POI feature.
Page 134 of 325
133
Audio
This section describes how to operate the audio system. You can play
music from a wide array of media s ources, and control the audio system
using the audio buttons, the Interface Dial, or voice control.
Audio System .................................................. 134
About Your Audio System .............................. 134
USB Port ........................................................ 135
Auxiliary Input Jack ......... .......................... ..... 136
Audio System Theft Protection ....................... 137
Setting Audio Shortcuts ................................. 138
Audio Remote Controls .................................. 140
Steering Wheel Controls ................................ 140
Audio Settings ................................................. 141
Adjusting the Sound ...................................... 143
Playing FM/AM Radio ..................................... 145
Selecting FM/AM Mode.................................. 145
Audio Screen Control ..................................... 145
Audio Menu .................................................. 147
Playing SiriusXM® Radio ................................ 151
Selecting SiriusXM® Mode............................. 151
Audio Screen Control ..................................... 151
Audio Menu .................................................. 153 SiriusXM® Radio Service................................. 155
Playing a Disc ................................................... 156
Selecting Disc Mode ....................................... 156
Audio Screen Control ..................................... 157
Audio Menu ................................................... 158
Recommended CDs ........................................ 161
Playing Hard Disc Drive (HDD) Audio ............ 163
Selecting HDD Mode ...................................... 163
Recording a Music CD to HDD........................ 164
Audio Screen Control ..................................... 165
Audio Menu ................................................... 166
Playing an iPod® ............................................. 175
Selecting iPod® Mode .................................... 176
Audio Screen Control ..................................... 177
Audio Menu ................................................... 179
Song By Voice
TM (SBV) .................................... 182
Playing Internet Radio ..................................... 187
Selecting Internet Radio Mode........................ 187 Pandora® Menu ............................................ 188
Aha
TM Radio Menu ......................................... 189
Playing a USB Flash Drive ............................... 191
Selecting USB Mode....................................... 192
Audio Screen Control..................................... 193
Audio Menu .................................................. 194
Playing Bluetooth ® Audio............................. 197
Selecting Bluetooth ® Audio Mode ................ 197
Audio Screen Control..................................... 198
Page 135 of 325
134
Audio
Audio System
About Your Audio System
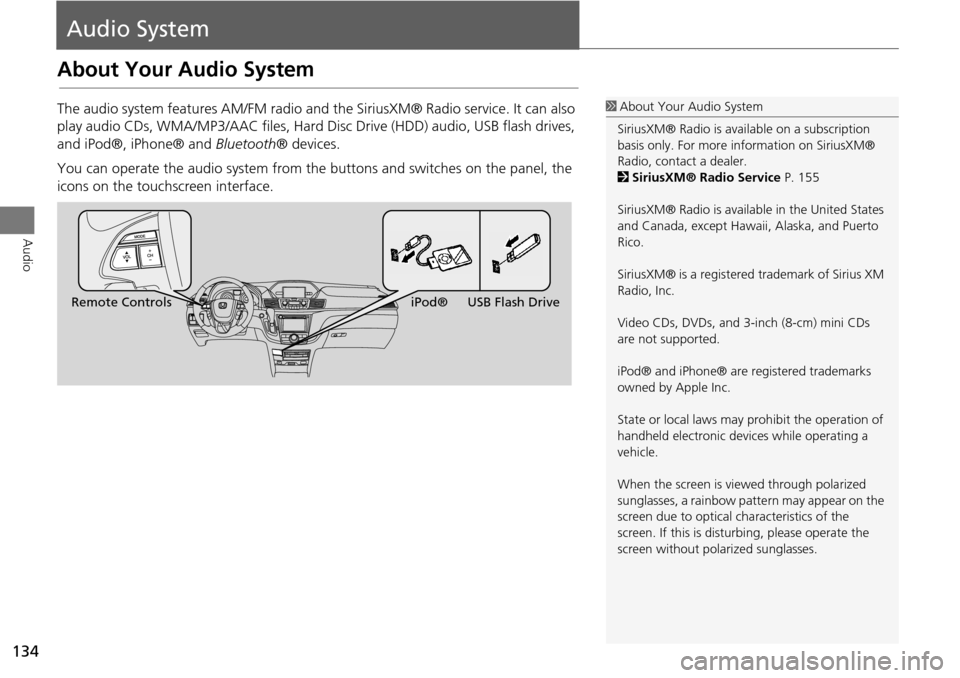
The audio system features AM/FM radio and the SiriusXM® Radio service. It can also
play audio CDs, WMA/MP3/AAC fi les, Hard Disc Drive (HDD) audio, USB flash drives,
and iPod®, iPhone® and Bluetooth® devices.
You can operate the audio system from the buttons and switches on the panel, the
icons on the touchscreen interface.1 About Your Audio System
SiriusXM® Radio is avai lable on a subscription
basis only. For more information on SiriusXM®
Radio, contact a dealer.
2 SiriusXM® Radio Service P. 155
SiriusXM® Radio is available in the United States
and Canada, except Hawa ii, Alaska, and Puerto
Rico.
SiriusXM® is a registered trademark of Sirius XM
Radio, Inc.
Video CDs, DVDs, and 3-inch (8-cm) mini CDs
are not supported.
iPod® and iPhone® are registered trademarks
owned by Apple Inc.
State or local laws may prohibit the operation of
handheld electronic devices while operating a
vehicle.
When the screen is vi ewed through polarized
sunglasses, a rainbow pattern may appear on the
screen due to optical characteristics of the
screen. If this is distur bing, please operate the
screen without polarized sunglasses.
Remote Controls iPod® USB Flash Drive
Page 136 of 325
135
Audio SystemUSB Port
Audio
USB Port
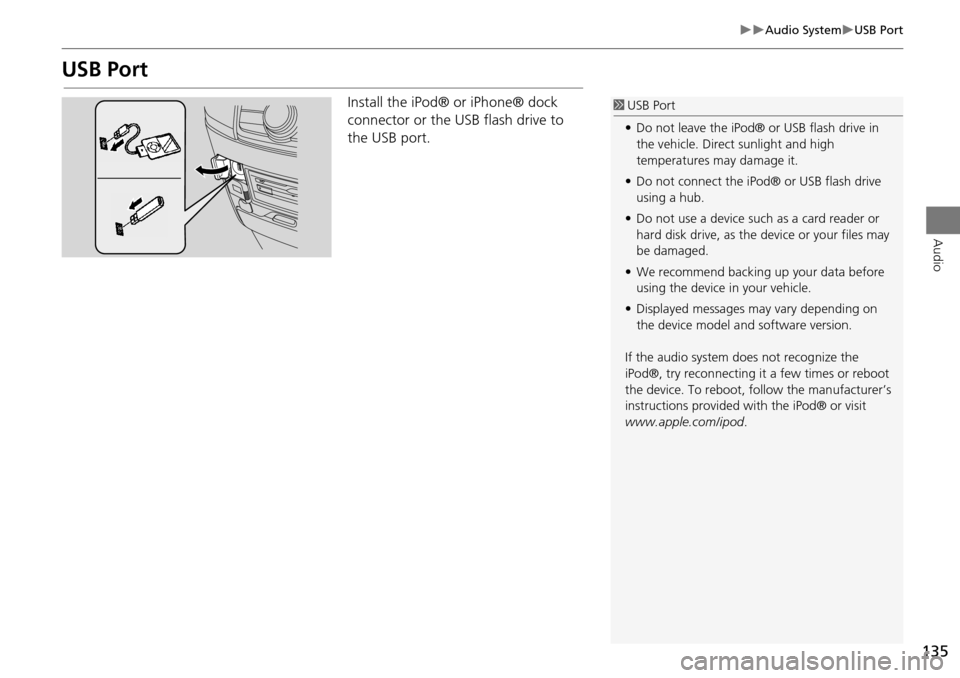
Install the iPod® or iPhone® dock
connector or the USB flash drive to
the USB port.1 USB Port
• Do not leave the iPod® or USB flash drive in
the vehicle. Direct sunlight and high
temperatures may damage it.
• Do not connect the iPod® or USB flash drive
using a hub.
• Do not use a device such as a card reader or
hard disk drive, as the device or your files may
be damaged.
• We recommend backing up your data before
using the device in your vehicle.
• Displayed messages may vary depending on
the device model a nd software version.
If the audio system does not recognize the
iPod®, try reconnecting it a few times or reboot
the device. To reboot, fo llow the manufacturer’s
instructions provided wi th the iPod® or visit
www.apple.com/ipod.
Page 188 of 325
187
Audio
Playing Internet Radio
Selecting Internet Radio Mode
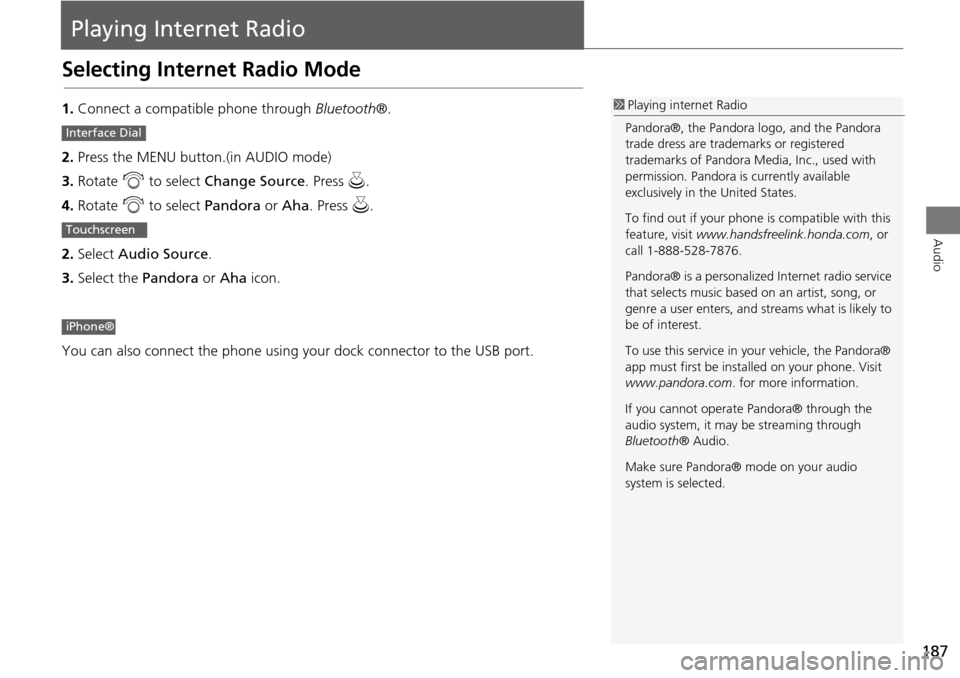
1.Connect a compatible phone through Bluetooth®.
2. Press the MENU button.(in AUDIO mode)
3. Rotate i to select Change Source . Press u.
4. Rotate i to select Pandora or Aha. Press u.
2. Select Audio Source .
3. Select the Pandora or Aha icon.
You can also connect the phone using your dock connector to the USB port.1 Playing internet Radio
Pandora®, the Pandora logo, and the Pandora
trade dress are trademarks or registered
trademarks of Pandora Media, Inc., used with
permission. Pandora is currently available
exclusively in the United States.
To find out if your phone is compatible with this
feature, visit www.handsfreelink.honda.com , or
call 1-888-528-7876.
Pandora® is a personalized Internet radio service
that selects music based on an artist, song, or
genre a user enters, and st reams what is likely to
be of interest.
To use this service in your vehicle, the Pandora®
app must first be inst alled on your phone. Visit
www.pandora.com . for more information.
If you cannot operat e Pandora® through the
audio system, it may be streaming through
Bluetooth ® Audio.
Make sure Pandora® mode on your audio
system is selected.
Interface Dial
Touchscreen
iPhone®
Page 192 of 325
191
Audio
Playing a USB Flash Drive
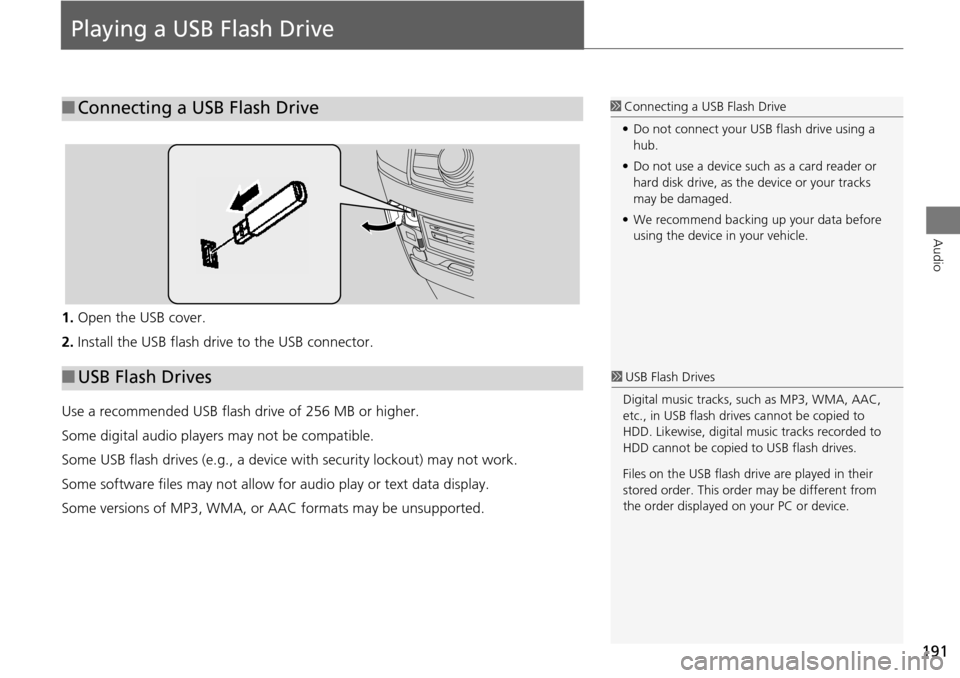
1.Open the USB cover.
2. Install the USB flash drive to the USB connector.
Use a recommended USB flash drive of 256 MB or higher.
Some digital audio players may not be compatible.
Some USB flash drives (e.g., a device with security lockout) may not work.
Some software files may not allow for audio play or text data display.
Some versions of MP3, WMA, or AAC formats may be unsupported.
■Connecting a USB Flash Drive1 Connecting a USB Flash Drive
• Do not connect your US B flash drive using a
hub.
• Do not use a device such as a card reader or
hard disk drive, as th e device or your tracks
may be damaged.
• We recommend backing up your data before
using the device in your vehicle.
■ USB Flash Drives1 USB Flash Drives
Digital music tracks, such as MP3, WMA, AAC,
etc., in USB flash drives cannot be copied to
HDD. Likewise, digital music tracks recorded to
HDD cannot be copied to USB flash drives.
Files on the USB flash drive are played in their
stored order. This orde r may be different from
the order displayed on your PC or device.
Page 193 of 325
192
Playing a USB Flash DriveSelecting USB Mode
Audio
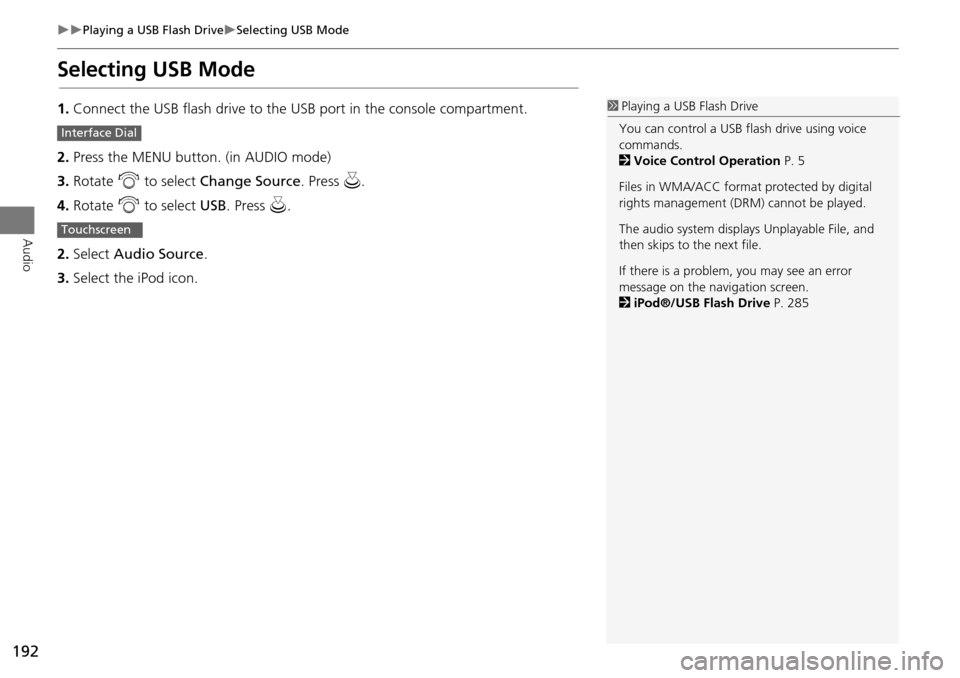
Selecting USB Mode
1.Connect the USB flash drive to the USB port in the console compartment.
2. Press the MENU button. (in AUDIO mode)
3. Rotate i to select Change Source . Press u.
4. Rotate i to select USB. Press u .
2. Select Audio Source .
3. Select the iPod icon.1Playing a USB Flash Drive
You can control a USB flash drive using voice
commands.
2 Voice Control Operation P. 5
Files in WMA/ACC format protected by digital
rights management (DRM) cannot be played.
The audio system displays Unplayable File, and
then skips to the next file.
If there is a problem, you may see an error
message on the navigation screen.
2 iPod®/USB Flash Drive P. 285
Interface Dial
Touchscreen
Page 286 of 325
285
Error MessagesiPod®/USB Flash Drive
Troubleshooting
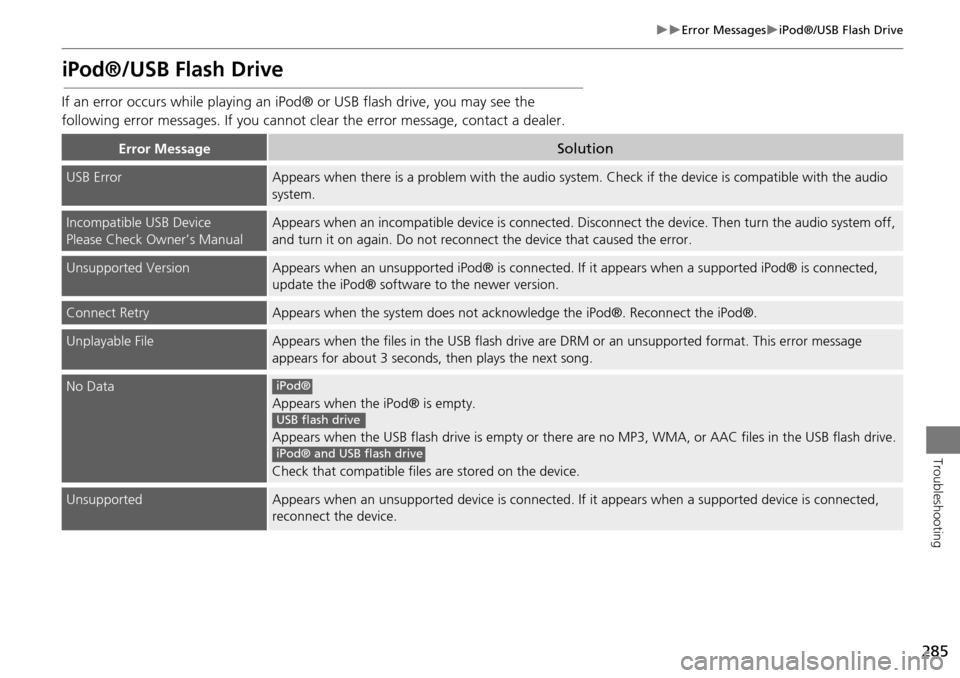
iPod®/USB Flash Drive
If an error occurs while playing an iPod® or USB flash drive, you may see the
following error messages. If you cannot cl ear the error message, contact a dealer.
Error MessageSolution
USB ErrorAppears when there is a problem with the audio system. Check if the device is compatible with the audio
system.
Incompatible USB Device
Please Check Owner’s ManualAppears when an incompatible device is connected. Di sconnect the device. Then turn the audio system off,
and turn it on again. Do not reconnec t the device that caused the error.
Unsupported VersionAppears when an unsupported iPod® is connected. If it appears when a supported iPod® is connected,
update the iPod® software to the newer version.
Connect RetryAppears when the system does not acknowledge the iPod®. Reconnect the iPod®.
Unplayable FileAppears when the files in the USB flash drive are DRM or an unsupported format. This error message
appears for about 3 seconds, then plays the next song.
No Data
Appears when the iPod® is empty.
Appears when the USB flash drive is empty or there ar e no MP3, WMA, or AAC files in the USB flash drive.
Check that compatible files are stored on the device.
UnsupportedAppears when an unsupported device is connected. If it appears when a supported device is connected,
reconnect the device.
iPod®
USB flash drive
iPod® and USB flash drive