check engine light HONDA ODYSSEY 2016 RC1-RC2 / 5.G Quick Guide
[x] Cancel search | Manufacturer: HONDA, Model Year: 2016, Model line: ODYSSEY, Model: HONDA ODYSSEY 2016 RC1-RC2 / 5.GPages: 80, PDF Size: 16.28 MB
Page 4 of 80
| 1
VISUAL INDEX
INDEX
VOICE COMMAND
INDEX
CUSTOMER
INFORMATION
SPECIFICATIONS
MAINTENANCE
HANDLING THE UNEXPECTED
DRIVING
NAVIGATION
TABLE OF CONTENTS
VISUAL INDEX
SAFETY
INFORMATION
INSTRUMENT PANEL
VEHICLE
CONTROLS
AUDIO AND
CONNECTIVITY
BLUETOOTH®
HANDSFREELINK®
HONDALINK®
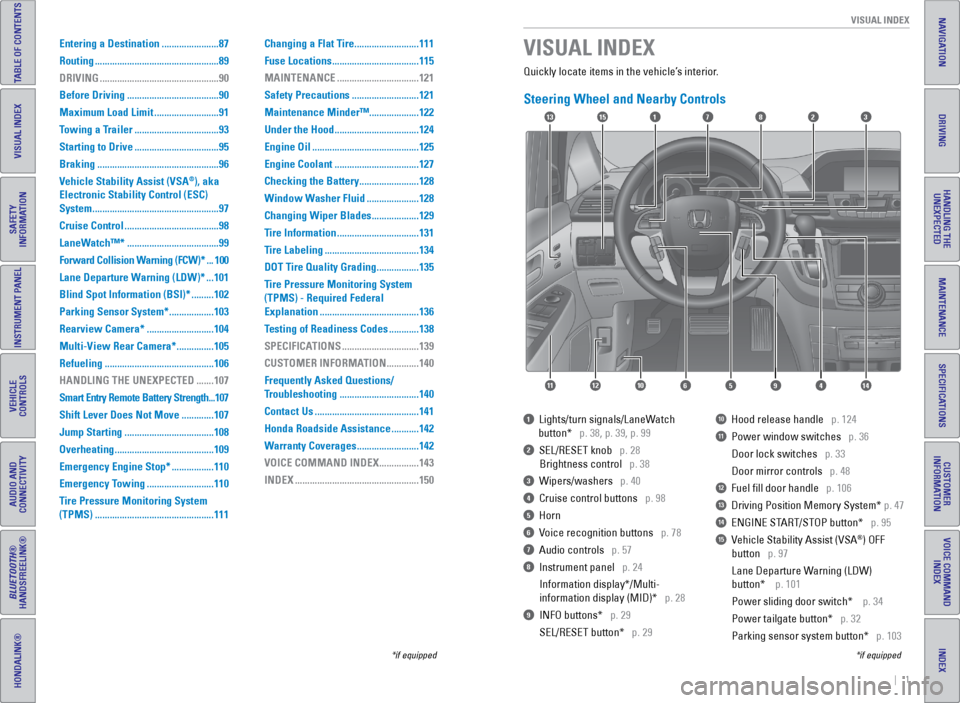
Quickly locate items in the vehicle’s interior.
Steering Wheel and Nearby Controls
1 Lights/turn signals/LaneWatch
button* p. 38, p. 39, p. 99
2 SEL/RESET knob p. 28
Brightness control p. 38
3 Wipers/washers p. 40
4 Cruise control buttons p. 98
5 Horn
6 Voice recognition buttons p. 78
7 Audio controls p. 57
8 Instrument panel p. 24
Information display*/Multi-
information display (MID)* p. 28
9 INFO buttons* p. 29
SEL/RESET button* p. 29
10 Hood release handle p. 124
11 Power window switches p. 36
Door lock switches p. 33
Door mirror controls p. 48
12 Fuel fill door handle p. 106
13 Driving Position Memory System* p. 47
14 ENGINE START/STOP button* p. 95
15 Vehicle Stability Assist (VSA®) OFF
button p. 97
Lane Departure Warning (LDW)
button* p. 101
Power sliding door switch* p. 34
Power tailgate button* p. 32
Parking sensor system button* p. 103
VISUAL INDEX
*if equipped
*if equipped
Entering a Destination ....................... 87
Routing .................................................. 89
DRIVING ................................................ 90
Before Driving ..................................... 90
Maximum Load Limit ..........................91
Towing a Trailer .................................. 93
Starting to Drive .................................. 95
Braking ................................................. 96
Vehicle Stability Assist (VSA
®), aka
Electronic Stability Control (ESC)
System ................................................... 97
Cruise Control ...................................... 98
LaneWatch™* ..................................... 99
Forward Collision Warning (FCW)* ... 100
Lane Departure Warning (LDW)* ... 101
Blind Spot Information (BSI)* ......... 102
Parking Sensor System* .................. 103
Rearview Camera* ...........................104
Multi-View Rear Camera* ............... 105
Refueling ............................................ 106
HANDLING THE UNEXPECTED ....... 107
Smart Entry Remote Battery Strength ... 107
Shift Lever Does Not Move ............. 107
Jump Starting .................................... 108
Overheating ........................................ 109
Emergency Engine Stop* ................. 110
Emergency Towing ...........................110
Tire Pressure Monitoring System
(TPMS) ................................................ 111Changing a Flat Tire
..........................111
Fuse Locations ................................... 115
MAINTENANCE ................................. 121
Safety Precautions ...........................121
Maintenance Minder™ ....................122
Under the Hood .................................. 124
Engine Oil ........................................... 125
Engine Coolant .................................. 127
Checking the Battery ........................ 128
Window Washer Fluid ..................... 128
Changing Wiper Blades ................... 129
Tire Information ................................. 131
Tire Labeling ...................................... 134
DOT Tire Quality Grading ................. 135
Tire Pressure Monitoring System
(TPMS) - Required Federal
Explanation ........................................ 136
Testing of Readiness Codes ............ 138
SPECIFICATIONS ...............................139
CUSTOMER INFORMATION ............. 140
Frequently Asked Questions/
Troubleshooting ................................ 140
Contact Us .......................................... 141
Honda Roadside Assistance ........... 142
Warranty Coverages .........................142
VOICE COMMAND INDEX ................ 143
INDEX .................................................. 150
17
4596111210
1513823
14
Page 16 of 80
24 || 25
INSTRUMENT P
ANEL
INSTRUMENT P ANEL
INDEX
VOICE COMMAND
INDEX
CUSTOMER
INFORMATION
SPECIFICATIONS
MAINTENANCE
HANDLING THE UNEXPECTED
DRIVING
NAVIGATION
TABLE OF CONTENTS
VISUAL INDEX
SAFETY
INFORMATION
INSTRUMENT PANEL
VEHICLE
CONTROLS
AUDIO AND
CONNECTIVITY
BLUETOOTH®
HANDSFREELINK®
HONDALINK®
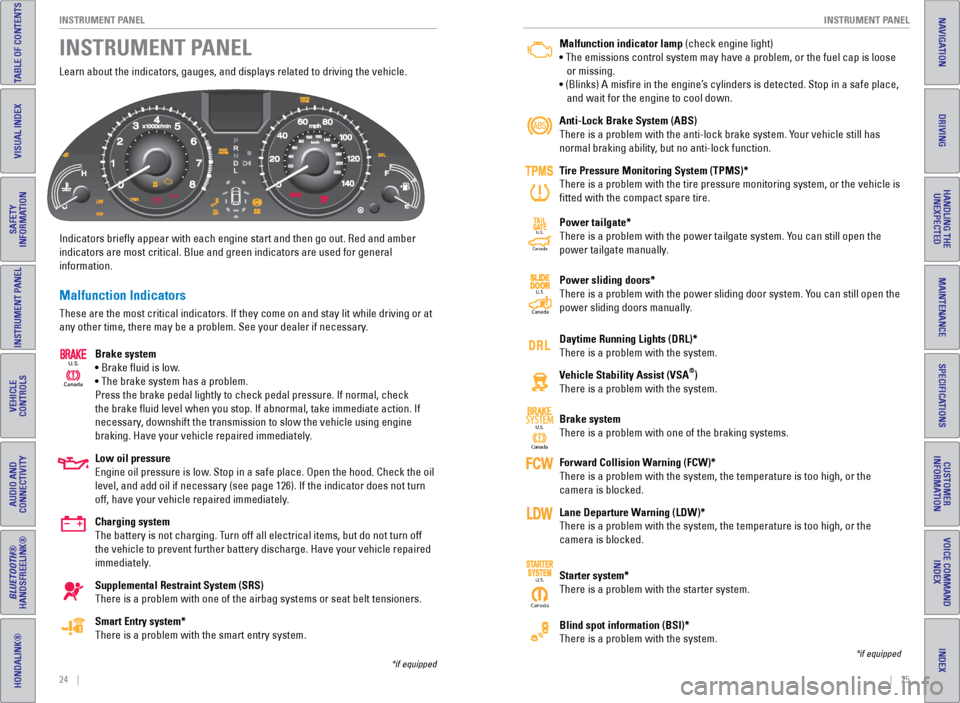
Learn about the indicators, gauges, and displays related to driving the \
vehicle.
Indicators briefly appear with each engine start and then go out. Red \
and amber
indicators are most critical. Blue and green indicators are used for gen\
eral
information.
Malfunction Indicators
These are the most critical indicators. If they come on and stay lit whi\
le driving or at
any other time, there may be a problem. See your dealer if necessary.
Brake system
• Brake fluid is low.
• The brake system has a problem.
Press the brake pedal lightly to check pedal pressure. If normal, check \
the brake fluid level when you stop. If abnormal, take immediate actio\
n. If
necessary, downshift the transmission to slow the vehicle using engine
braking. Have your vehicle repaired immediately.
Low oil pressure
Engine oil pressure is low. Stop in a safe place. Open the hood. Check the oil
level, and add oil if necessary (see page 126). If the indicator does \
not turn
off, have your vehicle repaired immediately.
Charging system
The battery is not charging. Turn off all electrical items, but do not turn off
the vehicle to prevent further battery discharge. Have your vehicle repa\
ired
immediately.
Supplemental Restraint System (SRS)
There is a problem with one of the airbag systems or seat belt tensioner\
s.
Smart Entry system*
There is a problem with the smart entry system.
INSTRUMENT PANEL
Canada
U.S.
*if equipped
Malfunction indicator lamp (check engine light)
• The emissions control system may have a problem, or the fuel cap is\
loose
or missing.
• (Blinks) A misfire in the engine’s cylinders is detected. Stop in a safe place,
and wait for the engine to cool down.
Anti-Lock Brake System (ABS)
There is a problem with the anti-lock brake system. Your vehicle still has
normal braking ability, but no anti-lock function.
Tire Pressure Monitoring System (TPMS)*
There is a problem with the tire pressure monitoring system, or the vehi\
cle is
fitted with the compact spare tire.
Power tailgate*
There is a problem with the power tailgate system. You can still open the
power tailgate manually.
Power sliding doors*
There is a problem with the power sliding door system. You can still open the
power sliding doors manually.
Daytime Running Lights (DRL)*
There is a problem with the system.
Vehicle Stability Assist (VSA
®)
There is a problem with the system.
Brake system
There is a problem with one of the braking systems.
Forward Collision Warning (FCW)*
There is a problem with the system, the temperature is too high, or the \
camera is blocked.
Lane Departure Warning (LDW)*
There is a problem with the system, the temperature is too high, or the \
camera is blocked.
Starter system*
There is a problem with the starter system.
Blind spot information (BSI)*
There is a problem with the system.
*if equipped
Ca nada
U.S.SYSTEM
CanadaU.S.
Canada
U.S.
CanadaU.S.
Page 17 of 80
26 || 27
INSTRUMENT P
ANEL
INSTRUMENT P ANEL
INDEX
VOICE COMMAND
INDEX
CUSTOMER
INFORMATION
SPECIFICATIONS
MAINTENANCE
HANDLING THE UNEXPECTED
DRIVING
NAVIGATION
TABLE OF CONTENTS
VISUAL INDEX
SAFETY
INFORMATION
INSTRUMENT PANEL
VEHICLE
CONTROLS
AUDIO AND
CONNECTIVITY
BLUETOOTH®
HANDSFREELINK®
HONDALINK®
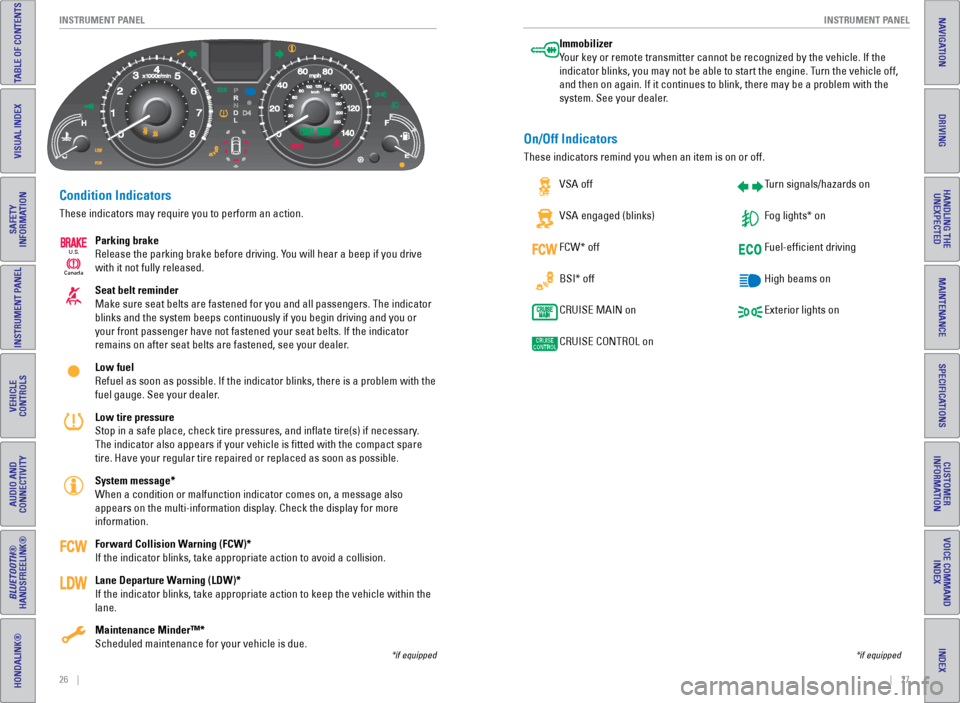
Condition Indicators
These indicators may require you to perform an action.
Parking brake
Release the parking brake before driving. You will hear a beep if you drive
with it not fully released.
Seat belt reminder
Make sure seat belts are fastened for you and all passengers. The indica\
tor
blinks and the system beeps continuously if you begin driving and you or\
your front passenger have not fastened your seat belts. If the indicator\
remains on after seat belts are fastened, see your dealer.
Low fuel
Refuel as soon as possible. If the indicator blinks, there is a problem \
with the
fuel gauge. See your dealer.
Low tire pressure
Stop in a safe place, check tire pressures, and inflate tire(s) if n\
ecessary.
The indicator also appears if your vehicle is fitted with the compact \
spare
tire. Have your regular tire repaired or replaced as soon as possible.
System message*
When a condition or malfunction indicator comes on, a message also
appears on the multi-information display. Check the display for more
information.
Forward Collision Warning (FCW)*
If the indicator blinks, take appropriate action to avoid a collision.
Lane Departure Warning (LDW)*
If the indicator blinks, take appropriate action to keep the vehicle wit\
hin the
lane.
Maintenance Minder™*
Scheduled maintenance for your vehicle is due.
*if equipped
Immobilizer
Your key or remote transmitter cannot be recognized by the vehicle. If th\
e
indicator blinks, you may not be able to start the engine. Turn the vehicle off,
and then on again. If it continues to blink, there may be a problem with\
the
system. See your dealer.
On/Off Indicators
These indicators remind you when an item is on or off. VSA off
VSA engaged (blinks)
FCW* off
BSI* off
CRUISE MAIN on
CRUISE CONTROL on Turn signals/hazards on
Fog lights* on
Fuel-efficient driving
High beams on
Exterior lights on
*if equipped
Ca
nada
U.S.
Page 49 of 80
90 || 91
DRIVING
DRIVING
INDEX
VOICE COMMAND
INDEX
CUSTOMER
INFORMATION
SPECIFICATIONS
MAINTENANCE
HANDLING THE UNEXPECTED
DRIVING
NAVIGATION
TABLE OF CONTENTS
VISUAL INDEX
SAFETY
INFORMATION
INSTRUMENT PANEL
VEHICLE
CONTROLS
AUDIO AND
CONNECTIVITY
BLUETOOTH®
HANDSFREELINK®
HONDALINK®
Learn about preparation for driving, as well as other features.
Before Driving
Check the following items before you begin driving.
Exterior Checks
• Make sure there are no obstructions on the windows, door mirrors, exterior
lights, or other parts of the vehicle.
• Remove any frost, snow, or ice.
• Make sure the hood is securely closed.
• Heat from the engine and exhaust can ignite flammable materials left u\
nder
the hood, causing a fire. If you’ve parked your vehicle for an exte\
nded period,
inspect and remove any debris that may have collected, such as dried grass
and leaves that have fallen or have been carried in for use as a nest by\
a small
animal. Also check under the hood for leftover flammable materials aft\
er you or
someone else has performed maintenance on your vehicle.
• Make sure the tires are in good condition.
• Make sure there are no people or objects behind or around the vehicle.
Interior Checks
• Store or secure all items on board properly.
• Do not pile items higher than the seat height.
• Do not place anything in the front seat footwells. Make sure to secure t\
he floor
mats.
• If you have any animals on board, do not let them move freely around in \
the
vehicle.
• Securely close and lock all doors and the tailgate.
• Adjust your seating position, mirrors, and steering wheel properly.
• Make sure items placed on the floor behind the front seats cannot roll\
under the
seats.
• Everyone in the vehicle must fasten their seat belt.
• Make sure that the indicators in the instrument panel come on when you s\
tart
the vehicle, and go off soon after.
DRIVING
If the doors are frozen shut, use warm water around the door edges to me\
lt any
ice. Do not try to force them open, as this can damage the rubber trim a\
round the
doors. When done, wipe dry to avoid further freezing.
NOTICE
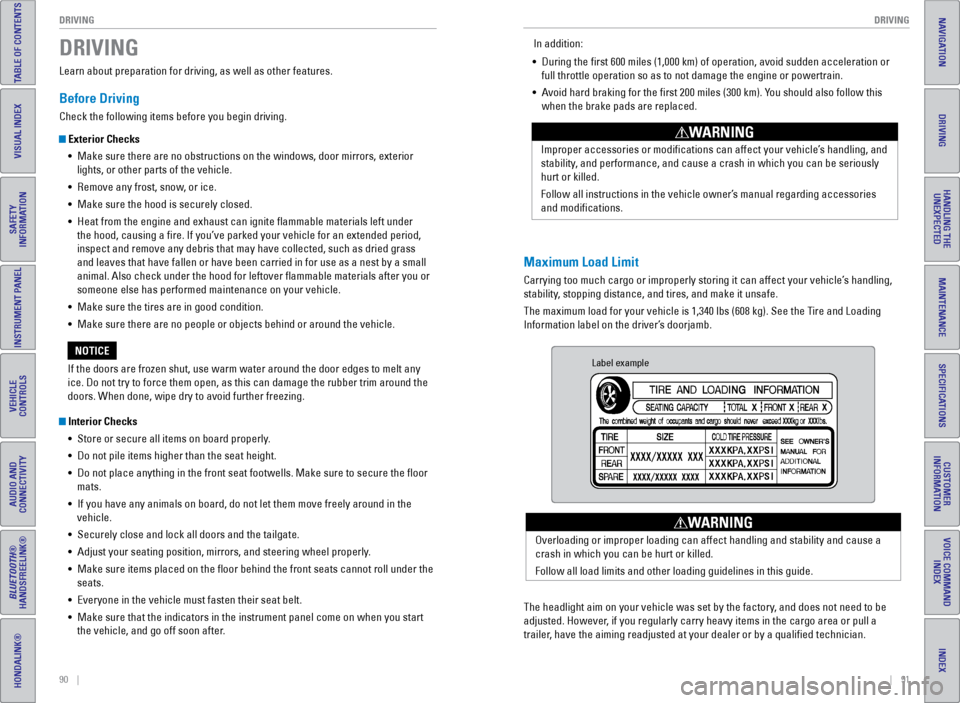
Maximum Load Limit
Carrying too much cargo or improperly storing it can affect your vehicle\
’s handling,
stability, stopping distance, and tires, and make it unsafe.
The maximum load for your vehicle is 1,340 lbs (608 kg). See the Tire and Loading
Information label on the driver’s doorjamb. Improper accessories or modifications can affect your vehicle’s handling, and
stability, and performance, and cause a crash in which you can be seriously
hurt or killed.
Follow all instructions in the vehicle owner’s manual regarding accessories
and modifications.
WARNING
In addition:
• During the first 600 miles (1,000 km) of operation, avoid sudden acc\
eleration or
full throttle operation so as to not damage the engine or powertrain.
• Avoid hard braking for the first 200 miles (300 km). You should also follow this
when the brake pads are replaced.
Label example
The headlight aim on your vehicle was set by the factory, and does not need to be
adjusted. However, if you regularly carry heavy items in the cargo area or pull a
trailer, have the aiming readjusted at your dealer or by a qualified technici\
an. Overloading or improper loading can affect handling and stability and ca\
use a
crash in which you can be hurt or killed.
Follow all load limits and other loading guidelines in this guide.
WARNING
Page 51 of 80
94 || 95
DRIVING
DRIVING
INDEX
VOICE COMMAND
INDEX
CUSTOMER
INFORMATION
SPECIFICATIONS
MAINTENANCE
HANDLING THE UNEXPECTED
DRIVING
NAVIGATION
TABLE OF CONTENTS
VISUAL INDEX
SAFETY
INFORMATION
INSTRUMENT PANEL
VEHICLE
CONTROLS
AUDIO AND
CONNECTIVITY
BLUETOOTH®
HANDSFREELINK®
HONDALINK®
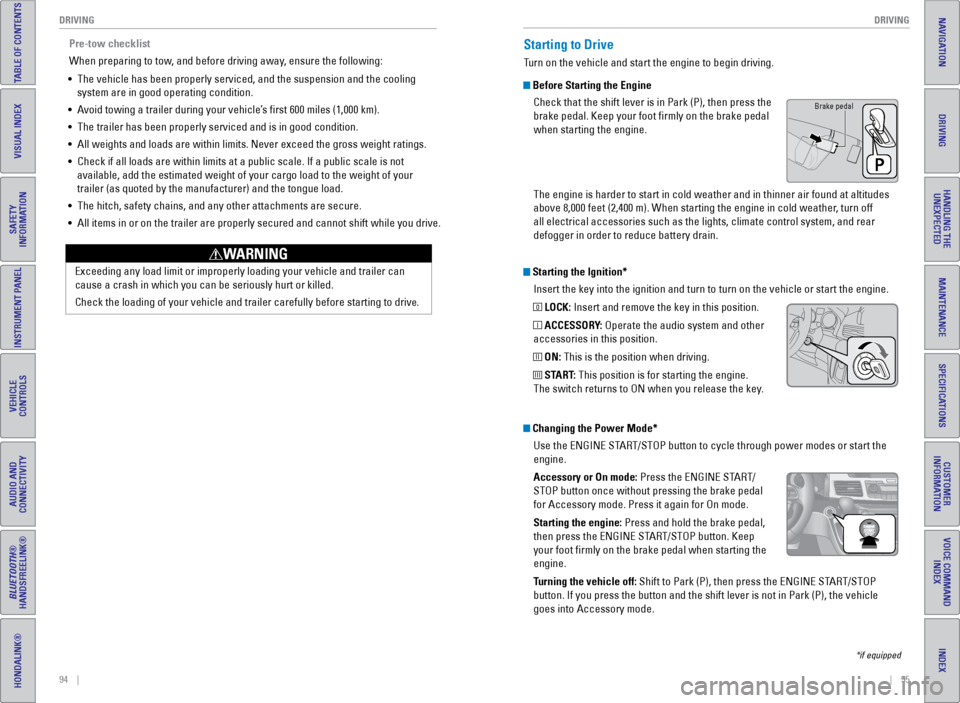
Starting the Ignition*
Insert the key into the ignition and turn to turn on the vehicle or star\
t the engine.
0 LOCK: Insert and remove the key in this position.
I ACCESSORY: Operate the audio system and other
accessories in this position.
II ON: This is the position when driving.
III START: This position is for starting the engine.
The switch returns to ON when you release the key.
Starting to Drive
Turn on the vehicle and start the engine to begin driving.
Before Starting the Engine
Check that the shift lever is in Park (P), then press the
brake pedal. Keep your foot firmly on the brake pedal
when starting the engine.
The engine is harder to start in cold weather and in thinner air found a\
t altitudes
above 8,000 feet (2,400 m). When starting the engine in cold weather, turn off
all electrical accessories such as the lights, climate control system, a\
nd rear
defogger in order to reduce battery drain.
*if equipped
Changing the Power Mode*Use the ENGINE START/STOP button to cycle through power modes or start the
engine.
Accessory or On mode: Press the ENGINE START/
STOP button once without pressing the brake pedal
for Accessory mode. Press it again for On mode.
Starting the engine: Press and hold the brake pedal,
then press the ENGINE START/STOP button. Keep
your foot firmly on the brake pedal when starting the
engine.
Turning the vehicle off: Shift to Park (P), then press the ENGINE START/STOP
button. If you press the button and the shift lever is not in Park (P)\
, the vehicle
goes into Accessory mode.
Brake pedal
Pre-tow checklist
When preparing to tow, and before driving away, ensure the following:
• The vehicle has been properly serviced, and the suspension and the cooli\
ng
system are in good operating condition.
• Avoid towing a trailer during your vehicle’s first 600 miles (1,000 km).
• The trailer has been properly serviced and is in good condition.
• All weights and loads are within limits. Never exceed the gross weight r\
atings.
• Check if all loads are within limits at a public scale. If a public scal\
e is not
available, add the estimated weight of your cargo load to the weight of \
your
trailer (as quoted by the manufacturer) and the tongue load.
• The hitch, safety chains, and any other attachments are secure.
• All items in or on the trailer are properly secured and cannot shift whi\
le you drive.
Exceeding any load limit or improperly loading your vehicle and trailer \
can
cause a crash in which you can be seriously hurt or killed.
Check the loading of your vehicle and trailer carefully before starting \
to driv
e.
WARNING
Page 58 of 80
108 || 109
HANDLING THE UNEXPECTED
HANDLING THE UNEXPECTED
INDEX
VOICE COMMAND
INDEX
CUSTOMER
INFORMATION
SPECIFICATIONS
MAINTENANCE
HANDLING THE UNEXPECTED
DRIVING
NAVIGATION
TABLE OF CONTENTS
VISUAL INDEX
SAFETY
INFORMATION
INSTRUMENT PANEL
VEHICLE
CONTROLS
AUDIO AND
CONNECTIVITY
BLUETOOTH®
HANDSFREELINK®
HONDALINK®
After the Engine Starts
Once your vehicle’s engine has started, remove the jumper cables in the following
order:
1. Disconnect the jumper cable from your engine hanger.
2. Disconnect the other end of the jumper cable from the assisting vehicle’\
s (-)
terminal.
3. Disconnect the jumper cable from your vehicle’s (+) terminal.
4. Disconnect the other end of the jumper cable from the assisting vehicle’\
s (+)
terminal.
5. Have your vehicle inspected by a nearby service station or a dealer.
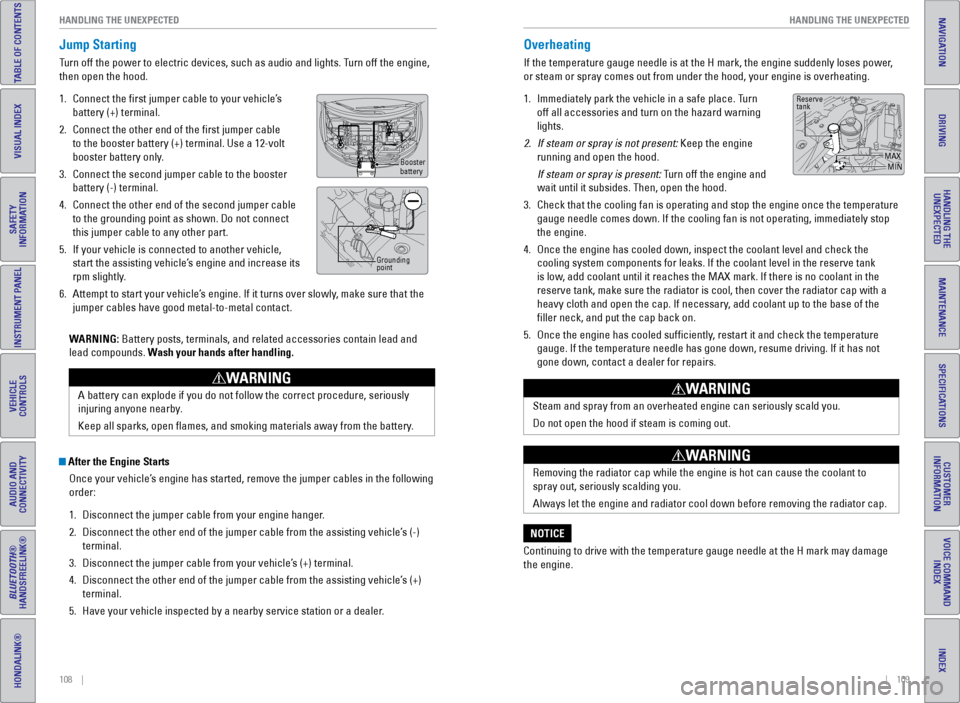
Overheating
If the temperature gauge needle is at the H mark, the engine suddenly lo\
ses power,
or steam or spray comes out from under the hood, your engine is overheat\
ing.
1. Immediately park the vehicle in a safe place. Turn
off all accessories and turn on the hazard warning
lights.
2. If steam or spray is not present: Keep the engine
running and open the hood.
If steam or spray is present: Turn off the engine and
wait until it subsides. Then, open the hood.
3. Check that the cooling fan is operating and stop the engine once the tem\
perature
gauge needle comes down. If the cooling fan is not operating, immediatel\
y stop
the engine.
4. Once the engine has cooled down, inspect the coolant level and check the\
cooling system components for leaks. If the coolant level in the reserve\
tank
is low, add coolant until it reaches the MAX mark. If there is no coolant in t\
he
reserve tank, make sure the radiator is cool, then cover the radiator ca\
p with a
heavy cloth and open the cap. If necessary, add coolant up to the base of the
filler neck, and put the cap back on.
5. Once the engine has cooled sufficiently, restart it and check the temperature
gauge. If the temperature needle has gone down, resume driving. If it ha\
s not
gone down, contact a dealer for repairs.
Steam and spray from an overheated engine can seriously scald you.
Do not open the hood if steam is coming out.
WARNING
Removing the radiator cap while the engine is hot can cause the coolant \
to
spray out, seriously scalding you.
Always let the engine and radiator cool down before removing the radiato\
r cap.
WARNING
Continuing to drive with the temperature gauge needle at the H mark may \
damage
the engine.
NOTICE
Reserve
tank
MAXMIN
Jump Starting
Turn off the power to electric devices, such as audio and lights. Turn off the engine,
then open the hood.
1. Connect the first jumper cable to your vehicle’s
battery (+) terminal.
2. Connect the other end of the first jumper cable
to the booster battery (+) terminal. Use a 12-volt
booster battery only.
3. Connect the second jumper cable to the booster
battery (-) terminal.
4. Connect the other end of the second jumper cable
to the grounding point as shown. Do not connect
this jumper cable to any other part.
5. If your vehicle is connected to another vehicle,
start the assisting vehicle’s engine and increase its
rpm slightly.
6. Attempt to start your vehicle’s engine. If it turns over slowly, make sure that the
jumper cables have good metal-to-metal contact.
WARNING: Battery posts, terminals, and related accessories contain lead and
lead compounds. Wash your hands after handling.
A battery can explode if you do not follow the correct procedure, seriou\
sly
injuring anyone nearby.
Keep all sparks, open flames, and smoking materials away from the batt\
ery.
WARNING
Booster
battery
Grounding
point
Page 59 of 80
110 || 111
HANDLING THE UNEXPECTED
HANDLING THE UNEXPECTED
INDEX
VOICE COMMAND
INDEX
CUSTOMER
INFORMATION
SPECIFICATIONS
MAINTENANCE
HANDLING THE UNEXPECTED
DRIVING
NAVIGATION
TABLE OF CONTENTS
VISUAL INDEX
SAFETY
INFORMATION
INSTRUMENT PANEL
VEHICLE
CONTROLS
AUDIO AND
CONNECTIVITY
BLUETOOTH®
HANDSFREELINK®
HONDALINK®
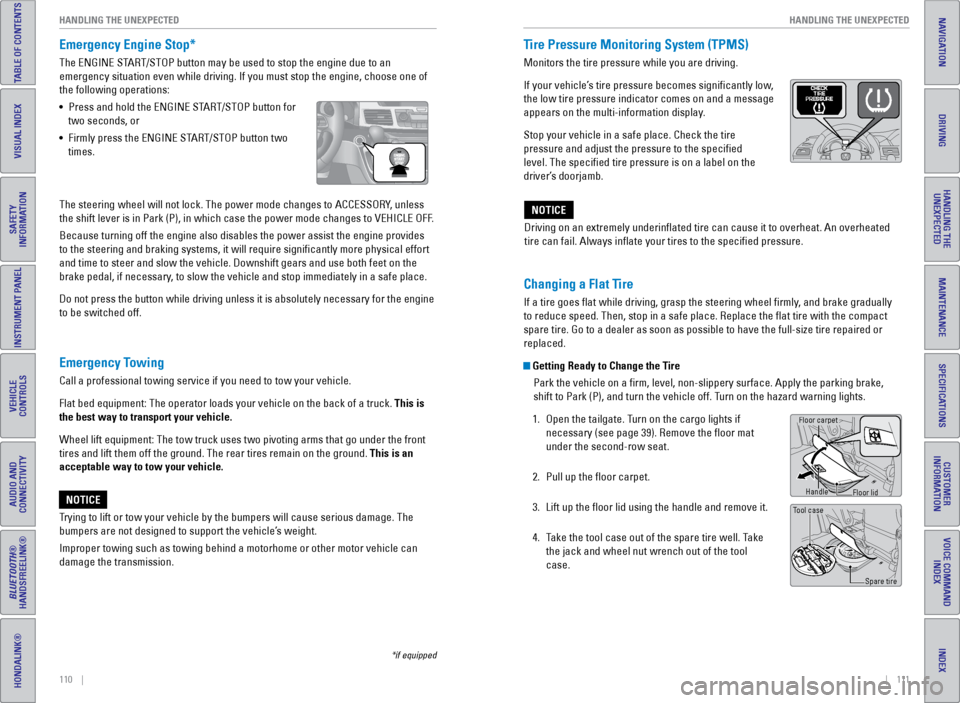
Emergency Engine Stop*
The ENGINE START/STOP button may be used to stop the engine due to an
emergency situation even while driving. If you must stop the engine, cho\
ose one of
the following operations:
• Press and hold the ENGINE START/STOP button for
two seconds, or
• Firmly press the ENGINE START/STOP button two
times.
Emergency Towing
Call a professional towing service if you need to tow your vehicle.
Flat bed equipment: The operator loads your vehicle on the back of a tru\
ck. This is
the best way to transport your vehicle.
Wheel lift equipment: The tow truck uses two pivoting arms that go under\
the front
tires and lift them off the ground. The rear tires remain on the ground.\
This is an
acceptable way to tow your vehicle.
Trying to lift or tow your vehicle by the bumpers will cause serious dama\
ge. The
bumpers are not designed to support the vehicle’s weight.
Improper towing such as towing behind a motorhome or other motor vehicle\
can
damage the transmission.
NOTICE
*if equipped
The steering wheel will not lock. The power mode changes to ACCESSORY, unless
the shift lever is in Park (P), in which case the power mode changes t\
o VEHICLE OFF.
Because turning off the engine also disables the power assist the engine\
provides
to the steering and braking systems, it will require significantly mor\
e physical effort
and time to steer and slow the vehicle. Downshift gears and use both fee\
t on the
brake pedal, if necessary, to slow the vehicle and stop immediately in a safe place.
Do not press the button while driving unless it is absolutely necessary \
for the engine
to be switched off. Driving on an extremely underinflated tire can cause it to overheat. A\
n overheated
tire can fail. Always inflate your tires to the specified pressure.NOTICE
Tire Pressure Monitoring System (TPMS)
Monitors the tire pressure while you are driving.
If your vehicle’s tire pressure becomes significantly low,
the low tire pressure indicator comes on and a message
appears on the multi-information display.
Stop your vehicle in a safe place. Check the tire
pressure and adjust the pressure to the specified
level. The specified tire pressure is on a label on the
driver’s doorjamb.
Changing a Flat Tire
If a tire goes flat while driving, grasp the steering wheel firmly, and brake gradually
to reduce speed. Then, stop in a safe place. Replace the flat tire wit\
h the compact
spare tire. Go to a dealer as soon as possible to have the full-size tir\
e repaired or
replaced.
Getting Ready to Change the Tire
Park the vehicle on a firm, level, non-slippery surface. Apply the par\
king brake,
shift to Park (P), and turn the vehicle off. Turn on the hazard warning lights.
1. Open the tailgate. Turn on the cargo lights if
necessary (see page 39). Remove the floor mat
under the second-row seat.
2. Pull up the floor carpet.
3. Lift up the floor lid using the handle and remove it.
4. Take the tool case out of the spare tire well. Take
the jack and wheel nut wrench out of the tool
case.
Tool case
Spare tire
Floor carpet
Handle
Floor lid
Page 64 of 80
120 || 121
MAINTENANCE
HANDLING THE UNEXPECTED
INDEX
VOICE COMMAND
INDEX
CUSTOMER
INFORMATION
SPECIFICATIONS
MAINTENANCE
HANDLING THE UNEXPECTED
DRIVING
NAVIGATION
TABLE OF CONTENTS
VISUAL INDEX
SAFETY
INFORMATION
INSTRUMENT PANEL
VEHICLE
CONTROLS
AUDIO AND
CONNECTIVITY
BLUETOOTH®
HANDSFREELINK®
HONDALINK®
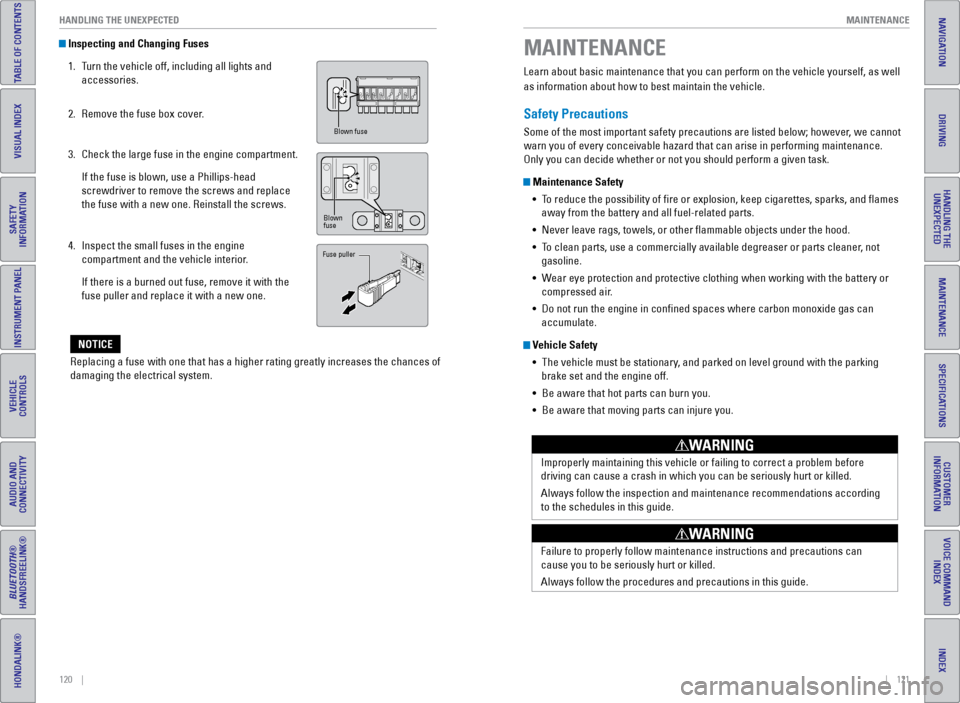
Inspecting and Changing Fuses
1. Turn the vehicle off, including all lights and
accessories.
2. Remove the fuse box cover.
3. Check the large fuse in the engine compartment.
If the fuse is blown, use a Phillips-head
screwdriver to remove the screws and replace
the fuse with a new one. Reinstall the screws.
4. Inspect the small fuses in the engine
compartment and the vehicle interior.
If there is a burned out fuse, remove it with the
fuse puller and replace it with a new one.
Replacing a fuse with one that has a higher rating greatly increases the\
chances of
damaging the electrical system.
NOTICE
Blown fuse
Blown
fuse
Fuse puller
Learn about basic maintenance that you can perform on the vehicle yourse\
lf, as well
as information about how to best maintain the vehicle.
Safety Precautions
Some of the most important safety precautions are listed below; however, we cannot
warn you of every conceivable hazard that can arise in performing mainte\
nance.
Only you can decide whether or not you should perform a given task.
Maintenance Safety • To reduce the possibility of fire or explosion, keep cigarettes, sparks\
, and flames
away from the battery and all fuel-related parts.
• Never leave rags, towels, or other flammable objects under the hood.
• To clean parts, use a commercially available degreaser or parts cleaner, not
gasoline.
• Wear eye protection and protective clothing when working with the battery\
or
compressed air.
• Do not run the engine in confined spaces where carbon monoxide gas can\
accumulate.
Vehicle Safety
• The vehicle must be stationary, and parked on level ground with the parking
brake set and the engine off.
• Be aware that hot parts can burn you.
• Be aware that moving parts can injure you.
Improperly maintaining this vehicle or failing to correct a problem befo\
re
driving can cause a crash in which you can be seriously hurt or killed. \
Always follow the inspection and maintenance recommendations according
to the schedules in this guide.
WARNING
Failure to properly follow maintenance instructions and precautions can \
cause you to be seriously hurt or killed.
Always follow the procedures and precautions in this guide.
WARNING
MAINTENANCE
Page 73 of 80
138 || 139
SPECIFICATIONS
MAINTENANCE
INDEX
VOICE COMMAND
INDEX
CUSTOMER
INFORMATION
SPECIFICATIONS
MAINTENANCE
HANDLING THE UNEXPECTED
DRIVING
NAVIGATION
TABLE OF CONTENTS
VISUAL INDEX
SAFETY
INFORMATION
INSTRUMENT PANEL
VEHICLE
CONTROLS
AUDIO AND
CONNECTIVITY
BLUETOOTH®
HANDSFREELINK®
HONDALINK®
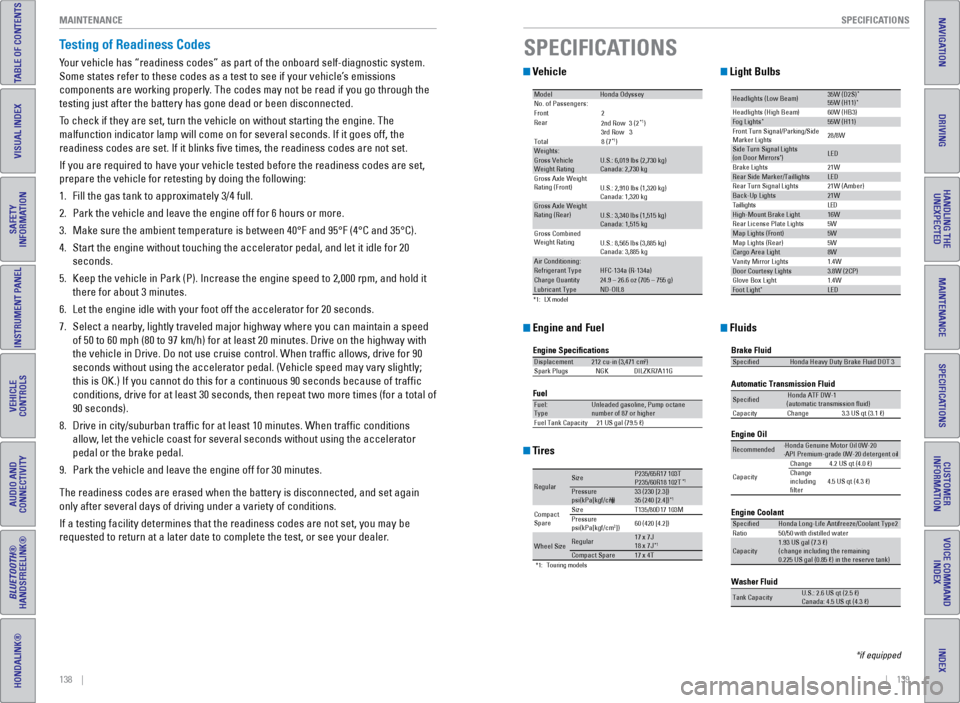
Testing of Readiness Codes
Your vehicle has “readiness codes” as part of the onboard self-diag\
nostic system.
Some states refer to these codes as a test to see if your vehicle’s emissions
components are working properly. The codes may not be read if you go through the
testing just after the battery has gone dead or been disconnected.
To check if they are set, turn the vehicle on without starting the engine\
. The
malfunction indicator lamp will come on for several seconds. If it goes \
off, the
readiness codes are set. If it blinks five times, the readiness codes \
are not set.
If you are required to have your vehicle tested before the readiness cod\
es are set,
prepare the vehicle for retesting by doing the following:
1. Fill the gas tank to approximately 3/4 full.
2. Park the vehicle and leave the engine off for 6 hours or more.
3. Make sure the ambient temperature is between 40°F and 95°F (4°\
C and 35°C).
4. Start the engine without touching the accelerator pedal, and let it idle\
for 20
seconds.
5. Keep the vehicle in Park (P). Increase the engine speed to 2,000 rpm, \
and hold it
there for about 3 minutes.
6. Let the engine idle with your foot off the accelerator for 20 seconds.
7. Select a nearby, lightly traveled major highway where you can maintain a speed
of 50 to 60 mph (80 to 97 km/h) for at least 20 minutes. Drive on the \
highway with
the vehicle in Drive. Do not use cruise control. When traffic allows, \
drive for 90
seconds without using the accelerator pedal. (Vehicle speed may vary slightly;
this is OK.) If you cannot do this for a continuous 90 seconds because \
of traffic
conditions, drive for at least 30 seconds, then repeat two more times (\
for a total of
90 seconds).
8. Drive in city/suburban traffic for at least 10 minutes. When traffic\
conditions
allow, let the vehicle coast for several seconds without using the accelerator
pedal or the brake pedal.
9. Park the vehicle and leave the engine off for 30 minutes.
The readiness codes are erased when the battery is disconnected, and set\
again
only after several days of driving under a variety of conditions.
If a testing facility determines that the readiness codes are not set, y\
ou may be
requested to return at a later date to complete the test, or see your de\
aler. Vehicle
Engine and Fuel
Tires
Light Bulbs
Fluids
*1 :L X mode l
Mode lHonda Odysse yNo. of Passengers:
Front2
Rear
*1)
3rd Ro w3
Tota l8 (7
*1)Weights:Gross Vehicle
Weight Rating U.S.: 6,019 lbs (2,730 kg)
Canada: 2,730 kg
Gross Axle Weight
Rating (Front )U.S.: 2,910 lbs (1,320 kg)
Canada: 1,320 kg
Gross Axle Weight
Rating (R ear)U.S.: 3,340 lbs (1,515 kg)
Canada: 1,515 kg
Gross Combined
Weight Ratin g
U.S.: 8,565 lbs (3,885 kg)
Canada: 3,885 kg
Air Conditioning:Refrigerant Type HFC-134a (R-134a)Charge Quantity24.9 – 26.6 oz (705 – 755 g)Lubricant TypeND-OIL8
2nd Ro w3 (2
Engine Speci�cation s
FuelDisplacement212 cu-in (3,471 cm3)
Spark Plug sN GKDILZKR7A11 G
Fuel:
TypeUnleaded gasoline, Pump octane
number of 87 or higher
Fuel Tank Capacit y21 US gal (79.5 �)
*1:T ouring models
Regula rSizeP235/65R17 103TP235/60R18 102T*1Pressure
psi(kPa[kgf/cm2])33 (23 0 [2.3])
35 (24 0 [2.4])*1
Compact
Spar e Size
T135/80D17 103M
Pressure
ps i(kPa[kgf/cm2]) 60 (42
0 [4.2])
Wheel Siz eRegular17 x 7J
18 x 7J*1Compact Spar e17 x 4T
Headlights (Low Beam )35W (D2S)*55W (H11)
60W (HB3)
21W
5W 21W (Amber)*Head lights (High Beam )Fog Lights*55W (H11)
Front Turn Signal/Park ing/Side
Marker Lights 28/8W
Si
de Turn Si gnal Lights
(on Door Mirrors ) *LED
Brake Lights
Rear Side Marker/Taillight sLED
Rear Turn Signal Lights
Back-Up Lights21W D
E
L
s
t
h
g
i
l
l
i
a
T
High-Mount Brake Ligh t16W
Rear License Plate Lights
Map Lights (F ront)5W
5W
1.4W
1.4W
Map Lights (Rear)
Cargo Area Ligh
t8W
Vanity Mirror Lights
Door Courtesy Lights3.8W (2CP )
Glove Box Li ght
Foot Ligh t*LED
Brake Fluid
Automatic Transmission Flui
d
Speci�e dHonda Heavy Duty Brake Fluid DOT 3
Speci�edHonda ATF DW- 1
(automatic transmission �uid )
Ca pacit yC hange3 .3 US qt (3.1�)
Engine Oil
Engine Coolant
Recommended·Honda Genuine Motor Oil 0W-2 0
·API Premium-grade 0W-20 detergent oi l
Capacity Change
4.2 US qt (4.0 �)
Change
including
�lter 4.5 US qt (4.3 �)
Speci�edHonda Long-Life Anti
freeze/Coolant Type2
Ratio 50/50 with distilled wate r
Capacity1.93 US gal (7.3 �)
(change in cluding the remaining
0.225 US gal (0.85 �) in the reserve tank)
Washer Fluid
Tank CapacityU.S.: 2.6 US qt (2.5 �)
Ca nada: 4.5 US qt (4.3 �)
SPECIFICATIONS
*if equipped
Page 74 of 80
140 || 141
CUSTOMER INFORMATION
CUSTOMER INFORMATION
INDEX
VOICE COMMAND
INDEX
CUSTOMER
INFORMATION
SPECIFICATIONS
MAINTENANCE
HANDLING THE UNEXPECTED
DRIVING
NAVIGATION
TABLE OF CONTENTS
VISUAL INDEX
SAFETY
INFORMATION
INSTRUMENT PANEL
VEHICLE
CONTROLS
AUDIO AND
CONNECTIVITY
BLUETOOTH®
HANDSFREELINK®
HONDALINK®
Learn about information specific to you as a Honda customer and how to\
get help.
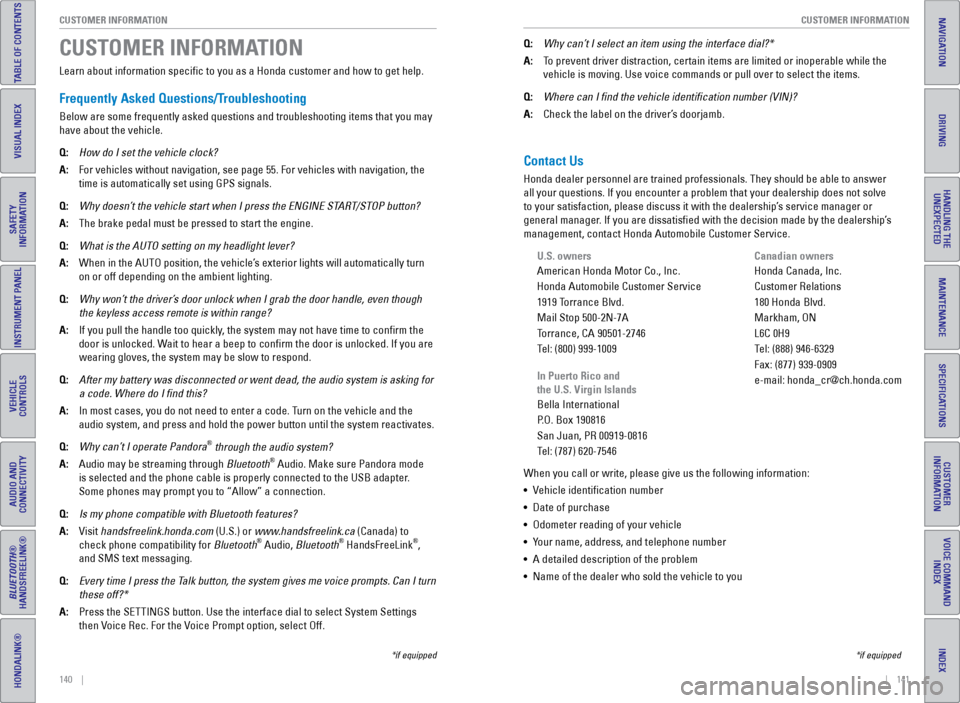
Frequently Asked Questions/Troubleshooting
Below are some frequently asked questions and troubleshooting items that\
you may
have about the vehicle.
Q: How do I set the vehicle clock?
A: For vehicles without navigation, see page 55. For vehicles with navigati\
on, the
time is automatically set using GPS signals.
Q: Why doesn’t the vehicle start when I press the ENGINE START/STOP button?
A: The brake pedal must be pressed to start the engine.
Q: What is the AUTO setting on my headlight lever?
A: When in the AUTO position, the vehicle’s exterior lights will automatically turn
on or off depending on the ambient lighting.
Q: Why won’t the driver’s door unlock when I grab the door handle, even though
the keyless access remote is within range?
A: If you pull the handle too quickly, the system may not have time to confirm the
door is unlocked. Wait to hear a beep to confirm the door is unlocked. If you are
wearing gloves, the system may be slow to respond.
Q: After my battery was disconnected or went dead, the audio system is aski\
ng for
a code. Where do I find this?
A: In most cases, you do not need to enter a code. Turn on the vehicle and the
audio system, and press and hold the power button until the system react\
ivates.
Q: Why can’t I operate Pandora
® through the audio system?
A: Audio may be streaming through Bluetooth® Audio. Make sure Pandora mode
is selected and the phone cable is properly connected to the USB adapter\
.
Some phones may prompt you to “Allow” a connection.
Q: Is my phone compatible with Bluetooth features?
A: Visit handsfreelink.honda.com (U.S.) or www.handsfreelink.ca (Canada) to
check phone compatibility for Bluetooth
® Audio, Bluetooth® HandsFreeLink®,
and SMS text messaging.
Q: Every time I press the Talk button, the system gives me voice prompts. Can I turn
these off?*
A: Press the SETTINGS button. Use the interface dial to select System Setti\
ngs
then Voice Rec. For the Voice Prompt option, select Off.
CUSTOMER INFORMATION
*if equipped
Contact Us
Honda dealer personnel are trained professionals. They should be able to\
answer
all your questions. If you encounter a problem that your dealership does\
not solve
to your satisfaction, please discuss it with the dealership’s service manager or
general manager. If you are dissatisfied with the decision made by the dealership’\
s
management, contact Honda Automobile Customer Service.
U.S. owners
American Honda Motor Co., Inc.
Honda Automobile Customer Service
1919 Torrance Blvd.
Mail Stop 500-2N-7A
Torrance, CA 90501-2746
Tel: (800) 999-1009
In Puerto Rico and
the U.S. Virgin Islands
Bella International
P.O. Box 190816
San Juan, PR 00919-0816
Tel: (787) 620-7546
When you call or write, please give us the following information:
• Vehicle identification number
• Date of purchase
• Odometer reading of your vehicle
• Your name, address, and telephone number
• A detailed description of the problem
• Name of the dealer who sold the vehicle to you Canadian owners
Honda Canada, Inc.
Customer Relations
180 Honda Blvd.
Markham, ON
L6C 0H9
Tel: (888) 946-6329
Fax: (877) 939-0909
e-mail: [email protected]
Q:
Why can’t I select an item using the interface dial?*
A: To prevent driver distraction, certain items are limited or inoperable wh\
ile the
vehicle is moving. Use voice commands or pull over to select the items.
Q: Where can I find the vehicle identification number (VIN)?
A: Check the label on the driver’s doorjamb.
*if equipped