clock reset HONDA ODYSSEY 2016 RC1-RC2 / 5.G Quick Guide
[x] Cancel search | Manufacturer: HONDA, Model Year: 2016, Model line: ODYSSEY, Model: HONDA ODYSSEY 2016 RC1-RC2 / 5.GPages: 80, PDF Size: 16.28 MB
Page 32 of 80
56 || 57
AUDIO AND CONNECTIVITY
AUDIO AND CONNECTIVITY
INDEX
VOICE COMMAND
INDEX
CUSTOMER
INFORMATION
SPECIFICATIONS
MAINTENANCE
HANDLING THE UNEXPECTED
DRIVING
NAVIGATION
TABLE OF CONTENTS
VISUAL INDEX
SAFETY
INFORMATION
INSTRUMENT PANEL
VEHICLE
CONTROLS
AUDIO AND
CONNECTIVITY
BLUETOOTH®
HANDSFREELINK®
HONDALINK®
Basic Audio Operation
Connect audio devices and operate buttons and displays for the audio sys\
tem.
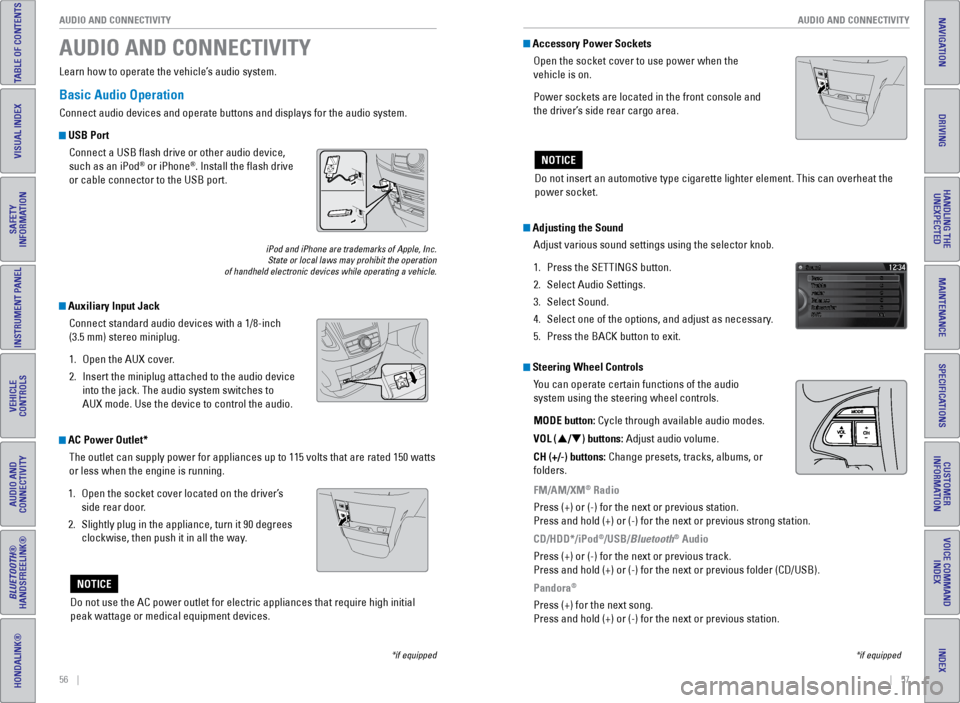
USB Port
Connect a USB flash drive or other audio device,
such as an iPod
® or iPhone®. Install the flash drive
or cable connector to the USB port.
Auxiliary Input Jack
Connect standard audio devices with a 1/8-inch
(3.5 mm) stereo miniplug.
1. Open the AUX cover.
2. Insert the miniplug attached to the audio device
into the jack. The audio system switches to
AUX mode. Use the device to control the audio.
iPod and iPhone are trademarks of Apple, Inc.
State or local laws may prohibit the operation
of handheld electronic devices while operating a vehicle.
AUDIO AND CONNECTIVITY
Learn how to operate the vehicle’s audio system.
Adjusting the Sound
Adjust various sound settings using the selector knob.
1. Press the SETTINGS button.
2. Select Audio Settings.
3. Select Sound.
4. Select one of the options, and adjust as necessary.
5. Press the BACK button to exit.
Steering Wheel Controls
You can operate certain functions of the audio
system using the steering wheel controls.
MODE button: Cycle through available audio modes.
VOL (p/q) buttons: Adjust audio volume.
CH (+/-) buttons: Change presets, tracks, albums, or
folders.
FM/AM/XM
® Radio
Press (+) or (-) for the next or previous station.
Press and hold (+) or (-) for the next or previous strong station.
CD/HDD*/iPod
®/USB/Bluetooth® Audio
Press (+) or (-) for the next or previous track.
Press and hold (+) or (-) for the next or previous folder (CD/USB)\
.
Pandora
®
Press (+) for the next song.
Press and hold (+) or (-) for the next or previous station.
*if equipped
Accessory Power Sockets Open the socket cover to use power when the
vehicle is on.
Power sockets are located in the front console and
the driver’s side rear cargo area.
Do not insert an automotive type cigarette lighter element. This can ove\
rheat the
power socket.
NOTICE
AC Power Outlet*The outlet can supply power for appliances up to 115 volts that are rate\
d 150 watts
or less when the engine is running.
1. Open the socket cover located on the driver’s
side rear door.
2. Slightly plug in the appliance, turn it 90 degrees
clockwise, then push it in all the way.
Do not use the AC power outlet for electric appliances that require high\
initial
peak wattage or medical equipment devices.
NOTICE
*if equipped
Page 33 of 80
58 || 59
AUDIO AND CONNECTIVITY
AUDIO AND CONNECTIVITY
INDEX
VOICE COMMAND
INDEX
CUSTOMER
INFORMATION
SPECIFICATIONS
MAINTENANCE
HANDLING THE UNEXPECTED
DRIVING
NAVIGATION
TABLE OF CONTENTS
VISUAL INDEX
SAFETY
INFORMATION
INSTRUMENT PANEL
VEHICLE
CONTROLS
AUDIO AND
CONNECTIVITY
BLUETOOTH®
HANDSFREELINK®
HONDALINK®
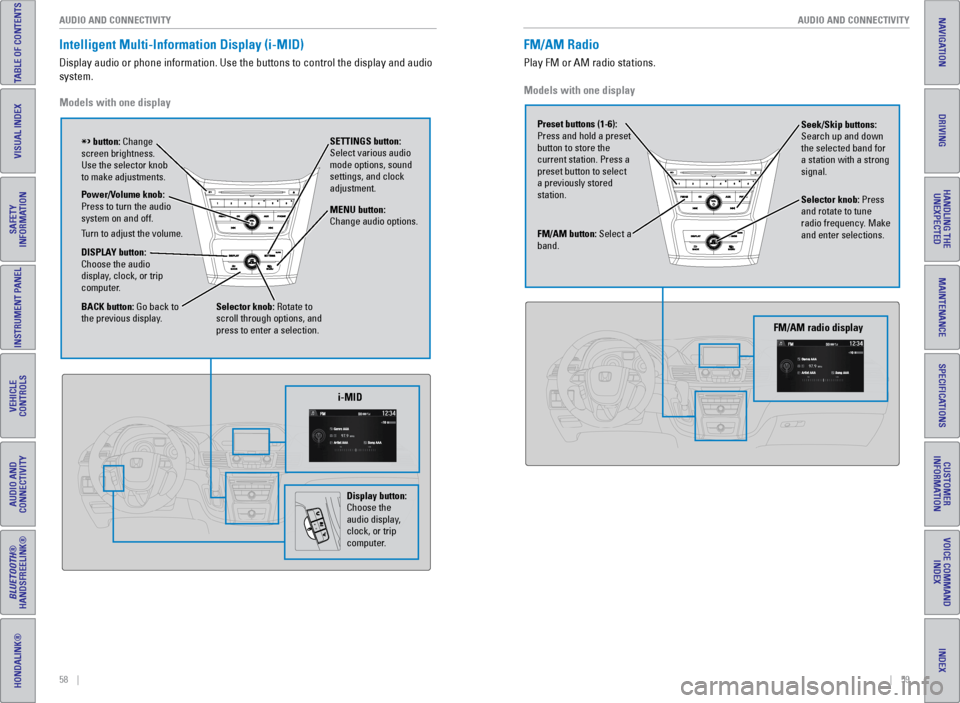
Intelligent Multi-Information Display (i-MID)
Display audio or phone information. Use the buttons to control the displ\
ay and audio
system.
Models with one display
Selector knob: Rotate to
scroll through options, and
press to enter a selection. MENU button:
Change audio options.
DISPLAY button:
Choose the audio
display, clock, or trip
computer. Power/Volume knob:
Press to turn the audio
system on and off.
Turn to adjust the volume. SETTINGS button:
Select various audio
mode options, sound
settings, and clock
adjustment.
BACK button: Go back to
the previous display.
button: Change
screen brightness.
Use the selector knob
to make adjustments.
i-MID
Display button:
Choose the
audio display,
clock, or trip
computer.
Models with one display
FM/AM Radio
Play FM or AM radio stations.
FM/AM button: Select a
band. Preset buttons (1-6):
Press and hold a preset
button to store the
current station. Press a
preset button to select
a previously stored
station. Seek/Skip buttons:
Search up and down
the selected band for
a station with a strong
signal.
Selector knob: Press
and rotate to tune
radio frequency. Make
and enter selections.
FM/AM radio display
Page 36 of 80
64 || 65
AUDIO AND CONNECTIVITY
AUDIO AND CONNECTIVITY
INDEX
VOICE COMMAND
INDEX
CUSTOMER
INFORMATION
SPECIFICATIONS
MAINTENANCE
HANDLING THE UNEXPECTED
DRIVING
NAVIGATION
TABLE OF CONTENTS
VISUAL INDEX
SAFETY
INFORMATION
INSTRUMENT PANEL
VEHICLE
CONTROLS
AUDIO AND
CONNECTIVITY
BLUETOOTH®
HANDSFREELINK®
HONDALINK®
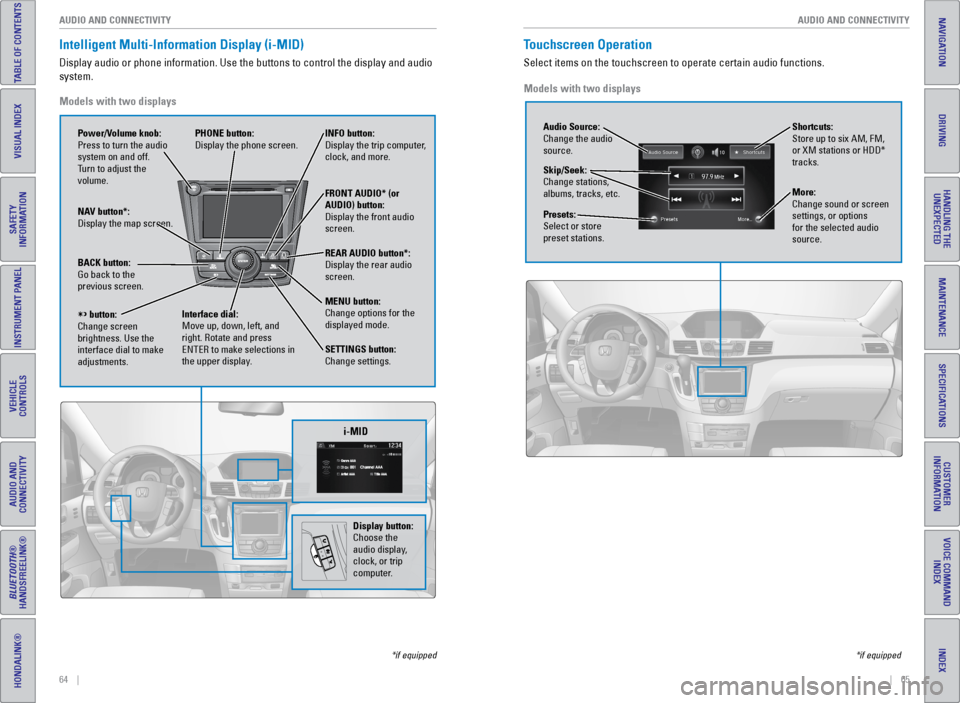
Intelligent Multi-Information Display (i-MID)
Display audio or phone information. Use the buttons to control the displ\
ay and audio
system.
*if equipped
Models with two displays
REAR
AUDIO
FRONT
AUDIO
NAV
i-MID
Power/Volume knob:
Press to turn the audio
system on and off.
Turn to adjust the
volume. INFO button:
Display the trip computer,
clock, and more.
FRONT AUDIO* (or
AUDIO) button:
Display the front audio
screen.
REAR AUDIO button*:
Display the rear audio
screen.
MENU button:
Change options for the
displayed mode.
SETTINGS button:
Change settings.
PHONE button:
Display the phone screen.
NAV button*:
Display the map screen.
BACK button:
Go back to the
previous screen.
button:
Change screen
brightness. Use the
interface dial to make
adjustments. Interface dial:
Move up, down, left, and
right. Rotate and press
ENTER to make selections in
the upper display.
Display button:
Choose the
audio display,
clock, or trip
computer.
Touchscreen Operation
Select items on the touchscreen to operate certain audio functions.
*if equipped
Models with two displays
Audio Source:
Change the audio
source.
Shortcuts:
Store up to six AM, FM,
or XM stations or HDD*
tracks.
More:
Change sound or screen
settings, or options
for the selected audio
source.
Skip/Seek:
Change stations,
albums, tracks, etc.
Presets:
Select or store
preset stations.
Page 67 of 80
126 || 127
MAINTENANCE
MAINTENANCE
INDEX
VOICE COMMAND
INDEX
CUSTOMER
INFORMATION
SPECIFICATIONS
MAINTENANCE
HANDLING THE UNEXPECTED
DRIVING
NAVIGATION
TABLE OF CONTENTS
VISUAL INDEX
SAFETY
INFORMATION
INSTRUMENT PANEL
VEHICLE
CONTROLS
AUDIO AND
CONNECTIVITY
BLUETOOTH®
HANDSFREELINK®
HONDALINK®
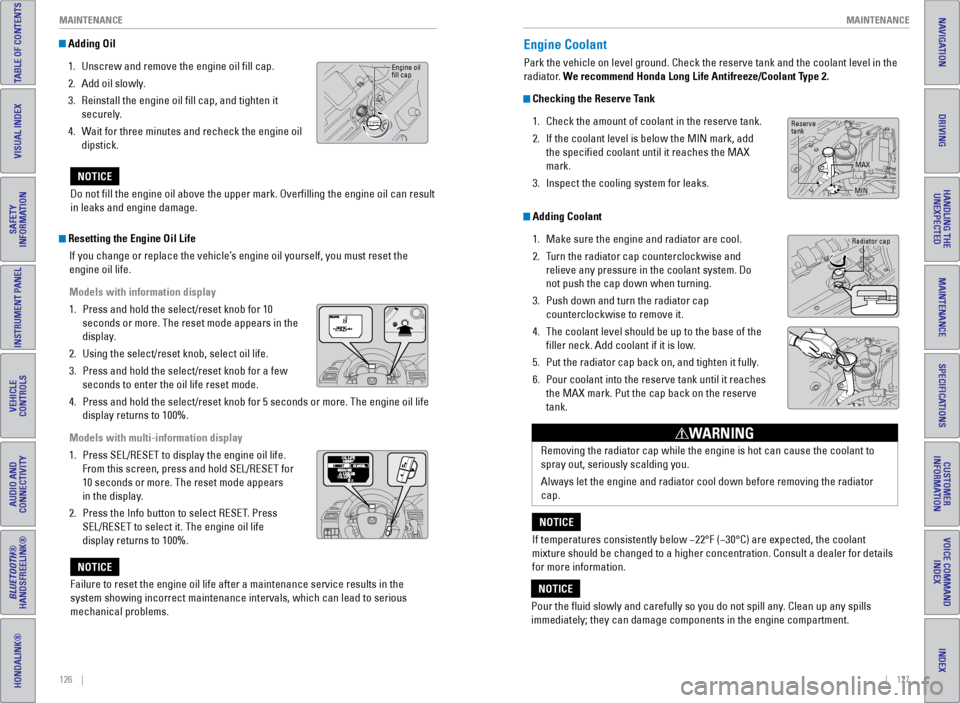
Adding Oil
1. Unscrew and remove the engine oil fill cap.
2. Add oil slowly.
3. Reinstall the engine oil fill cap, and tighten it
securely.
4. Wait for three minutes and recheck the engine oil
dipstick.
Do not fill the engine oil above the upper mark. Overfilling the eng\
ine oil can result
in leaks and engine damage.
NOTICE
Engine oil
fill cap
Resetting the Engine Oil Life If you change or replace the vehicle’s engine oil yourself, you must reset the
engine oil life.
Models with information display
1. Press and hold the select/reset knob for 10
seconds or more. The reset mode appears in the
display.
2. Using the select/reset knob, select oil life.
3. Press and hold the select/reset knob for a few
seconds to enter the oil life reset mode.
4. Press and hold the select/reset knob for 5 seconds or more. The engine o\
il life
display returns to 100%.
Models with multi-information display
1. Press SEL/RESET to display the engine oil life.
From this screen, press and hold SEL/RESET for
10 seconds or more. The reset mode appears
in the display.
2. Press the Info button to select RESET. Press
SEL/RESET to select it. The engine oil life
display returns to 100%.
Failure to reset the engine oil life after a maintenance service results\
in the
system showing incorrect maintenance intervals, which can lead to seriou\
s
mechanical problems.
NOTICE
Engine Coolant
Park the vehicle on level ground. Check the reserve tank and the coolant\
level in the
radiator. We recommend Honda Long Life Antifreeze/Coolant Type 2.
Checking the Reserve Tank 1. Check the amount of coolant in the reserve tank.
2. If the coolant level is below the MIN mark, add
the specified coolant until it reaches the MAX
mark.
3. Inspect the cooling system for leaks.
Adding Coolant
1. Make sure the engine and radiator are cool.
2. Turn the radiator cap counterclockwise and
relieve any pressure in the coolant system. Do
not push the cap down when turning.
3. Push down and turn the radiator cap
counterclockwise to remove it.
4. The coolant level should be up to the base of the
filler neck. Add coolant if it is low.
5. Put the radiator cap back on, and tighten it fully.
6. Pour coolant into the reserve tank until it reaches
the MAX mark. Put the cap back on the reserve
tank.
Removing the radiator cap while the engine is hot can cause the coolant \
to
spray out, seriously scalding you.
Always let the engine and radiator cool down before removing the radiato\
r
cap.
WARNING
If temperatures consistently below −22°F (−30°C) are expec\
ted, the coolant
mixture should be changed to a higher concentration. Consult a dealer fo\
r details
for more information.
NOTICE
Pour the fluid slowly and carefully so you do not spill any. Clean up any spills
immediately; they can damage components in the engine compartment.
NOTICE
Radiator cap
Reserve
tank MAX
MIN
Page 80 of 80
152 || 153
INDEX
INDEX
INDEX
VOICE COMMAND
INDEX
CUSTOMER
INFORMATION
SPECIFICATIONS
MAINTENANCE
HANDLING THE UNEXPECTED
DRIVING
NAVIGATION
TABLE OF CONTENTS
VISUAL INDEX
SAFETY
INFORMATION
INSTRUMENT PANEL
VEHICLE
CONTROLS
AUDIO AND
CONNECTIVITY
BLUETOOTH®
HANDSFREELINK®
HONDALINK®
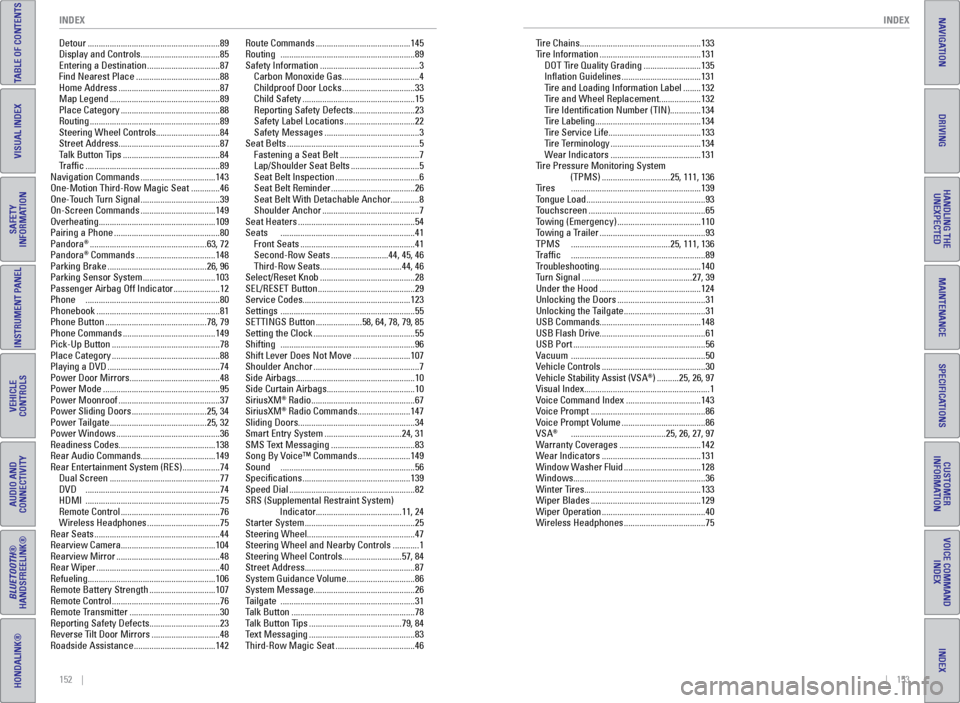
Detour ............................................................ 89
Display and Controls ....................................85
Entering a Destination .................................87
Find Nearest Place ...................................... 88
Home Address .............................................. 87
Map Legend .................................................. 89
Place Category ............................................. 88
Routing ........................................................... 89
Steering Wheel Controls ............................. 84
Street Address .............................................. 87
Talk Button Tips ............................................ 84
Traffic ............................................................. 89
Navigation Commands ..................................143
One-Motion Third-Row Magic Seat ............. 46
One-Touch Turn Signal ....................................39
On-Screen Commands ..................................149
Overheating ..................................................... 109
Pairing a Phone ................................................ 80
Pandora
® ..................................................... 63, 72
Pandora® Commands .................................... 148
Parking Brake ............................................. 26, 96
Parking Sensor System .................................103
Passenger Airbag Off Indicator ..................... 12
Phone ............................................................. 80
Phonebook ........................................................ 81
Phone Button .............................................. 78, 79
Phone Commands .......................................... 149
Pick-Up Button ................................................. 78
Place Category ................................................. 88
Playing a DVD ................................................... 74
Power Door Mirrors ......................................... 48
Power Mode ..................................................... 95
Power Moonroof .............................................. 37
Power Sliding Doors ..................................25, 34
Power Tailgate ............................................ 25, 32
Power Windows ............................................... 36
Readiness Codes ............................................ 138
Rear Audio Commands ..................................149
Rear Entertainment System (RES) ................. 74
Dual Screen .................................................. 77
DVD ............................................................. 74
HDMI ............................................................. 75
Remote Control ............................................. 76
Wireless Headphones .................................75
Rear Seats ......................................................... 44
Rearview Camera ........................................... 104
Rearview Mirror ............................................... 48
Rear Wiper ........................................................ 40
Refueling .......................................................... 106
Remote Battery Strength .............................. 107
Remote Control ................................................. 76
Remote Transmitter ......................................... 30
Reporting Safety Defects ................................23
Reverse Tilt Door Mirrors ...............................48
Roadside Assistance .....................................142Route Commands ...........................................
145
Routing ............................................................. 89
Safety Information ............................................. 3
Carbon Monoxide Gas ...................................4
Childproof Door Locks .................................33
Child Safety ................................................... 15
Reporting Safety Defects ............................ 23
Safety Label Locations ................................22
Safety Messages ........................................... 3
Seat Belts ............................................................ 5
Fastening a Seat Belt ....................................7
Lap/Shoulder Seat Belts ............................... 5
Seat Belt Inspection ...................................... 6
Seat Belt Reminder ...................................... 26
Seat Belt With Detachable Anchor .............8
Shoulder Anchor ............................................ 7
Seat Heaters ..................................................... 54
Seats ............................................................. 41
Front Seats .................................................... 41
Second-Row Seats ..........................44, 45, 46
Third-Row Seats ..................................... 44, 46
Select/Reset Knob ........................................... 28
SEL/RESET Button ............................................ 29
Service Codes ................................................. 123
Settings ............................................................. 55
SETTINGS Button .....................58, 64, 78, 79, 85
Setting the Clock .............................................. 55
Shifting ............................................................. 96
Shift Lever Does Not Move .......................... 107
Shoulder Anchor ................................................ 7
Side Airbags ...................................................... 10
Side Curtain Airbags ........................................ 10
SiriusXM
® Radio ............................................... 67
SiriusXM® Radio Commands ........................ 147
Sliding Doors ..................................................... 34
Smart Entry System ................................... 24, 31
SMS Text Messaging ......................................83
Song By Voice™ Commands ........................ 149
Sound ............................................................. 56
Specifications ................................................. 139
Speed Dial ......................................................... 82
SRS (Supplemental Restraint System) Indicator ....................................... 11, 24
Starter System .................................................. 25
Steering Wheel ................................................. 47
Steering Wheel and Nearby Controls ............ 1
Steering Wheel Controls ...........................57, 84
Street Address .................................................. 87
System Guidance Volume ............................... 86
System Message .............................................. 26
Tailgate ............................................................. 31
Talk Button ........................................................ 78
Talk Button Tips .......................................... 79, 84
Text Messaging ................................................ 83
Third-Row Magic Seat ....................................46 Tire Chains .......................................................
133
Tire Information .............................................. 131
DOT Tire Quality Grading .......................... 135
Inflation Guidelines .................................... 131
Tire and Loading Information Label ........ 132
Tire and Wheel Replacement ................... 132
Tire Identification Number (TIN) .............. 134
Tire Labeling ................................................ 134
Tire Service Life .......................................... 133
Tire Terminology ......................................... 134
Wear Indicators ......................................... 131
Tire Pressure Monitoring System (TPMS) ............................... 25, 111, 136
Tires ........................................................... 139
Tongue Load ...................................................... 93
Touchscreen ..................................................... 65
Towing (Emergency) ...................................... 110
Towing a Trailer ................................................ 93
TPMS ............................................. 25, 111, 136
Traffic ............................................................. 89
Troubleshooting .............................................. 140
Turn Signal ..................................................
27, 39
Under the Hood .............................................. 124
Unlocking the Doors ........................................ 31
Unlocking the Tailgate .....................................31
USB Commands .............................................. 148
USB Flash Drive ................................................ 61
USB Port ............................................................ 56
Vacuum ............................................................. 50
Vehicle Controls ............................................... 30
Vehicle Stability Assist (VSA
®) .......... 25, 26, 97
Visual Index ......................................................... 1
Voice Command Index ..................................143
Voice Prompt .................................................... 86
Voice Prompt Volume ......................................86
VSA
® ........................................... 25, 26, 27, 97
Warranty Coverages .....................................142
Wear Indicators ............................................. 131
Window Washer Fluid ...................................128
Windows ............................................................ 36
Winter Tires ..................................................... 133
Wiper Blades .................................................. 129
Wiper Operation ............................................... 40
Wireless Headphones .....................................75