jump start terminals HONDA ODYSSEY 2017 RC1-RC2 / 5.G Quick Guide
[x] Cancel search | Manufacturer: HONDA, Model Year: 2017, Model line: ODYSSEY, Model: HONDA ODYSSEY 2017 RC1-RC2 / 5.GPages: 81, PDF Size: 15.25 MB
Page 58 of 81

108 || 109
HANDLING THE UNEXPECTED
HANDLING THE UNEXPECTED
TABLE OF CONTENTS
INDEX
VISUAL INDEX
VOICE COMMAND
INDEX
SAFETY
INFORMATION
CUSTOMER
INFORMATION
INSTRUMENT PANEL
SPECIFICATIONS
VEHICLE
CONTROLS
MAINTENANCE
AUDIO AND
CONNECTIVITY
HANDLING THE UNEXPECTED
BLUETOOTH®
HANDSFREELINK®
DRIVING
HONDALINK®
NAVIGATION
Learn about what to do in critical or emergency situations.
Smart Entry Remote Battery Strength
If the battery life in your remote transmitter is weak, a message appear\
s in the
display with information on how to start the engine.
1. Touch the back of the remote transmitter to the
eNGINe START/STOP button while the indicator is
flashing.
2. With the brake pedal pressed, press the eNGINe
START/STOP button within 10 seconds.
HANDLING THE UNEXPECTED
Shift Lever Does Not Move
Follow the procedure below if you cannot move the shift lever out of Par\
k (P).
1. Set the parking brake.
2. Remove the key from the ignition, or remove the
built-in key from the remote transmitter.
3. Wrap a cloth around the tip of a small flat-tip
screwdriver to remove the cover of the shift lock
release slot. Put the tip of the flat-tip screwdriver
into the slot and remove it (as shown).
4. Insert the key into the shift lock release slot.
5. While pushing the key down, press the shift lever
release button and place the shift lever into Neutral
(N). The lock is now released. Have the shift lever
checked by a dealer as soon as possible.
Slot
Cover
Release
button
Shift lock
release slot
After the Engine StartsOnce your vehicle’s engine has started, remove the jumper cables in the following
order:
1. Disconnect the jumper cable from your engine hanger.
2. Disconnect the other end of the jumper cable from the booster battery (\
-)
terminal.
3. Disconnect the jumper cable from your vehicle’s (+) terminal.
4. Disconnect the other end of the jumper cable from the booster battery (\
+)
terminal.
5. Have your vehicle inspected by a nearby service station or a dealer.
Jump Starting
Turn off the power to electric devices, such as audio and lights. Turn off the engine,
then open the hood.
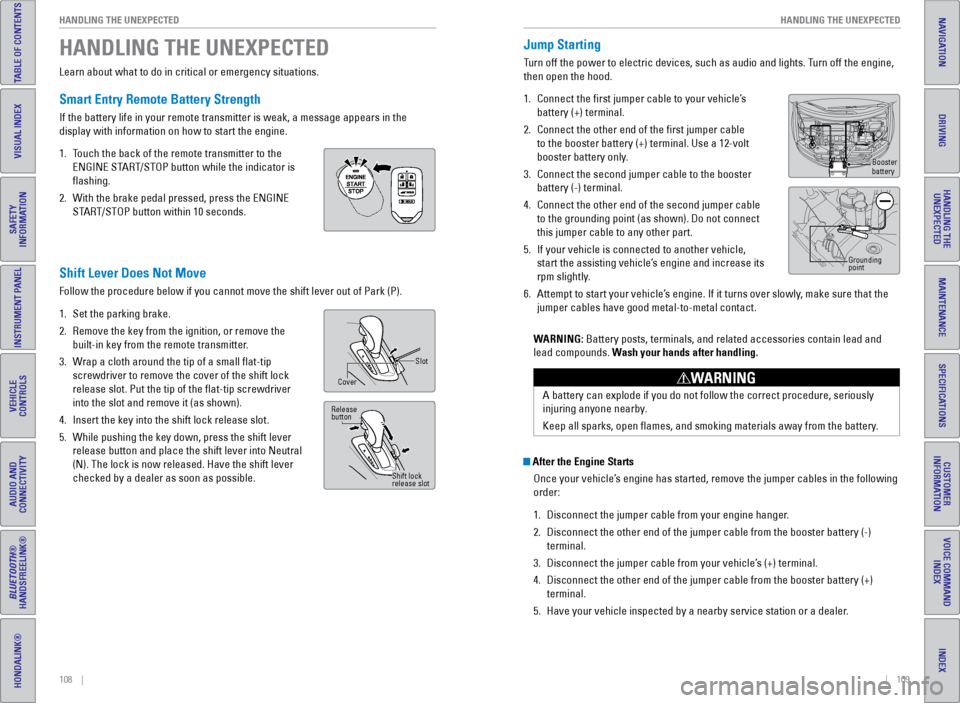
1. Connect the first jumper cable to your vehicle’s
battery (+) terminal.
2. Connect the other end of the first jumper cable
to the booster battery (+) terminal. Use a 12-volt
booster battery only.
3. Connect the second jumper cable to the booster
battery (-) terminal.
4. Connect the other end of the second jumper cable
to the grounding point (as shown). Do not connect
this jumper cable to any other part.
5. If your vehicle is connected to another vehicle,
start the assisting vehicle’s engine and increase its
rpm slightly.
6. Attempt to start your vehicle’s engine. If it turns over slowly, make sure that the
jumper cables have good metal-to-metal contact.
WARNING: Battery posts, terminals, and related accessories contain lead and
lead compounds. Wash your hands after handling.
A battery can explode if you do not follow the correct procedure, seriou\
sly
injuring anyone nearby.
Keep all sparks, open flames, and smoking materials away from the batt\
ery.
WARNING
Booster
battery
Grounding
point
Page 68 of 81

128 || 129
MAINTENANCE
MAINTENANCE
TABLE OF CONTENTS
INDEX
VISUAL INDEX
VOICE COMMAND
INDEX
SAFETY
INFORMATION
CUSTOMER
INFORMATION
INSTRUMENT PANEL
SPECIFICATIONS
VEHICLE
CONTROLS
MAINTENANCE
AUDIO AND
CONNECTIVITY
HANDLING THE UNEXPECTED
BLUETOOTH®
HANDSFREELINK®
DRIVING
HONDALINK®
NAVIGATION
Engine Coolant
Park the vehicle on level ground. Check the reserve tank and the coolant\
level in the
radiator. We recommend Honda Long Life Antifreeze/Coolant Type 2.
Checking the Reserve Tank
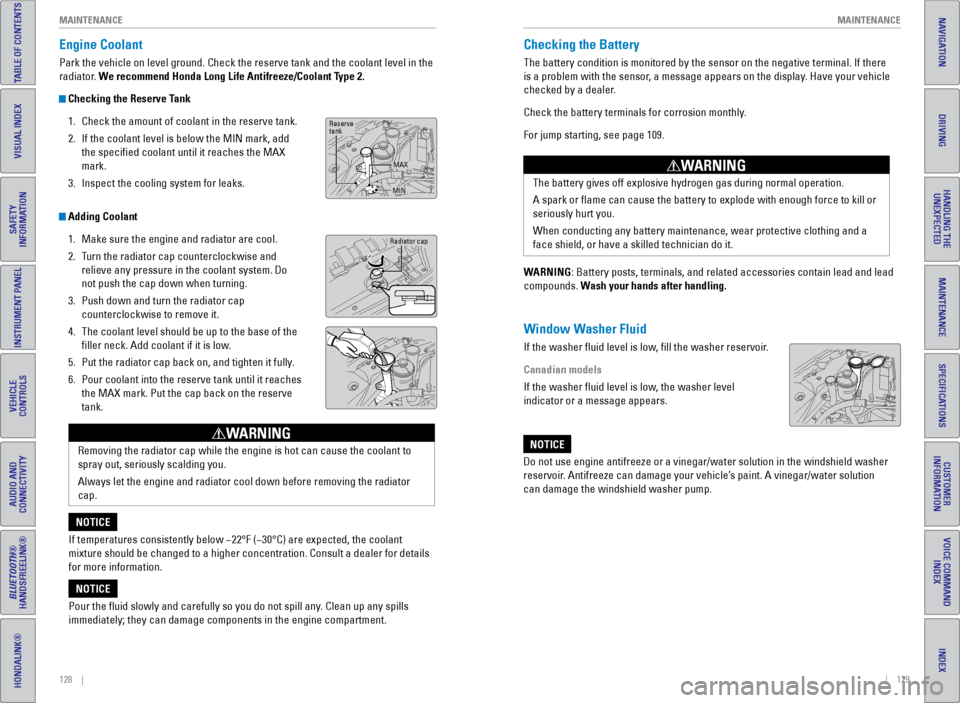
1. Check the amount of coolant in the reserve tank.
2. If the coolant level is below the MIN mark, add
the specified coolant until it reaches the MAX
mark.
3. Inspect the cooling system for leaks.
Adding Coolant
1. Make sure the engine and radiator are cool.
2. Turn the radiator cap counterclockwise and
relieve any pressure in the coolant system. Do
not push the cap down when turning.
3. Push down and turn the radiator cap
counterclockwise to remove it.
4. The coolant level should be up to the base of the
filler neck. Add coolant if it is low.
5. Put the radiator cap back on, and tighten it fully.
6. Pour coolant into the reserve tank until it reaches
the MAX mark. Put the cap back on the reserve
tank.
Removing the radiator cap while the engine is hot can cause the coolant \
to
spray out, seriously scalding you.
Always let the engine and radiator cool down before removing the radiato\
r
cap.
WARNING
If temperatures consistently below −22°F (−30°C) are expec\
ted, the coolant
mixture should be changed to a higher concentration. Consult a dealer fo\
r details
for more information.
NOTICE
Pour the fluid slowly and carefully so you do not spill any. Clean up any spills
immediately; they can damage components in the engine compartment.
NOTICE
Radiator cap
Reserve
tank MAX
MIN
Checking the Battery
The battery condition is monitored by the sensor on the negative termina\
l. If there
is a problem with the sensor, a message appears on the display. Have your vehicle
checked by a dealer.
Check the battery terminals for corrosion monthly.
For jump starting, see page 109.
WARNING: Battery posts, terminals, and related accessories contain lead and lea\
d
compounds. Wash your hands after handling.
Window Washer Fluid
If the washer fluid level is low, fill the washer reservoir.
Canadian models
If the washer fluid level is low, the washer level
indicator or a message appears. The battery gives off explosive hydrogen gas during normal operation.
A spark or flame can cause the battery to explode with enough force to\
kill or
seriously hurt you.
When conducting any battery maintenance, wear protective clothing and a \
face shield, or have a skilled technician do it.
WARNING
Do not use engine antifreeze or a vinegar/water solution in the windshie\
ld washer
reservoir. Antifreeze can damage your vehicle’s paint. A vinegar/water solution
can damage the windshield washer pump.
NOTICE