lights HONDA ODYSSEY 2019 (in English) Owners Manual
[x] Cancel search | Manufacturer: HONDA, Model Year: 2019, Model line: ODYSSEY, Model: HONDA ODYSSEY 2019Pages: 767, PDF Size: 47.46 MB
Page 712 of 767
710
Handling the Unexpected
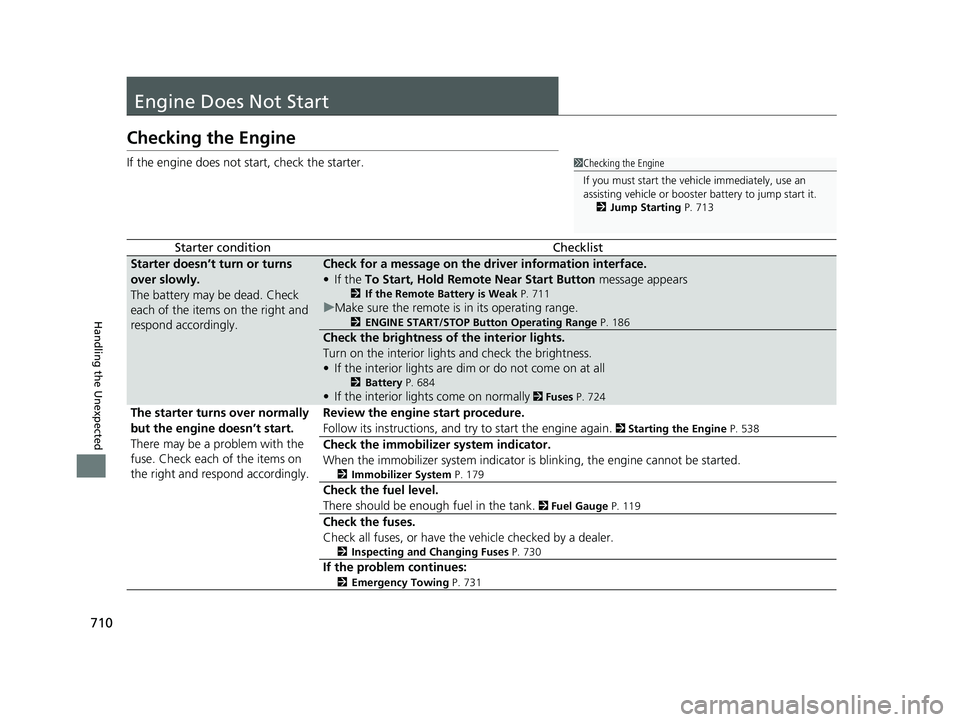
Engine Does Not Start
Checking the Engine
If the engine does not start, check the starter.
Starter conditionChecklist
Starter doesn’t turn or turns
over slowly.
The battery may be dead. Check
each of the items on the right and
respond accordingly.Check for a message on the dr iver information interface.
• If the To Start, Hold Remote Near Start Button message appears
2If the Remote Battery is Weak P. 711
uMake sure the remote is in its operating range.
2 ENGINE START/STOP Button Operating Range P. 186
Check the brightness of the interior lights.
Turn on the interior lights and check the brightness.
• If the interior lights are dim or do not come on at all
2 Battery P. 684
•If the interior lights come on normally 2 Fuses P. 724
The starter turns over normally
but the engine doesn’t start.
There may be a problem with the
fuse. Check each of the items on
the right and resp ond accordingly. Review the engine start procedure.
Follow its instructions, and try to start the engine again.
2
Starting the Engine P. 538
Check the immobilizer system indicator.
When the immobilizer system indicator is blinking, the engine cannot be started.
2Immobilizer System P. 179
Check the fuel level.
There should be enough fuel in the tank.
2 Fuel Gauge P. 119
Check the fuses.
Check all fuses, or have the vehicle checked by a dealer.
2Inspecting and Changing Fuses P. 730
If the problem continues:
2Emergency Towing P. 731
1Checking the Engine
If you must start the vehi cle immediately, use an
assisting vehicle or booster battery to jump start it.
2 Jump Starting P. 713
19 ODYSSEY-31THR6120.book 710 ページ 2018年12月6日 木曜日 午後4時35分
Page 715 of 767
713Continued
Handling the Unexpected
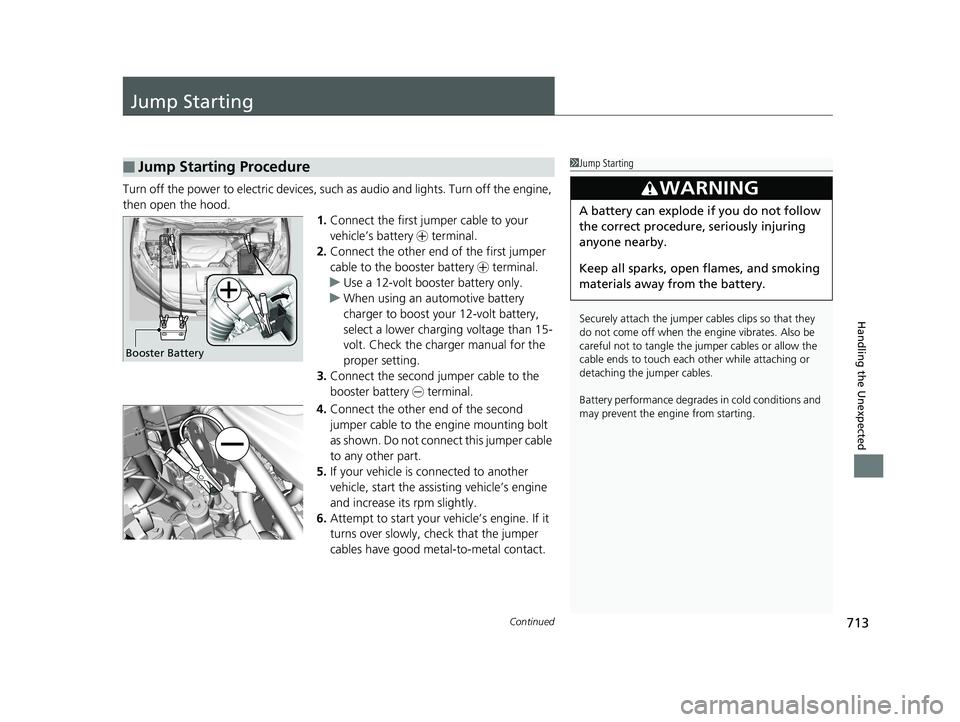
Jump Starting
Turn off the power to electric devices, such as audio and lights. Turn off the engine,
then open the hood. 1.Connect the first jumper cable to your
vehicle’s battery + terminal.
2. Connect the other end of the first jumper
cable to the booster battery + terminal.
u Use a 12-volt booster battery only.
u When using an automotive battery
charger to boost your 12-volt battery,
select a lower charging voltage than 15-
volt. Check the charger manual for the
proper setting.
3. Connect the second jumper cable to the
booster battery - terminal.
4. Connect the other end of the second
jumper cable to the engine mounting bolt
as shown. Do not connect this jumper cable
to any other part.
5. If your vehicle is connected to another
vehicle, start the assisting vehicle’s engine
and increase its rpm slightly.
6. Attempt to start your ve hicle’s engine. If it
turns over slowly, check that the jumper
cables have good metal-to-metal contact.
■Jump Starting Procedure1 Jump Starting
Securely attach the jumper cables clips so that they
do not come off when the e ngine vibrates. Also be
careful not to tangle the ju mper cables or allow the
cable ends to touch each other while attaching or
detaching the jumper cables.
Battery performance degrades in cold conditions and
may prevent the engi ne from starting.
3WARNING
A battery can explode if you do not follow
the correct procedure, seriously injuring
anyone nearby.
Keep all sparks, open flames, and smoking
materials away from the battery.
Booster Battery
19 ODYSSEY-31THR6120.book 713 ページ 2018年12月6日 木曜日 午後4時35分
Page 717 of 767
715Continued
Handling the Unexpected
Overheating
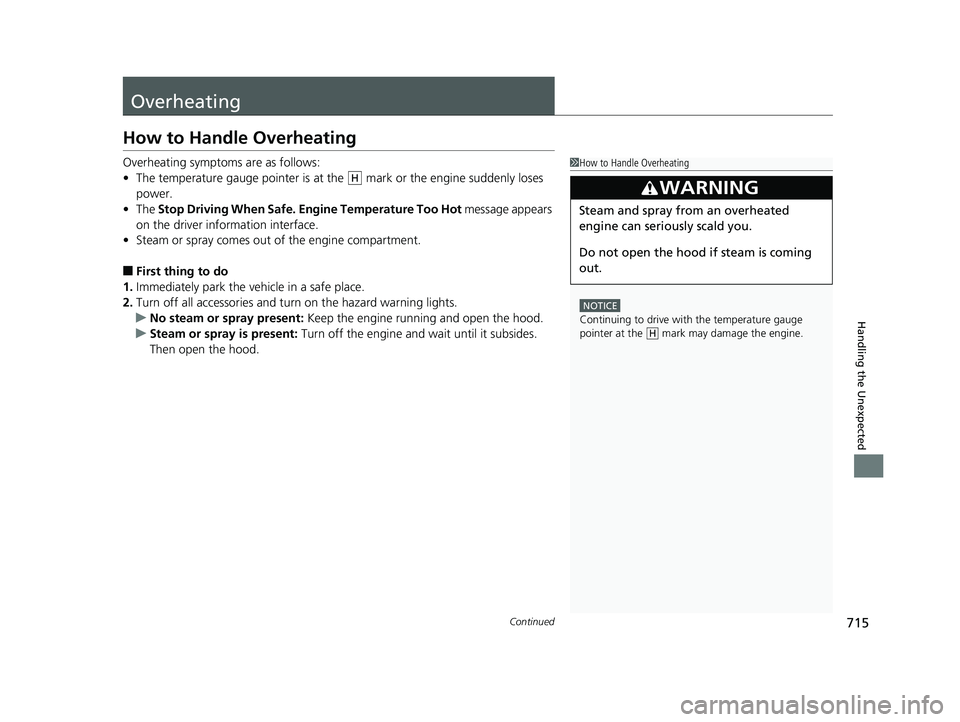
How to Handle Overheating
Overheating symptoms are as follows:
•The temperature gauge pointer is at th e mark or the engine suddenly loses
power.
• The Stop Driving When Safe. En gine Temperature Too Hot message appears
on the driver information interface.
• Steam or spray comes out of the engine compartment.
■First thing to do
1. Immediately park the vehicle in a safe place.
2. Turn off all accessories and turn on the hazard warning lights.
u No steam or spray present: Keep the engine running and open the hood.
u Steam or spray is present: Turn off the engine and wait until it subsides.
Then open the hood.
1 How to Handle Overheating
NOTICE
Continuing to drive with the temperature gauge
pointer at the mark may damage the engine.
3WARNING
Steam and spray from an overheated
engine can seriously scald you.
Do not open the hood if steam is coming
out.
H
H
19 ODYSSEY-31THR6120.book 715 ページ 2018年12月6日 木曜日 午後4時35分
Page 719 of 767
717
uuOverheating uHow to Handle Overheating
Handling the Unexpected
■The Stop Driving When Safe. Engi ne Temperature Too Hot Message
Appears On The Driver Information Interface.
The Stop Driving When Safe. En gine Temperature Too Hot message appears
on the driver information interface when the engine temperature is high.
2 Driver Information Interface Wa rning and Information Messages P. 102
1.Immediately park the vehicle in a safe place.
u Press the
(P button, and set the parking brake. Turn off all accessories and
turn on the hazard warning lights.
2. Keep the engine running, and wait until the message disappears.
u If the message does not disappear, have the vehicle inspected at a dealer.
1How to Handle Overheating
Continuing to drive with the Stop Driving When
Safe. Engine Temperature Too Hot message on
the driver information interface may damage the
engine.
19 ODYSSEY-31THR6120.book 717 ページ 2018年12月6日 木曜日 午後4時35分
Page 720 of 767
718
Handling the Unexpected
Indicator, Coming On/Blinking
If the Low Oil Pressure Symbol Appears
■Reasons for the symbol to appear
Appears when the engine oil pressure is low.
■What to do as soon as the symbol appears
1. Immediately park the vehicle on level ground in a safe place.
2. If necessary, turn the ha zard warning lights on.
■What to do after parking the vehicle
1. Stop the engine and let it sit for about three minutes.
2. Open the hood and check the oil level.
u Add oil as necessary.
2 Oil Check P. 651
3.Start the engine and check the low oil pressure symbol.
u The symbol disappears: Start driving again.
u The symbol does not disappear within 10 seconds: Stop the engine
and contact a dealer for repairs immediately.
If the Charging System Indicator Comes On
■Reasons for the indicator to come on
Comes on when the battery is not being charged.
■What to do when the indicator comes on
Turn off the climate con trol system, rear defogger, and other electrical
systems, and immediately contact a dealer for repairs.
1 If the Low Oil Pressure Symbol Appears
NOTICE
Running the engine with low oil pressure can cause
serious mechanical damage almost immediately.
1If the Charging System Indicator Comes On
If you need to stop temporarily, do not turn off the
engine. Restarting the engi ne may rapidly discharge
the battery.
19 ODYSSEY-31THR6120.book 718 ページ 2018年12月6日 木曜日 午後4時35分
Page 724 of 767
722
uuIndicator, Coming On/Blinking uIf the Electric Power Steering (EPS) System Indicator Comes On
Handling the Unexpected
If the Electric Power Steeri ng (EPS) System Indicator
Comes On
■Reasons for the indicator to come on
• Comes on when there is a problem with the EPS system.
• If you depress the accelerator pedal repeatedly to increase the engine
speed while the engine is idling, the indicator comes on, and
sometimes the steering wheel becomes harder to operate.
■What to do when the indicator comes on
Stop the vehicle in a safe place and restart the engine.
If the indicator comes on and stays on, immediately have your vehicle
inspected by a dealer.
If the Low Tire Pressure/TPMS Indicator Comes On or
Blinks
■Reasons for the indicator to come on or blink
A tire pressure is significantly low. If there is a problem with the TPMS
with Tire Fill Assist or the compact spare tire is installed, the indicator
blinks for about one mi nute, and then stays on.
■What to do when the indicator comes on
Drive carefully and avoid abrupt cornering and hard braking.
Stop your vehicle in a safe place. Ch eck the tire pressure and adjust the
pressure to the specified level. The sp ecified tire pressure is on a label on
the driver side doorjamb.
■What to do when the indicator blinks, then remains on
Have the tire inspected by a dealer as soon as possible. If the compact
spare tire causes the indicator to blink, change the tire to a full-size tire.
The indicator goes off after driv ing for a few miles (kilometers).
1If the Low Tire Pressure/TPMS Indicator Comes On or Blinks
NOTICE
Driving on an extremely unde rinflated tire can cause
it to overheat. An overheated tire can fail. Always
inflate your tires to the prescribed level.
TPMS with Tire Fill Assist provides visual and audible
assistance during tire pre ssure adjustment. With the
power mode in ON, while y ou adjust tire pressure up
or down, the system alerts you as follows:
Below recommended pressure: The beeper
sounds and exterior lights flash once every five
seconds.
At recommended pressure: The beeper sounds
and exterior lights flash rapi dly for three seconds with
five seconds intervals.
Above recommended pressure: The beeper
sounds and lights flash tw ice every two seconds.
19 ODYSSEY-31THR6120.book 722 ページ 2018年12月6日 木曜日 午後4時35分
Page 727 of 767
725
uuFuses uFuse Locations
Continued
Handling the Unexpected
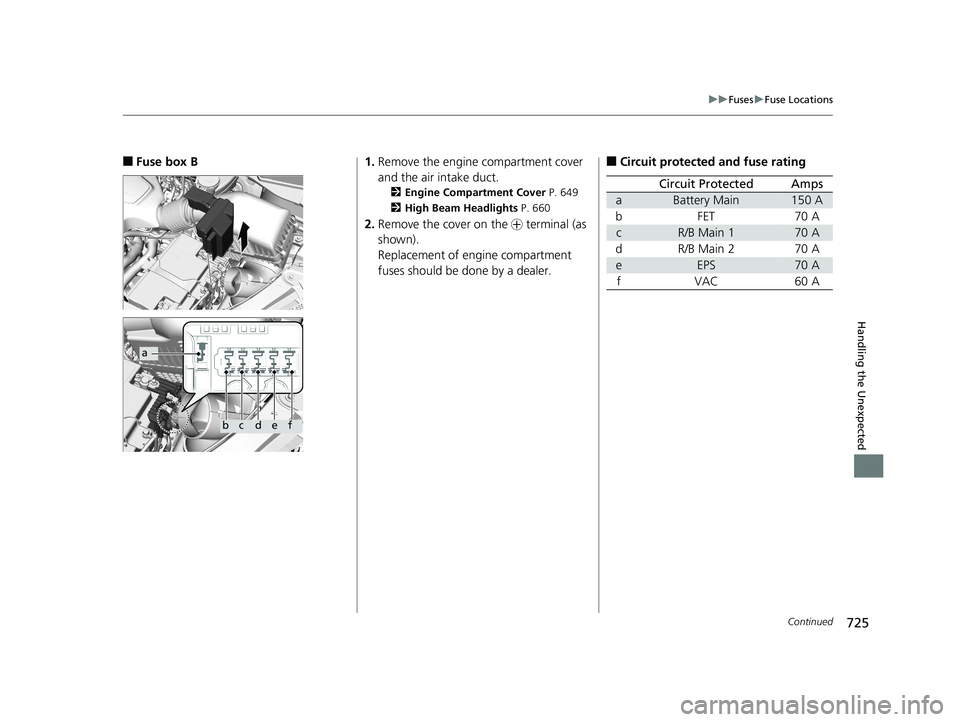
■Fuse box B
a
bcdef
1. Remove the engine compartment cover
and the air intake duct.
2 Engine Compartment Cover P. 649
2 High Beam Headlights P. 660
2.Remove the cover on the + terminal (as
shown).
Replacement of engine compartment
fuses should be done by a dealer.
■Circuit protected and fuse rating
Circuit ProtectedAmps
aBattery Main150 A
bFET70 A
cR/B Main 170 A
dR/B Main 270 A
eEPS70 A
fVAC60 A
19 ODYSSEY-31THR6120.book 725 ページ 2018年12月6日 木曜日 午後4時35分
Page 732 of 767
730
uuFuses uInspecting and Changing Fuses
Handling the Unexpected
Inspecting and Changing Fuses
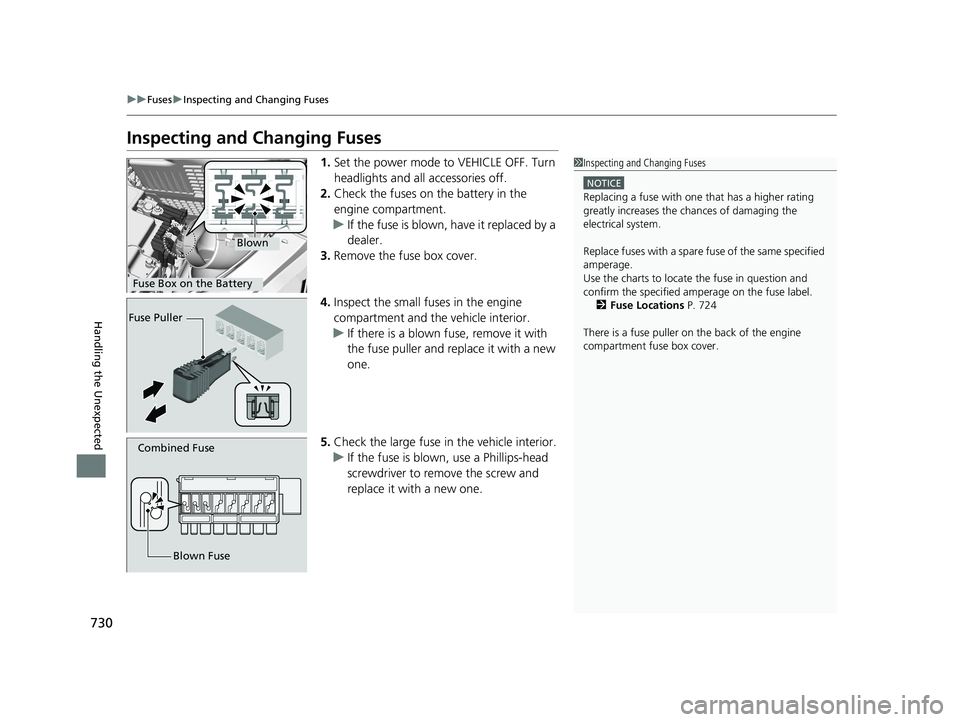
1. Set the power mode to VEHICLE OFF. Turn
headlights and all accessories off.
2. Check the fuses on the battery in the
engine compartment.
u If the fuse is blown, have it replaced by a
dealer.
3. Remove the fuse box cover.
4. Inspect the small fuses in the engine
compartment and the vehicle interior.
u If there is a blown fuse, remove it with
the fuse puller and replace it with a new
one.
5. Check the large fuse in the vehicle interior.
u If the fuse is blown, use a Phillips-head
screwdriver to remo ve the screw and
replace it with a new one.1 Inspecting and Changing Fuses
NOTICE
Replacing a fuse with on e that has a higher rating
greatly increases the chances of damaging the
electrical system.
Replace fuses with a spare fuse of the same specified
amperage.
Use the charts to locate the fuse in question and
confirm the specified amperage on the fuse label. 2 Fuse Locations P. 724
There is a fuse puller on the back of the engine
compartment fuse box cover.
Blown
Fuse Box on the Battery
Fuse Puller
Combined Fuse
Blown Fuse
19 ODYSSEY-31THR6120.book 730 ページ 2018年12月6日 木曜日 午後4時35分
Page 742 of 767
740
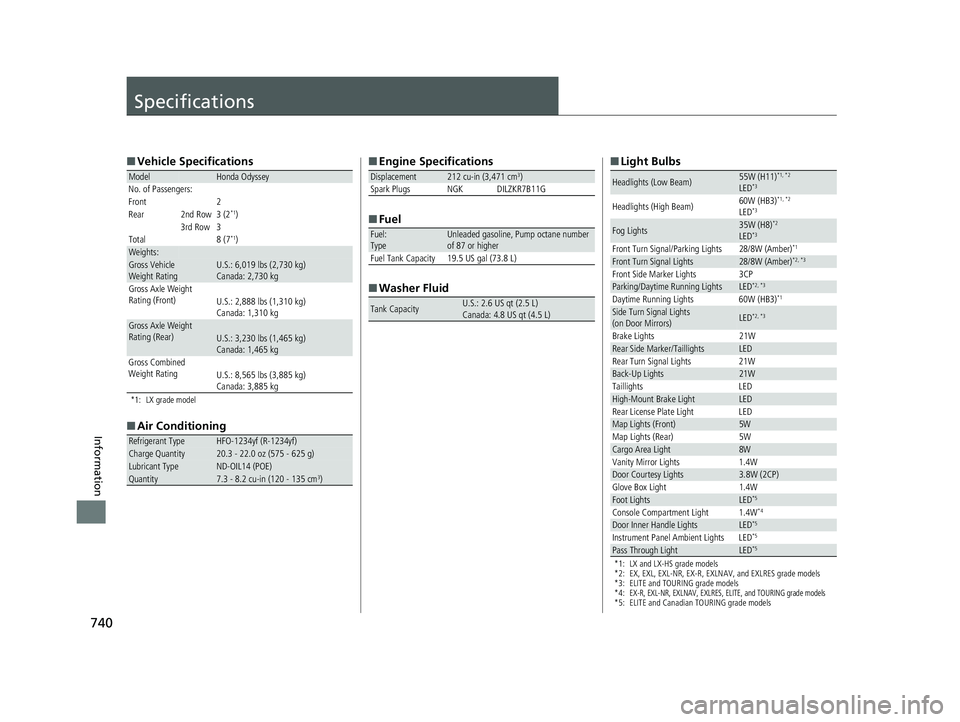
Information
Specifications
■Vehicle Specifications
*1: LX grade model
■Air Conditioning
ModelHonda Odyssey
No. of Passengers:
Front 2
Rear 2nd Row 3 (2
*1)
3rd Row 3
Total 8 (7
*1)Weights:Gross Vehicle
Weight Rating U.S.: 6,019 lbs (2,730 kg)
Canada: 2,730 kg
Gross Axle Weight
Rating (Front)U.S.: 2,888 lbs (1,310 kg)
Canada: 1,310 kg
Gross Axle Weight
Rating (Rear)U.S.: 3,230 lbs (1,465 kg)
Canada: 1,465 kg
Gross Combined
Weight Rating U.S.: 8,565 lbs (3,885 kg)
Canada: 3,885 kg
Refrigerant TypeHFO-1234yf (R-1234yf)Charge Quantity20.3 - 22.0 oz (575 - 625 g)Lubricant TypeND-OIL14 (POE)Quantity7.3 - 8.2 cu-in (120 - 135 cm3)
■Engine Specifications
■ Fuel
■ Washer Fluid
Displacement212 cu-in (3,471 cm3)
Spark Plugs NGK DILZKR7B11G
Fuel:
TypeUnleaded gasoline, Pump octane number
of 87 or higher
Fuel Tank Capacity 19.5 US gal (73.8 L)
Tank CapacityU.S.: 2.6 US qt (2.5 L)
Canada: 4.8 US qt (4.5 L)
■ Light Bulbs
*1: LX and LX-HS grade models
*2: EX, EXL, EXL-NR, EX-R, EXLNAV, and EXLRES grade models
*3: ELITE and TOURING grade models
*4:
EX-R, EXL-NR, EXLNAV, EXLRES, ELITE, and TOURING grade models*5: ELITE and Canadian TOURING grade models
Headlights (Low Beam)55W (H11)*1, *2
LED*3
Headlights (High Beam) 60W (HB3)*1, *2
LED*3
Fog Lights35W (H8)*2
LED*3
Front Turn Signal/Parking Lights 28/8W (Amber)*1
Front Turn Signal Lights28/8W (Amber)*2, *3
Front Side Marker Lights 3CPParking/Daytime Running LightsLED*2, *3
Daytime Running Lights 60W (HB3)*1
Side Turn Signal Lights
(on Door Mirrors)LED*2, *3
Brake Lights
21WRear Side Marker/TaillightsLED
Rear Turn Signal Lights 21W
Back-Up Lights21W
Taillights LED
High-Mount Brake LightLED
Rear License Plate Light LED
Map Lights (Front)5W
Map Lights (Rear) 5W
Cargo Area Light8W
Vanity Mirror Lights 1.4W
Door Courtesy Lights3.8W (2CP)
Glove Box Light 1.4W
Foot LightsLED*5
Console Compartment Light 1.4W*4
Door Inner Handle LightsLED*5
Instrument Panel Ambient Lights LED*5
Pass Through LightLED*5
19 ODYSSEY-31THR6120.book 740 ページ 2018年12月6日 木曜日 午後4時35分
Page 755 of 767
753
Index
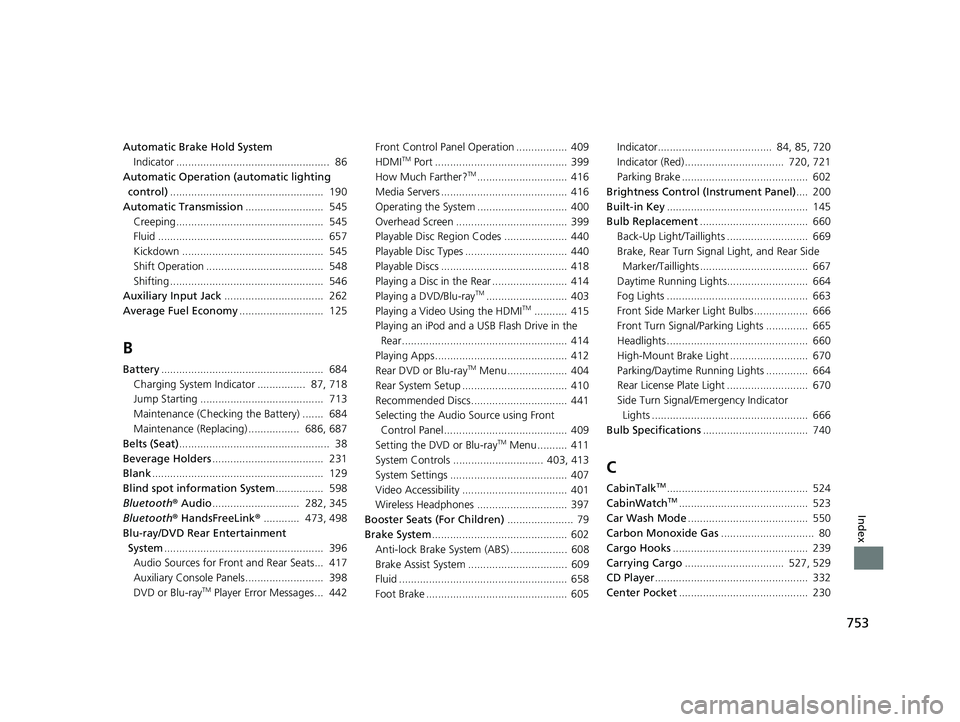
Automatic Brake Hold SystemIndicator ................................................... 86
Automatic Operation (automatic lighting control) ................................................... 190
Automatic Transmission .......................... 545
Creeping................................................. 545
Fluid ....................................................... 657
Kickdown ............................................... 545
Shift Operation ....................................... 548
Shifting ................................................... 546
Auxiliary Input Jack ................................. 262
Average Fuel Economy ............................ 125
B
Battery...................................................... 684
Charging System Indicator ................ 87, 718
Jump Starting ......................................... 713
Maintenance (Checking the Battery) ....... 684
Maintenance (Replacing) ................. 686, 687
Belts (Seat) .................................................. 38
Beverage Holders ..................................... 231
Blank ......................................................... 129
Blind spot information System ................ 598
Bluetooth ® Audio ............................. 282, 345
Bluetooth ® HandsFreeLink ®............ 473, 498
Blu-ray/DVD Rear Entertainment
System ..................................................... 396
Audio Sources for Front and Rear Seats... 417
Auxiliary Console Panels.......................... 398
DVD or Blu-ray
TM Player Error Messages... 442 Front Control Panel Operation ................. 409
HDMI
TM Port ............................................ 399
How Much Farther?TM.............................. 416
Media Servers .......................................... 416
Operating the System .............................. 400
Overhead Screen ..................................... 399
Playable Disc Region Codes ..................... 440
Playable Disc Types .................................. 440
Playable Discs .......................................... 418
Playing a Disc in the Rear ......................... 414
Playing a DVD/Blu-ray
TM........................... 403
Playing a Video Using the HDMITM........... 415
Playing an iPod and a USB Flash Drive in the Rear....................................................... 414
Playing Apps ............................................ 412
Rear DVD or Blu-ray
TM Menu .................... 404
Rear System Setup ................................... 410
Recommended Discs ................................ 441
Selecting the Audio Source using Front
Control Panel......................................... 409
Setting the DVD or Blu-ray
TM Menu .......... 411
System Controls .............................. 403, 413
System Settings ....................................... 407
Video Accessibility ................................... 401
Wireless Headphones .............................. 397
Booster Seats (For Children) ...................... 79
Brake System ............................................. 602
Anti-lock Brake System (ABS) ................... 608
Brake Assist System ................................. 609
Fluid ........................................................ 658
Foot Brake ............................................... 605 Indicator...................................... 84, 85, 720
Indicator (Red) ................................. 720, 721
Parking Brake .......................................... 602
Brightness Control (Instrument Panel) .... 200
Built-in Key ............................................... 145
Bulb Replacement .................................... 660
Back-Up Light/Taillights ........................... 669
Brake, Rear Turn Signal Light, and Rear Side
Marker/Taillights .................................... 667
Daytime Running Lights........................... 664
Fog Lights ............................................... 663
Front Side Marker Light Bulbs .................. 666
Front Turn Signal/Parking Lights .............. 665
Headlights ............................................... 660
High-Mount Brake Light .......................... 670
Parking/Daytime Running Lights .............. 664
Rear License Plate Light ........................... 670
Side Turn Signal/Emergency Indicator Lights .................................................... 666
Bulb Specifications ................................... 740
C
CabinTalkTM............................................... 524
CabinWatchTM........................................... 523
Car Wash Mode ........................................ 550
Carbon Monoxide Gas ............................... 80
Cargo Hooks ............................................. 239
Carrying Cargo ................................. 527, 529
CD Player ................................................... 332
Center Pocket ........................................... 230
19 ODYSSEY-31THR6120.book 753 ページ 2018年12月6日 木曜日 午後4時35分