tires HONDA ODYSSEY 2019 (in English) User Guide
[x] Cancel search | Manufacturer: HONDA, Model Year: 2019, Model line: ODYSSEY, Model: HONDA ODYSSEY 2019Pages: 767, PDF Size: 47.46 MB
Page 602 of 767
600
uuWhen Driving uLaneWatchTM*
Driving
LaneWatchTM*
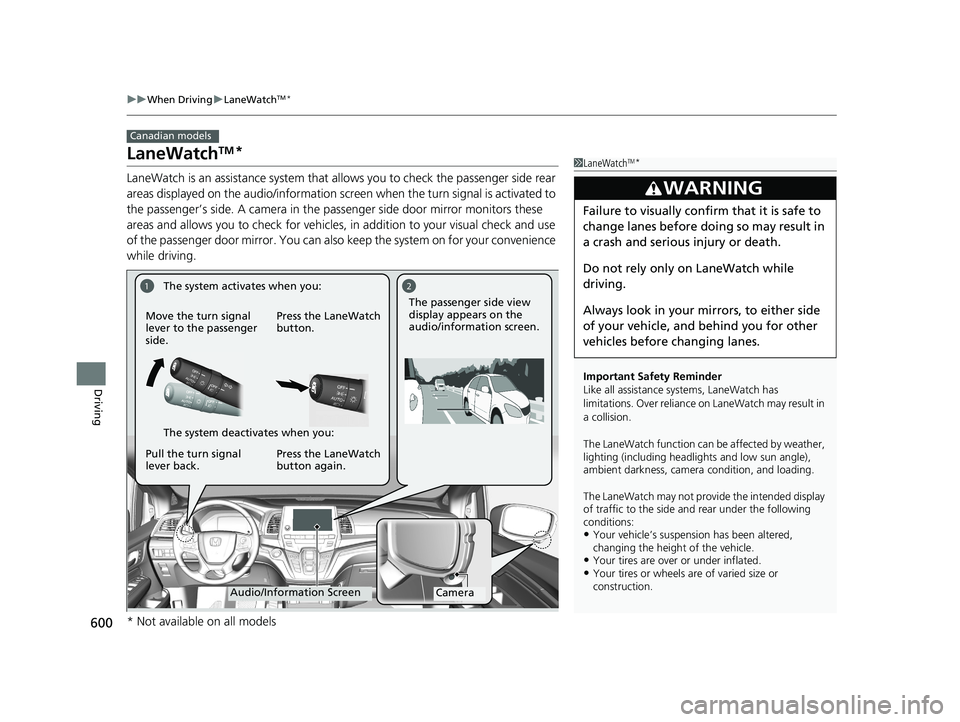
LaneWatch is an assistance system that allows you to check the passenger side rear
areas displayed on the audio/in formation screen when the turn signal is activated to
the passenger’s side. A camera in the passenger side door mirror monitors these
areas and allows you to check for vehicles, in addition to your visual check and use
of the passenger door mirror. You can also keep the system on for your convenience
while driving.
Canadian models
1 LaneWatchTM*
Important Safety Reminder
Like all assistance systems, LaneWatch has
limitations. Over reliance on LaneWatch may result in
a collision.
The LaneWatch func tion can be affected by weather,
lighting (including headli ghts and low sun angle),
ambient darkness, camera condition, and loading.
The LaneWatch may not prov ide the intended display
of traffic to the side and rear under the following
conditions:
•Your vehicle’s suspension has been altered,
changing the height of the vehicle.
•Your tires are over or under inflated.•Your tires or wheels are of varied size or
construction.
3WARNING
Failure to visually confirm that it is safe to
change lanes before doing so may result in
a crash and serious injury or death.
Do not rely only on LaneWatch while
driving.
Always look in your mi rrors, to either side
of your vehicle, and behind you for other
vehicles before changing lanes.
12
CameraAudio/Information Screen
Move the turn signal
lever to the passenger
side.
Press the LaneWatch
button.
Pull the turn signal
lever back. Press the LaneWatch
button again. The passenger side view
display appears on the
audio/information screen.
The system activates when you:
The system deactivates when you:
* Not available on all models
19 ODYSSEY-31THR6120.book 600 ページ 2018年12月6日 木曜日 午後4時35分
Page 610 of 767
608
uuBraking uAnti-lock Brake System (ABS)
Driving
Anti-lock Brake System (ABS)
Helps prevent the wheels from locking up, an d helps you retain steering control by
pumping the brakes rapidly, much faster than you.
The electronic brake distribution (EBD) system, which is part of the ABS, also
balances the front-to-rear braking distri bution according to vehicle loading.
You should never pump the brake pedal. Let the ABS work for you by always
keeping firm, steady pressure on the brake pe dal. This is sometimes referred to as
“stomp and steer.”
■ABS operation
The brake pedal may pulsate slightly when the ABS is working. Keep holding the
pedal firmly down. On dry pavement, you will need to press on the brake pedal very
hard before the ABS activates. However, you may feel the ABS activate immediately
if you are trying to stop on snow or ice.
ABS may activate when you depress the brake pedal when driving on:
• Wet or snow covered roads.
• Roads paved with stone.
• Roads with uneven surfaces, such as potholes, cracks, manholes, etc.
When the vehicle speed goes unde r 6 mph (10 km/h), the ABS stops.
■ABS1Anti-lock Brake System (ABS)
NOTICE
The ABS may not function correc tly if you use a tire of
the wrong size or type.
If the ABS indicator comes on while driving, there
may be a problem with the system. While normal
braking will not be affected, there is a possibility that
the ABS will not operati ng. Have your vehicle
checked by a dealer immediately.
The ABS is not designed for the purpose of reducing
the time or distance it takes for a vehicle to stop: It is
designed to limit brake lo ckup which can lead to
skidding and loss of steering control.
In the following cases, yo ur vehicle may need more
distance to stop than a vehicle without the ABS:
•You are driving on rough or uneven road surfaces,
such as gravel or snow.
•The tires are equipped with snow chains.
The following may be observed with the ABS system:
•Motor sounds coming from the engine
compartment when the brakes are applied, or
when system checks are being performed after the
engine has been started and while the vehicle
accelerates.
•Brake pedal and/or the ve hicle body vibration when
ABS activates.
These vibrations and sou nds are normal to ABS
systems and are no cause for concern.
19 ODYSSEY-31THR6120.book 608 ページ 2018年12月6日 木曜日 午後4時35分
Page 639 of 767
637
Maintenance
This chapter discusses basic maintenance.
Before Performing MaintenanceInspection and Maintenance ............ 638
Safety When Performing Maintenance .... 639
Parts and Fluids Used in Maintenance Service ........................................... 640
Maintenance Minder
TM..................... 641
Maintenance Under the Hood
Maintenance Items Un der the Hood .... 647
Opening the Hood ........................... 648
Recommended Engine Oil ................ 650
Oil Check ......................................... 651
Adding Engine Oil ............................ 652
Changing the Engine Oil and Oil Filter ..... 653Engine Coolant ................................ 655
Transmission Fluid ............................ 657
Brake Fluid ....................................... 658
Refilling Window Washer Fluid......... 659
Replacing Light Bulbs ....................... 660
Checking and Maintaining Wiper Blades.... 671Checking and Maintaining Tires
Checking Tires ................................. 675
Tire and Loading Information Label ..... 676Tire Labeling .................................... 676DOT Tire Quality Grading (U.S. Vehicles) ...... 678Wear Indicators................................ 680 Tire Service Life ................................ 680
Tire and Wheel Replacement ........... 681
Tire Rotation .................................... 682
Winter Tires ..................................... 683
Battery ............................................... 684
Remote Transmitter Care ................. 686
Remote Control and Wireless Headphone Care
*........................... 687Climate Control System Maintenance.... 689Cleaning Interior Care .................................... 690
Exterior Care.................................... 693
Accessories and Modifications ........ 696
* Not available on all models
19 ODYSSEY-31THR6120.book 637 ページ 2018年12月6日 木曜日 午後4時35分
Page 640 of 767
638
Maintenance
Before Performing Maintenance
Inspection and Maintenance
For your safety, perform all listed inspections and maintenance to keep your vehicle
in good condition. If you become aware of any abnormality (noise, smell, insufficient
brake fluid, oil residue on the ground, etc.), have your vehicle inspected by a dealer.
(Note, however, that service at a dealer is not mandatory to keep your warranties in
effect.)
■Daily inspections
Perform inspections before long distance trips, when washing the vehicle, or when
refueling.
■Periodic inspections
• Check the brake fluid level monthly.
2 Brake Fluid P. 658
•Check the tire pressure monthly. Examin e the tread for wear and foreign objects.
2Checking and Maintaining Tires P. 675
•Check the operation of the exterior lights monthly.
2 Replacing Light Bulbs P. 660
•Check the condition of the wiper bl ades at least every six months.
2Checking and Maintaining Wiper Blades P. 671
■Types of Inspection and Maintenance
1Inspection and Maintenance
Maintenance, replacement, or repair of
emissions control devices and systems may be
done by any automotive repair establishment or
individuals using parts that are “certified” to
EPA standards.
According to state and fede ral regulations, failure to
perform maintenance on the maintenance main
items marked with # will not void your emissions
warranties. However, all ma intenance services should
be performed in accordan ce with the intervals
indicated by the driver information interface.
2 Maintenance Service Items P. 644
If you want to perform complex maintenance tasks
that require more skills a nd tools, you can purchase a
subscription to the Service Express website at
www.techinfo.honda.com .
2 Authorized Manuals P. 750
If you want to perform ma intenance yourself, make
sure that you have the necessary tools and skills first.
After performing ma intenance, update the records in
the separate maintenance booklet.
U.S. models
19 ODYSSEY-31THR6120.book 638 ページ 2018年12月6日 木曜日 午後4時35分
Page 646 of 767
644
uuMaintenance MinderTMuTo Use Maintenance MinderTM
Maintenance
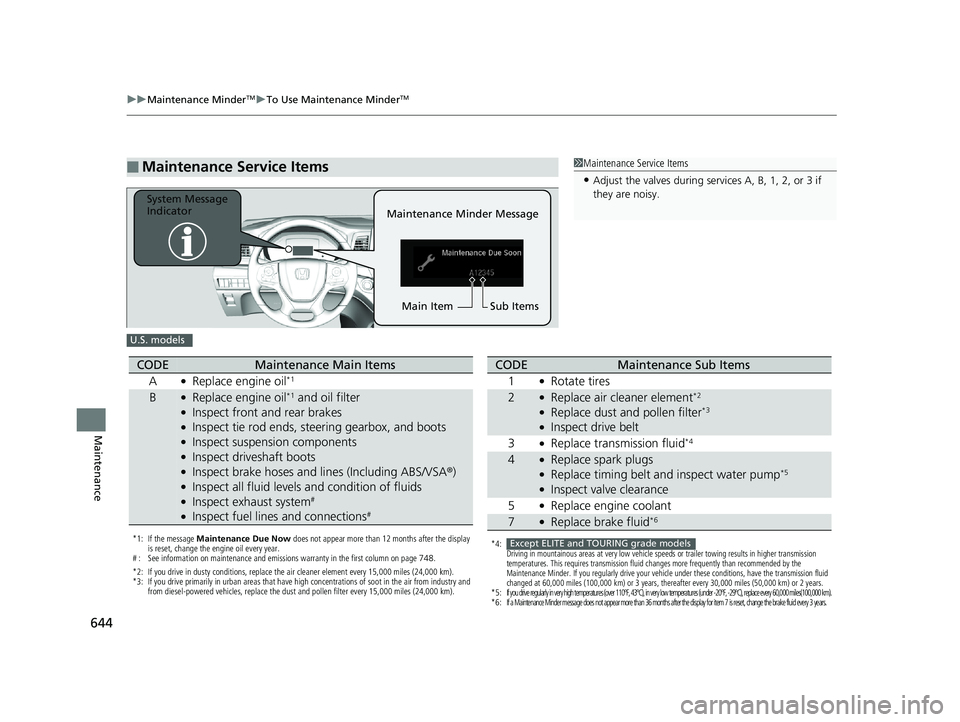
■Maintenance Service Items1Maintenance Service Items
•Adjust the valves during services A, B, 1, 2, or 3 if
they are noisy.
Maintenance Minder Message
System Message
Indicator
Sub Items
Main Item
U.S. models
*1: If the message Maintenance Due Now does not appear more than 12 months after the display
is reset, change the engine oil every year.
# : See information on maintenance and emissions warranty in the first column on page 748.
*2: If you drive in dusty conditions, replace the air cleaner element every 15,000 miles (24,000 km).
*3: If you drive primarily in urban areas that have high concentrations of soot in the air from industry and from diesel-powered vehicles, replace the dust and pollen filter every 15,000 miles (24,000 km).
CODEMaintenance Main Items
A
●Replace engine oil*1
B●Replace engine oil*1 and oil filter●Inspect front and rear brakes●Inspect tie rod ends, steering gearbox, and boots●Inspect suspension components●Inspect driveshaft boots●Inspect brake hoses and li nes (Including ABS/VSA®)●Inspect all fluid levels and condition of fluids●Inspect exhaust system#
●Inspect fuel lines and connections#
*4:Driving in mountainous areas at very low vehicle speeds or trailer towing results in higher transmission
temperatures. This requires transmission fluid changes more frequently than recommended by the
Maintenance Minder. If you regularly drive your vehicle under these conditions, have the transmission fluid
changed at 60,000 miles (100,000 km) or 3 years, thereafter every 30,000 miles (50,000 km) or 2 years.
*5:If you drive regularly in very high temperatures (over 110ºF, 43 ºC), in very low temperatures (under -20ºF, -29ºC), replace eve ry 60,000 miles(100,000 km).*6:If a Maintenance Minder message does not appear more than 36 mont hs after the display for item 7 is reset, change the brake fluid every 3 years.
CODEMaintenance Sub Items
1
●Rotate tires
2●Replace air cleaner element*2
●Replace dust and pollen filter*3
●Inspect drive belt
3
●Replace transmission fluid*4
4●Replace spark plugs●Replace timing belt and inspect water pump*5
●Inspect valve clearance
5
●Replace engine coolant
7●Replace brake fluid*6
Except ELITE and TOURING grade models
19 ODYSSEY-31THR6120.book 644 ページ 2018年12月6日 木曜日 午後4時35分
Page 647 of 767
645
uuMaintenance MinderTMuTo Use Maintenance MinderTM
Continued
Maintenance
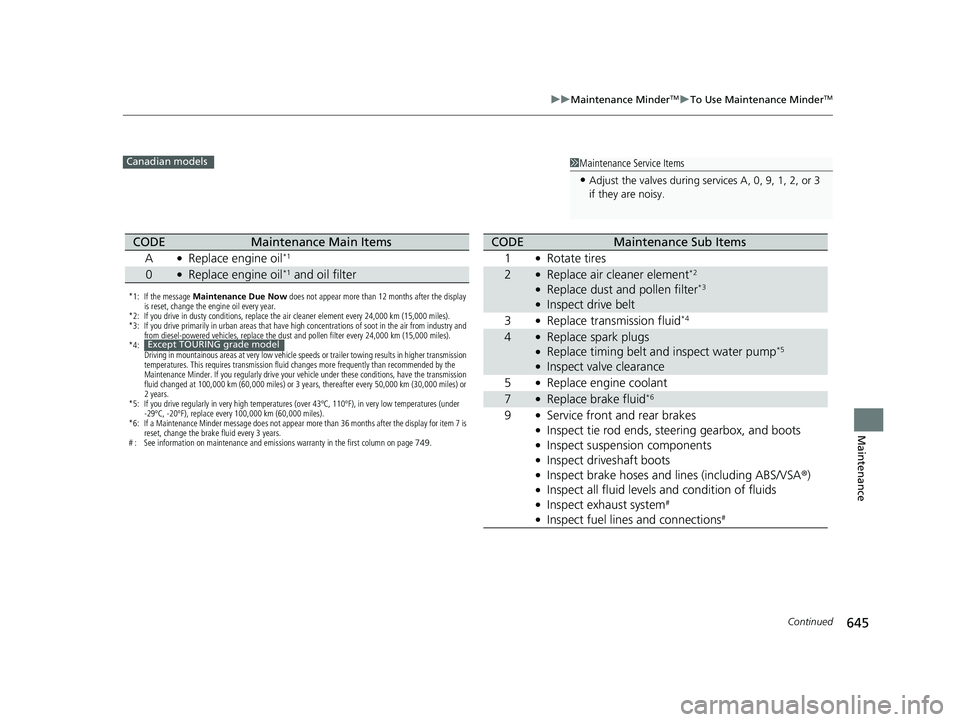
1Maintenance Service Items
•Adjust the valves during services A, 0, 9, 1, 2, or 3
if they are noisy.
Canadian models
*1: If the message Maintenance Due Now does not appear more than 12 months after the display
is reset, change the engine oil every year.
*2: If you drive in dusty conditions, replace the air cleaner element every 24,000 km (15,000 miles).
*3: If you drive primarily in urban areas that have high concentrations of soot in the air from industry and from diesel-powered vehicles, replace the dust and pollen filter every 24,000 km (15,000 miles).
*4: Driving in mountainous areas at very low vehicle speeds or trailer towing results in higher transmission
temperatures. This requires transmission fluid changes more frequently than recommended by the
Maintenance Minder. If you regularly drive your vehicle under these conditions, have the transmission
fluid changed at 100,000 km (60,000 miles) or 3 years, thereafter every 50,000 km (30,000 miles) or
2 years.
*5: If you drive regularly in very high temperatures (over 43ºC, 110ºF), in very low temperatures (under -29ºC, -20ºF), replace every 100,000 km (60,000 miles).
*6: If a Maintenance Minder message does not appear more than 36 months after the display for item 7 is reset, change the brake fluid every 3 years.
# : See information on maintenance and emissions warranty in the first column on page 749.
CODEMaintenance Main Items
A
●Replace engine oil*1
0●Replace engine oil*1 and oil filter
Except TOURING grade model
CODEMaintenance Sub Items
1
●Rotate tires
2●Replace air cleaner element*2
●Replace dust and pollen filter*3
●Inspect drive belt
3
●Replace transmission fluid*4
4●Replace spark plugs●Replace timing belt and inspect water pump*5
●Inspect valve clearance
5
●Replace engine coolant
7●Replace brake fluid*6
9●Service front and rear brakes●Inspect tie rod ends, st eering gearbox, and boots●Inspect suspension components●Inspect driveshaft boots●Inspect brake hoses and lines (including ABS/VSA ®)●Inspect all fluid levels and condition of fluids●Inspect exhaust system#
●Inspect fuel lines and connections#
19 ODYSSEY-31THR6120.book 645 ページ 2018年12月6日 木曜日 午後4時35分
Page 677 of 767
675
Maintenance
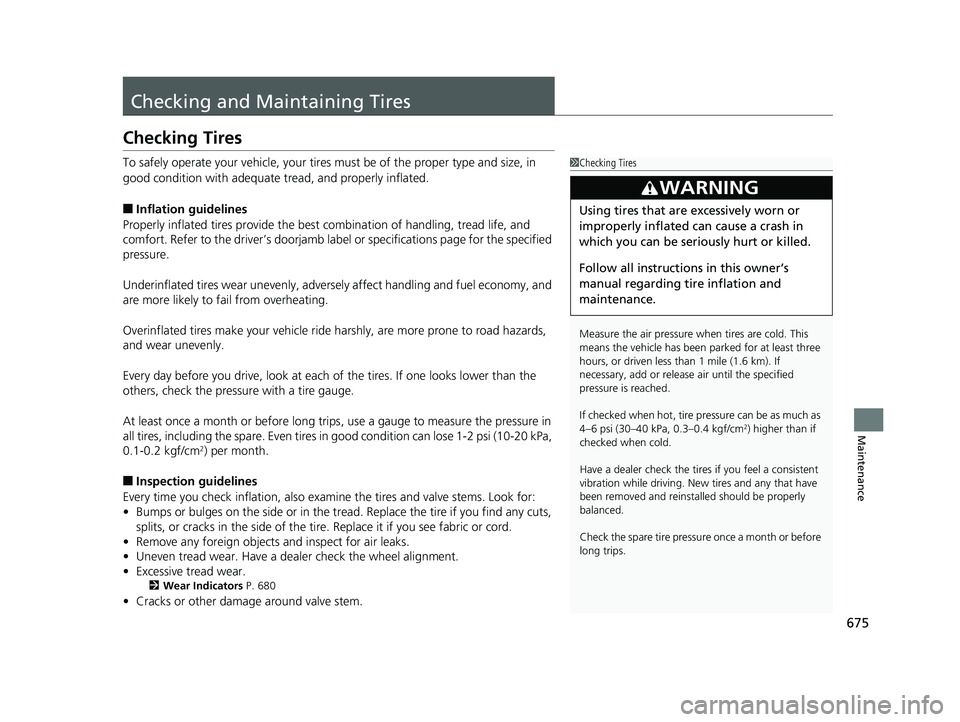
Checking and Maintaining Tires
Checking Tires
To safely operate your vehicle, your tires must be of the proper type and size, in
good condition with adequate tread, and properly inflated.
■Inflation guidelines
Properly inflated tires provide the best combination of handling, tread life, and
comfort. Refer to the driver’s doorjamb labe l or specifications page for the specified
pressure.
Underinflated tires wear unev enly, adversely affect handling and fuel economy, and
are more likely to fail from overheating.
Overinflated tires make your vehicle ride ha rshly, are more prone to road hazards,
and wear unevenly.
Every day before you drive, look at each of the tires. If one looks lower than the
others, check the pressure with a tire gauge.
At least once a month or before long trips , use a gauge to measure the pressure in
all tires, including the spare. Even tires in good condition can lose 1-2 psi (10-20 kPa,
0.1-0.2 kgf/cm
2) per month.
■Inspection guidelines
Every time you check inflation, also examine the tires and valve stems. Look for:
• Bumps or bulges on the side or in the tr ead. Replace the tire if you find any cuts,
splits, or cracks in the side of the tire . Replace it if you see fabric or cord.
• Remove any foreign objects and inspect for air leaks.
• Uneven tread wear. Have a deal er check the wheel alignment.
• Excessive tread wear.
2 Wear Indicators P. 680
•Cracks or other damage around valve stem.
1Checking Tires
Measure the air pressure when tires are cold. This
means the vehicle has been parked for at least three
hours, or driven less than 1 mile (1.6 km). If
necessary, add or releas e air until the specified
pressure is reached.
If checked when hot, tire pressure can be as much as
4–6 psi (30–40 kPa, 0.3–0.4 kgf/cm
2) higher than if
checked when cold.
Have a dealer check the tires if you feel a consistent
vibration while driving. Ne w tires and any that have
been removed and reinst alled should be properly
balanced.
Check the spare tire pressu re once a month or before
long trips.
3WARNING
Using tires that are excessively worn or
improperly inflated can cause a crash in
which you can be seriously hurt or killed.
Follow all instruction s in this owner’s
manual regarding tire inflation and
maintenance.
19 ODYSSEY-31THR6120.book 675 ページ 2018年12月6日 木曜日 午後4時35分
Page 678 of 767

676
uuChecking and Maintaining Tires uTire and Loading Information Label
Maintenance
Tire and Loading Information Label
The label attached to the driver’s doorj amb provides necessary tire and loading
information.
Tire Labeling
The tires that came on your vehicle have a
number of markings. Those you should be
aware of are described as follows.
Whenever tires are replaced, they should be replaced with tires of the same size.
1 Tire and Loading Information Label
The tire and loading informat ion label attached to the
driver’s doorjamb contains:
aThe number of people your vehicle can carry.
bThe total weight your vehicle can carry. Do not
exceed this weight.
cThe original tire sizes for front, rear, and spare.
dThe proper cold tire pre ssure for front, rear, and
spare.
Label
Example
Example Tire Size
Tire
Identification
Number (TIN)
Maximum
Tire Load
Maximum
Tire Pressure
Tire Size
■Tire Sizes
1 Tire Sizes
Following is an example of tire size with an
explanation of what each component means.
P235/60 R18 102T
P: Vehicle type (P indi cates passenger vehicle).
235: Tire width in millimeters.
60: Aspect ratio (the tire’s section height as a
percentage of its width).
R: Tire construction code (R indicates radial).
18: Rim diameter in inches.
102: Load index (a numerical code associated with
the maximum load the tire can carry).
T: Speed symbol (an alphabe tical code indicating the
maximum speed rating).
19 ODYSSEY-31THR6120.book 676 ページ 2018年12月6日 木曜日 午後4時35分
Page 679 of 767
677
uuChecking and Maintaining Tires uTire Labeling
Maintenance
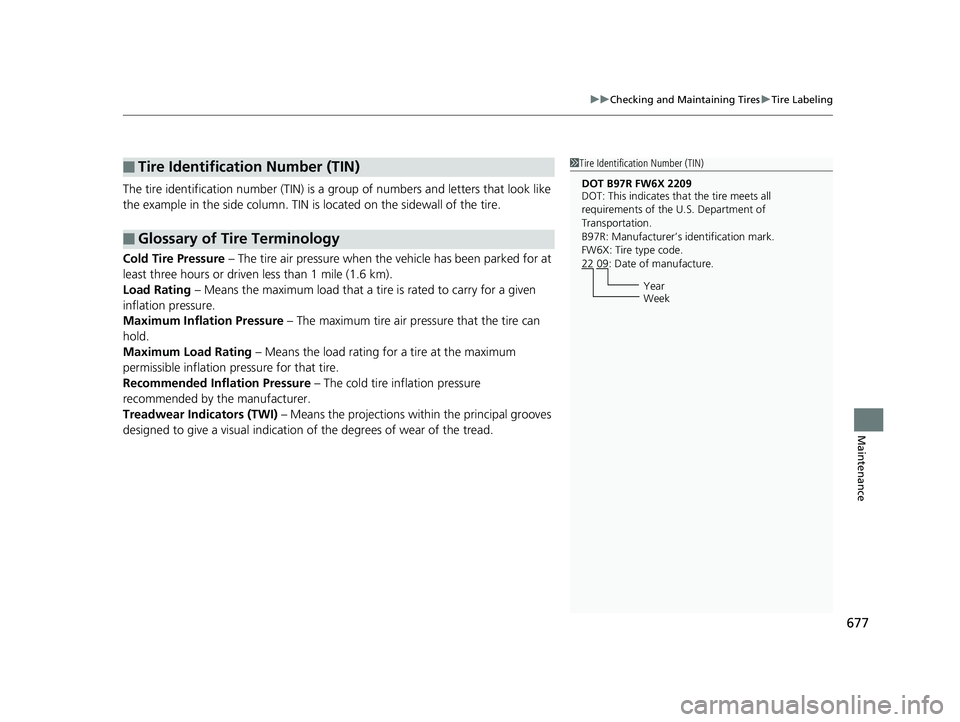
The tire identification number (TIN) is a group of numbers and letters that look like
the example in the side column. TIN is located on the sidewall of the tire.
Cold Tire Pressure – The tire air pressure when the vehicle has been parked for at
least three hours or driven less than 1 mile (1.6 km).
Load Rating – Means the maximum load that a ti re is rated to carry for a given
inflation pressure.
Maximum Inflation Pressure – The maximum tire air pressure that the tire can
hold.
Maximum Load Rating – Means the load rating for a tire at the maximum
permissible inflation pr essure for that tire.
Recommended Inflation Pressure – The cold tire inflation pressure
recommended by the manufacturer.
Treadwear Indicators (TWI) – Means the projections within the principal grooves
designed to give a visual indication of the degrees of wear of the tread.
■Tire Identification Number (TIN)
■Glossary of Tire Terminology
1Tire Identification Number (TIN)
DOT B97R FW6X 2209
DOT: This indicates that the tire meets all
requirements of the U.S. Department of
Transportation.
B97R: Manufacturer’s identification mark.
FW6X: Tire type code.
22 09: Date of manufacture.
Year
Week
19 ODYSSEY-31THR6120.book 677 ページ 2018年12月6日 木曜日 午後4時35分
Page 680 of 767
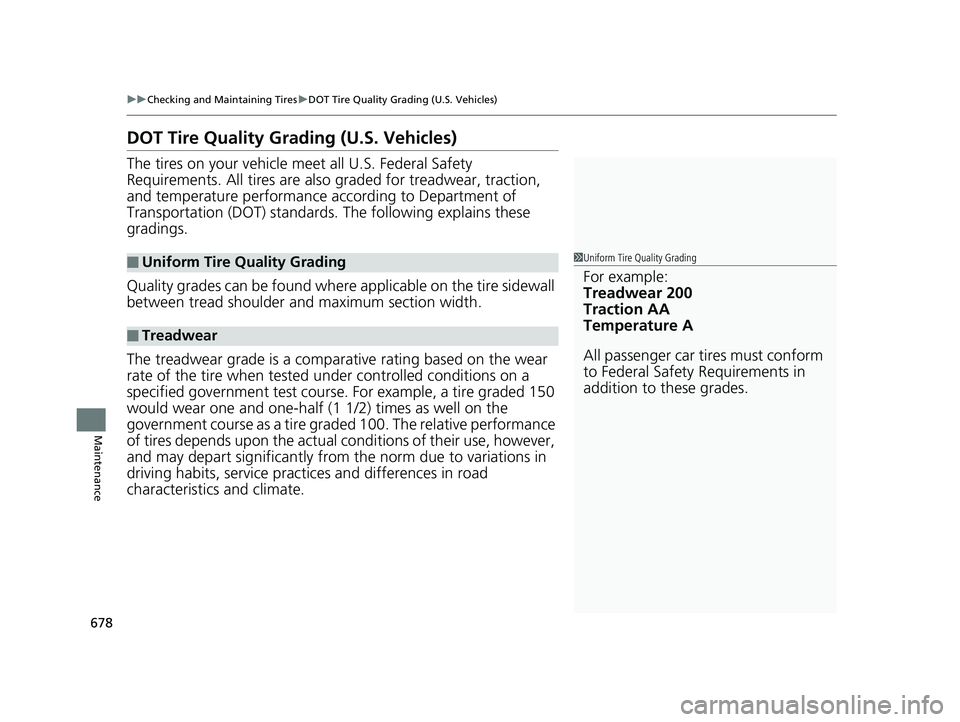
678
uuChecking and Maintaining Tires uDOT Tire Quality Grading (U.S. Vehicles)
Maintenance
DOT Tire Quality Grading (U.S. Vehicles)
The tires on your vehicle meet all U.S. Federal Safety
Requirements. All tires are also graded for treadwear, traction,
and temperature performance a ccording to Department of
Transportation (DOT) standards. The following explains these
gradings.
Quality grades can be found where applicable on the tire sidewall
between tread shoulder an d maximum section width.
The treadwear grade is a comparative rating based on the wear
rate of the tire when tested un der controlled conditions on a
specified government test course. For example, a tire graded 150
would wear one and one-half (1 1/2) times as well on the
government course as a tire graded 100. The relative performance
of tires depends upon the actual conditions of their use, however,
and may depart significantly from the norm due to variations in
driving habits, service practices and differences in road
characteristics and climate.
■Uniform Tire Quality Grading
■Treadwear
1 Uniform Tire Quality Grading
For example:
Treadwear 200
Traction AA
Temperature A
All passenger car tires must conform
to Federal Safety Requirements in
addition to these grades.
19 ODYSSEY-31THR6120.book 678 ページ 2018年12月6日 木曜日 午後4時35分