battery HONDA ODYSSEY 2019 (in English) Workshop Manual
[x] Cancel search | Manufacturer: HONDA, Model Year: 2019, Model line: ODYSSEY, Model: HONDA ODYSSEY 2019Pages: 767, PDF Size: 47.46 MB
Page 696 of 767
uuCleaning uExterior Care
694
Maintenance
A good coat of automotive body wax helps protect your vehicle’s paint from the
elements. Wax will wear off over time and expose your vehicle’s paint to the
elements, so reapply as necessary.
If you get gasoline, oil, engine coolant, or battery fluid on resin coated parts, they
may be stained or the coating may peel. Prom ptly wipe it away using a soft cloth and
clean water.
Wipe using a glass cleaner.
Aluminum is susceptible to deterioration caused by salt and other road
contaminants. When necessary, as early as possible use a sponge and mild detergent
to wipe away these contaminants. Do no t use a stiff brush or harsh chemicals
(including some commercial wheel cleaners). These can damage the protective finish
on aluminum alloy wheels, resulting in corrosion. Depending on the type of finish,
the wheels also may lose their luster or appear burnished. To avoid water stains,
wipe the wheels dry with a cloth while they are still wet.
■Applying Wax
■Maintaining the Bumpers and Other Resin Coated Parts
■Cleaning the Window
■Maintaining Aluminum Wheels
1 Applying Wax
NOTICE
Chemical solvents and st rong cleaners can damage
the paint, metal, and plasti c on your vehicle. Wipe
away spills immediately.
1 Maintaining the Bumpers an d Other Resin Coated Parts
Ask a dealer about the corr ect coating material when
you want to repair the pa inted surface of the parts
made of resin.
19 ODYSSEY-31THR6120.book 694 ページ 2018年12月6日 木曜日 午後4時35分
Page 699 of 767
697
uuAccessories and Modifications uModifications
Maintenance
Modifications
Do not modify your vehicle in a manner that may affect its handling, stability, or
reliability, or install non-genuine Honda pa rts or accessories that may have a similar
effect.
Even minor modifications to vehicle systems can affect overall vehicle performance.
Always make sure all equipment is properly installed and maintained, and do not
make any modification to your vehicle or its systems that might cause your vehicle
to no longer meet federal, state, pr ovince, territory, and local regulations.
The on-board diagnostic port (OBD-II/SAE J1 962 connector) installed on this vehicle
is intended to be used with automobile system diagnostic devices or with other
devices that Honda has approved. Use of any other type of device may adversely
affect the vehicle’s electronic systems or allow them to be compromised, possibly
resulting in a system malfunction, drained battery, or other unexpected problems.
Do not modify or attempt to repair any of the electrical components.
19 ODYSSEY-31THR6120.book 697 ページ 2018年12月6日 木曜日 午後4時35分
Page 701 of 767
699
Handling the Unexpected
This chapter explains how to handle unexpected troubles.
ToolsTypes of Tools .................................. 700
If a Tire Goes Flat Changing a Flat Tire ......................... 701
Engine Does Not Start Checking the Engine ........................ 710
If the Remote Battery is Weak .......... 711
Emergency Engine Stop ................... 712
Jump Starting .................................... 713
Overheating How to Handle Overheating ............. 715
Indicator, Coming On/Blinking
If the Low Oil Pressure Symbol Appears... 718
If the Charging System Indicator Comes On ................................................. 718
If the Malfunction Indicator Lamp Comes
On or Blinks ................................... 719
If the Brake System Indicator (Red) Comes On or Blinks ................................... 720
If the Brake System Indicator (Red) Comes On or Blinks at the Same Time When the Brake
System Indicator (Amber) Comes On ..... 721
If the Electric Power Steering (EPS) System Indicator Comes On ....................... 722
If the Low Tire Pressure/TPMS Indicator
Comes On or Blinks........................ 722 If the Transmission System Indicator Blinks
along with the Warning Message... 723
Fuses
Fuse Locations ................................. 724
Inspecting and Changing Fuses ........ 730
Emergency Towing ........................... 731
When You Cannot Unlock the Fuel Fill Door ................................................. 732When You Cannot Open the Tailgate..... 733When You Cannot Close the Power
Sliding Doors*................................. 735
Refueling
Refueling From a Portable Fuel Container .... 736
* Not available on all models
19 ODYSSEY-31THR6120.book 699 ページ 2018年12月6日 木曜日 午後4時35分
Page 712 of 767
710
Handling the Unexpected
Engine Does Not Start
Checking the Engine
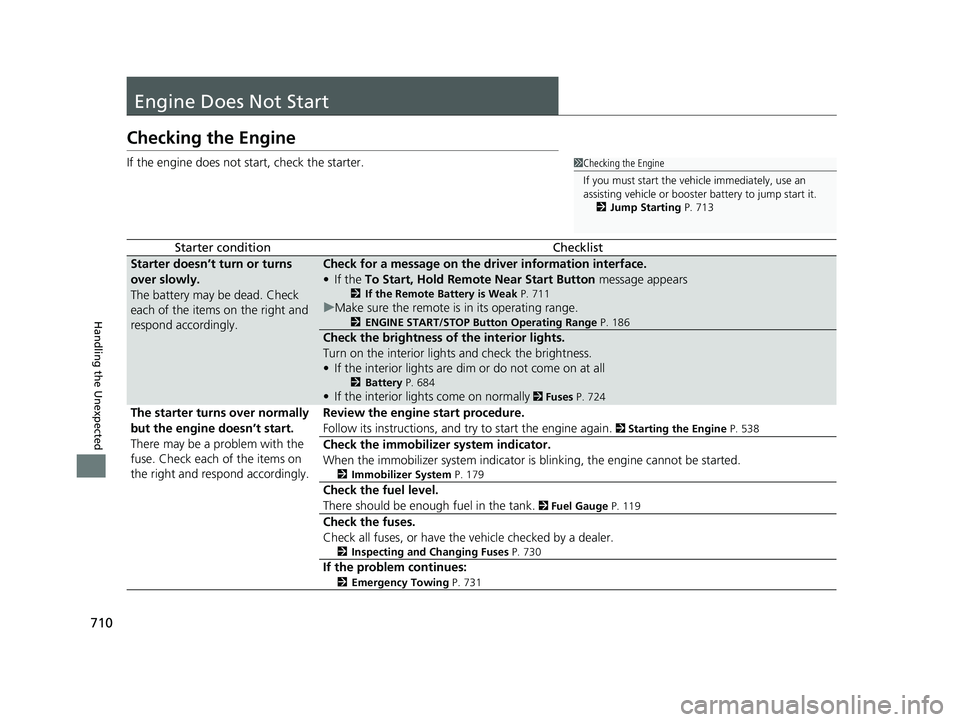
If the engine does not start, check the starter.
Starter conditionChecklist
Starter doesn’t turn or turns
over slowly.
The battery may be dead. Check
each of the items on the right and
respond accordingly.Check for a message on the dr iver information interface.
• If the To Start, Hold Remote Near Start Button message appears
2If the Remote Battery is Weak P. 711
uMake sure the remote is in its operating range.
2 ENGINE START/STOP Button Operating Range P. 186
Check the brightness of the interior lights.
Turn on the interior lights and check the brightness.
• If the interior lights are dim or do not come on at all
2 Battery P. 684
•If the interior lights come on normally 2 Fuses P. 724
The starter turns over normally
but the engine doesn’t start.
There may be a problem with the
fuse. Check each of the items on
the right and resp ond accordingly. Review the engine start procedure.
Follow its instructions, and try to start the engine again.
2
Starting the Engine P. 538
Check the immobilizer system indicator.
When the immobilizer system indicator is blinking, the engine cannot be started.
2Immobilizer System P. 179
Check the fuel level.
There should be enough fuel in the tank.
2 Fuel Gauge P. 119
Check the fuses.
Check all fuses, or have the vehicle checked by a dealer.
2Inspecting and Changing Fuses P. 730
If the problem continues:
2Emergency Towing P. 731
1Checking the Engine
If you must start the vehi cle immediately, use an
assisting vehicle or booster battery to jump start it.
2 Jump Starting P. 713
19 ODYSSEY-31THR6120.book 710 ページ 2018年12月6日 木曜日 午後4時35分
Page 713 of 767

711
uuEngine Does Not Start uIf the Remote Battery is Weak
Handling the Unexpected
If the Remote Battery is Weak
If the beeper sounds, the To Start, Hold Remote Near Start Button message
appears on the driver information interface, the ENGINE START/STOP button
flashes, and the engine won’t start. Start the engine as follows:
1.Touch the center of the ENGINE START/
STOP button with the H logo on the
remote while the ENGINE START/STOP
button is flashing. The buttons on the
remote should be facing you.
u The ENGINE START/STOP button
flashes for about 30 seconds.
2. Depress the brake pedal and press the
ENGINE START/STOP button within 10
seconds after the beeper sounds and the
ENGINE START/STOP button changes
from flashing to on.
u If you don’t depress the pedal, the mode
will change to ACCESSORY.
19 ODYSSEY-31THR6120.book 711 ページ 2018年12月6日 木曜日 午後4時35分
Page 715 of 767
713Continued
Handling the Unexpected
Jump Starting
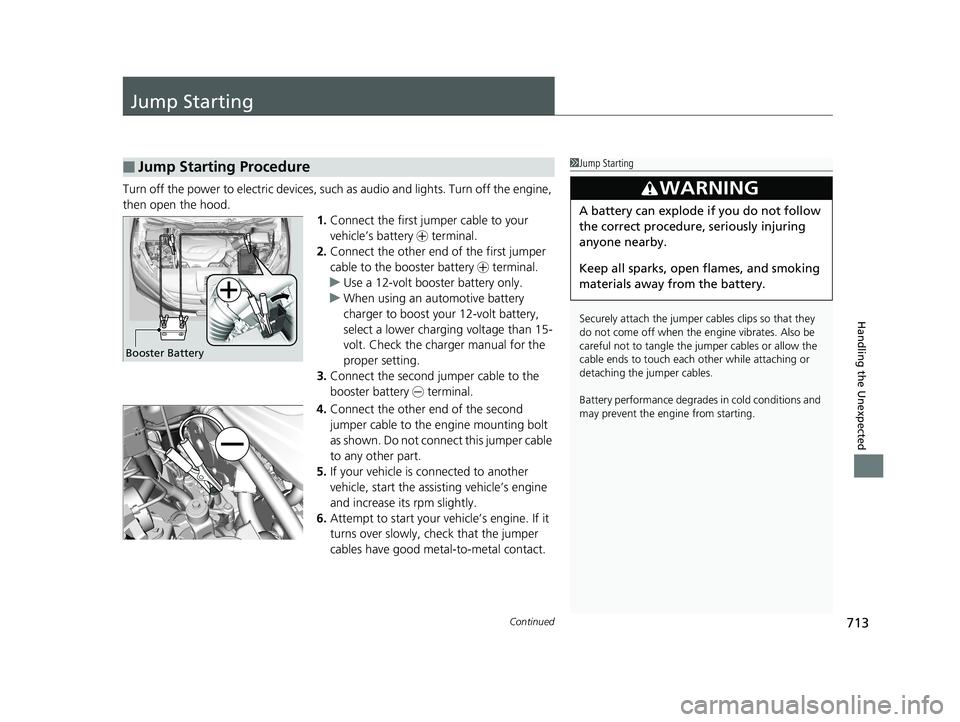
Turn off the power to electric devices, such as audio and lights. Turn off the engine,
then open the hood. 1.Connect the first jumper cable to your
vehicle’s battery + terminal.
2. Connect the other end of the first jumper
cable to the booster battery + terminal.
u Use a 12-volt booster battery only.
u When using an automotive battery
charger to boost your 12-volt battery,
select a lower charging voltage than 15-
volt. Check the charger manual for the
proper setting.
3. Connect the second jumper cable to the
booster battery - terminal.
4. Connect the other end of the second
jumper cable to the engine mounting bolt
as shown. Do not connect this jumper cable
to any other part.
5. If your vehicle is connected to another
vehicle, start the assisting vehicle’s engine
and increase its rpm slightly.
6. Attempt to start your ve hicle’s engine. If it
turns over slowly, check that the jumper
cables have good metal-to-metal contact.
■Jump Starting Procedure1 Jump Starting
Securely attach the jumper cables clips so that they
do not come off when the e ngine vibrates. Also be
careful not to tangle the ju mper cables or allow the
cable ends to touch each other while attaching or
detaching the jumper cables.
Battery performance degrades in cold conditions and
may prevent the engi ne from starting.
3WARNING
A battery can explode if you do not follow
the correct procedure, seriously injuring
anyone nearby.
Keep all sparks, open flames, and smoking
materials away from the battery.
Booster Battery
19 ODYSSEY-31THR6120.book 713 ページ 2018年12月6日 木曜日 午後4時35分
Page 716 of 767
714
uuJump Starting u
Handling the Unexpected
Once your vehicle’s engine has started, re move the jumper cables in the following
order:
1. Disconnect the jumper cable from your vehicle’s engine mounting bolt.
2. Disconnect the other end of the jumper cable from the booster battery -
terminal.
3. Disconnect the jumper cable from your vehicle’s battery + terminal.
4. Disconnect the other end of the jumper cable from the booster battery +
terminal.
Have your vehicle inspected by a n earby service station or a dealer.
■What to Do After the Engine Starts
19 ODYSSEY-31THR6120.book 714 ページ 2018年12月6日 木曜日 午後4時35分
Page 720 of 767
718
Handling the Unexpected
Indicator, Coming On/Blinking
If the Low Oil Pressure Symbol Appears
■Reasons for the symbol to appear
Appears when the engine oil pressure is low.
■What to do as soon as the symbol appears
1. Immediately park the vehicle on level ground in a safe place.
2. If necessary, turn the ha zard warning lights on.
■What to do after parking the vehicle
1. Stop the engine and let it sit for about three minutes.
2. Open the hood and check the oil level.
u Add oil as necessary.
2 Oil Check P. 651
3.Start the engine and check the low oil pressure symbol.
u The symbol disappears: Start driving again.
u The symbol does not disappear within 10 seconds: Stop the engine
and contact a dealer for repairs immediately.
If the Charging System Indicator Comes On
■Reasons for the indicator to come on
Comes on when the battery is not being charged.
■What to do when the indicator comes on
Turn off the climate con trol system, rear defogger, and other electrical
systems, and immediately contact a dealer for repairs.
1 If the Low Oil Pressure Symbol Appears
NOTICE
Running the engine with low oil pressure can cause
serious mechanical damage almost immediately.
1If the Charging System Indicator Comes On
If you need to stop temporarily, do not turn off the
engine. Restarting the engi ne may rapidly discharge
the battery.
19 ODYSSEY-31THR6120.book 718 ページ 2018年12月6日 木曜日 午後4時35分
Page 727 of 767
725
uuFuses uFuse Locations
Continued
Handling the Unexpected
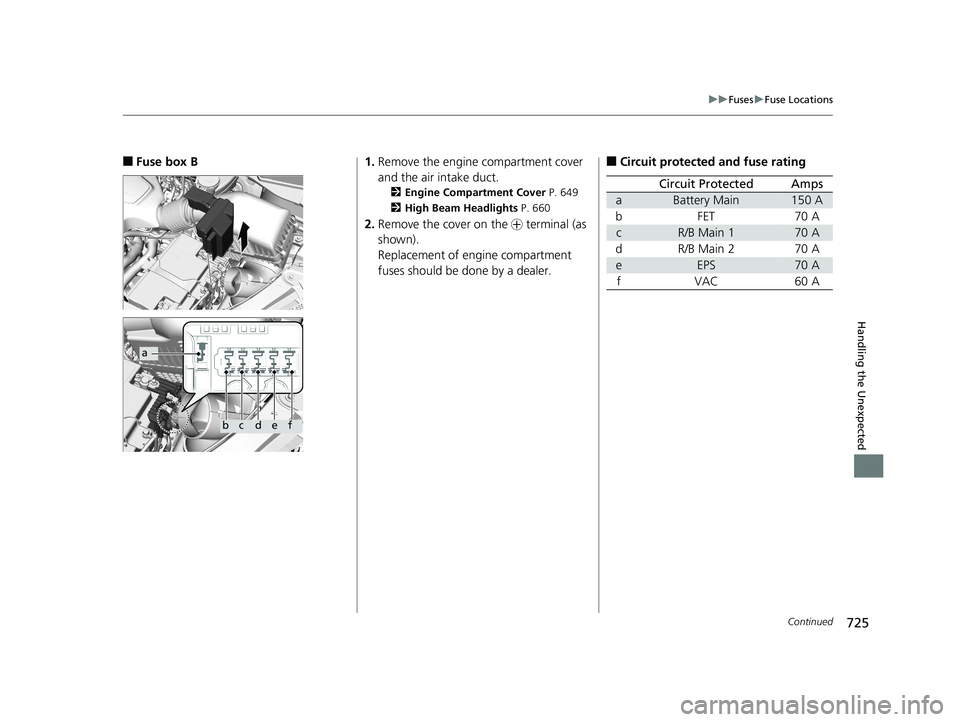
■Fuse box B
a
bcdef
1. Remove the engine compartment cover
and the air intake duct.
2 Engine Compartment Cover P. 649
2 High Beam Headlights P. 660
2.Remove the cover on the + terminal (as
shown).
Replacement of engine compartment
fuses should be done by a dealer.
■Circuit protected and fuse rating
Circuit ProtectedAmps
aBattery Main150 A
bFET70 A
cR/B Main 170 A
dR/B Main 270 A
eEPS70 A
fVAC60 A
19 ODYSSEY-31THR6120.book 725 ページ 2018年12月6日 木曜日 午後4時35分
Page 732 of 767
730
uuFuses uInspecting and Changing Fuses
Handling the Unexpected
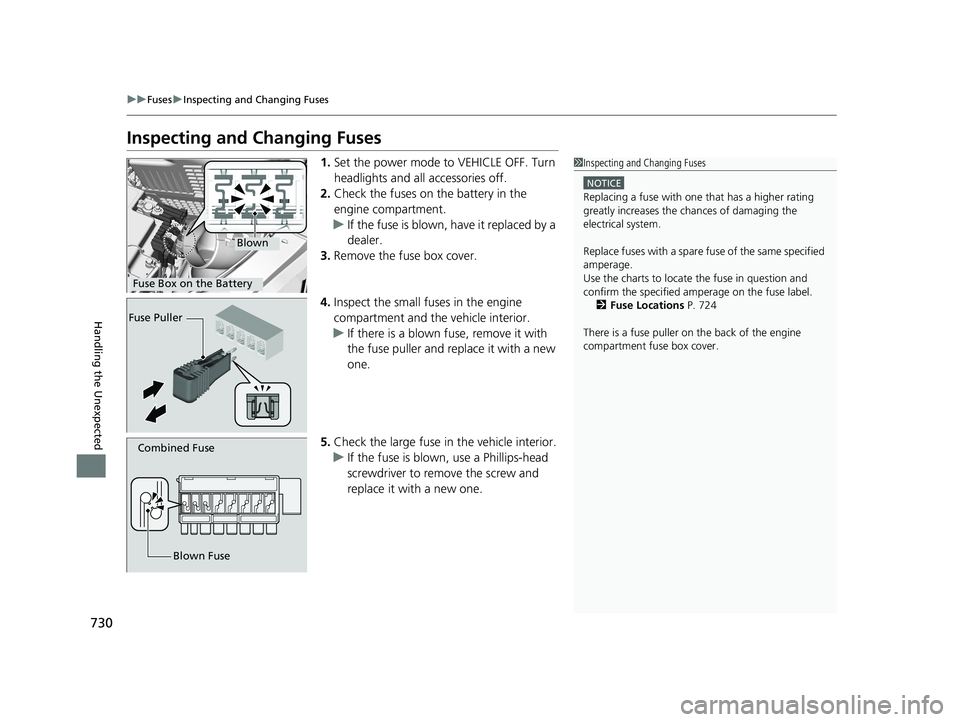
Inspecting and Changing Fuses
1. Set the power mode to VEHICLE OFF. Turn
headlights and all accessories off.
2. Check the fuses on the battery in the
engine compartment.
u If the fuse is blown, have it replaced by a
dealer.
3. Remove the fuse box cover.
4. Inspect the small fuses in the engine
compartment and the vehicle interior.
u If there is a blown fuse, remove it with
the fuse puller and replace it with a new
one.
5. Check the large fuse in the vehicle interior.
u If the fuse is blown, use a Phillips-head
screwdriver to remo ve the screw and
replace it with a new one.1 Inspecting and Changing Fuses
NOTICE
Replacing a fuse with on e that has a higher rating
greatly increases the chances of damaging the
electrical system.
Replace fuses with a spare fuse of the same specified
amperage.
Use the charts to locate the fuse in question and
confirm the specified amperage on the fuse label. 2 Fuse Locations P. 724
There is a fuse puller on the back of the engine
compartment fuse box cover.
Blown
Fuse Box on the Battery
Fuse Puller
Combined Fuse
Blown Fuse
19 ODYSSEY-31THR6120.book 730 ページ 2018年12月6日 木曜日 午後4時35分