park assist HONDA ODYSSEY 2019 Owner's Manual (in English)
[x] Cancel search | Manufacturer: HONDA, Model Year: 2019, Model line: ODYSSEY, Model: HONDA ODYSSEY 2019Pages: 767, PDF Size: 47.46 MB
Page 6 of 767
4
Quick Reference Guide
Quick Reference Guide
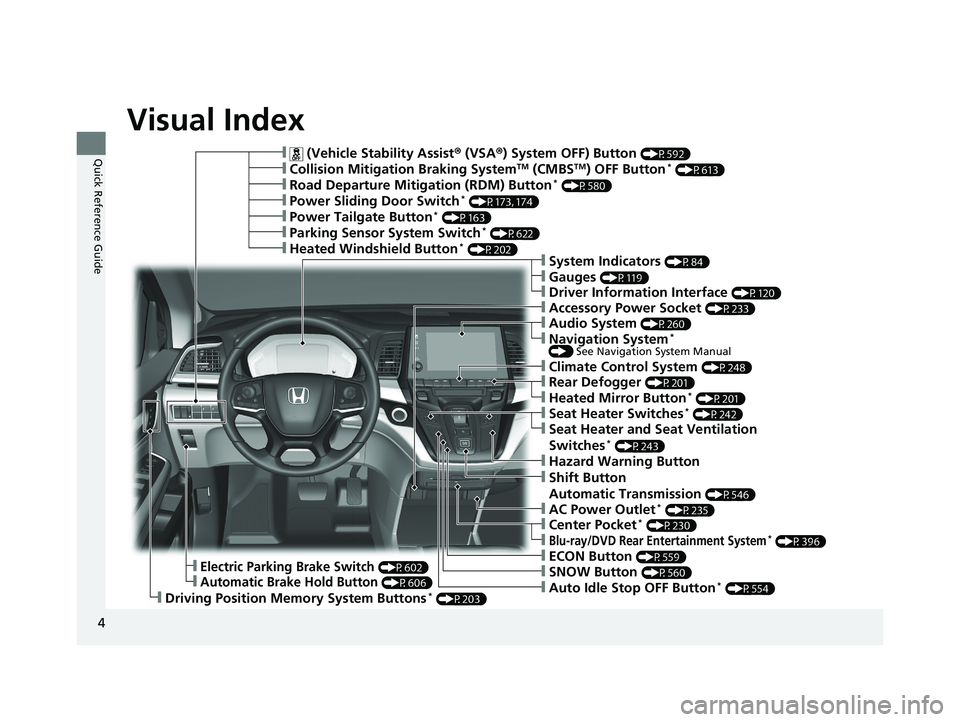
Visual Index
❙ (Vehicle Stability Assist® (VSA ®) System OFF) Button (P592)
❙Road Departure Mitigation (RDM) Button* (P580)
❙Power Sliding Door Switch* (P173, 174)
❙Climate Control System (P248)
❙Driving Position Memory System Buttons* (P203)
❙Accessory Power Socket (P233)
❙Power Tailgate Button* (P163)
❙Parking Sensor System Switch* (P622)
❙Collision Mitigation Braking SystemTM (CMBSTM) OFF Button* (P613)
❙Heated Windshield Button* (P202)
❙Electric Parking Brake Switch (P602)
❙Automatic Brake Hold Button (P606)
❙Shift Button
Automatic Transmission
(P546)
❙ECON Button (P559)
❙SNOW Button (P560)
❙Auto Idle Stop OFF Button* (P554)
❙Hazard Warning Button
❙AC Power Outlet* (P235)
❙System Indicators (P84)
❙Gauges (P119)
❙Driver Information Interface (P120)
❙Audio System (P260)
❙Navigation System* () See Navigation System Manual
❙Rear Defogger (P201)
❙Heated Mirror Button* (P201)
❙Seat Heater Switches* (P242)
❙Seat Heater and Seat Ventilation
Switches* (P243)
❙Center Pocket* (P230)
❙Blu-ray/DVD Rear Entertainment System* (P396)
19 ODYSSEY-31THR6120.book 4 ページ 2018年12月6日 木曜日 午後4時35分
Page 15 of 767
13
Quick Reference Guide
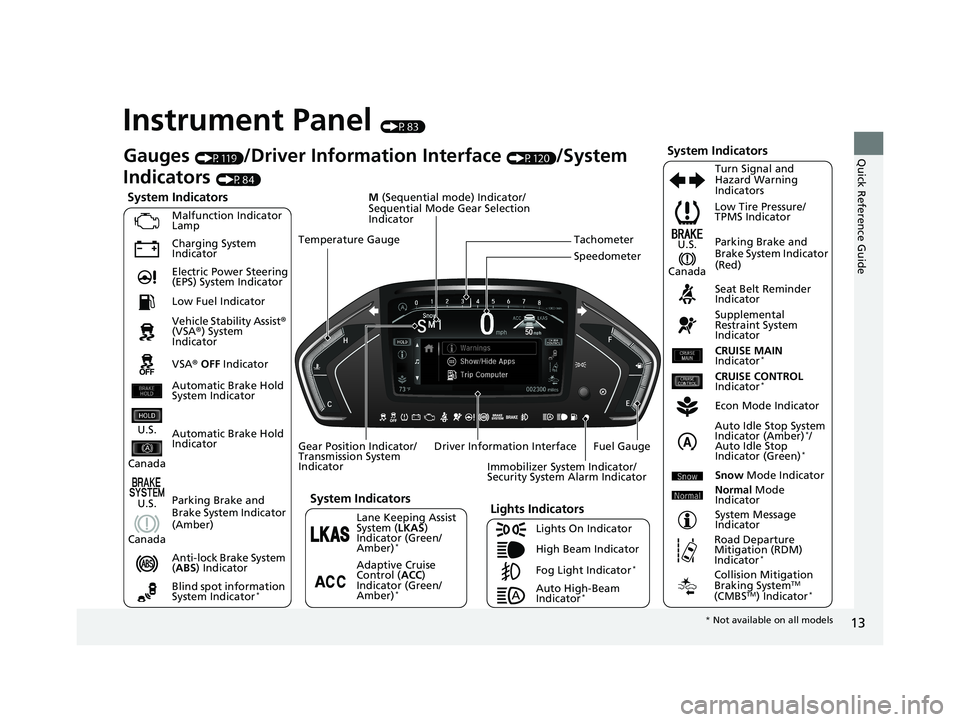
Instrument Panel (P83)
System Indicators
Malfunction Indicator
Lamp
Charging System
Indicator
Anti-lock Brake System
(ABS ) Indicator
Vehicle Stability Assist
®
(VSA ®) System
Indicator
VSA ® OFF Indicator Low Tire Pressure/
TPMS Indicator
Immobilizer System Indicator/
Security System Alarm Indicator
Lights Indicators
Lights On Indicator
High Beam Indicator
Fog Light Indicator
*
Lane Keeping Assist
System ( LKAS)
Indicator (Green/
Amber)
*
Seat Belt Reminder
Indicator
System Indicators
Econ Mode Indicator
System Message
Indicator Parking Brake and
Brake System Indicator
(Red)
Supplemental
Restraint System
Indicator
Driver Information Interface CRUISE MAIN
Indicator
*
Tachometer
M
(Sequential mode) Indicator/
Sequential Mode Gear Selection
Indicator
Speedometer
Fuel Gauge
Gear Position Indicator/
Transmission System
Indicator Auto Idle Stop System
Indicator (Amber)
*/
Auto Idle Stop
Indicator (Green)
*
Gauges (P119)/Driver Information Interface (P120)/System
Indicators
(P84)
Automatic Brake Hold
Indicator Adaptive Cruise
Control (ACC)
Indicator (Green/
Amber)
*
Turn Signal and
Hazard Warning
Indicators
Electric Power Steering
(EPS) System Indicator
Blind spot information
System Indicator
*
CRUISE CONTROL
Indicator*
Temperature Gauge
Parking Brake and
Brake System Indicator
(Amber)
U.S.
Canada
U.S.
Canada
System Indicators
U.S.
Canada
Low Fuel Indicator
Automatic Brake Hold
System Indicator
Auto High-Beam
Indicator*
Snow Mode Indicator
Normal Mode
Indicator
Road Departure
Mitigation (RDM)
Indicator
*
Collision Mitigation
Braking SystemTM
(CMBSTM) Indicator*
* Not available on all models
19 ODYSSEY-31THR6120.book 13 ページ 2018年12月6日 木曜日 午後4時35分
Page 34 of 767
32
Quick Reference Guide
Pulling the electric parking
brake switch does not
release the parking brake.
Why?Pull the electric parking brake switch with the brake pedal
depressed.
Depressing the accelerator
pedal does not release the
parking brake
automatically. Why?●Fasten the driver’s seat belt.
●Check if the transmission is in (P or (N. If so, select any other
position.
Why does the gear position
automatically change to
(P
when I open the driver’s
door to check for parking
space lines when
reversing?
●Fasten the driver’s seat belt.
●Close the driver’s door and manually change the gear
position.
2 When opening the driver’s door (P549)
I’m seeing an amber
indicator of a tire with an
exclamation point. What is
that?The Tire Pressure Monitoring System (TPMS) needs attention.
Check tire pressure.
2 Tire Pressure Monitoring System (TPMS) with Tire Fill Assist (P594, 722)
19 ODYSSEY-31THR6120.book 32 ページ 2018年12月6日 木曜日 午後4時35分
Page 197 of 767
Continued195
uuOperating the Switches Around the Steering Wheel uAuto High-Beam*
Controls
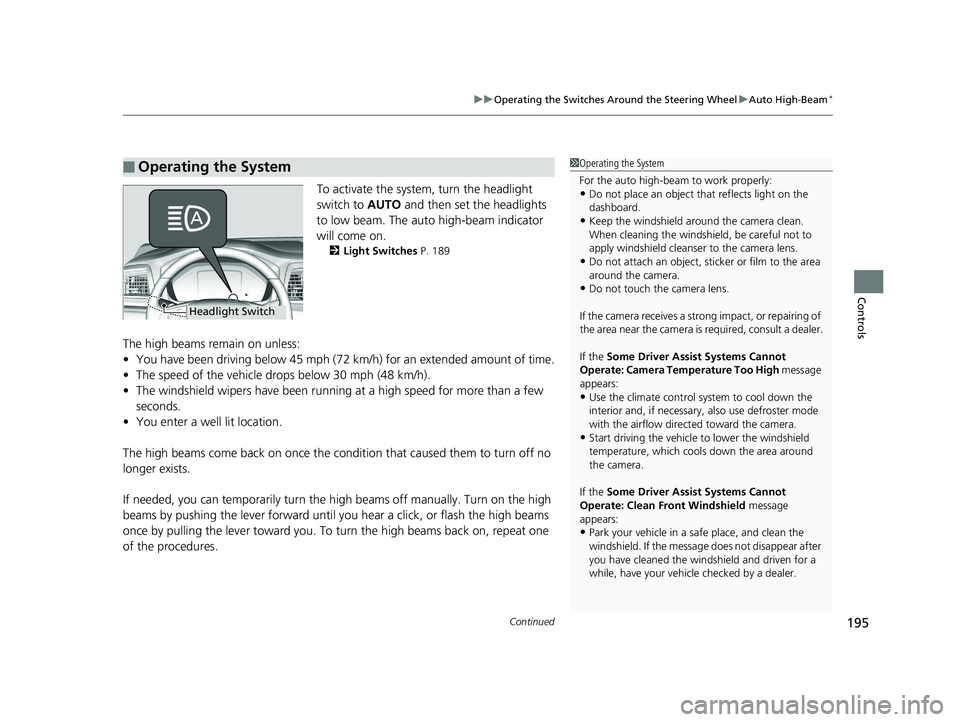
To activate the system , turn the headlight
switch to AUTO and then set the headlights
to low beam. The auto high-beam indicator
will come on.
2 Light Switches P. 189
The high beams remain on unless:
•You have been driving below 45 mph (72 km/h) for an extended amount of time.
• The speed of the vehicle drops below 30 mph (48 km/h).
• The windshield wipers have been runnin g at a high speed for more than a few
seconds.
• You enter a well lit location.
The high beams come back on once the condi tion that caused them to turn off no
longer exists.
If needed, you can temporarily turn the hi gh beams off manually. Turn on the high
beams by pushing the lever forward until you hear a click, or flash the high beams
once by pulling the lever toward you. To turn the high beams back on, repeat one
of the procedures.
■Operating the System1 Operating the System
For the auto high-beam to work properly:
•Do not place an object that reflects light on the
dashboard.
•Keep the windshield around the camera clean.
When cleaning the windshield, be careful not to
apply windshield cleanser to the camera lens.
•Do not attach an object, sticker or film to the area
around the camera.
•Do not touch the camera lens.
If the camera receives a st rong impact, or repairing of
the area near the camera is required, consult a dealer.
If the Some Driver Assist Systems Cannot
Operate: Camera Temperature Too High message
appears:
•Use the climate control system to cool down the
interior and, if necessary, also use defroster mode
with the airflow directed toward the camera.
•Start driving the vehicle to lower the windshield
temperature, which cool s down the area around
the camera.
If the Some Driver Assist Systems Cannot
Operate: Clean Front Windshield message
appears:
•Park your vehicle in a sa fe place, and clean the
windshield. If the message does not disappear after
you have cleaned the winds hield and driven for a
while, have your vehicle checked by a dealer.
Headlight Switch
19 ODYSSEY-31THR6120.book 195 ページ 2018年12月6日 木曜日 午後4時35分
Page 503 of 767
501
uuBluetooth ® HandsFreeLink ®u HFL Menus
Continued
Features
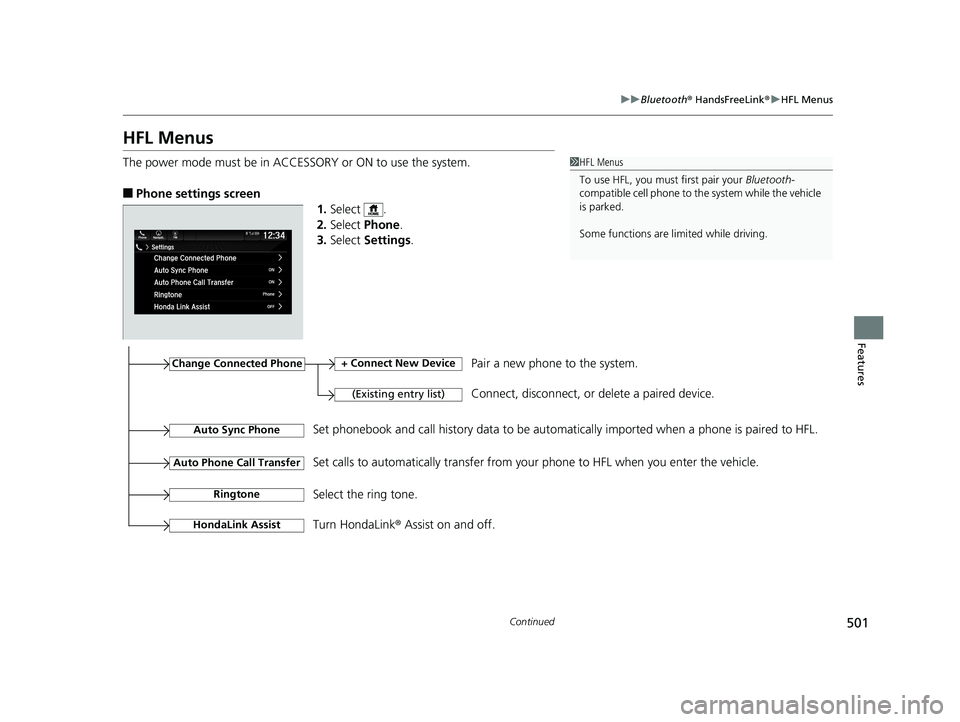
HFL Menus
The power mode must be in ACCESSO RY or ON to use the system.
■Phone settings screen
1.Select .
2. Select Phone.
3. Select Settings .
1HFL Menus
To use HFL, you must first pair your Bluetooth-
compatible cell phone to th e system while the vehicle
is parked.
Some functions are li mited while driving.
Change Connected Phone
(Existing entry list)
+ Connect New DevicePair a new phone to the system.
Connect, disconnect, or delete a paired device.
RingtoneSelect the ring tone.
Auto Sync PhoneSet phonebook and call history data to be automatically imported when a phone is paired to HFL.
Turn HondaLink® Assist on and off.
HondaLink Assist
Auto Phone Call TransferSet calls to automatically transfer from your phone to HFL when you enter the vehicle.
19 ODYSSEY-31THR6120.book 501 ページ 2018年12月6日 木曜日 午後4時35分
Page 524 of 767
uuBluetooth ® HandsFreeLink ®u HFL Menus
522
Features
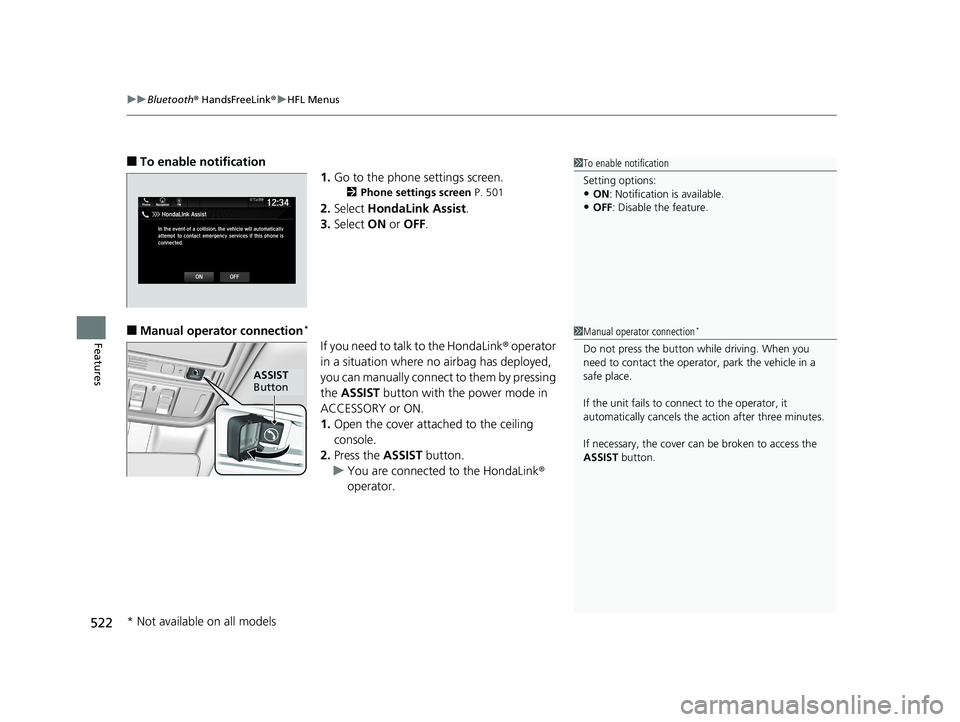
■To enable notification
1.Go to the phone settings screen.
2 Phone settings screen P. 501
2.Select HondaLink Assist .
3. Select ON or OFF .
■Manual operator connection*
If you need to talk to the HondaLink ® operator
in a situation where no airbag has deployed,
you can manually connect to them by pressing
the ASSIST button with the power mode in
ACCESSORY or ON.
1. Open the cover attached to the ceiling
console.
2. Press the ASSIST button.
u You are connected to the HondaLink ®
operator.
1 To enable notification
Setting options:
•ON : Notification is available.
•OFF: Disable the feature.
1Manual operator connection*
Do not press the button while driving. When you
need to contact the operato r, park the vehicle in a
safe place.
If the unit fails to connect to the operator, it
automatically cancels the action after three minutes.
If necessary, the cover can be broken to access the
ASSIST button.
ASSIST
Button
* Not available on all models
19 ODYSSEY-31THR6120.book 522 ページ 2018年12月6日 木曜日 午後4時35分
Page 527 of 767
525
Driving
This chapter discusses driving and refueling.
Before DrivingDriving Preparation .......................... 526
Maximum Load Limit........................ 529
Towing a Trailer Towing Preparation .......................... 532
Driving Safely with a Trailer .............. 536
Towing Your Vehicle ........................ 537
When Driving Starting the Engine .......................... 538
Precautions While Driving................. 544
Automatic Transmission ................... 545
Shifting ............................................ 546
Auto Idle Stop
*................................ 554
ECON Button ................................... 559 Intelligent Traction Management ..... 560
Cruise Control
*............................... 561
Front Sensor Camera*..................... 564
Adaptive Cruise Control (ACC)*....... 566Road Departure Mitigation (RDM) System*... 578Lane Keeping Assist System (LKAS)*.... 583
Vehicle Stability Assist® (VSA®), aka Electronic
Stability Control (ESC), System............. 591
Agile Handling Assist ....................... 593
Tire Pressure Monitoring System (TPMS) with Tire Fill Assist .......................... 594
Tire Pressure Monitoring System (TPMS) -
Required Federal Explanation ......... 596
Blind spot information System*........... 598LaneWatchTM*.................................. 600 Braking
Brake System ................................... 602
Anti-lock Brake System (ABS) ........... 608
Brake Assist System ......................... 609
Collision Mitigation Braking System
TM
(CMBSTM)*..................................... 610
Parking Your Vehicle When Stopped ................................ 619
Parking Sensor System
*................... 621
Cross Traffic Monitor*..................... 626
Multi-View Rear Camera .................. 630
Refueling
Fuel Information .............................. 632
How to Refuel ................................. 633
Fuel Economy and CO
2 Emissions .... 635
* Not available on all models
19 ODYSSEY-31THR6120.book 525 ページ 2018年12月6日 木曜日 午後4時35分
Page 545 of 767
543
uuWhen Driving uStarting the Engine
Driving
1. Depress the brake pedal and press the ENGINE START/STOP button
simultaneously.
2. Keeping your right foot on the br ake pedal, press the button. Select
(R
when reversing.
3. With the parking brake applied, release the brake pedal and gently depress the
accelerator pedal.
u Make sure the parking brake and brake system indicator goes off.
2 Parking Brake P. 602
2 If the Transmission System Indicator Blinks along with the Warning
Message P. 723
■Hill start assist system
Hill start assist keeps the brake engaged br iefly to help prevent the vehicle from
rolling on inclines as you move your foot from the brake pedal to the accelerator.
Change the gear position to
(D or (S when facing uphill, or (R when facing
downhill, then release the brake pedal.
The brakes remain engaged briefly as you release the brake pedal.
■Starting to Drive1 Starting to Drive
The engine stops when the gear position is changed
from
( P before the ENGINE START/STOP button is
pressed. Follow the step 1 when starting to drive.
You can also release the parking brake by pulling the
electric parking brake sw itch while depressing the
brake pedal.
When facing downhill, you can start your vehicle
more smoothly by manually releasing it with the
electric parking brake switch than by releasing it with
the accelerator pedal.
When the engine was started using the button on
the remote*When the engine was started using the button on the remote*
When the engine was started in any case
D/S
1 Hill start assist system
Hill start assist may not prevent the vehicle from
rolling downhill on a very steep or slippe ry slope, and
will not operate on small inclines.
Hill start assist is not a replacement for the parking
brake.
Hill start assist will operate even when VSA ® is
switched off.
* Not available on all models
19 ODYSSEY-31THR6120.book 543 ページ 2018年12月6日 木曜日 午後4時35分
Page 560 of 767
558
uuWhen Driving uAuto Idle Stop*
Driving
■The engine restarts even if the automa tic brake hold system is activated
when:
• The automatic brake hold sy stem is canceled and the electric parking brake is
applied automatically.
• The automatic brake hold system has a problem.
Briefly keeps the brake applied after releasi ng the brake pedal to restart the engine.
This can keep your vehicle from unexpectedly moving while on an incline.
■Starting Assist Brake Function
19 ODYSSEY-31THR6120.book 558 ページ 2018年12月6日 木曜日 午後4時35分
Page 567 of 767
565
uuWhen Driving uFront Sensor Camera*
Driving
1Front Sensor Camera*
If the Some Driver Assist Systems Cannot
Operate: Camera Temperature Too High message
appears:
•Use the climate control system to cool down the
interior and, if necessary, also use defroster mode
with the airflow directed towards the camera.
•Start driving the vehicle to lower the windshield
temperature, which cool s down the area around
the camera.
If the Some Driver Assist Systems Cannot
Operate: Clean Front Windshield message
appears:
•Park your vehicle in a sa fe place, and clean the
windshield. If the message does not disappear after
you have cleaned the winds hield and driven for a
while, have your vehicle checked by a dealer.
* Not available on all models
19 ODYSSEY-31THR6120.book 565 ページ 2018年12月6日 木曜日 午後4時35分