remove seats HONDA ODYSSEY 2022 Owners Manual
[x] Cancel search | Manufacturer: HONDA, Model Year: 2022, Model line: ODYSSEY, Model: HONDA ODYSSEY 2022Pages: 782, PDF Size: 27.17 MB
Page 45 of 782
uuSeat Belts uFastening a Seat Belt
44
Safe Driving
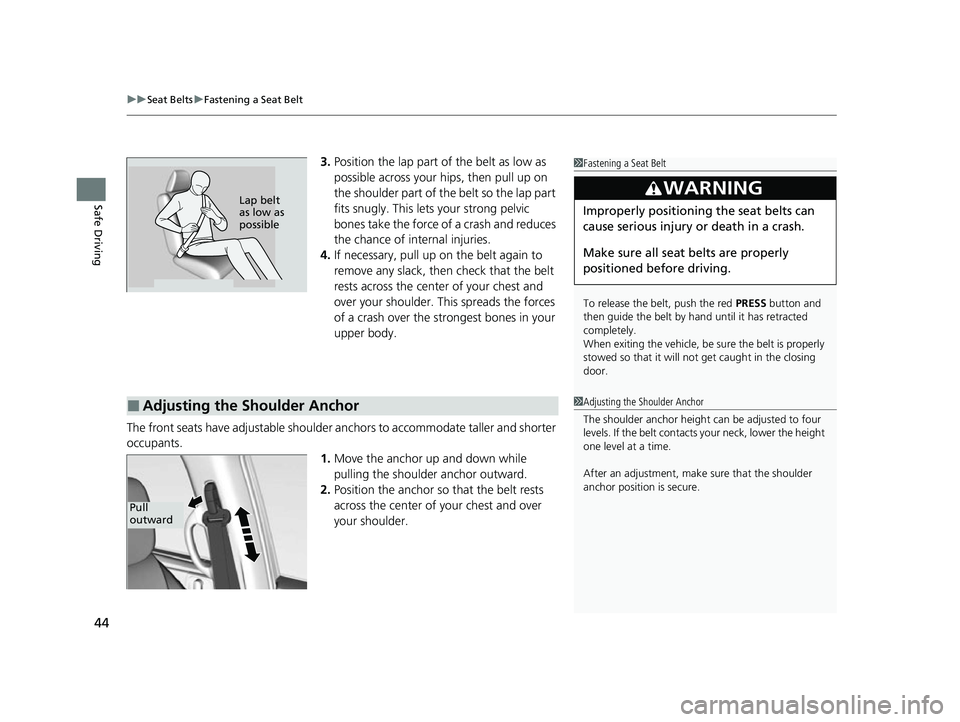
3. Position the lap part of the belt as low as
possible across your hips, then pull up on
the shoulder part of the belt so the lap part
fits snugly. Th is lets your strong pelvic
bones take the force of a crash and reduces
the chance of internal injuries.
4. If necessary, pull up on the belt again to
remove any slack, then check that the belt
rests across the center of your chest and
over your shoulder. Th is spreads the forces
of a crash over the strongest bones in your
upper body.
The front seats have adjustable shoulder anchors to accommodate taller and shorter
occupants. 1.Move the anchor up and down while
pulling the shoulder anchor outward.
2. Position the anchor so that the belt rests
across the center of your chest and over
your shoulder.1Fastening a Seat Belt
To release the belt, push the red PRESS button and
then guide the belt by hand until it has retracted
completely.
When exiting the vehicle, be sure the belt is properly
stowed so that it will not get caught in the closing
door.
3WARNING
Improperly positioning the seat belts can
cause serious injury or death in a crash.
Make sure all seat belts are properly
positioned be fore driving.Lap belt
as low as
possible
■Adjusting the Shoulder Anchor1Adjusting the Shoulder Anchor
The shoulder anchor height can be adjusted to four
levels. If the belt contacts your neck, lower the height
one level at a time.
After an adjustment, make sure that the shoulder
anchor position is secure.
Pull
outward
22 US ODYSSEY-31THR6400.book 44 ページ 2020年11月16日 月曜日 午後1時41分
Page 74 of 782
Continued73
uuChild Safety uSafety of Infants and Small Children
Safe Driving
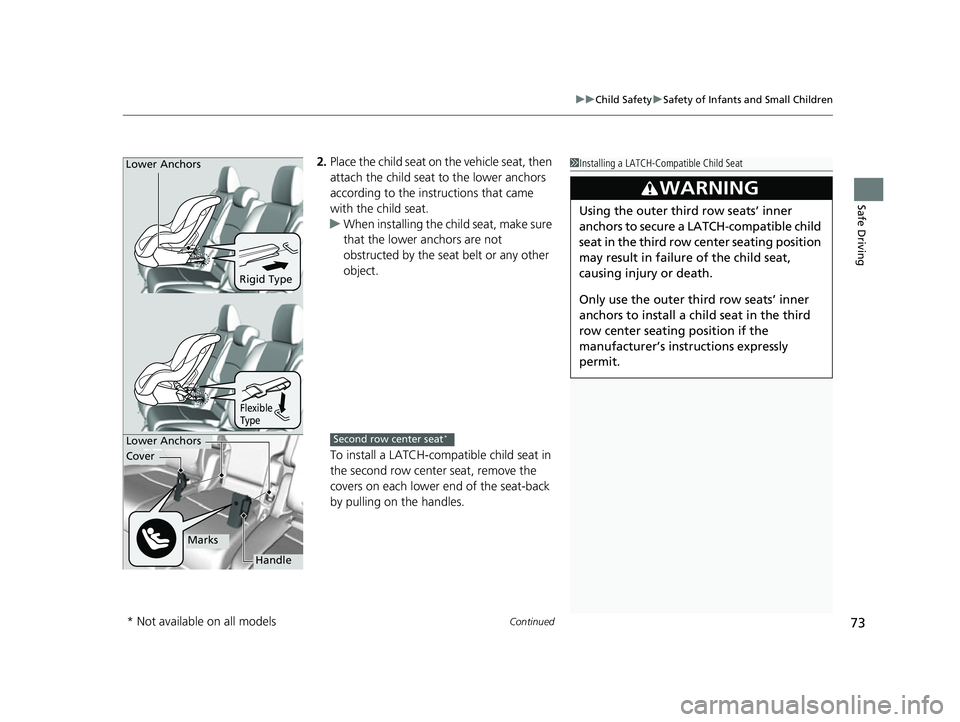
2. Place the child seat on the vehicle seat, then
attach the child seat to the lower anchors
according to the instructions that came
with the child seat.
u When installing the child seat, make sure
that the lower anchors are not
obstructed by the seat belt or any other
object.
To install a LATCH-compatible child seat in
the second row center seat, remove the
covers on each lower end of the seat-back
by pulling on the handles.1 Installing a LATCH-Compatible Child Seat
3WARNING
Using the outer third row seats’ inner
anchors to secure a LA TCH-compatible child
seat in the third row center seating position
may result in failur e of the child seat,
causing injury or death.
Only use the outer th ird row seats’ inner
anchors to install a child seat in the third
row center seating position if the
manufacturer’s instructions expressly
permit.
Rigid Type
Lower Anchors
Flexible
Type
Lower Anchors
Handle
Marks
Cover
Second row center seat*
* Not available on all models
22 US ODYSSEY-31THR6400.book 73 ページ 2020年11月16日 月曜日 午後1時41分
Page 228 of 782
Continued227
uuSeats uSecond Row Seats
Controls
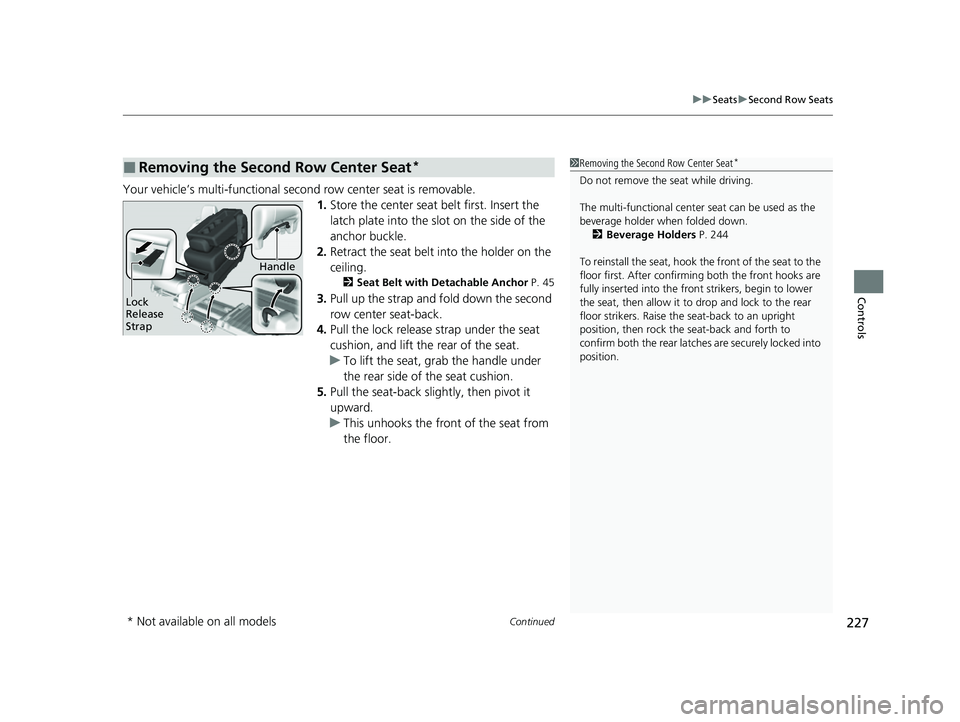
Your vehicle’s multi-functional second row center seat is removable.
1.Store the center seat belt first. Insert the
latch plate into the slot on the side of the
anchor buckle.
2. Retract the seat belt into the holder on the
ceiling.
2 Seat Belt with Detachable Anchor P. 45
3.Pull up the strap and fold down the second
row center seat-back.
4. Pull the lock release strap under the seat
cushion, and lift the rear of the seat.
u To lift the seat, gr ab the handle under
the rear side of the seat cushion.
5. Pull the seat-back slightly, then pivot it
upward.
u This unhooks the front of the seat from
the floor.
■Removing the Second Row Center Seat*1Removing the Second Row Center Seat*
Do not remove the seat while driving.
The multi-functional center seat can be used as the
beverage holder when folded down. 2 Beverage Holders P. 244
To reinstall the seat, hook the front of the seat to the
floor first. Afte r confirming both the front hooks are
fully inserted into the front strikers, begin to lower
the seat, then allow it to drop and lock to the rear
floor strikers. Raise the seat-back to an upright
position, then rock the seat-back and forth to
confirm both the rear latches are securely locked into
position.
Lock
Release
Strap
Handle
* Not available on all models
22 US ODYSSEY-31THR6400.book 227 ページ 2020年11月16日 月曜日 午後1時41分
Page 229 of 782
uuSeats uSecond Row Seats
228
Controls
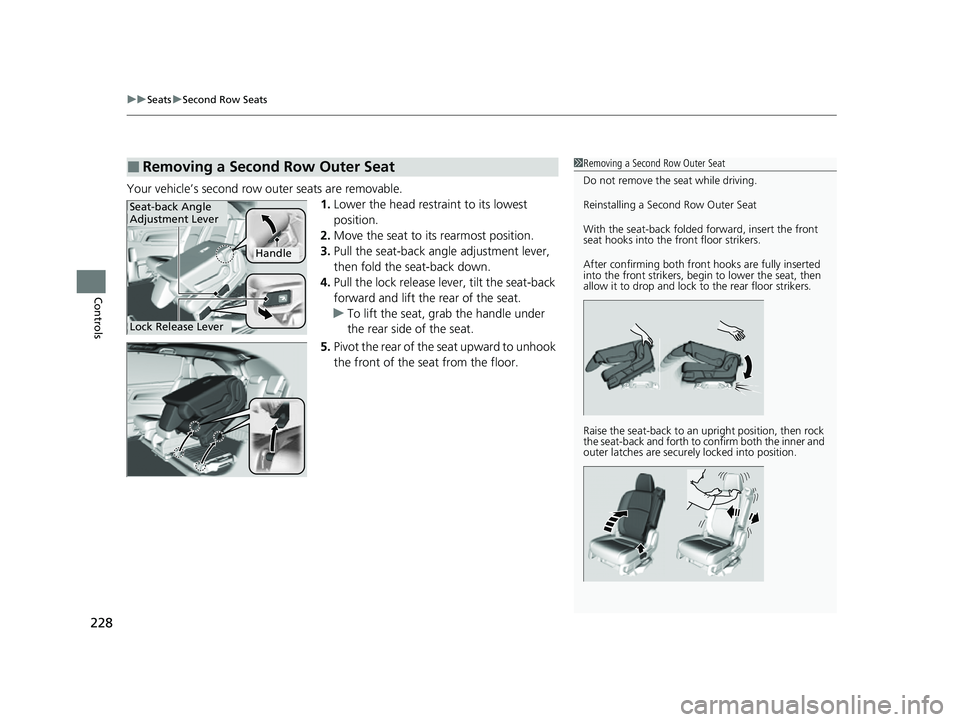
Your vehicle’s second row outer seats are removable.
1.Lower the head restra int to its lowest
position.
2. Move the seat to it s rearmost position.
3. Pull the seat-back angle adjustment lever,
then fold the seat-back down.
4. Pull the lock release lever, tilt the seat-back
forward and lift the rear of the seat.
u To lift the seat, grab the handle under
the rear side of the seat.
5. Pivot the rear of the seat upward to unhook
the front of the seat from the floor.
■Removing a Second Row Outer Seat1Removing a Second Row Outer Seat
Do not remove the seat while driving.
Reinstalling a Second Row Outer Seat
With the seat-back folded forward, insert the front
seat hooks into the front floor strikers.
After confirming both front hooks are fully inserted
into the front strikers, begin to lower the seat, then
allow it to drop and lock to the rear floor strikers.
Raise the seat-back to an upright position, then rock
the seat-back and forth to confirm both the inner and
outer latches are securely locked into position.
Handle
Seat-back Angle
Adjustment Lever
Lock Release Lever
22 US ODYSSEY-31THR6400.book 228 ページ 2020年11月16日 月曜日 午後1時41分
Page 230 of 782
229
uuSeats uSecond Row Seats
Controls
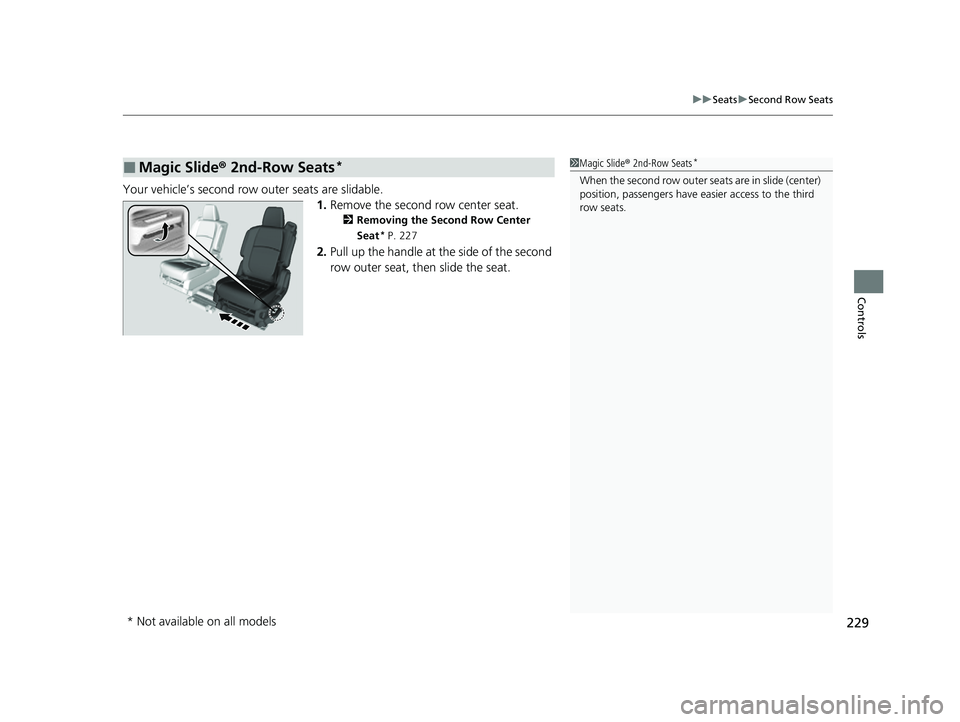
Your vehicle’s second row outer seats are slidable.
1.Remove the second row center seat.
2 Removing the Second Row Center
Seat
* P. 227
2.Pull up the handle at the side of the second
row outer seat, then slide the seat.
■Magic Slide® 2nd-Row Seats*1Magic Slide ® 2nd-Row Seats*
When the second row outer seats are in slide (center)
position, passengers have eas ier access to the third
row seats.
* Not available on all models
22 US ODYSSEY-31THR6400.book 229 ページ 2020年11月16日 月曜日 午後1時41分
Page 232 of 782
Continued231
uuSeats uThird Row Seats
Controls
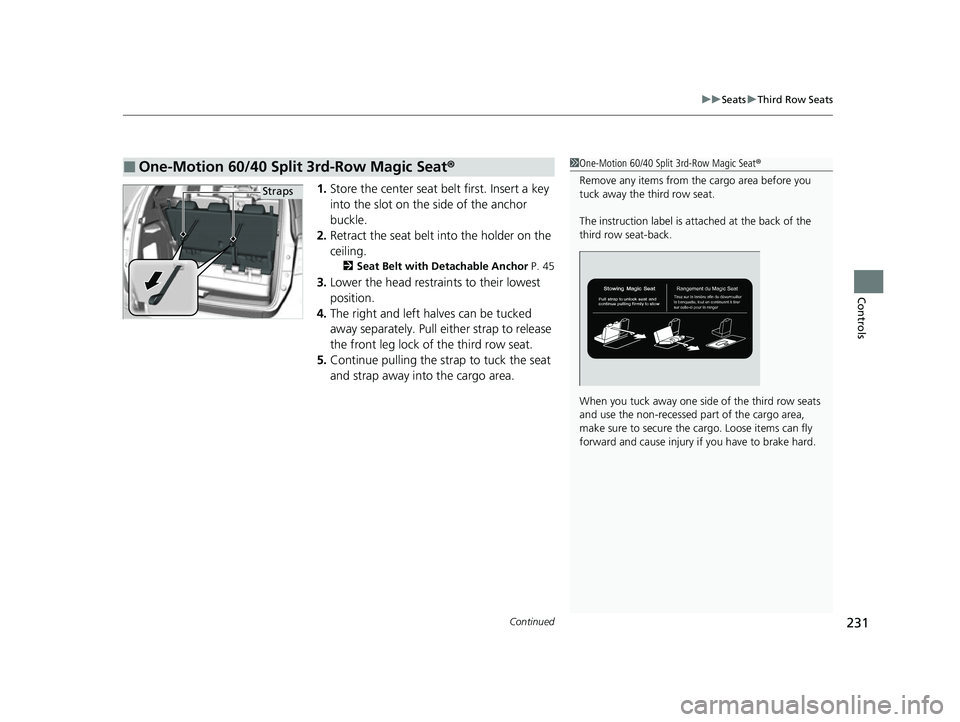
1. Store the center seat belt first. Insert a key
into the slot on the side of the anchor
buckle.
2. Retract the seat belt into the holder on the
ceiling.
2 Seat Belt with Detachable Anchor P. 45
3.Lower the head restrain ts to their lowest
position.
4. The right and left halves can be tucked
away separately. Pull either strap to release
the front leg lock of the third row seat.
5. Continue pulling the strap to tuck the seat
and strap away into the cargo area.
■One-Motion 60/40 Split 3rd-Row Magic Seat ®1One-Motion 60/40 Split 3rd-Row Magic Seat ®
Remove any items from the cargo area before you
tuck away the third row seat.
The instruction label is atta ched at the back of the
third row seat-back.
When you tuck away one si de of the third row seats
and use the non-recessed pa rt of the cargo area,
make sure to secure the cargo. Loose items can fly
forward and cause injury if you have to brake hard.
Straps
22 US ODYSSEY-31THR6400.book 231 ページ 2020年11月16日 月曜日 午後1時41分
Page 238 of 782
237
uuSeats uHead Restraints
Controls
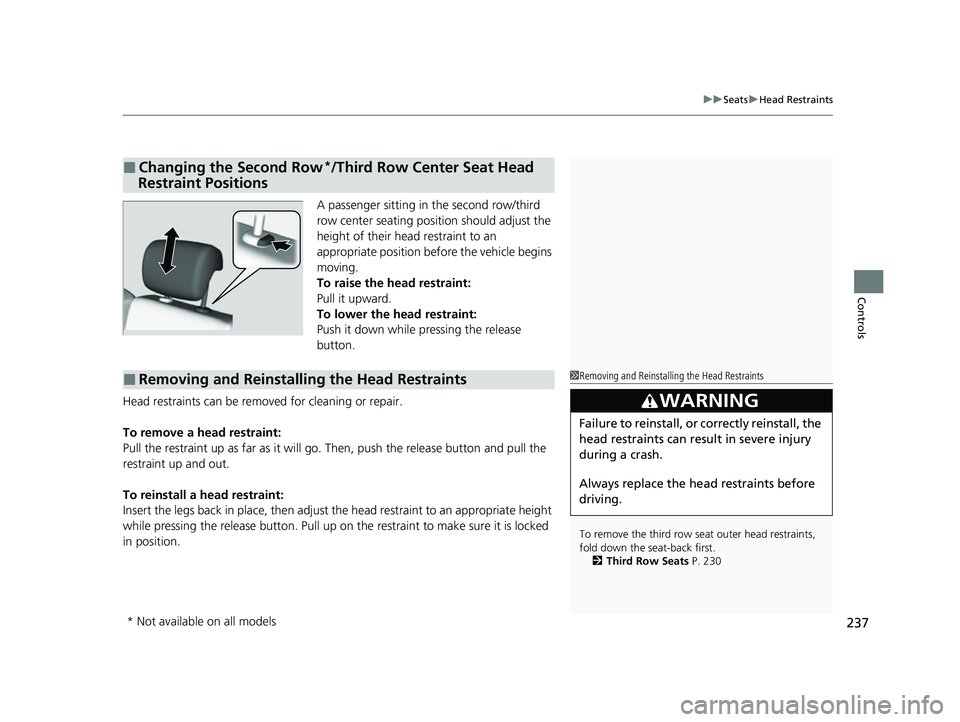
A passenger sitting in the second row/third
row center seating position should adjust the
height of their head restraint to an
appropriate position before the vehicle begins
moving.
To raise the head restraint:
Pull it upward.
To lower the head restraint:
Push it down while pressing the release
button.
Head restraints can be removed for cleaning or repair.
To remove a head restraint:
Pull the restraint up as far as it will go. Then, push the release button and pull the
restraint up and out.
To reinstall a head restraint:
Insert the legs back in place, then adjust the head restraint to an appropriate height
while pressing the release button. Pull up on the restraint to make sure it is locked
in position.
■Changing the Second Row*/Third Row Center Seat Head
Restraint Positions
■Removing and Reinstalling the Head Restraints1 Removing and Reinstalling the Head Restraints
To remove the third row seat outer head restraints,
fold down the seat-back first.
2 Third Row Seats P. 230
3WARNING
Failure to reinstall, or correctly reinstall, the
head restraints can result in severe injury
during a crash.
Always replace the he ad restraints before
driving.
* Not available on all models
22 US ODYSSEY-31THR6400.book 237 ページ 2020年11月16日 月曜日 午後1時41分
Page 691 of 782
690
uuReplacing Light Bulbs uBrake, Rear Turn Signal Light Bulbs, and Rear Side Marker/Taillights
Maintenance
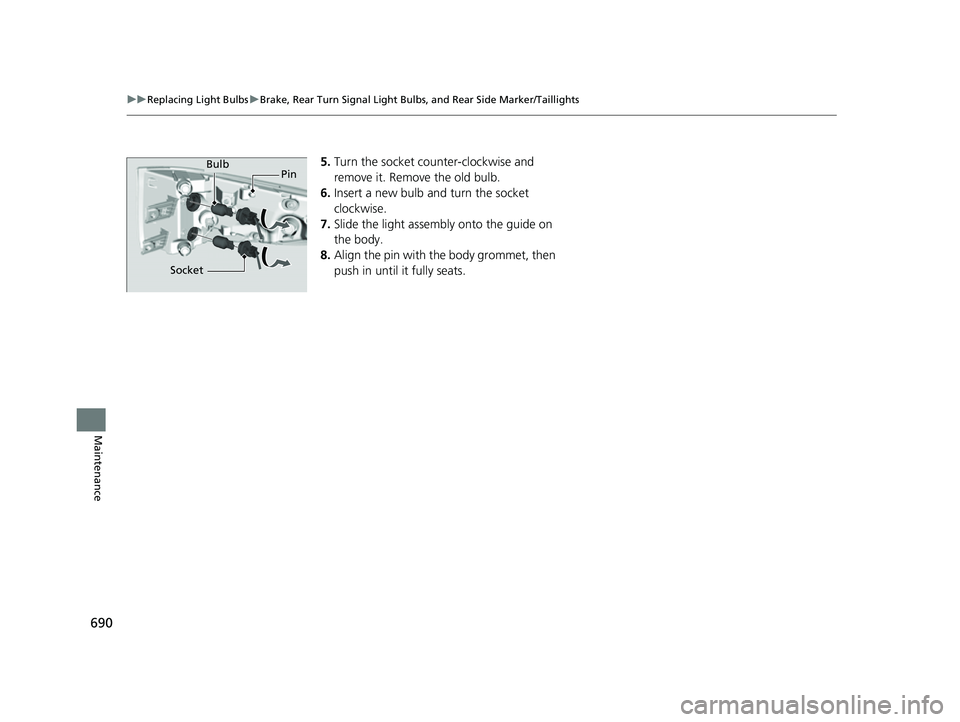
5. Turn the socket counter-clockwise and
remove it. Remove the old bulb.
6. Insert a new bulb and turn the socket
clockwise.
7. Slide the light assembly onto the guide on
the body.
8. Align the pin with the body grommet, then
push in until it fully seats.Bulb
Socket Pin
22 US ODYSSEY-31THR6400.book 690 ページ 2020年11月16日 月曜日 午後1時41分
Page 715 of 782
uuCleaning uInterior Care
714
Maintenance
To properly clean leather:
1. Use a vacuum or soft dry cloth first to remove any dirt or dust.
2. Clean the leather with a soft cloth dampen ed with a solution comprised of 90%
water and 10% neutral soap.
3. Wipe away any soap residu e with a clean damp cloth.
4. Wipe away residual water and allow leather to air dry in the shade.
■Maintaining Genuine Leather*1Maintaining Genuine Leather*
It is important to clean or wipe away dirt or dust as
soon as possible. Spills can soak into leather resulting
in stains. Dirt or dust ca n cause abrasions in the
leather. In addition, pl ease note that some dark
colored clothing can rub onto the leather seats
resulting in discol oration or stains.
* Not available on all models
22 US ODYSSEY-31THR6400.book 714 ページ 2020年11月16日 月曜日 午後1時41分