tire type HONDA PASSPORT 2000 2.G Owners Manual
[x] Cancel search | Manufacturer: HONDA, Model Year: 2000, Model line: PASSPORT, Model: HONDA PASSPORT 2000 2.GPages: 267, PDF Size: 3.03 MB
Page 7 of 267
Importan
t Safet y Precaution s
You'll find many safety
recommendations throughout this section, and throughout this
manual. The recommendations on
this page are the ones we consider
to be the most important.
Alway s Wea r You r Sea t Bel t
A seat belt is your best protection in all types of collisions. Airbags
supplement seat belts, but airbags
are designed to inflate only in a
moderate to severe frontal
collision. So even though your
vehicle is equipped with airbags, make sure you and your
passengers always wear your seat belts, and wear them properly. (See page 13.)
Restrai n All Childre n
Children are safest when they are
properly restrained in the back seat, not the front seat. A child
who is too small for a seat belt must be properly restrained in a
child safety seat. (See page 18.)
B e Awar e o f Airba g Hazard s
While airbags save lives, they can
cause serious or fatal injuries to
occupants who sit too close to
them, or are not properly
restrained. Infants, young children, and short adults are atthe greatest risk. Be sure to follow
all instructions and warnings in
this manual. (See page 7.)
Don' t Drin k an d Driv e
Alcohol and driving don't mix.
Even one drink can reduce your ability to respond to changing
conditions, and your reaction time
gets worse with every additional
drink. So don't drink and drive,
and don't let your friends drinkand drive either. Contro
l You r Spee d
Excessive speed is a major factor in crash injuries and deaths.
Generally, the higher the speed
the greater the risk, but serious
accidents can also occur at lowerspeeds. Never drive faster than is
safe for current conditions,
regardless of the maximum speed
posted.
Kee p You r Vehicl e i n Saf e
Conditio n
Having a tire blowout or a
mechanical failure can be
extremely hazardous. To reduce the possibility of such problems,
check your tire pressure and
condition frequently, and perform
all regularly scheduled
maintenance. (See page 187.)
Drive r an d Passenge r Safet y
Page 155 of 267
Befor
e Drivin g
Drivin g Guideline s
Your Honda has higher ground
clearance than a passenger car
designed for use only on
pavement. Higher ground clearance has many advantages
for off-road driving. It allows you
to travel over bumps, obstacles,
and rough terrain. It also provides
good visibility so you can
anticipate problems earlier.
These advantages come at some
cost. Because your vehicle is
taller and rides higher off the
ground, it has a high center of
gravity. This means that your
vehicle can tip or roll over if you make abrupt turns. Utility
vehicles have a significantly
higher rollover rate than other types of vehicles. To prevent rollover or loss of
control:
Take corners at slower speeds
than you would with a
passenger car. Avoid sharp turns and abrupt
maneuvers whenever possible.
Do not modify your vehicle in
any way that would raise the
center of gravity (see page 170). Do not carry heavy cargo on
the roof (see page 173).
For off-road driving guidelines, see the Off-Road Driving
Information booklet that came with your vehicle.
Befor e Enterin g th e Vehicl e
1. Check that the windows,
mirrors, lights and reflectors
are clean and unobstructed.
2. Check the tires to see if they
are low or flat. You will need
a pressure gauge to tell if tires
are properly inflated.
3. Check that all lights work.
4. Check for fluid leaks.
5. Be sure everything is properly
stowed.
6. Check the area behind the vehicle if you are about to
back up.
Befor e Drivin g th e Vehicl e
1. Lock all doors.
2. Adjust the seat and any movable head restraints.
3. Adjust the inside and outside mirrors.
4. Check that all the indicator lights work when the key
Drivin g Tip s
Page 162 of 267
distances will be longer and
vehicle control more limited.
While driving on a surface with
reduced traction, avoid maneuvers involving sudden steering,
acceleration, or braking (including
engine braking due to shifting to
lower gear), that could cause the
tires to skid.
Drivers may not realize the surface is slippery until the
vehicle is skidding.
Learn to recognize warning
clues — such as enough water or ice on the road to make a
"mirrored surface"— and slow
down when there is any doubt.
Also see "Traction" under "Tires" in this section. To safely operate your vehicle,
your tires must be the proper type
and size, in good condition with
adequate tread, and correctly
inflated. The following pages give
more detailed information on how
and when to check air pressure,
how to inspect your tires for damage and wear, and what to do
when your tires need to be
replaced.
Driving Tip s
Rapid slowing down or
speeding-up can cause loss
of control on slippery
surfaces. If you crash, you
can be injured.
Use extra care when driving
on slippery surfaces.
Using tires that are excessivelyworn or improperly inflated can
cause a crash in which you
can be seriously hurt or killed.
Follow all instructions in this
owner's manual regarding tire inflation and maintenance.
Tire
s
Page 166 of 267
We urge you not to install
oversize tires and wheels that
would change your vehicle's
ride height and possibly affect
handling and stability. It is best to replace all four tires at
the same time. If that is not
possible or necessary, then replace the two front tires or the two rear
tires as a pair. Replacing just one
tire can seriously affect your
vehicle's handling.
The ABS works by comparing the speed of the wheels. When
replacing tires, use the same size originally supplied with the
vehicle. Tire size and construction
can affect wheel speed and may
cause the system to work inconsistently.
If you ever need to replace a
wheel, make sure the
replacement's specifications
match the wheels that originally
came on your Honda. Replacement wheels are available
at your Honda dealer.
Wheel
s an d Tire s
Wheels:
16 x 7 JJ
Tires:
Standard on LX 2WD 225/75R16
Standard on all other models 245/70R16
See page 247 for information
about DOT Tire Quality Grading.
Driving Tip s
Installing improper tires on
your vehicle can affect handling and stability. This
can cause a crash in which
you can be seriously hurt or
killed.
Always use the size and type
of tires recommended in this
owner's manual.
Page 167 of 267
Tractio
n
A decrease in driving, cornering, and braking traction occurs when
water, snow, ice, gravel, or other
materials are on the road. Vehicle speed should be adjusted to the
road conditions.
When driving on wet or slushy roads, a wedge of water can buildup between the tire and road. This
is known as hydroplaning and
may cause partial or complete loss
of traction, vehicle control, and
stopping ability. To reduce the
chance of traction loss, follow
these tips:
1. Slow down during rainstorms or when roads are slushy.
2. Slow down if the road has standing water or puddles. 3. Replace tires when they are
worn to a point where 1/16inch (1.6 mm) or less tread
remains, or cord or fabric
can be seen.
4. Keep the tires properly inflated.
If your vehicle has snow tires, be sure they are the same size, load
range and construction type as your other tires. Vehicle speed should belimited to a maximum of 75 mph
(120 km/h) when equipped with
either passenger vehicle-typ e or
truck-type sno
w tires.
Tire Chains
To prevent tire chains from damaging your vehicle: Install the chains on the rear
tires as tightly as possible.Tighten them again after
driving 1/4 to 1/2 mile (0.4 to
0.8 kilometer). Using chains on
the front tires is not
recommended. They may contact the body and possibly
damage the vehicle. If youintend to use chains on the
front tires, be sure there is
enough clearance. Do not exceed 45 mph
(70 km/h) or the chain
manufacturer's suggested speed
limit if it is lower.
Drive in a restrained manner
and avoid large bumps,
potholes, severe turns or other
maneuvers that could cause the
vehicle to bounce up and down.
Follow the chain
manufacturer's instructions.
Drivin g Tip s
Page 168 of 267
Whee
l Replacemen t
Consideration s
Damaged wheels must be
replaced. For example, replace
wheels if they are bent, cracked or
heavily rusted, or if wheel nuts
often become loose. Also replace
wheels that leak air (except some
aluminum wheels that can be
repaired). See your Honda dealer.
Do not use bent wheels that have
been straightened, and do not use
tubes in leaking wheels designed
for tubeless tires. Such wheels
may have structural damage and
could fail without warning.
Maximum loads, maximum
inflation pressures, wheel
identification codes, and wheel
sizes are stamped on each wheel.
Service-tested and approved
wheels are available from your
Honda dealer.
When obtaining wheels for any
reason from any other source, the
replacement wheels should be
equal in load capacity, inflation
pressure capacity, diameter, width, offset and mounting configuration
to those originally installed on
your vehicle. A wheel of the
wrong size or type may adversely
affect load carrying capacity, wheel
and bearing life, brake cooling,
speedometer/odometer calibration,
stopping ability, headlight aim,
bumper height, vehicle ground clearance, and tire or tire chain
clearance to the body and chassis.
Replacement with used wheels is
not advised: They may have been subjected to harsh treatment or very high mileage and could fail
without warning.
Installing wheels and/or tires that
have a higher load carrying limit
than those that originally came on
your vehicle does not increase the
GAWR or GVWR of the vehicle.
Driving Tip s
Page 225 of 267
been coated with corrosion
protectants.
At least every spring, flush thesematerials from the underbody
with plain water. Take care to
thoroughly clean any areas where mud and other debris can collect.
Sediment packed in closed areas
of the frame should be loosened
before being flushed.
Interio
r
With the use of modern trim
materials it is very important that
proper cleaning techniques and
cleaners be used. Failure to do
this on the first cleaning may
result in water spots, spot rings or
setting of stains, all of which
make it more difficult to remove
on a second cleaning.
The portion of the following cleaning instructions that are in
ALL CAPITAL LETTERS are
especially important and MUST
be followed.
Dust and loose dirt thataccumulate on interior fabrics
should be removed often with a
vacuum cleaner or soft brush.
Vinyl or leather trim should be
wiped regularly with a clean
damp cloth. Normal trim soil,
spots or stains can be cleaned with
conventional cleaners. Remembe
r Thes e Basi c Step s
Befor e Cleanin g
1. Remove stains as quickly as possible before they become"set."
2. Use a clean cloth or sponge and change to a clean area
often. (A SOFT brush may be
used if stains persist.)
3. Use solvent-type cleaners only in a well ventilated area; also,
do not saturate the stained
area.
4. If a ring forms after spot cleaning, clean the entire area
IMMEDIATELY.
5. Follow specific instructions on the cleaning products' labels.
Car e an d Maintenanc e
Page 227 of 267
Gently scrape the stain off trim
material with a clean, DULL
knife or scraper. USE VERY
LITTLE CLEANER, light
pressure, and a clean cloth
(preferably cheesecloth).
Cleaning should be from the
outside of the stain,
"FEATHERING" towards the
center. Keep changing to a clean section of the cloth. When the stain is cleaned from
the fabric, immediately dry the
area with an air hose, heat dryer
or heat lamp to help prevent a
cleaning ring. (Use caution witha heat dryer or lamp to prevent
damage to fabric.) If a ring forms, immediately
repeat the cleaning operation over a slightly larger area with
emphasis on "FEATHERING"towards its center. If a ring still remains, mask off surrounding
trim sections and clean the entire
affected area with a
multipurpose powered cleaner
(as described under "Cleaning
General Soilage or Water Spots
From Fabric Trim").
Removal of Specific Stains
Greas e o r Oi l Stain s
These include grease, oil, butter,
margarine, shoe polish, coffee
with cream, chewing gum,
cosmetic creams, vegetable oils,
wax crayon, tar and asphalts.
Carefully scrape off excess
stain; then use fabric cleaner
(solvent type) as previously
described.
Shoe polish, wax crayons, tar
and asphalt will stain if allowed
to remain on trim; they should
be removed as soon as possible.
Use caution as cleaner will
dissolve them and may cause
them to "bleed."
Non-Greas y Stain s
These include catsup, coffee (black), egg, fruit juice, milk, soft
drinks, wine, vomit and blood. Carefully scrape off excess
stain; then sponge stain with
cool water. If a stain remains, use a
multipurpose powdered cleaner(foam type) as previously
described.
Car e an d Maintenanc e
Page 247 of 267
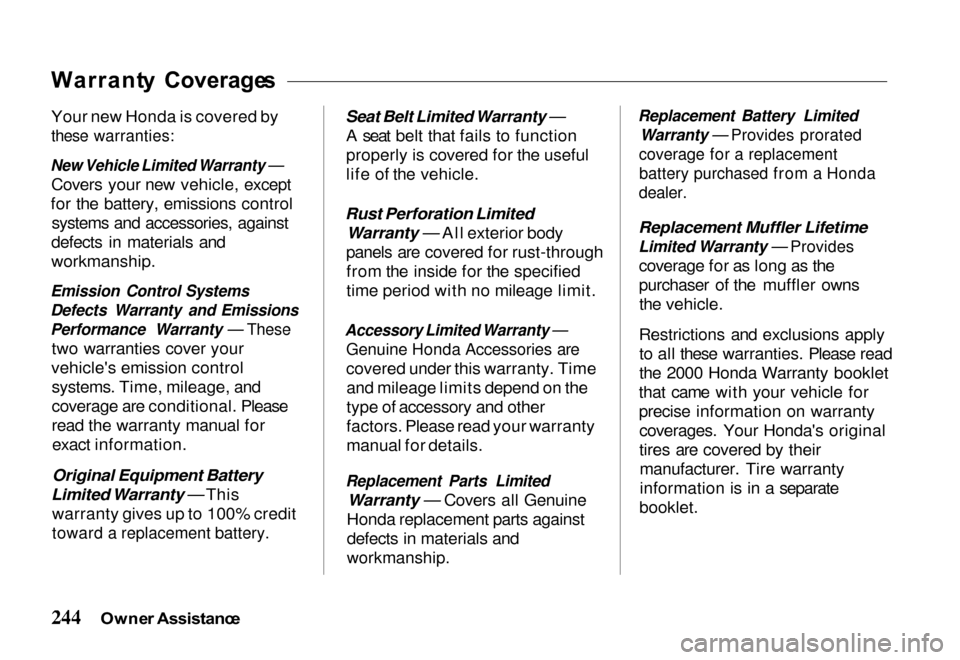
Warrant
y Coverage s
Your new Honda is covered by
these warranties:
New Vehicle Limited Warranty —
Covers your new vehicle, except
for the battery, emissions control systems and accessories, against
defects in materials and
workmanship.
Emission Control Systems
Defects Warranty and Emissions
Performance Warranty — These
two warranties cover your
vehicle's emission control systems. Time, mileage, and
coverage are conditional. Please
read the warranty manual forexact information.
Original Equipment Battery
Limited Warranty — This warranty gives up to 100% credit
toward a replacement battery.
Seat Belt Limited Warranty —
A seat belt that fails to function
properly is covered for the useful
life of the vehicle.
Rust Perforation Limited Warranty — All exterior body
panels are covered for rust-through from the inside for the specified
time period with no mileage limit.
Accessory Limited Warranty —
Genuine Honda Accessories are
covered under this warranty. Timeand mileage limits depend on the
type of accessory and other
factors. Please read your warranty
manual for details.
Replacement Parts Limited
Warranty — Covers all Genuine
Honda replacement parts against
defects in materials and
workmanship.
Replacement Battery Limited
Warranty — Provides prorated
coverage for a replacement
battery purchased from a Honda
dealer.
Replacement Muffler Lifetime
Limited Warranty — Provides
coverage for as long as the
purchaser of the muffler ownsthe vehicle.
Restrictions and exclusions apply to all these warranties. Please read
the 2000 Honda Warranty booklet
that came with your vehicle for
precise information on warranty coverages. Your Honda's original
tires are covered by theirmanufacturer. Tire warranty
information is in a separate
booklet.
Owne r Assistanc e
Page 264 of 267
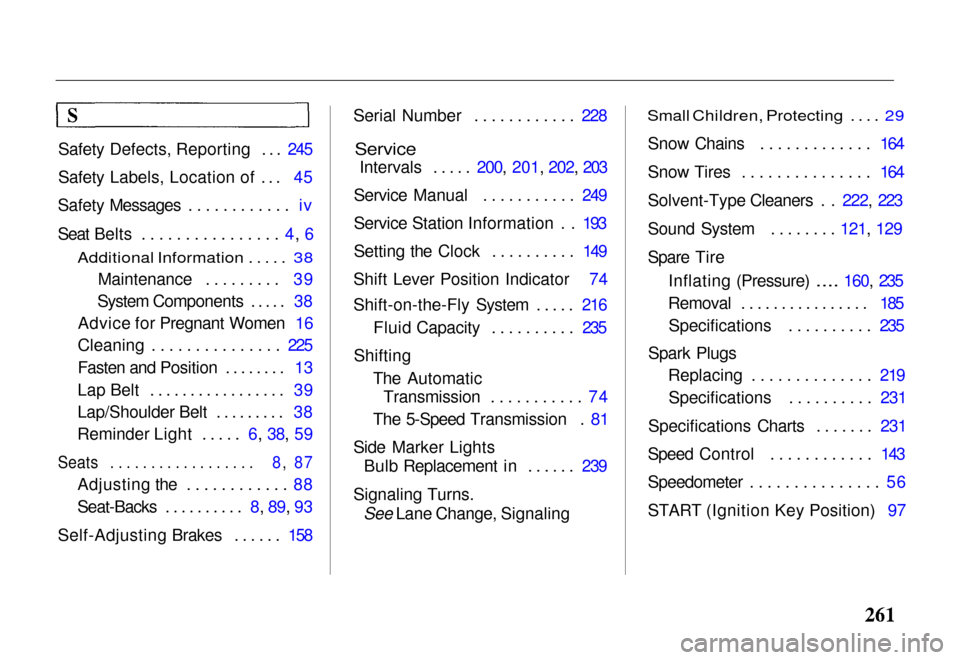
Safety Defects, Reporting ... 245
Safety Labels, Location of ... 45
Safety Messages ............ iv
Seat Belt
s ................ 4, 6
Additional Information ..... 38
Maintenance ......... 39
System Components ..... 38
Advice for Pregnant Women 16
Cleaning ............... 225
Fasten and Position ........ 13
Lap Belt ................. 39
Lap/Shoulder Belt ......... 38
Reminder Light ..... 6, 38, 59
Seats .................. 8, 87
Adjusting the ............ 88
Seat-Backs .......... 8, 89, 93
Self-Adjusting Brakes ...... 158 Serial Number ............ 228
Service
Intervals ..... 200, 201, 202, 203
Service Manual ........... 249
Service Station Information . . 193
Setting the Clock .......... 149
Shift Lever Position Indicator 74
Shift-on-the-Fly System ..... 216 Fluid Capacity .......... 235
Shifting The AutomaticTransmission ........... 74
The 5-Speed Transmission . 81
Side Marker Lights Bulb Replacement in ...... 239
Signaling Turns. See Lane Change, Signaling
Small Children, Protecting .... 29
Snow Chains ............. 164
Snow Tires ............... 164
Solvent-Type Cleaners . .
222, 223
Sound System ........ 121, 129
Spare Tire Inflating (Pressure)
.... 160, 235
Removal ................ 185 Specifications .......... 235
Spark Plugs Replacing .............. 219
Specifications .......... 231
Specifications Charts ....... 231
Speed Control ............ 143
Speedometer ............... 56
START (Ignition Key Position) 97