ECO mode HONDA PASSPORT 2001 2.G Owner's Manual
[x] Cancel search | Manufacturer: HONDA, Model Year: 2001, Model line: PASSPORT, Model: HONDA PASSPORT 2001 2.GPages: 317, PDF Size: 4.85 MB
Page 183 of 317

Follo
w th e recommendation s i n
thi s manua l an d as k you r Hond a
deale r fo r furthe r detail s befor e
yo u to w a traile r wit h you r
Passport .
Towin g a traile r affect s vehicl e
maintenanc e requirement s du e
t o th e additiona l load . Mor e
frequen t maintenanc e interval s
wil l b e require d to assur e
continue d satisfactio n wit h
you r vehicle . Consul t you r
Hond a deale r fo r recommende d
maintenanc e an d service .
Th e gros s traile r weigh t (traile r
weigh t plu s carg o load ) mus t
neve r excee d 4,50 0 Ib .
Additiona l equipmen t wil l b e
required , dependin g o n th e
specifi c model/loa d combination .
See "Traile r Hitches " i n thi s
section .
Exceedin
g th e weigh t limi t wil l
caus e damag e t o you r vehicl e an d
possibl y resul t i n persona l injury . Th
e Gros s Vehicl e Weigh t
Ratin g (GVWR ) i s th e
combine d weigh t o f th e
unloade d vehicle , passengers,
cargo , traile r hitch , traile r
tongu e load , an d optiona l
equipment . Thi s valu e is
indicate d o n th e F.M.V.S.S .
Certificatio n Labe l o n th e
driver' s doorjamb . Th
e Gros s Combine d Weigh t
Ratin g (GCWR ) equal s th e
combine d weigh t o f you r
vehicl e (includin g passengers
an d cargo ) plu s th e tota l traile r
load . Th e followin g limit s
apply .
2WD : 8,70 0 Ib
4WD : 8,95 0 Ib
Th e Gros s Axl e Weigh t Ratin g
(GAWR ) i s als o indicate d o n
th e Certificatio n Label . Th e
loa d o n eithe r th e fron t o r rea r
axl e resultin g fro m distributio n
o f th e gross vehicl e weigh t o n
bot h axle s mus t no t excee d th e
value s listed . Remembe r t o
accoun t fo r additiona l
equipmen t an d tongu e load .
Drivin g Tip s
Page 189 of 317

If
a battery sits in extreme cold,
the electrolyte inside can freeze.
Attempting to jump start a frozen
battery can cause it to rupture.
4 . Jumpe r Cabl e Connectio n
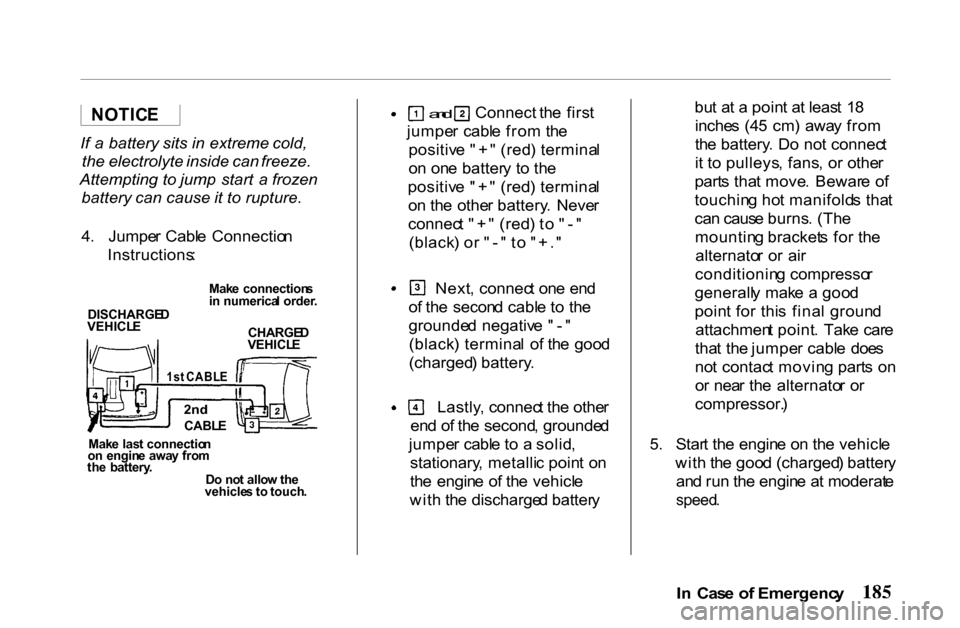
Instructions : bu
t a t a poin t a t leas t 1 8
inche s (4 5 cm ) awa y fro m
th e battery . D o no t connec t
i t t o pulleys , fans , o r othe r
part s tha t move . Bewar e o f
touchin g ho t manifold s tha t
ca n caus e burns . (Th e
mountin g bracket s fo r th e
alternato r o r ai r
conditionin g compresso r
generall y mak e a goo d
poin t fo r thi s fina l groun d
attachmen t point . Tak e car e
tha t th e jumpe r cabl e doe s
no t contac t movin g part s o n
o r nea r th e alternato r o r
compressor. )
5 . Star t th e engin e o n th e vehicl e
wit h th e goo d (charged ) batter y
an d ru n th e engin e a t moderat e
speed .
I n Cas e o f Emergenc y
and Connect the firs t
jumpe r cabl e fro m th e
positiv e "+ " (red ) termina l
o n on e batter y t o th e
positiv e "+ " (red ) termina l
o n th e othe r battery . Neve r
connec t "+ " (red ) t o "- "
(black ) o r "- " t o "+. " Next
, connec t on e en d
o f th e secon d cabl e t o th e
grounde d negativ e "- "
(black ) termina l o f th e goo d
(charged ) battery . Lastly
, connec t th e othe r
en d o f th e second , grounde d
jumpe r cabl e t o a solid ,
stationary , metalli c poin t o n
th e engin e o f th e vehicl e
wit h th e discharge d batter y
NOTIC
E
Make connection s
i n numerica l order .
DISCHARGE D
VEHICL E
CHARGED
VEHICL E
1s t CABL E
2nd
CABL E
Mak e las t connectio n
o n engin e awa y fro m
th e battery .
Do no t allo w th e
vehicle s t o touch .
Page 230 of 317

bee
n coate d wit h corrosio n
protectants .
A t leas t ever y spring , flus h thes e
material s fro m th e underbod y
wit h plai n water . Tak e car e t o
thoroughl y clea n an y area s wher e
mu d an d othe r debri s ca n collect .
Sedimen t packe d in close d area s
o f th e fram e shoul d b e loosene d
befor e bein g flushed .
Wit
h th e us e o f moder n tri m
material s i t i s ver y importan t tha t
prope r cleanin g technique s an d
cleaner s b e used . Failur e to d o
thi s o n th e firs t cleanin g ma y
resul t i n wate r spots , spo t ring s o r
settin g o f stains , al l o f whic h
mak e it mor e difficul t t o remov e
o n a secon d cleaning .
Th e portio n o f th e followin g
cleanin g instruction s tha t ar e in
AL L CAPITA L LETTER S ar e
especiall y importan t an d MUS T
b e followed .
Dus t an d loos e dir t tha t
accumulat e o n interio r fabric s
shoul d b e remove d ofte n wit h a
vacuu m cleane r o r sof t brush .
Viny l o r leathe r tri m shoul d b e
wipe d regularl y wit h a clea n
dam p cloth . Norma l tri m soil ,
spot s o r stain s ca n b e cleane d wit h
conventiona l cleaners .
Remembe
r Thes e Basi c Step s
Befor e Cleanin g
1 . Remov e stain s a s quickl y a s
possibl e befor e the y becom e
"set. "
2 . Us e a clea n clot h o r spong e
an d chang e t o a clea n are a
often . ( A SOF T brus h ma y b e
use d i f stain s persist. )
3 . Us e solvent-typ e cleaner s onl y
i n a wel l ventilate d area ; also ,
d o no t saturat e th e staine d
area .
4 . I f a rin g form s afte r spo t
cleaning , clea n th e entir e are a
IMMEDIATELY .
5 . Follo w specifi c instruction s o n
th e cleanin g products ' labels .
Car e an d Maintenanc e
Interio
r