tires HONDA PASSPORT 2002 2.G Owners Manual
[x] Cancel search | Manufacturer: HONDA, Model Year: 2002, Model line: PASSPORT, Model: HONDA PASSPORT 2002 2.GPages: 294, PDF Size: 3.97 MB
Page 158 of 294

155Driving Tips
Before Driving156
. . . . . . . . . . .
Starting the Engine157 . . . . .
New Vehicle Break-In 158 . . . . .
Parking 158 . . . . . . . . . . . . . . . .
Brakes 159 . . . . . . . . . . . . . . . . .
Tires 163 . . . . . . . . . . . . . . . . . .
Inflation 164 . . . . . . . . . . . . .
Inspection 165 . . . . . . . . . . . .
Maintenance 166 . . . . . . . . . .
Tire Rotation 166 . . . . . . . . . .
Replacing Tires
and Wheels 166 . . . . . . . . . .
Wheels and Tires 167 . . . . . .
Traction 168 . . . . . . . . . . . . . .
Tire Chains 168 . . . . . . . . .
Wheel Replacement
Considerations 169 . . . . . . .
Fuel Economy 170 . . . . . . . . . . .
Three-Way Catalytic
Converter 172 . . . . . . . . . . . . . Operation in
Foreign Countries 173
. . . . . . .
Accessories & Modifications173
Carrying Cargo175 . . . . . . . . . . .
Trailer Towing 178 . . . . . . . . . . .
Trailer Hitches 180 . . . . . . . .
Safety Chain181 . . . . . . . . . .
Trailer Lights181 . . . . . . . . . .
Tires181 . . . . . . . . . . . . . . . . .
Trailer Brakes181 . . . . . . . . .
Equipment Check182 . . . . . .
Limited Slip Differential 182 . . .
Driving Tips
Page 159 of 294

156 Driving Tips
Driving Guidelines
Your Honda has higher ground
clearance than a passenger car
designed for use only on
pavement. Higher ground
clearance has many advantages
for off-road driving. It allows you
to travel over bumps, obstacles,
and rough terrain. It also provides
good visibility so you can
anticipate problems earlier.
These advantages come at some
cost. Because your vehicle is
taller and rides higher off the
ground, it has a high center of
gravity. This means that your
vehicle can tip or roll over if you
make abrupt turns. Utility
vehicles have a significantly
higher rollover rate than other
types of vehicles. To prevent rollover or loss of
control:
•
Take corners at slower speeds
than you would with a
passenger car.
• Avoid sharp turns and abrupt
maneuvers whenever possible.
• Do not modify your vehicle in
any way that would raise the
center of gravity (see page 174).
•Do not carry heavy cargo on
the roof (see page 177).
For off-road driving guidelines,
see the Off-Road Driving
Information booklet that came
with your vehicle.
Before Entering the Vehicle
1. Check that the windows, mirrors, lights and reflectors
are clean and unobstructed. 2. Check the tires to see if they
are low or flat. You will need
a pressure gauge to tell if tires
are properly inflated.
3. Check that all lights work.
4. Check for fluid leaks.
5. Be sure everything is properly stowed.
6. Check the area behind the vehicle if you are about to
back up.
Before Driving the Vehicle
1. Lock all doors.
2. Adjust the seat and anymovable head restraints.
3. Adjust the inside and outside mirrors.
4. Check that all the indicator lights work when the key
Before Driving
Page 162 of 294

159Driving Tips
•If your vehicle is equipped with
an automatic transmission, set
the parking brake before you
leave the driver’s seat. If the
vehicle is parked on a grade
and the transmission shift lever
is placed in “P” (Park) position
before you set the parking
brake, the weight of the vehicle
may exert so much force on the
transmission that you may have
difficulty moving the shift
lever out of “P” (Park)
position. To prevent this, apply
the parking brake
BEFORE
moving the shift lever to “P”
(Park). When you want to drive
away, move the shift lever out
of the “P” (Park) position
BEFORE releasing the parking
brake. It is good driving
practice to set the parking
brake first, then place the
transmission in “
PA R K” position, even on level
surfaces.
•If the parking brake does not
seem to hold the vehicle as
well as before, have the vehicle
serviced by your Honda dealer.
•Do not park your vehicle over
high grass, dry leaves or other
combustible materials. The
catalytic converter gets very
hot and could set fire to these
materials.
Anti-Lock Brakes
Your vehicle has an Anti-lock
Brake System (
ABS) as standard
equipment.
ABS helps to prevent
the wheels from locking up and
skidding during hard braking,
allowing you to retain steering
control.
When the front tires skid, you
lose steering control; the vehicle
continues straight ahead even
though you turn the steering
wheel. The
ABS helps to prevent
lock-up and retain steering control
by pumping the brakes rapidly;
much faster than a person can do it.
You should never pump the
brake pedal, this defeats the
purpose of the
ABS. Let the ABS
work for you by always keeping
firm, steady pressure on the brake
pedal as you steer away from the
Brakes
Page 163 of 294

160Driving Tips
hazard. This is sometimes referred
to as “stomp and steer
.”
You will feel a pulsation in the
brake pedal when the
ABS
activates, and you may hear some
noise. This is normal, it is the
ABS rapidly pumping the brakes.
Activation varies with the amount
of traction your tires have. On dry
pavement, you will need to press
on the brake pedal very hard
before you activate the
ABS.
However, you may feel the
ABS
activate immediately if you are
trying to stop on snow or ice.
Important Safety Reminders
ABS does not reduce the time
or distance it takes to stop the
vehicle, it only helps with steering
control during braking. You
should always maintain a safe following distance from other
vehicles.
ABS will not prevent a skid that
results from changing direction
abruptly, such as trying to take a
corner too fast or making a
sudden lane change. Always drive
at a safe, prudent speed for the
road and weather conditions.
ABS cannot prevent a loss of
stability. Always steer moderately
when you are braking hard.
Severe or sharp steering wheel
movement can still cause your
vehicle to veer into oncoming
traffic or off the road.
A vehicle with
ABS may require
a longer distance to stop on
loose or uneven surfaces, such as
gravel or snow, than a vehicle
without anti-lock. Slow down and allow a greater distance between
vehicles under those conditions.
ABS Indicator
The
ABS is self-checking. You
may feel a slight movement of the
brake pedal just after you start the
engine. This is the
ABS performing
a check. It also checks itself
whenever you use the brakes.
Page 166 of 294

163Driving Tips
distances will be longer and
vehicle control more limited.
While driving on a surface with
reduced traction, avoid maneuvers
involving sudden steering,
acceleration, or braking (including
engine braking due to shifting to
lower gear), that could cause the
tires to skid.
Drivers may not realize the
surface is slippery until the
vehicle is skidding.
Learn to recognize warning
clues—such as enough water or
ice on the road to make a
“mirrored surface”—and slow
down when there is any doubt.
Also see “Traction” under “Tires”
in this section.
Rapid slowing down or
speeding-up can cause loss
of control on slippery
surfaces. If you crash, you
can be injured.
Use extra care when driving
on slippery surfaces.
To safely operate your vehicle,
your tires must be the proper type
and size, in good condition with
adequate tread, and correctly
inflated. The following pages give
more detailed information on how
and when to check air pressure,
how to inspect your tires for
damage and wear, and what to do
when your tires need to be
replaced.
Using tires that are excessively
worn or improperly inflated can
cause a crash in which you
can be seriously hurt or killed.
Follow all instructions in this
owner’s manual regarding tire
inflation and maintenance.
Tires
Page 167 of 294

164Driving Tips
Inflation
Keeping the tires properly inflated
provides the best combination of
handling, tread life, and riding
comfort. Underinflated tires wear
unevenly, adversely affect handling
and fuel economy, and are more
likely to fail from being overheated.
Overinflated tires can make your
vehicle ride more harshly, are
more prone to damage from road
hazards, and wear unevenly.
We recommend that you visually
check your tires every day. If you
think a tire might be low, check it
immediately with a tire gauge.
Use a gauge to measure the air
pressure at least once a month.
Even tires that are in good
condition may lose one to two psi
per month. Remember to check
the spare tire at the same time you
check all the other tires.Check the pressure in the tires
when they are cold. This means
the vehicle has been parked for at
least three hours. If you have to
drive the vehicle before checking
the tire pressure, the tires can still
be considered “cold” if you drive
less than 1 mile (1.6 km).
If you check the pressure when
the tires are hot (the vehicle has
been driven several miles), you
will see readings 4 to 6 psi (28 to
41 kPa, 0.3 to 0.4 kg/cm
2) higher
than the cold reading. This is
normal. Do not let air out to
match the specified cold pressure.
The tire will be underinflated.
You should get your own tire
pressure gauge and use it at all
times. That makes it easier for
you to tell if a pressure loss is
caused by a tire problem and not a
variation between gauges. Recommended Tire Pressures for
Normal Driving
The following chart shows the
recommended cold tire pressures
for most normal driving
conditions and speeds.
Tire SizeCold Tire Pressure for
Normal Driving
225/75R1629psi (200 kPa)225/75R1629 psi (200 kPa)
245/70R1626 psi (180 kPa)
Page 168 of 294

165Driving Tips
These pressures are also given on
the tire information label on the
driver ’
s doorjamb.
LABEL
Tubeless tires have some ability to
self-seal if they are punctured.
However, because leakage is often
very slow, you should look
closely for punctures if a tire
starts losing pressure.
Inspection
Every time you check inflation,
you should also examine the tires
for damage, foreign objects, and
wear.
You should look for:
•Bumps or bulges in the tread or
side of the tire. Replace the tire
if you find either of these
conditions.
•Cuts, splits, or cracks in the
side of the tire. Replace the tire
if you can see fabric.
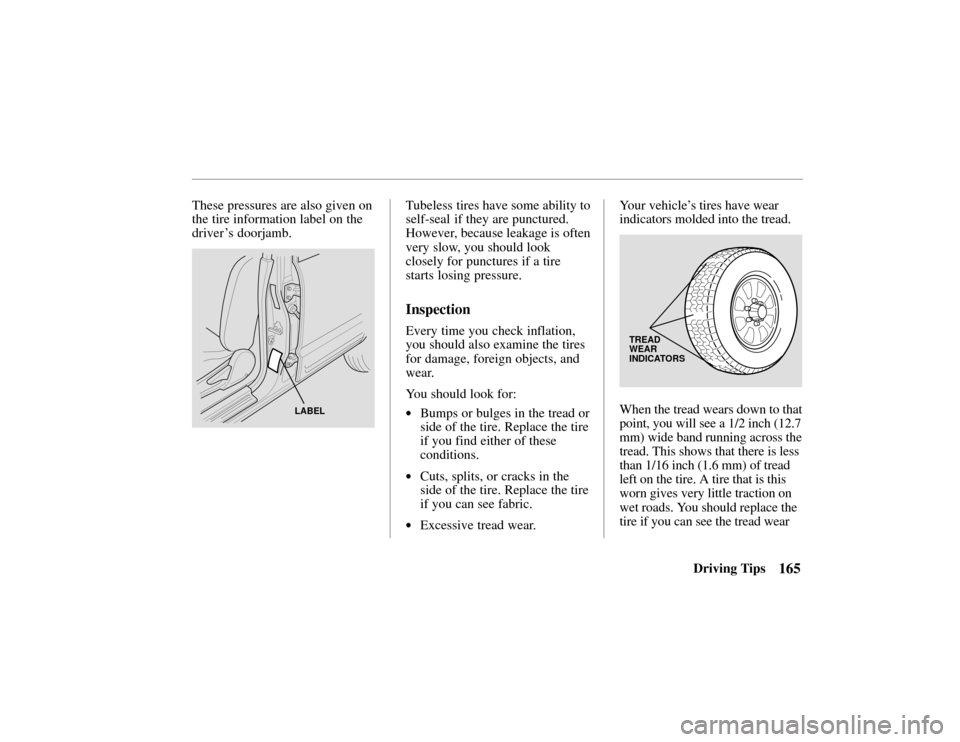
•Excessive tread wear. Your vehicle
’s tires have wear
indicators molded into the tread.
TREAD
WEAR
INDICATORS
When the tread wears down to that
point, you will see a 1/2 inch (12.7
mm) wide band running across the
tread. This shows that there is less
than 1/16 inch (1.6 mm) of tread
left on the tire. A tire that is this
worn gives very little traction on
wet roads. You should replace the
tire if you can see the tread wear
Page 169 of 294

166Driving Tips
indicator in three or more places
around the tire.
Maintenance
In addition to proper inflation,
correct wheel alignment helps to
decrease tire wear. You should get
your vehicle’
s suspension parts
inspected often, and aligned when
needed.
The tires were properly balanced
at the factory. They may need to
be rebalanced at some time before
they are worn out. Have your
dealer check the tires if you feel a
consistent vibration while driving.
A tire should always be
rebalanced if it is removed from
the wheel for repair.
Make sure the installer balances
the wheels when you have new
tires installed. This increases riding comfort and tire life. Your
vehicle’
s original tires were
dynamic or “spin” balanced at the
factory. For best results, have the
installer perform a dynamic
balance.
Tire Rotation
To help increase tire life and
distribute wear more evenly, you
should have the tires rotated every
7,500 miles (12,000 km).
FRONT
4 WHEEL 5 WHEEL
Move the tires to the positions
shown in the diagram each time
they are rotated.
Replacing Tires and Wheels
The tires that came with your
vehicle were selected to match its
performance capabilities while
providing the best combination of
handling, ride comfort, and long
life. You should replace them with
radial tires of the same size, load
range, speed rating, and maximum
cold tire pressure rating (as shown
on the tire’ s sidewall). Mixing
radial and bias-ply tires on your
vehicle can reduce its braking
ability, traction, and steering
accuracy.
Page 170 of 294

167Driving Tips
We urge you not to install
oversize tires and wheels that
would change your vehicle’s
ride height and possibly affect
handling and stability.
Installing improper tires on
your vehicle can affect
handling and stability. This
can cause a crash in which
you can be seriously hurt or
killed.
Always use the size and type
of tires recommended in this
owner’s manual.
It is best to replace all four tires at
the same time. If that is not
possible
or necessary, then replace
the two front tires or the two rear
tires as a pair. Replacing just one
tire can seriously affect your
vehicle’s handling.
The
ABS works by comparing the
speed of the wheels. When
replacing tires, use the same size
originally supplied with the
vehicle. Tire size and construction
can affect wheel speed and may
cause the system to work
inconsistently.
If you ever need to replace a
wheel, make sure the
replacement’s specifications
match the wheels that originally
came on your Honda. Replacement wheels are available
at your Honda dealer.
Wheels and Tires
Wheels:
16 x 7 JJ
Tires:
Standard on
LX 2WD
225/75R16
Standard on all other models
245/70R16
See page 250 for information
about DOT Tire Quality Grading.
Page 171 of 294

168Driving Tips
Traction
A decrease in driving, cornering,
and braking traction occurs when
water, snow, ice, gravel, or other
materials are on the road. Vehicle
speed should be adjusted to the
road conditions.
When driving on wet or slushy
roads, a wedge of water can build
up between the tire and road. This
is known as hydroplaning and
may cause partial or complete loss
of traction, vehicle control, and
stopping ability. To reduce the
chance of traction loss, follow
these tips:
1. Slow down during rainstormsor when roads are slushy.
2. Slow down if the road has standing water or puddles. 3. Replace tires when they are
worn to a point where 1/16
inch (1.6 mm) or less tread
remains, or cord or fabric
can be seen.
4. Keep the tires properly inflated.
If your vehicle has snow tires, be
sure they are the same size, load
range and construction type as your
other tires. Vehicle speed should be
limited to a maximum of 75 mph
(120 km/h) when equipped with
either passenger vehicle-type or
truck-type snow tires.
Tire Chains
To prevent tire chains from
damaging your vehicle:
•Install the chains on the rear
tires as tightly as possible. Tighten them again after
driving 1/4 to 1/2 mile (0.4 to
0.8 kilometer). Using chains on
the front tires is not
recommended. They may
contact the body and possibly
damage the vehicle. If you
intend to use chains on the
front tires, be sure there is
enough clearance.
•Do not exceed 45 mph
(70 km/h) or the chain
manufacturer ’
s suggested speed
limit if it is lower.
•Drive in a restrained manner
and avoid large bumps,
potholes, severe turns or other
maneuvers that could cause the
vehicle to bounce up and down.
•Follow the chain
manufacturer ’ s instructions.