headlights HONDA PASSPORT 2019 (in English) User Guide
[x] Cancel search | Manufacturer: HONDA, Model Year: 2019, Model line: PASSPORT, Model: HONDA PASSPORT 2019Pages: 667, PDF Size: 39.39 MB
Page 176 of 667
174
uuOperating the Switches Around the Steering Wheel uAuto High-Beam
Controls
Auto High-Beam
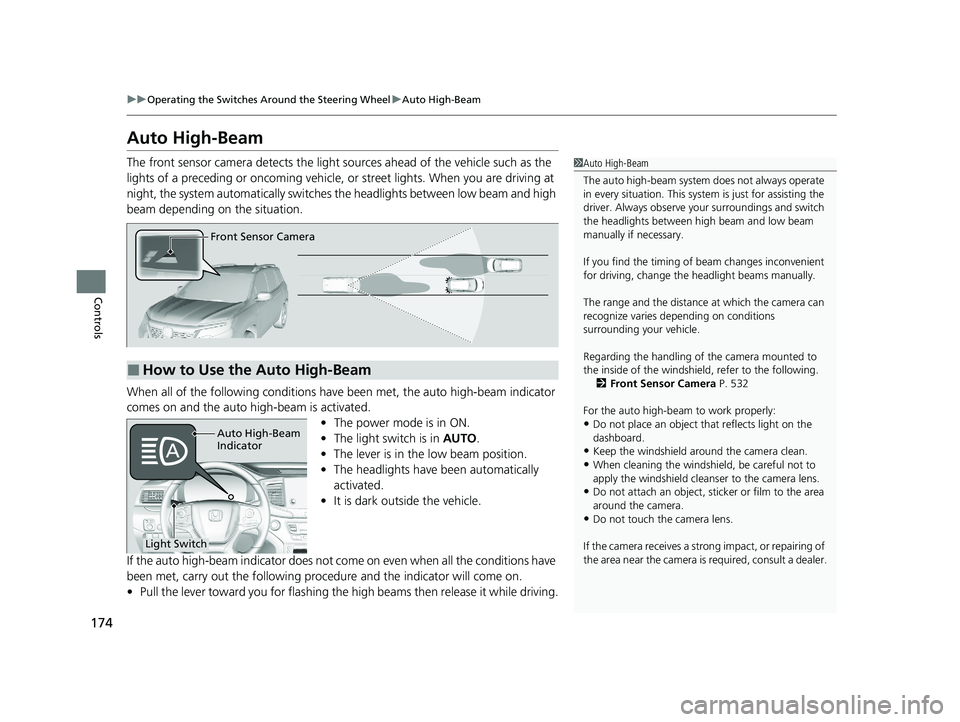
The front sensor camera detects the light sources ahead of the vehicle such as the
lights of a preceding or oncoming vehicle, or street lights. When you are driving at
night, the system automatically switches the headlights between low beam and high
beam depending on the situation.
When all of the following conditions have been met, the auto high-beam indicator
comes on and the auto high-beam is activated. •The power mode is in ON.
• The light switch is in AUTO.
• The lever is in the low beam position.
• The headlights have been automatically
activated.
• It is dark outside the vehicle.
If the auto high-beam indicator does not co me on even when all the conditions have
been met, carry out the following procedure and the indicator will come on.
• Pull the lever toward you for flashing the high beams then release it while driving.1Auto High-Beam
The auto high-beam system does not always operate
in every situation. This syst em is just for assisting the
driver. Always observe your surroundings and switch
the headlights between high beam and low beam
manually if necessary.
If you find the timing of beam changes inconvenient
for driving, change the headlight beams manually.
The range and the distance at which the camera can
recognize varies de pending on conditions
surrounding your vehicle.
Regarding the handling of the camera mounted to
the inside of the windshiel d, refer to the following.
2 Front Sensor Camera P. 532
For the auto high-beam to work properly:
•Do not place an object that reflects light on the
dashboard.
•Keep the windshield around the camera clean.
•When cleaning the windshield, be careful not to
apply the windshield cleans er to the camera lens.
•Do not attach an object, sticker or film to the area
around the camera.
•Do not touch the camera lens.
If the camera receives a st rong impact, or repairing of
the area near the camera is required, consult a dealer.
■How to Use the Auto High-Beam
Front Sensor Camera
Auto High-Beam
Indicator
Light Switch
19 PASSPORT-31TGS6020.book 174 ページ 2020年2月20日 木曜日 午後3時29分
Page 177 of 667
Continued175
uuOperating the Switches Around the Steering Wheel uAuto High-Beam
Controls
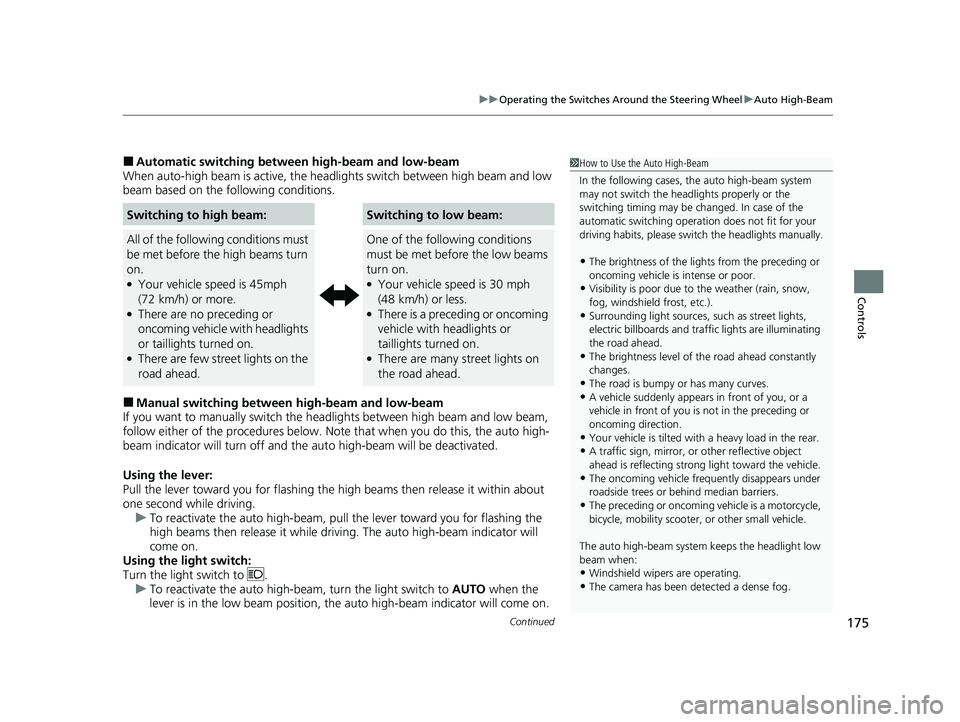
■Automatic switching between high-beam and low-beam
When auto-high beam is active, the head lights switch between high beam and low
beam based on the following conditions.
■Manual switching between high-beam and low-beam
If you want to manually switch the h eadlights between high beam and low beam,
follow either of the procedur es below. Note that when you do this, the auto high-
beam indicator will turn off and the auto high-beam will be deactivated.
Using the lever:
Pull the lever toward you for flashing the hi gh beams then release it within about
one second while driving. u To reactivate the auto hi gh-beam, pull the lever toward you for flashing the
high beams then release it while driv ing. The auto high-beam indicator will
come on.
Using the light switch:
Turn the light switch to . u To reactivate the au to high-beam, turn the light switch to AUTO when the
lever is in the low beam position, the auto high-beam indicator will come on.
Switching to high beam:Switching to low beam:
All of the following conditions must
be met before the high beams turn
on.
●Your vehicle speed is 45mph
(72 km/h) or more.
●There are no preceding or
oncoming vehicle with headlights
or taillights turned on.
●There are few street lights on the
road ahead.
One of the following conditions
must be met before the low beams
turn on.
●Your vehicle speed is 30 mph
(48 km/h) or less.
●There is a preceding or oncoming
vehicle with headlights or
taillights turned on.
●There are many street lights on
the road ahead.
1How to Use the Auto High-Beam
In the following cases, th e auto high-beam system
may not switch the head lights properly or the
switching timing may be ch anged. In case of the
automatic switching operati on does not fit for your
driving habits, please swit ch the headlights manually.
•The brightness of the lights from the preceding or
oncoming vehicle is intense or poor.
•Visibility is poor due to the weather (rain, snow,
fog, windshield frost, etc.).
•Surrounding light sources, such as street lights,
electric billboards and traf fic lights are illuminating
the road ahead.
•The brightness level of th e road ahead constantly
changes.
•The road is bumpy or has many curves.•A vehicle suddenly appears in front of you, or a
vehicle in front of you is not in the preceding or
oncoming direction.
•Your vehicle is tilted with a heavy load in the rear.•A traffic sign, mirror, or other reflective object
ahead is reflecting strong light toward the vehicle.
•The oncoming vehicle freq uently disappears under
roadside trees or be hind median barriers.
•The preceding or oncoming vehicle is a motorcycle,
bicycle, mobility scooter, or other small vehicle.
The auto high-beam system keeps the headlight low
beam when:
•Windshield wipers are operating.
•The camera has been detected a dense fog.
19 PASSPORT-31TGS6020.book 175 ページ 2020年2月20日 木曜日 午後3時29分
Page 188 of 667
186
Controls
Adjusting the Mirrors
Interior Rearview Mirror
Adjust the angle of the rearview mirror when you are sitting in the correct driving
position.
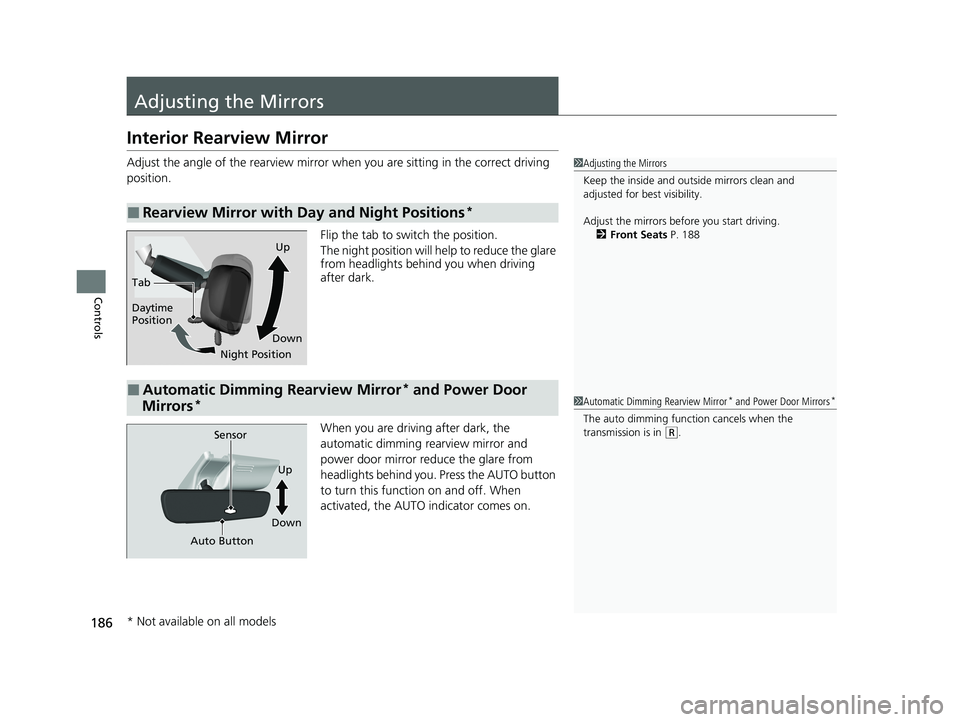
Flip the tab to switch the position.
The night position will help to reduce the glare
from headlights behind you when driving
after dark.
When you are driving after dark, the
automatic dimming rearview mirror and
power door mirror reduce the glare from
headlights behind you. Press the AUTO button
to turn this function on and off. When
activated, the AUTO indicator comes on.
■Rearview Mirror with Day and Night Positions*
1 Adjusting the Mirrors
Keep the inside and out side mirrors clean and
adjusted for best visibility.
Adjust the mirrors before you start driving. 2 Front Seats P. 188
Tab
Daytime
Position
Night PositionUp
Down
■Automatic Dimming Rearview Mirror* and Power Door
Mirrors*1 Automatic Dimming Rearview Mirror* and Power Door Mirrors*
The auto dimming function cancels when the
transmission is in
(R.Sensor
Auto Button
Up
Down
* Not available on all models
19 PASSPORT-31TGS6020.book 186 ページ 2020年2月20日 木曜日 午後3時29分
Page 376 of 667
374
uuCustomized Features u
Features
*1:Default SettingSetup
Group Customizable Features Description Selectable Settings
Vehicle
Lighting
Setup
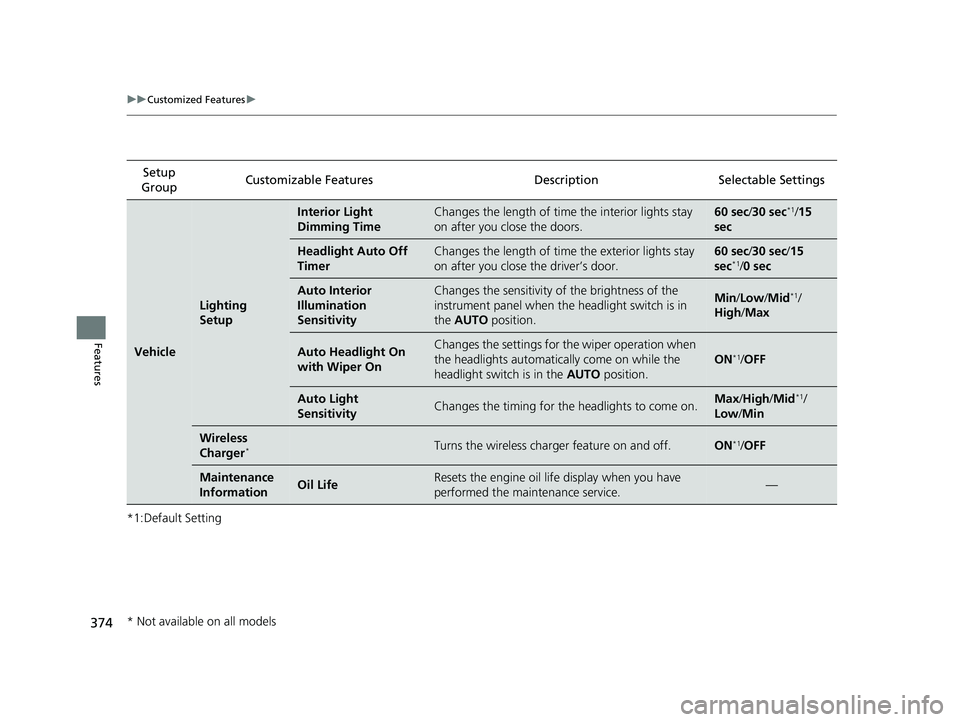
Interior Light
Dimming TimeChanges the length of time the interior lights stay
on after you close the doors.60 sec/
30 sec*1/15
sec
Headlight Auto Off
TimerChanges the length of time the exterior lights stay
on after you close the driver’s door.60 sec/ 30 sec/ 15
sec*1/ 0 sec
Auto Interior
Illumination
SensitivityChanges the sensitivity of the brightness of the
instrument panel when the headlight switch is in
the AUTO position.Min/Low/Mid*1/
High /Max
Auto Headlight On
with Wiper OnChanges the settings for th e wiper operation when
the headlights automati cally come on while the
headlight switch is in the AUTO position.
ON*1/OFF
Auto Light
SensitivityChanges the timing for the headlights to come on.Max /High /Mid*1/
Low /Min
Wireless
Charger*Turns the wireless charger feature on and off.ON*1/OFF
Maintenance
InformationOil LifeResets the engine oil life display when you have
performed the maintenance service.—
* Not available on all models
19 PASSPORT-31TGS6020.book 374 ページ 2020年2月20日 木曜日 午後3時29分
Page 500 of 667
498
uuHonda Sensing ®u Collision Mitigation Braking SystemTM (CMBSTM)
Driving
■Vehicle conditions
• Headlight lenses are dirty or the headlights are not properly adjusted.
• The outside of the windshie ld is blocked by dirt, mud, leaves, wet snow, etc.
• The inside of the windshield is fogged.
• An abnormal tire or wheel condition (wrong sized, varied size or construction,
improperly inflated, comp act spare tire, etc.).
• When tire chains are installed.
• The vehicle is tilted due to a heav y load or suspension modifications.
• The camera temperature gets too high.
• Driving with the parking brake applied.
• When the radar sensor in the front grille gets dirty.
• The vehicle is towing a trailer.
19 PASSPORT-31TGS6020.book 498 ページ 2020年2月20日 木曜日 午後3時29分
Page 528 of 667
526
uuHonda Sensing ®u Lane Keeping Assist System (LKAS)
Driving
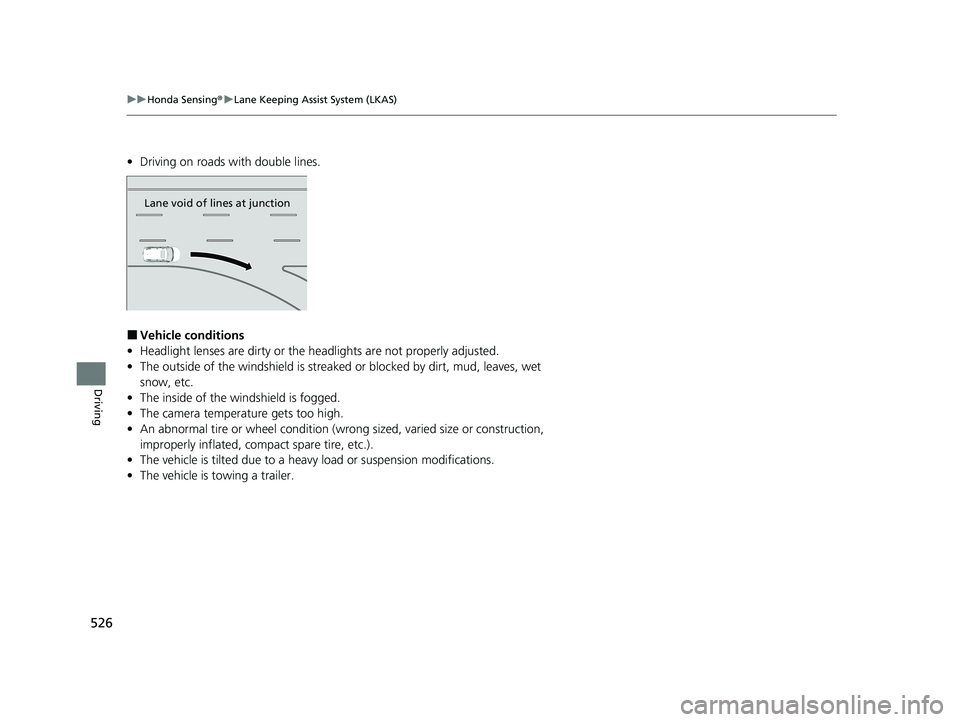
• Driving on roads with double lines.
■Vehicle conditions
• Headlight lenses are dirty or the headlights are not properly adjusted.
• The outside of the windshield is streake d or blocked by dirt, mud, leaves, wet
snow, etc.
• The inside of the windshield is fogged.
• The camera temperature gets too high.
• An abnormal tire or wheel condition (wrong sized, varied size or construction,
improperly inflated, comp act spare tire, etc.).
• The vehicle is tilted due to a heav y load or suspension modifications.
• The vehicle is towing a trailer.
Lane void of lines at junction
19 PASSPORT-31TGS6020.book 526 ページ 2020年2月20日 木曜日 午後3時29分
Page 581 of 667
579Continued
Maintenance
Replacing Light Bulbs
Headlight Bulbs
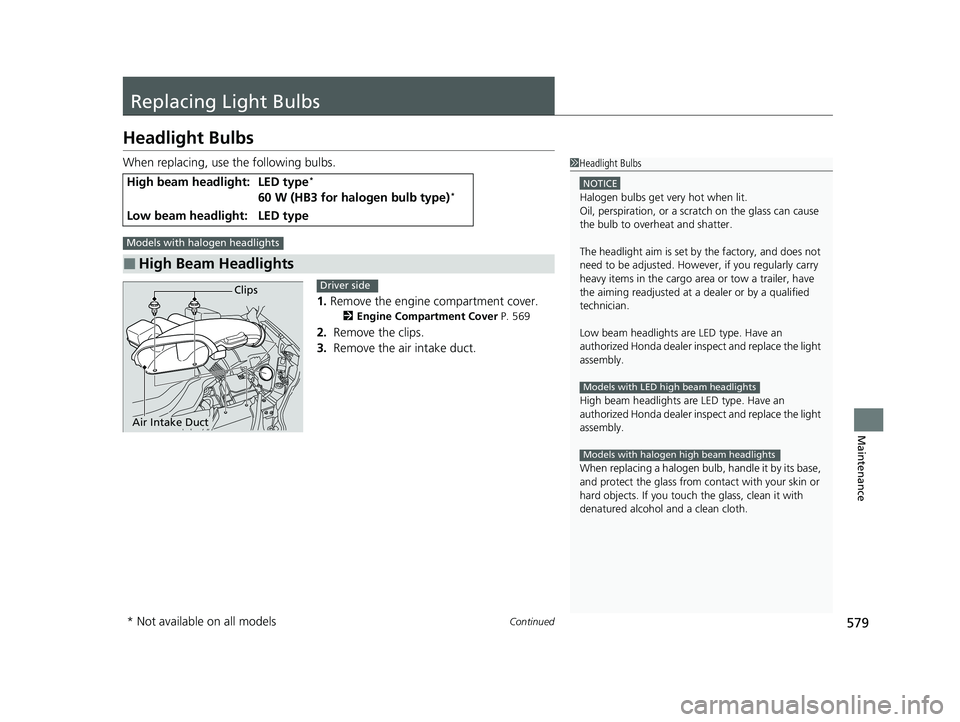
When replacing, use the following bulbs.1.Remove the engine compartment cover.
2 Engine Compartment Cover P. 569
2. Remove the clips.
3. Remove the air intake duct.
High beam headlight:LED type*
60 W (HB3 for halogen bulb type)*
Low beam headlight:LED type
■High Beam Headlights
1Headlight Bulbs
NOTICE
Halogen bulbs get very hot when lit.
Oil, perspiration, or a scratch on the glass can cause
the bulb to overhe at and shatter.
The headlight aim is set by the factory, and does not
need to be adjusted. Howeve r, if you regularly carry
heavy items in the cargo area or tow a trailer, have
the aiming readjusted at a dealer or by a qualified
technician.
Low beam headlights are LED type. Have an
authorized Honda d ealer inspect and replace the light
assembly.
High beam headlights ar e LED type. Have an
authorized Honda d ealer inspect and replace the light
assembly.
When replacing a halogen bu lb, handle it by its base,
and protect the glass from c ontact with your skin or
hard objects. If you touch the glass, clean it with
denatured alcohol and a clean cloth.
Models with LED high beam headlights
Models with halogen high beam headlights
Models with halogen headlights
Clips
Air Intake Duct
Driver side
* Not available on all models
19 PASSPORT-31TGS6020.book 579 ページ 2020年2月20日 木曜日 午後3時29分
Page 599 of 667
597
Maintenance
Battery
Checking the Battery
The condition of the battery is monitored by a
sensor located on the negative terminal of the
battery. If there is a problem with this sensor,
the driver information interface will display a
warning message. If this happens, have your
vehicle inspected by a dealer.
Check the battery termina ls for corrosion monthly.
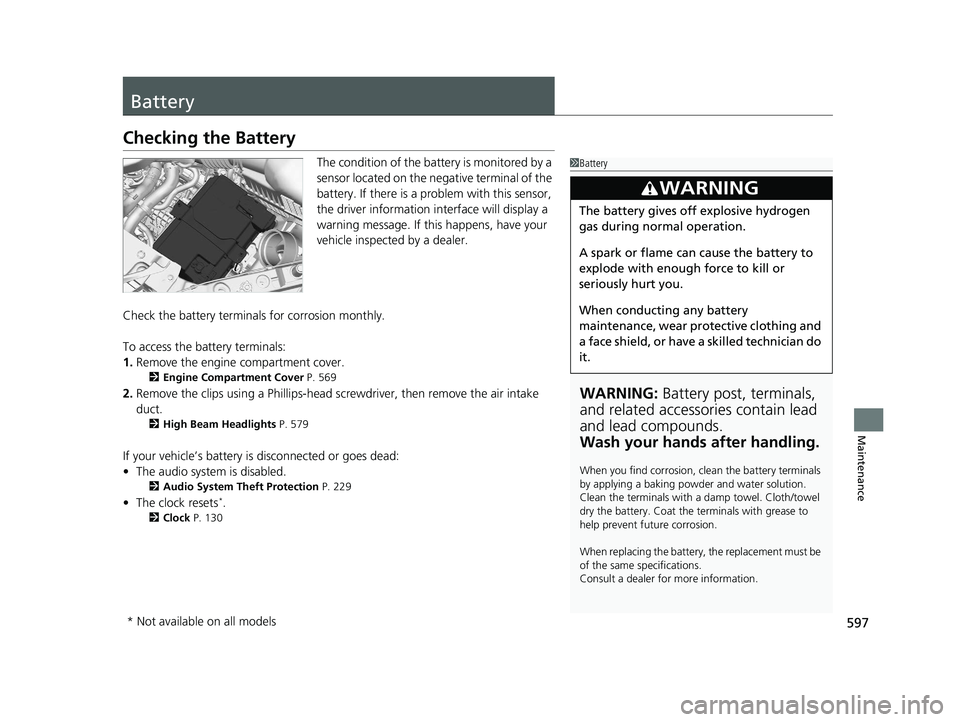
To access the battery terminals:
1. Remove the engine compartment cover.
2 Engine Compartment Cover P. 569
2.Remove the clips using a Ph illips-head screwdriver, then remove the air intake
duct.
2 High Beam Headlights P. 579
If your vehicle’s battery is disconnected or goes dead:
•The audio system is disabled.
2 Audio System Theft Protection P. 229
•The clock resets*.
2 Clock P. 130
1Battery
WARNING: Battery post, terminals,
and related accessories contain lead
and lead compounds.
Wash your hands after handling.
When you find corrosion, cl ean the battery terminals
by applying a baking powder and water solution.
Clean the terminals with a damp towel. Cloth/towel
dry the battery. Coat the terminals with grease to
help prevent future corrosion.
When replacing the battery, the replacement must be
of the same specifications.
Consult a dealer for more information.
3WARNING
The battery gives off explosive hydrogen
gas during normal operation.
A spark or flame can cause the battery to
explode with enough force to kill or
seriously hurt you.
When conducting any battery
maintenance, wear prot ective clothing and
a face shield, or have a skilled technician do
it.
* Not available on all models
19 PASSPORT-31TGS6020.book 597 ページ 2020年2月20日 木曜日 午後3時29分
Page 637 of 667
635
uuFuses uInspecting and Changing Fuses
Handling the Unexpected
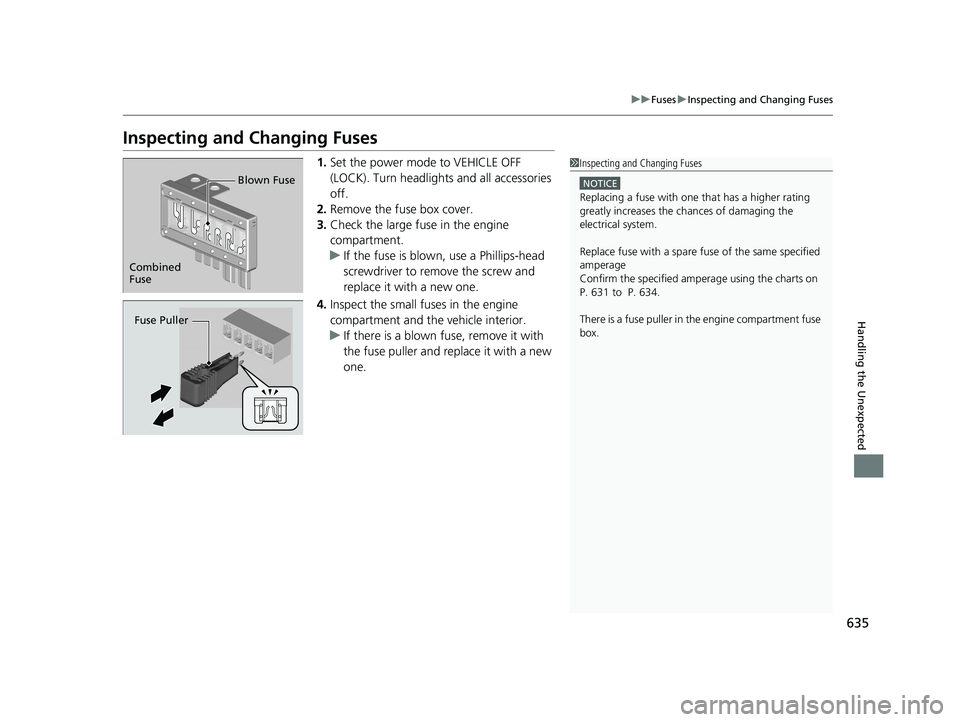
Inspecting and Changing Fuses
1. Set the power mode to VEHICLE OFF
(LOCK). Turn headlights and all accessories
off.
2. Remove the fuse box cover.
3. Check the large fuse in the engine
compartment.
u If the fuse is blown, use a Phillips-head
screwdriver to remove the screw and
replace it with a new one.
4. Inspect the small fu ses in the engine
compartment and the vehicle interior.
u If there is a blown fuse, remove it with
the fuse puller and replace it with a new
one.1Inspecting and Changing Fuses
NOTICE
Replacing a fuse with on e that has a higher rating
greatly increases the chances of damaging the
electrical system.
Replace fuse with a spare fuse of the same specified
amperage
Confirm the specified amperage using the charts on
P. 631 to P. 634.
There is a fuse puller in the engine compartment fuse
box.
Combined
Fuse Blown Fuse
Fuse Puller
19 PASSPORT-31TGS6020.book 635 ページ 2020年2月20日 木曜日 午後3時29分
Page 644 of 667
642
Information
Specifications
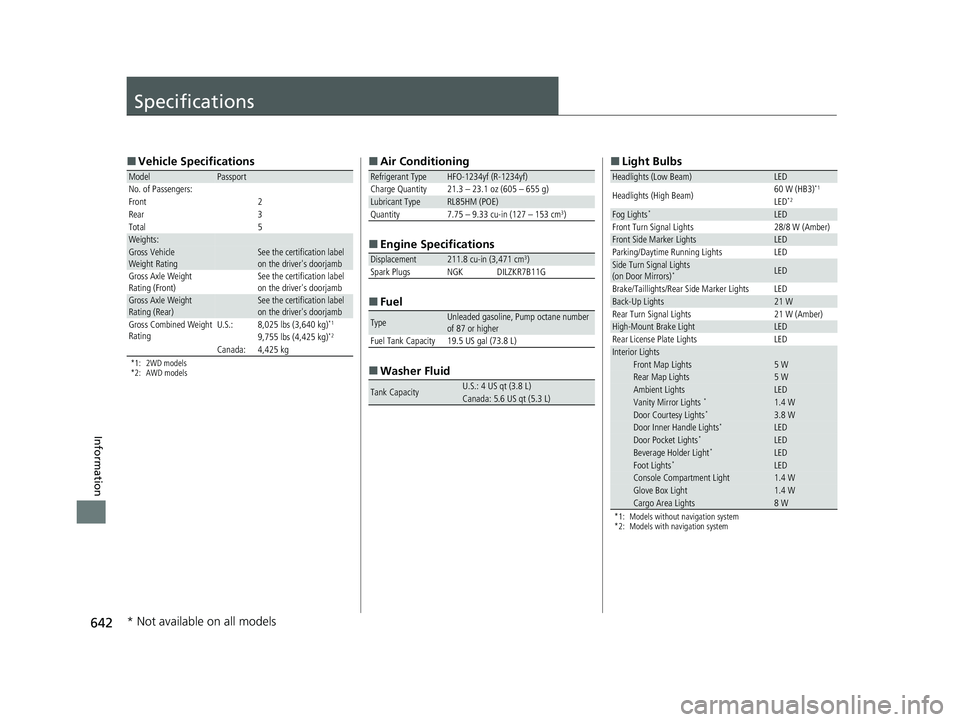
■Vehicle Specifications
*1: 2WD models
*2: AWD models
ModelPassport
No. of Passengers:
Front 2
Rear 3
Total
5Weights:Gross Vehicle
Weight RatingSee the certification label
on the driver's doorjamb
Gross Axle Weight
Rating (Front)See the certification label
on the driver's doorjamb
Gross Axle Weight
Rating (Rear)See the certification label
on the driver's doorjamb
Gross Combined Weight
RatingU.S.:8,025 lbs (3,640 kg)*1
9,755 lbs (4,425 kg)*2
Canada:4,425 kg
■ Air Conditioning
■ Engine Specifications
■ Fuel
■ Washer Fluid
Refrigerant TypeHFO-1234yf (R-1234yf)
Charge Quantity 21.3 – 23.1 oz (605 – 655 g)
Lubricant TypeRL85HM (POE)
Quantity 7.75 – 9.33 cu-in (127 – 153 cm3)
Displacement211.8 cu-in (3,471 cm3)
Spark Plugs NGK DILZKR7B11G
TypeUnleaded gasoline, Pump octane number
of 87 or higher
Fuel Tank Capacity 19.5 US gal (73.8 L)
Tank CapacityU.S.: 4 US qt (3.8 L)Canada: 5.6 US qt (5.3 L)
■ Light Bulbs
*1: Models without navigation system
*2: Models with navigation system
Headlights (Low Beam)LED
Headlights (High Beam)60 W (HB3)*1
LED*2
Fog Lights*LEDFront Turn Signal Lights28/8 W (Amber)Front Side Marker LightsLEDParking/Daytime Running LightsLEDSide Turn Signal Lights
(on Door Mirrors)*LED
Brake/Taillights/Rear Side Marker LightsLEDBack-Up Lights21 WRear Turn Signal Lights21 W (Amber)High-Mount Brake LightLEDRear License Plate LightsLEDInterior LightsFront Map Lights5 WRear Map Lights5 WAmbient LightsLEDVanity Mirror Lights *1.4 WDoor Courtesy Lights*3.8 WDoor Inner Handle Lights*LEDDoor Pocket Lights*LEDBeverage Holder Light*LEDFoot Lights*LEDConsole Compartment Light1.4 WGlove Box Light1.4 WCargo Area Lights8 W
* Not available on all models
19 PASSPORT-31TGS6020.book 642 ページ 2020年2月20日 木曜日 午後3時29分