brake light HONDA PASSPORT 2019 (in English) Owner's Guide
[x] Cancel search | Manufacturer: HONDA, Model Year: 2019, Model line: PASSPORT, Model: HONDA PASSPORT 2019Pages: 667, PDF Size: 39.39 MB
Page 560 of 667
558
Maintenance
Before Performing Maintenance
Inspection and Maintenance
For your safety, perform all listed inspections and maintenance to keep your vehicle
in good condition. If you become aware of an y abnormality (noise, smell, insufficient
brake fluid, oil residue on the ground, etc.), have your vehicle inspected by a dealer.
(Note, however, that service at a dealer is not mandatory to keep your warranties in
effect.)
■Daily inspections
Perform inspections before long distance tri ps, when washing the vehicle, or when
refueling.
■Periodic inspections
• Check the brake fluid level monthly.
2 Checking the Brake Fluid P. 578
•Check the tire pressure monthly. Examin e the tread for wear and foreign objects.
2Checking and Maintaining Tires P. 588
•Check the operation of the exterior lights monthly.
2 Replacing Light Bulbs P. 579
•Check the condition of the wiper bl ades at least every six months.
2Checking and Maintaining Wiper Blades P. 584
■Types of Inspection and Maintenance
1Inspection and Maintenance
Maintenance, replacement, or repair of
emissions control devices and systems may be
done by any automotive repair establishment or
individuals using parts that are “certified” to
EPA standards.
According to state and fede ral regulations, failure to
perform maintenance on the maintenance main
items marked with # will not void your emissions
warranties. However, all ma intenance services should
be performed in accordan ce with the intervals
indicated by the driver information interface.
2 Maintenance Service Items P. 564
If you want to perform complex maintenance tasks
that require more skills a nd tools, you can purchase a
subscription to the Service Express website at
www.techinfo.honda.com .
2 Authorized Manuals P. 651
If you want to perform ma intenance yourself, make
sure that you have the necessary tools and skills first.
After performing maintenanc e, update the records in
the separate maintenance booklet.
U.S. models
19 PASSPORT-31TGS6020.book 558 ページ 2020年2月20日 木曜日 午後3時29分
Page 570 of 667
568
uuMaintenance Under the Hood uOpening the Hood
Maintenance
Opening the Hood
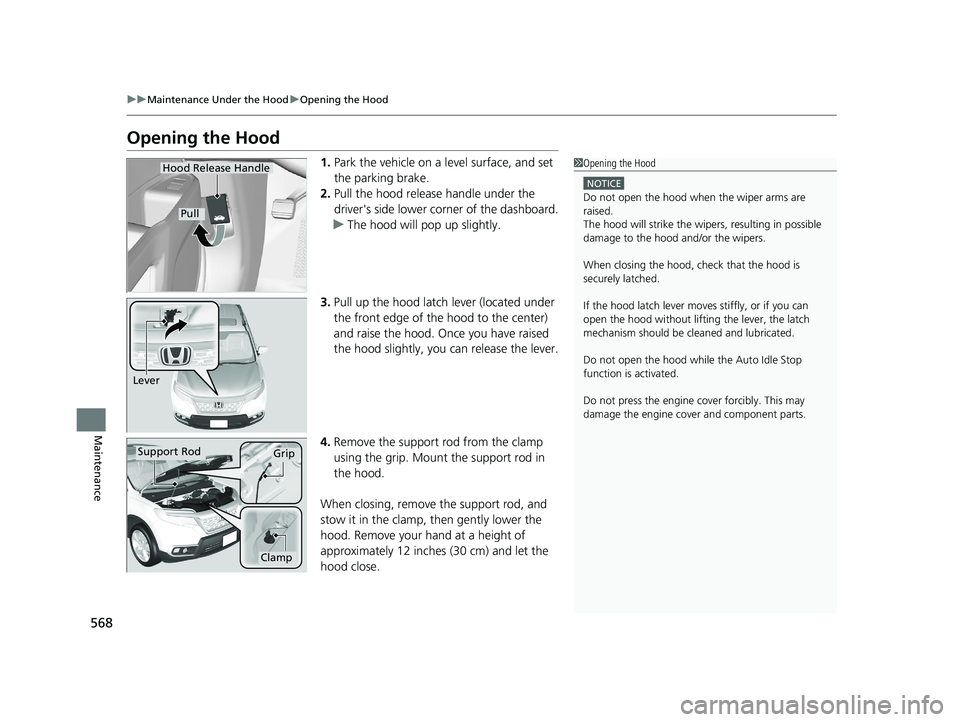
1. Park the vehicle on a level surface, and set
the parking brake.
2. Pull the hood release handle under the
driver's side lower corner of the dashboard.
u The hood will pop up slightly.
3. Pull up the hood latch lever (located under
the front edge of the hood to the center)
and raise the hood. Once you have raised
the hood slightly, you can release the lever.
4. Remove the support rod from the clamp
using the grip. Mount the support rod in
the hood.
When closing, remove the support rod, and
stow it in the clamp, then gently lower the
hood. Remove your hand at a height of
approximately 12 inches (30 cm) and let the
hood close.1 Opening the Hood
NOTICE
Do not open the hood when the wiper arms are
raised.
The hood will strike the wipe rs, resulting in possible
damage to the hood and/or the wipers.
When closing the hood, check that the hood is
securely latched.
If the hood latch lever moves stiffly, or if you can
open the hood without lifti ng the lever, the latch
mechanism should be cl eaned and lubricated.
Do not open the hood while the Auto Idle Stop
function is activated.
Do not press the engine cover forcibly. This may
damage the engine cover and component parts.
Hood Release Handle
Pull
Lever
Support RodGrip
Clamp
19 PASSPORT-31TGS6020.book 568 ページ 2020年2月20日 木曜日 午後3時29分
Page 584 of 667
582
uuReplacing Light Bulbs uSide Turn Signal/Emergency Indicator Lights*
Maintenance
Side Turn Signal/Emergency Indicator Lights*
Side turn lights are LED type. Have an au thorized Honda dealer inspect and replace
the light assembly.
Brake/Taillight, Rear Side Marker Light, and Rear
Turn Signal Light Bulbs
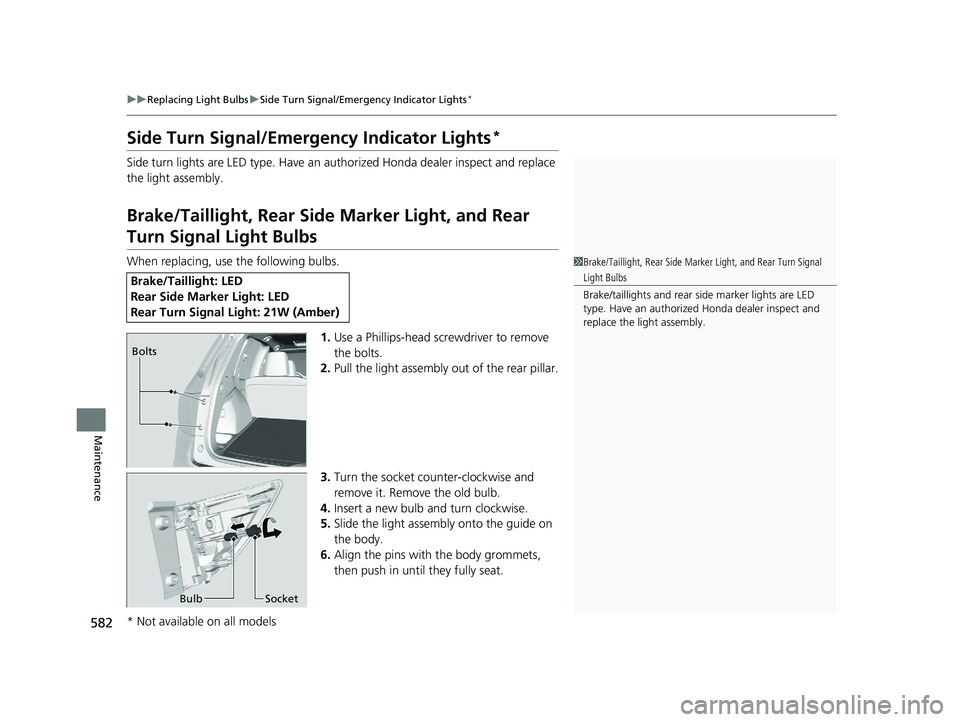
When replacing, use the following bulbs.
1.Use a Phillips-head screwdriver to remove
the bolts.
2. Pull the light assembly out of the rear pillar.
3. Turn the socket counter-clockwise and
remove it. Remove the old bulb.
4. Insert a new bulb and turn clockwise.
5. Slide the light assembly onto the guide on
the body.
6. Align the pins with the body grommets,
then push in unt il they fully seat.
Brake/Taillight: LED
Rear Side Marker Light: LED
Rear Turn Signal Light: 21W (Amber)
1Brake/Taillight, Rear Side Marker Light, and Rear Turn Signal
Light Bulbs
Brake/taillights and rear side marker lights are LED
type. Have an authorized Honda dealer inspect and
replace the light assembly.
Bolts
Bulb Socket
* Not available on all models
19 PASSPORT-31TGS6020.book 582 ページ 2020年2月20日 木曜日 午後3時29分
Page 585 of 667
583
uuReplacing Light Bulbs uBack-Up Lights
Maintenance
Back-Up Lights
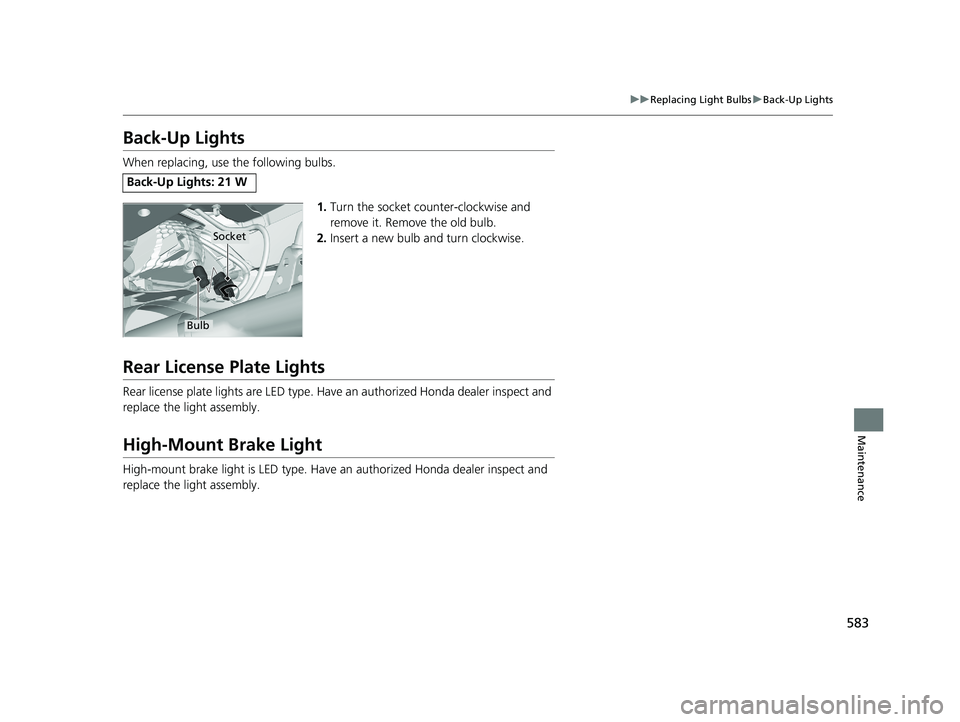
When replacing, use the following bulbs.
1.Turn the socket counter-clockwise and
remove it. Remove the old bulb.
2. Insert a new bulb and turn clockwise.
Rear License Plate Lights
Rear license plate lights are LED type. Have an authorized Honda dealer inspect and
replace the light assembly.
High-Mount Brake Light
High-mount brake light is LED type. Have an authorized Honda dealer inspect and
replace the light assembly.
Back-Up Lights: 21 W
Socket
Bulb
19 PASSPORT-31TGS6020.book 583 ページ 2020年2月20日 木曜日 午後3時29分
Page 608 of 667
606
uuCleaning uExterior Care
Maintenance
The inside lenses of exterior lights (headli ghts, brake lights, etc.) may fog temporarily
if you have driven in the rain, or after the vehicle has been run through a car wash.
Dew condensation also may build up inside the lenses when there is a significant
enough difference between the ambient and inside lens temperatures (similar to
vehicle windows fogging up in rainy conditions). These conditions are natural
processes, not structural design problems in the exterior lights.
Lens design characteristics may result in mo isture developing on the light lens frame
surfaces. This also is not a malfunction.
However, if you see large amounts of wa ter accumulation, or large water drops
building up inside the lenses, have your vehicle inspected by a dealer.
■Fogged Exterior Light Lenses
19 PASSPORT-31TGS6020.book 606 ページ 2020年2月20日 木曜日 午後3時29分
Page 613 of 667
611Continued
Handling the Unexpected
If a Tire Goes Flat
Changing a Flat Tire
If a tire goes flat while driving, grasp the steering wheel firmly, and brake gradually
to reduce speed. Then, stop in a safe plac e. Replace the flat tire with a compact
spare tire. Go to a dealer as soon as possib le to have the full-size tire repaired or
replaced.
1. Park the vehicle on firm, level, non-slip pery surface and apply the parking brake.
2. Change the gear position to
(P.
3. Turn on the hazard warning lights an d set the power mode to VEHICLE OFF
(LOCK).
1 Changing a Flat Tire
Follow compact spare precautions:
Periodically check the tire pressure of the compact
spare. It should be set to the specified pressure.
Specified Pressure: 60 psi (420 kPa, 4.2 kgf/cm
2)
When driving with the compact spare tire, keep the
vehicle speed under 50 mph (80 km/h). Replace with
a full-size tire as soon as possible.
The compact spare tire and wheel in your vehicle are
specifically for this model. Do not use them with
another vehicle. Do not us e another type of compact
spare tire or wheel with your vehicle.
Do not mount tire chains on a compact spare tire.
If a chain-mounted front tire goes flat, remove one of
the full-size rear tires and replace it with the compact
spare tire. Remove the flat front tire and replace it
with the full-size tire that was removed from the rear.
Mount the tire chains on the front tire.
Do not use a puncture-repairi ng agent on a flat tire,
as it can damage the tire pressure sensor.
19 PASSPORT-31TGS6020.book 611 ページ 2020年2月20日 木曜日 午後3時29分
Page 631 of 667
629
uuIndicator, Comin g On/BlinkinguIf the Brake System Indicator (Red) Comes On
Handling the Unexpected
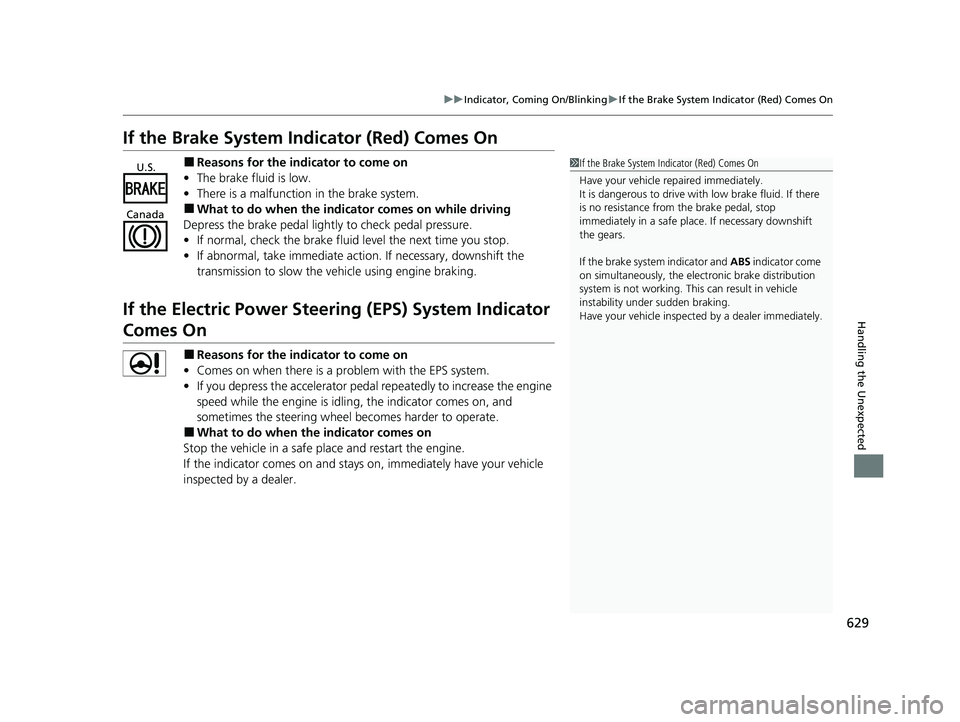
If the Brake System Indicator (Red) Comes On
■Reasons for the indicator to come on
• The brake fluid is low.
• There is a malfunction in the brake system.
■What to do when the indicator comes on while driving
Depress the brake pedal lightly to check pedal pressure.
• If normal, check the brake fluid level the next time you stop.
• If abnormal, take immediate acti on. If necessary, downshift the
transmission to slow the vehicle using engine braking.
If the Electric Power Steeri ng (EPS) System Indicator
Comes On
■Reasons for the indicator to come on
• Comes on when there is a problem with the EPS system.
• If you depress the accelerator pedal repeatedly to increase the engine
speed while the engine is idling, the indicator comes on, and
sometimes the steering wheel becomes harder to operate.
■What to do when th e indicator comes on
Stop the vehicle in a safe place and restart the engine.
If the indicator comes on and stays on, immediately have your vehicle
inspected by a dealer.
1 If the Brake System Indicator (Red) Comes On
Have your vehicle re paired immediately.
It is dangerous to drive with low brake fluid. If there
is no resistance from the brake pedal, stop
immediately in a safe plac e. If necessary downshift
the gears.
If the brake system indicator and ABS indicator come
on simultaneously, the elec tronic brake distribution
system is not working. Th is can result in vehicle
instability under sudden braking.
Have your vehicle inspecte d by a dealer immediately.U.S.
Canada
19 PASSPORT-31TGS6020.book 629 ページ 2020年2月20日 木曜日 午後3時29分
Page 632 of 667
630
uuIndicator, Coming On/Blinking uIf the Low Tire Pressure/Tire Pressure Monitoring System (TPMS) Indicator Comes On or Blinks
Handling the Unexpected
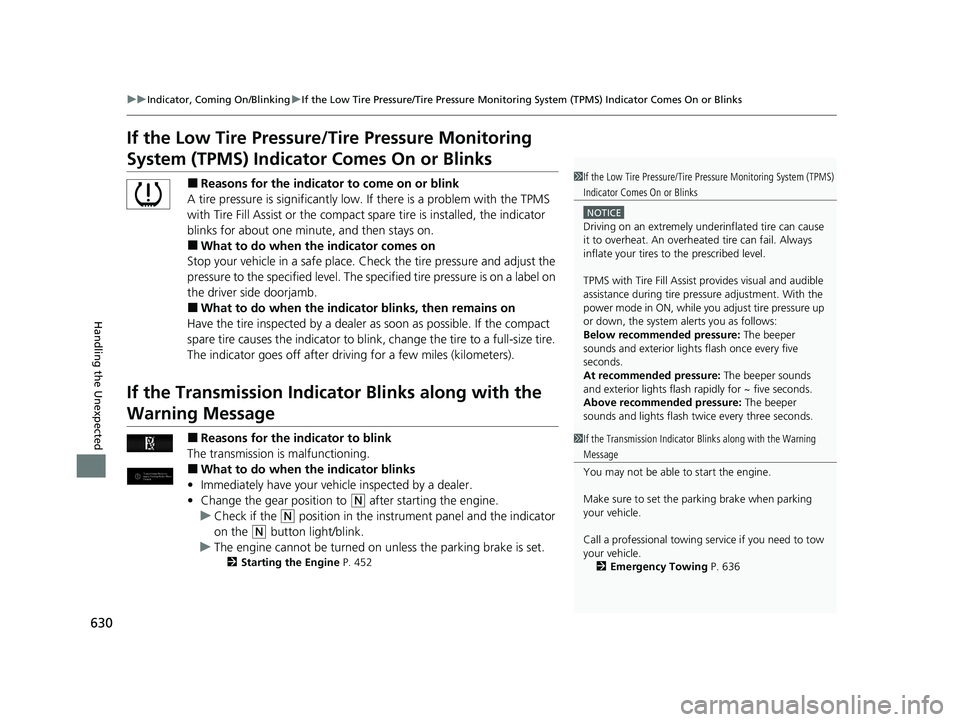
If the Low Tire Pressure/Tire Pressure Monitoring
System (TPMS) Indicato r Comes On or Blinks
■Reasons for the indicator to come on or blink
A tire pressure is significantly low. If there is a problem with the TPMS
with Tire Fill Assist or the compact spare tire is installed, the indicator
blinks for about one mi nute, and then stays on.
■What to do when the indicator comes on
Stop your vehicle in a safe place. Ch eck the tire pressure and adjust the
pressure to the specified level. The sp ecified tire pressure is on a label on
the driver side doorjamb.
■What to do when the indica tor blinks, then remains on
Have the tire inspected by a dealer as soon as possible. If the compact
spare tire causes the indicator to blink, change the tire to a full-size tire.
The indicator goes off after driving for a few miles (kilometers).
If the Transmission Indicato r Blinks along with the
Warning Message
■Reasons for the indicator to blink
The transmission is malfunctioning.
■What to do when the indicator blinks
• Immediately have your vehi cle inspected by a dealer.
• Change the gear position to
(N after starting the engine.
u Check if the
(N position in the instrume nt panel and the indicator
on the
(N button light/blink.
u The engine cannot be turned on unless the parking brake is set.
2 Starting the Engine P. 452
1If the Low Tire Pressure/Tire Pressure Monitoring System (TPMS)
Indicator Comes On or Blinks
NOTICE
Driving on an extremely underinflated tire can cause
it to overheat. An overheated tire can fail. Always
inflate your tires to the prescribed level.
TPMS with Tire Fill Assist provides visual and audible
assistance during tire pre ssure adjustment. With the
power mode in ON, while y ou adjust tire pressure up
or down, the system alerts you as follows:
Below recommended pressure: The beeper
sounds and exterior lights flash once every five
seconds.
At recommended pressure: The beeper sounds
and exterior lights flash ra pidly for ~ five seconds.
Above recommended pressure: The beeper
sounds and lights flash twice every three seconds.
1 If the Transmission Indicator Blinks along with the Warning
Message
You may not be able to start the engine.
Make sure to set the pa rking brake when parking
your vehicle.
Call a professional towing service if you need to tow
your vehicle. 2 Emergency Towing P. 636
19 PASSPORT-31TGS6020.book 630 ページ 2020年2月20日 木曜日 午後3時29分
Page 644 of 667
642
Information
Specifications
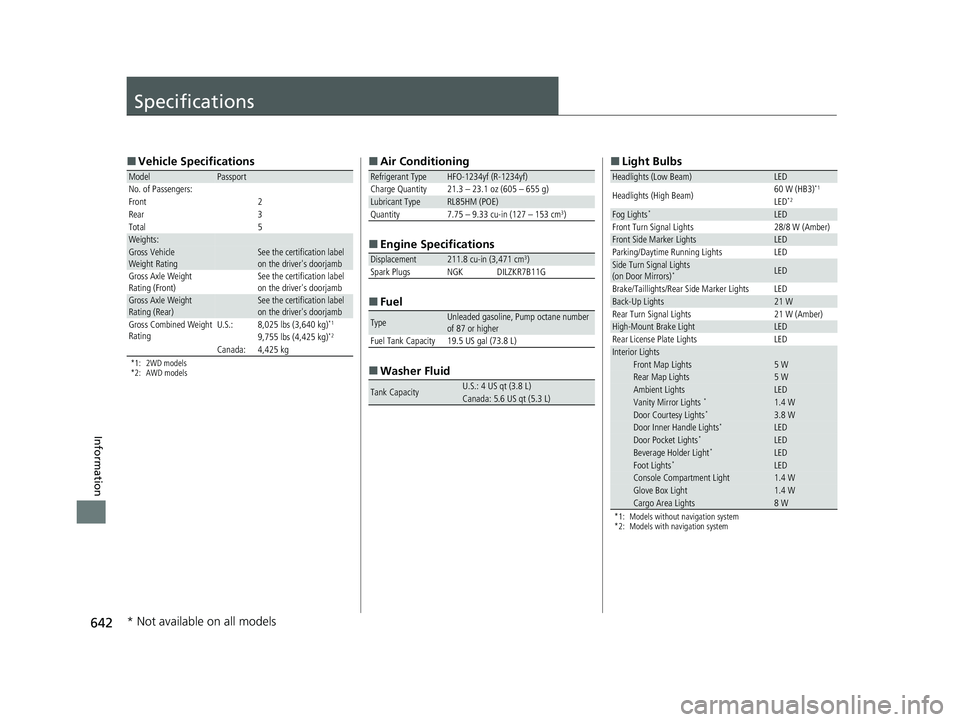
■Vehicle Specifications
*1: 2WD models
*2: AWD models
ModelPassport
No. of Passengers:
Front 2
Rear 3
Total
5Weights:Gross Vehicle
Weight RatingSee the certification label
on the driver's doorjamb
Gross Axle Weight
Rating (Front)See the certification label
on the driver's doorjamb
Gross Axle Weight
Rating (Rear)See the certification label
on the driver's doorjamb
Gross Combined Weight
RatingU.S.:8,025 lbs (3,640 kg)*1
9,755 lbs (4,425 kg)*2
Canada:4,425 kg
■ Air Conditioning
■ Engine Specifications
■ Fuel
■ Washer Fluid
Refrigerant TypeHFO-1234yf (R-1234yf)
Charge Quantity 21.3 – 23.1 oz (605 – 655 g)
Lubricant TypeRL85HM (POE)
Quantity 7.75 – 9.33 cu-in (127 – 153 cm3)
Displacement211.8 cu-in (3,471 cm3)
Spark Plugs NGK DILZKR7B11G
TypeUnleaded gasoline, Pump octane number
of 87 or higher
Fuel Tank Capacity 19.5 US gal (73.8 L)
Tank CapacityU.S.: 4 US qt (3.8 L)Canada: 5.6 US qt (5.3 L)
■ Light Bulbs
*1: Models without navigation system
*2: Models with navigation system
Headlights (Low Beam)LED
Headlights (High Beam)60 W (HB3)*1
LED*2
Fog Lights*LEDFront Turn Signal Lights28/8 W (Amber)Front Side Marker LightsLEDParking/Daytime Running LightsLEDSide Turn Signal Lights
(on Door Mirrors)*LED
Brake/Taillights/Rear Side Marker LightsLEDBack-Up Lights21 WRear Turn Signal Lights21 W (Amber)High-Mount Brake LightLEDRear License Plate LightsLEDInterior LightsFront Map Lights5 WRear Map Lights5 WAmbient LightsLEDVanity Mirror Lights *1.4 WDoor Courtesy Lights*3.8 WDoor Inner Handle Lights*LEDDoor Pocket Lights*LEDBeverage Holder Light*LEDFoot Lights*LEDConsole Compartment Light1.4 WGlove Box Light1.4 WCargo Area Lights8 W
* Not available on all models
19 PASSPORT-31TGS6020.book 642 ページ 2020年2月20日 木曜日 午後3時29分
Page 650 of 667
648
uuEmissions Testing uTesting of Readiness Codes
Information
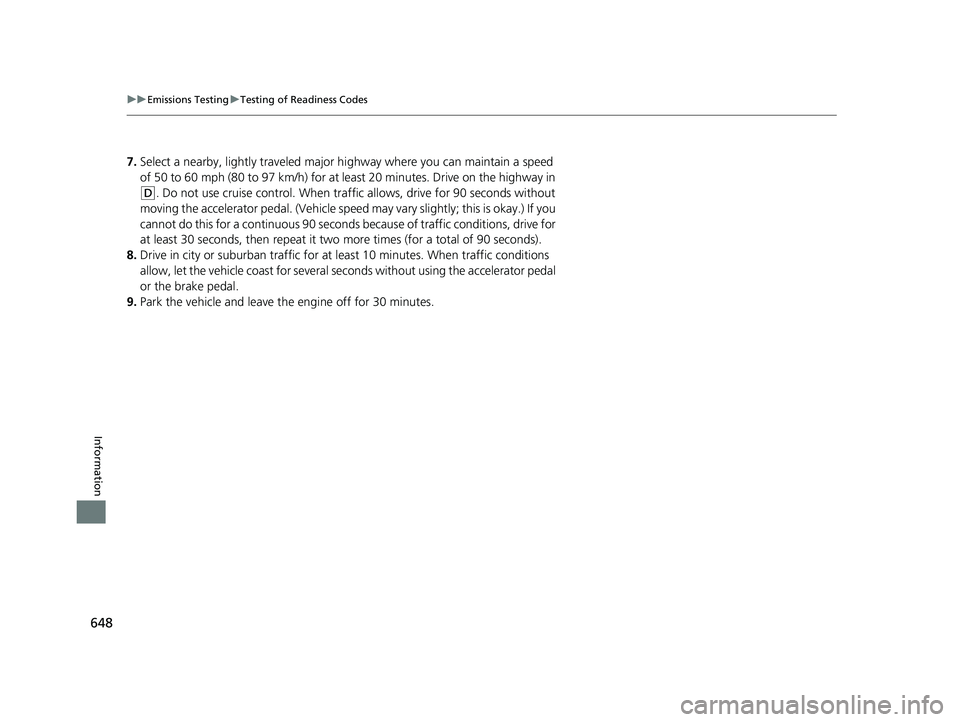
7. Select a nearby, lightly traveled major hi ghway where you can maintain a speed
of 50 to 60 mph (80 to 97 km/h) for at least 20 minutes. Drive on the highway in
(D. Do not use cruise control. When tra ffic allows, drive for 90 seconds without
moving the accelerator pedal. (Vehicle spee d may vary slightly; this is okay.) If you
cannot do this for a continuous 90 seconds because of traffic conditions, drive for
at least 30 seconds, then repeat it two mo re times (for a total of 90 seconds).
8. Drive in city or suburban traffic for at le ast 10 minutes. When traffic conditions
allow, let the vehicle coast for several se conds without using the accelerator pedal
or the brake pedal.
9. Park the vehicle and leave the engine off for 30 minutes.
19 PASSPORT-31TGS6020.book 648 ページ 2020年2月20日 木曜日 午後3時29分