lock HONDA PASSPORT 2021 Navigation Manual (in English)
[x] Cancel search | Manufacturer: HONDA, Model Year: 2021, Model line: PASSPORT, Model: HONDA PASSPORT 2021Pages: 607, PDF Size: 36.04 MB
Page 480 of 607
478
uuBraking uAnti-lock Brake System (ABS)
Driving
Anti-lock Brake System (ABS)
Helps prevent the wheels from locking up, a nd helps you retain steering control by
pumping the brakes rapidly, much faster than you can.
The electronic brake distribution (EBD) system, which is part of the ABS, also
balances the front-to-rear braking distri bution according to vehicle loading.
You should never pump the brake pedal. Let the ABS work for you by always
keeping firm, steady pressure on the brake pe dal. This is sometimes referred to as
“stomp and steer.”
■ABS operation
The brake pedal may pulsate slightly when the ABS is working. Depress the brake
pedal and keep holding the pedal firmly dow n. On dry pavement, you will need to
press on the brake pedal very hard before the ABS activates. However, you may feel
the ABS activate immediately if yo u are trying to stop on snow or ice.
ABS may activate when you depress the brake pedal when driving on:
• Wet or snow covered roads.
• Roads paved with stone.
• Roads with uneven surfaces, such as potholes, cracks, manholes, etc.
When the vehicle speed goes unde r 6 mph (10 km/h), the ABS stops.
■ABS1Anti-lock Brake System (ABS)
NOTICE
The ABS may not function correctly if you use a tire of
the wrong size or type.
If the ABS indicator comes on while driving, there
may be a problem with the system.
While normal braking will not be affected, there is a
possibility that the ABS wi ll not be operating. Have
your vehicle checked by a dealer immediately.
The ABS is not designed for the purpose of reducing
the time or distance it takes for a vehicle to stop: It is
designed to limit brake lo ckup which can lead to
skidding and loss of steering control.
In the following cases, yo ur vehicle may need more
distance to stop than a vehicle without the ABS:
•You are driving on rough or uneven road surfaces,
such as gravel or snow.
•The tires are equipped with snow chains.
The following may be observed with the ABS system:
•Motor sounds coming from the engine
compartment when the brakes are applied, or when
system checks are being performed after the engine
has been started and while the vehicle accelerates.
•Brake pedal and/or the vehicle body vibration when
ABS activates.
These vibrations and sounds are normal to ABS
systems and are no cause for concern.
21 PASSPORT-31TGS6200.book 478 ページ 2020年9月4日 金曜日 午後2時35分
Page 483 of 607
481
uuParking Your Vehicle uWhen Stopped
Driving
1When Stopped
In extremely cold temperatures, the parking brake
may freeze up if applied. If such temperatures are
expected, do not apply the parking brake but, if
parking on a slope, either turn the front wheels so
they will contact the curb if the vehicle rolls down the
slope or block the wheels to keep the vehicle from
moving. If you do not take either precaution, the
vehicle may roll unexpect edly, leading to a crash.
21 PASSPORT-31TGS6200.book 481 ページ 2020年9月4日 金曜日 午後2時35分
Page 488 of 607
uuParking Your Vehicle uParking Sensor System*
486
Driving
1. Make sure that the parking sensor system is not activated. Set the power mode to
VEHICLE OFF (LOCK).
2. Press and hold the parking sensor system button, and set the power mode to ON.
3. Keep pressing the button for 10 seconds. Release the button when the indicator
in the button flashes.
4. Press the button again. The indi cator in the button goes off.
u The beeper sounds twice. The re ar sensors are now turned off.
To turn the rear sensors on again, follow the above procedure. The beeper sounds
three times when the rear sensors come back on.
■Turning off All Rear Sensors1 Turning off All Rear Sensors
When you set the gear position to
(R, the indicator
in the parking sensor system button blinks as a
reminder that the rear sens ors have been turned off.
21 PASSPORT-31TGS6200.book 486 ページ 2020年9月4日 金曜日 午後2時35分
Page 490 of 607
uuParking Your Vehicle uCross Traffic Monitor*
488
Driving
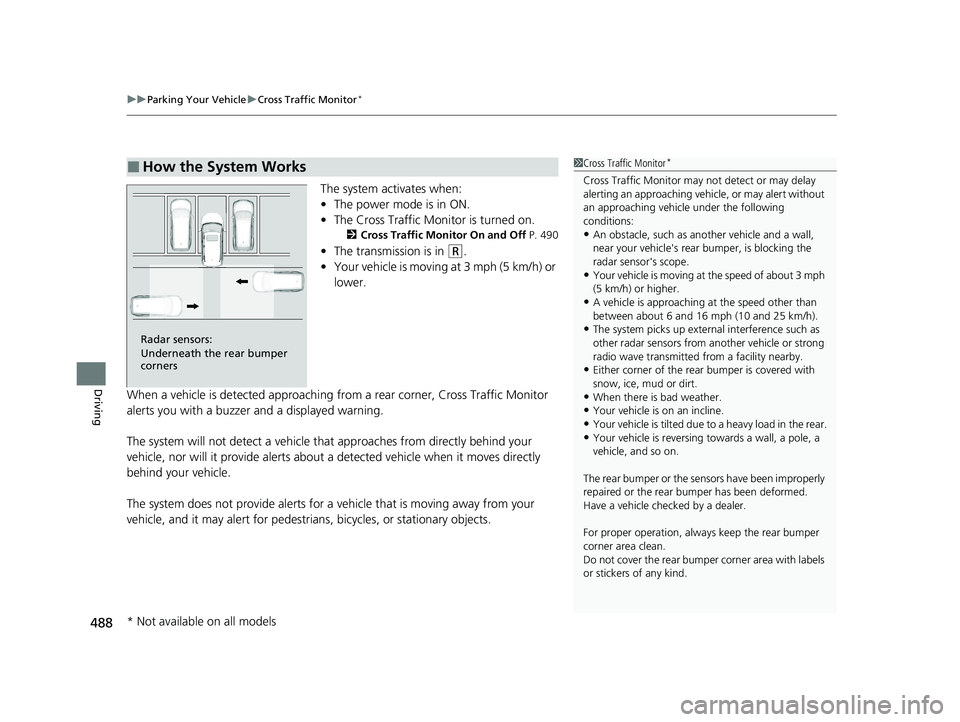
The system activates when:
• The power mode is in ON.
• The Cross Traffic Monitor is turned on.
2 Cross Traffic Monitor On and Off P. 490
•The transmission is in (R.
• Your vehicle is moving at 3 mph (5 km/h) or
lower.
When a vehicle is detected approaching from a rear corner, Cross Traffic Monitor
alerts you with a buzzer and a displayed warning.
The system will not detect a vehicle that approaches from directly behind your
vehicle, nor will it provide alerts about a detected vehicle when it moves directly
behind your vehicle.
The system does not provide alerts for a vehicle that is moving away from your
vehicle, and it may alert for pedestri ans, bicycles, or stationary objects.
■How the System Works1Cross Traffic Monitor*
Cross Traffic Monitor may not detect or may delay
alerting an approach ing vehicle, or may alert without
an approaching vehicle under the following
conditions:
•An obstacle, such as a nother vehicle and a wall,
near your vehicle's rear bumper, is blocking the
radar sensor's scope.
•Your vehicle is moving at the speed of about 3 mph
(5 km/h) or higher.
•A vehicle is approaching at the speed other than
between about 6 and 16 mph (10 and 25 km/h).
•The system picks up external interference such as
other radar sensors from an other vehicle or strong
radio wave transmitted fr om a facility nearby.
•Either corner of the rear bumper is covered with
snow, ice, mud or dirt.
•When there is bad weather.
•Your vehicle is on an incline.
•Your vehicle is tilted due to a heavy load in the rear.
•Your vehicle is reversing towards a wall, a pole, a
vehicle, and so on.
The rear bumper or the sens ors have been improperly
repaired or the rear bum per has been deformed.
Have a vehicle checked by a dealer.
For proper operation, always keep the rear bumper
corner area clean.
Do not cover the rear bumper corner area with labels
or stickers of any kind.
Radar sensors:
Underneath the rear bumper
corners
* Not available on all models
21 PASSPORT-31TGS6200.book 488 ページ 2020年9月4日 金曜日 午後2時35分
Page 518 of 607
uuMaintenance Under the Hood uEngine Coolant
516
Maintenance
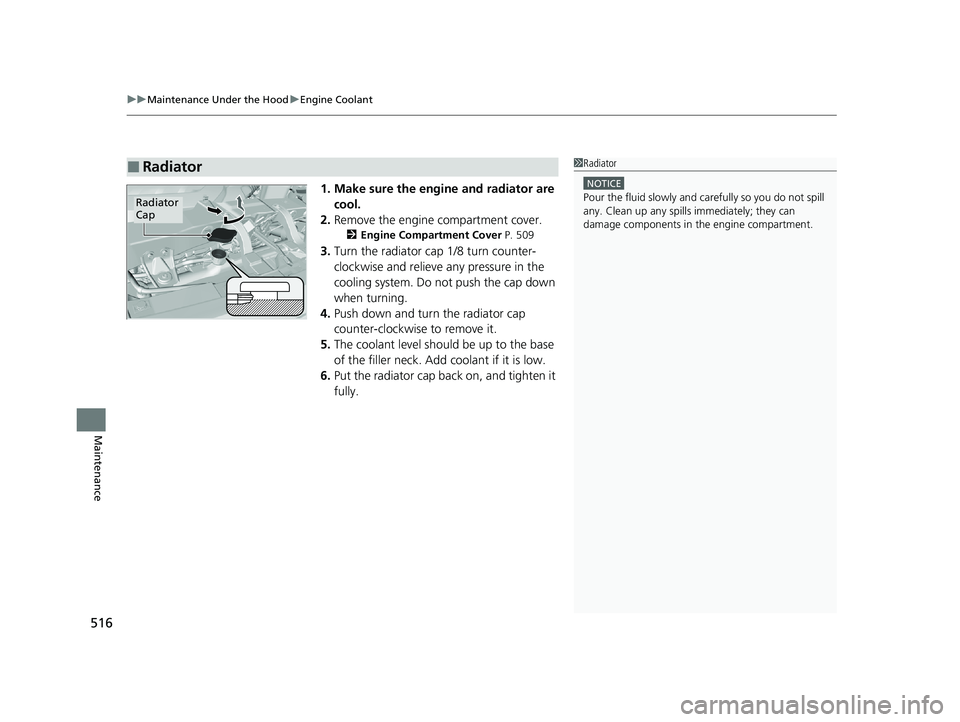
1. Make sure the engine and radiator are
cool.
2. Remove the engine compartment cover.
2 Engine Compartment Cover P. 509
3.Turn the radiator cap 1/8 turn counter-
clockwise and relieve any pressure in the
cooling system. Do not push the cap down
when turning.
4. Push down and turn the radiator cap
counter-clockwise to remove it.
5. The coolant level should be up to the base
of the filler neck. Add coolant if it is low.
6. Put the radiator cap back on, and tighten it
fully.
■Radiator1Radiator
NOTICE
Pour the fluid slowly and ca refully so you do not spill
any. Clean up any spills immediately; they can
damage components in the engine compartment.Radiator
Cap
21 PASSPORT-31TGS6200.book 516 ページ 2020年9月4日 金曜日 午後2時35分
Page 522 of 607
uuReplacing Light Bulbs uDaytime Running Lights and Parking Lights
520
Maintenance
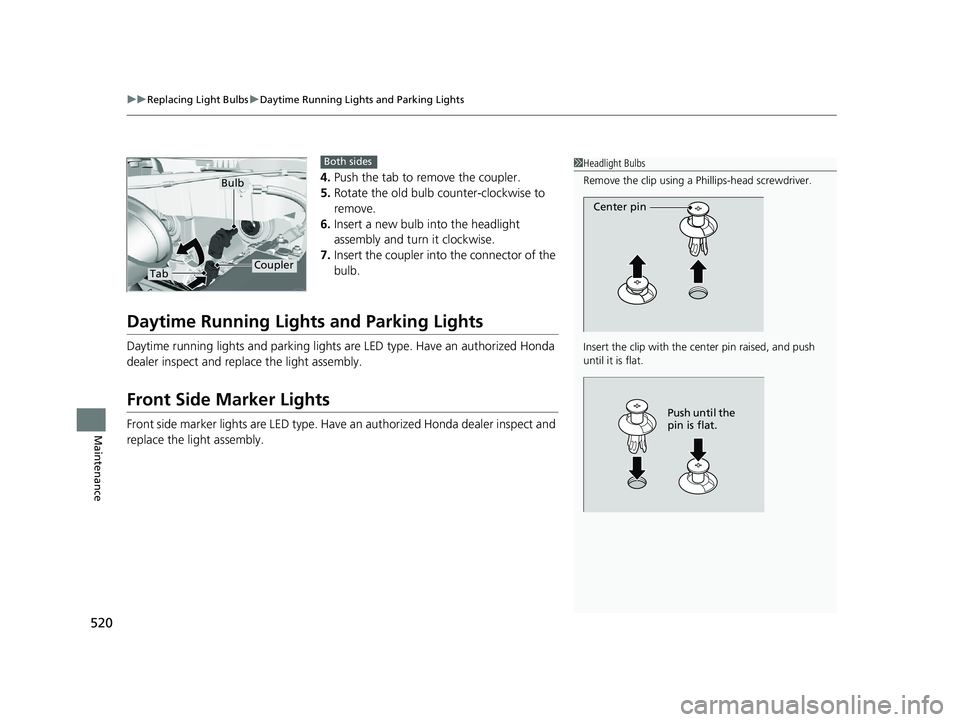
4. Push the tab to remove the coupler.
5. Rotate the old bulb counter-clockwise to
remove.
6. Insert a new bulb into the headlight
assembly and turn it clockwise.
7. Insert the coupler into the connector of the
bulb.
Daytime Running Lights and Parking Lights
Daytime running lights and parking lights are LED type. Have an authorized Honda
dealer inspect and replace the light assembly.
Front Side Marker Lights
Front side marker lights are LED type. Have an authorized Honda dealer inspect and
replace the light assembly.
1Headlight Bulbs
Remove the clip using a Phillips-head screwdriver.
Insert the clip with the center pin raised, and push
until it is flat.
Center pin
Push until the
pin is flat.
TabCoupler
Bulb
Both sides
21 PASSPORT-31TGS6200.book 520 ページ 2020年9月4日 金曜日 午後2時35分
Page 523 of 607
521
uuReplacing Light Bulbs uFront Turn Signal Light Bulbs
Maintenance
Front Turn Signal Light Bulbs
When replacing, use the following bulbs.
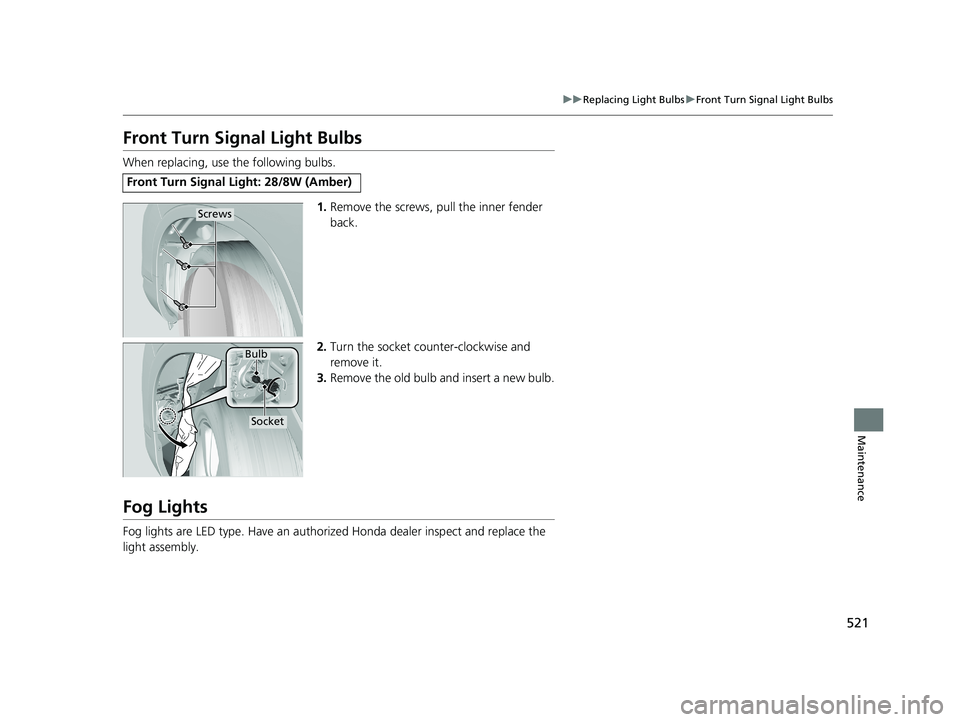
1.Remove the screws, pull the inner fender
back.
2. Turn the socket counter-clockwise and
remove it.
3. Remove the old bulb and insert a new bulb.
Fog Lights
Fog lights are LED type. Have an authoriz ed Honda dealer inspect and replace the
light assembly.
Front Turn Signal Light: 28/8W (Amber)
Screws
Socket
Bulb
21 PASSPORT-31TGS6200.book 521 ページ 2020年9月4日 金曜日 午後2時35分
Page 524 of 607
522
uuReplacing Light Bulbs uSide Turn Signal/Emergency Indicator Lights*
Maintenance
Side Turn Signal/Emergency Indicator Lights*
Side turn lights are LED type. Have an au thorized Honda dealer inspect and replace
the light assembly.
Brake/Taillight, Rear Side Marker Light, and Rear
Turn Signal Light Bulbs
When replacing, use the following bulbs.
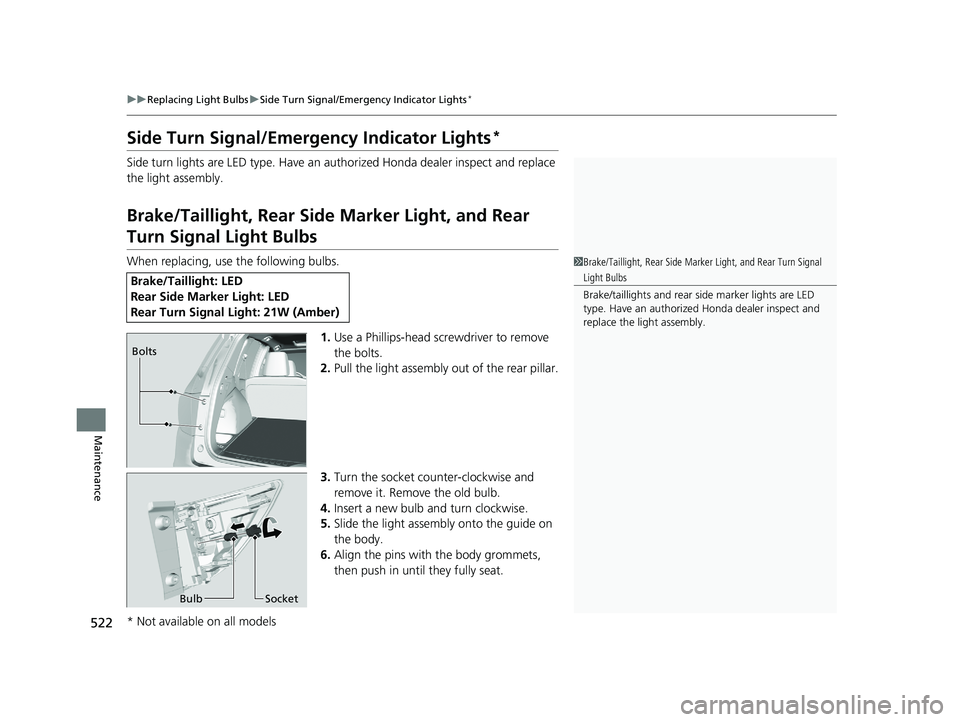
1.Use a Phillips-head screwdriver to remove
the bolts.
2. Pull the light assembly out of the rear pillar.
3. Turn the socket counter-clockwise and
remove it. Remove the old bulb.
4. Insert a new bulb and turn clockwise.
5. Slide the light assembly onto the guide on
the body.
6. Align the pins with the body grommets,
then push in unt il they fully seat.
Brake/Taillight: LED
Rear Side Marker Light: LED
Rear Turn Signal Light: 21W (Amber)
1Brake/Taillight, Rear Side Marker Light, and Rear Turn Signal
Light Bulbs
Brake/taillights and rear side marker lights are LED
type. Have an authorized Honda dealer inspect and
replace the light assembly.
Bolts
Bulb Socket
* Not available on all models
21 PASSPORT-31TGS6200.book 522 ページ 2020年9月4日 金曜日 午後2時35分
Page 525 of 607
523
uuReplacing Light Bulbs uBack-Up Lights
Maintenance
Back-Up Lights
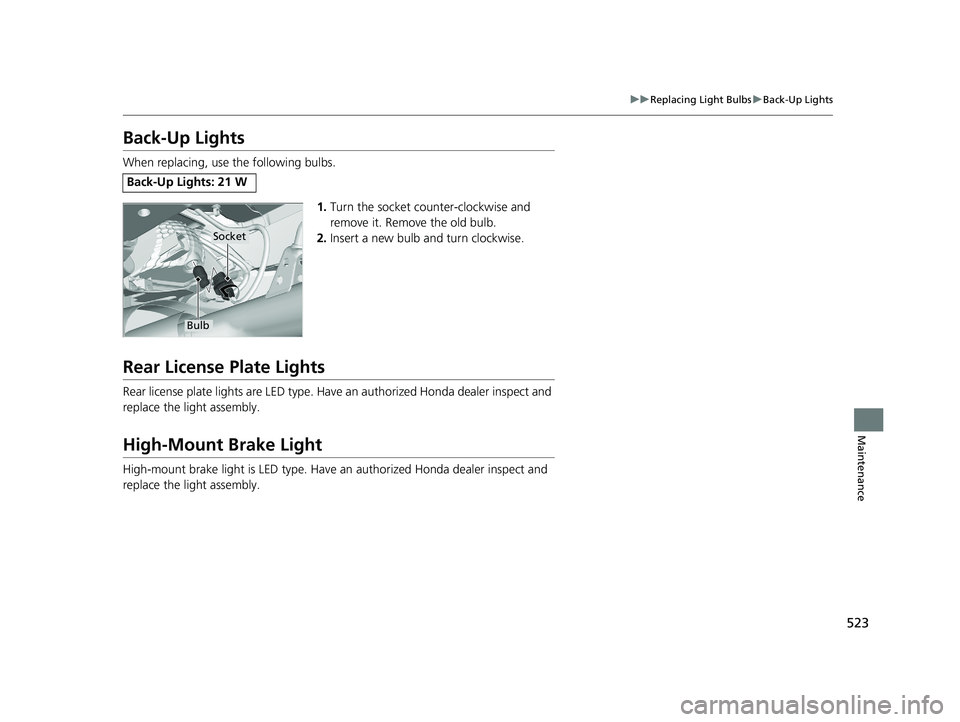
When replacing, use the following bulbs.
1.Turn the socket counter-clockwise and
remove it. Remove the old bulb.
2. Insert a new bulb and turn clockwise.
Rear License Plate Lights
Rear license plate lights are LED type. Have an authorized Honda dealer inspect and
replace the light assembly.
High-Mount Brake Light
High-mount brake light is LED type. Have an authorized Honda dealer inspect and
replace the light assembly.
Back-Up Lights: 21 W
Socket
Bulb
21 PASSPORT-31TGS6200.book 523 ページ 2020年9月4日 金曜日 午後2時35分
Page 526 of 607
524
Maintenance
Checking and Maintaining Wiper Blades
Checking Wiper Blades
If the wiper blade rubber has deteriorated, it will leave streaks and the hard surfaces
of the blade may scratch the window glass.
Changing the Front Wiper Blade Rubber
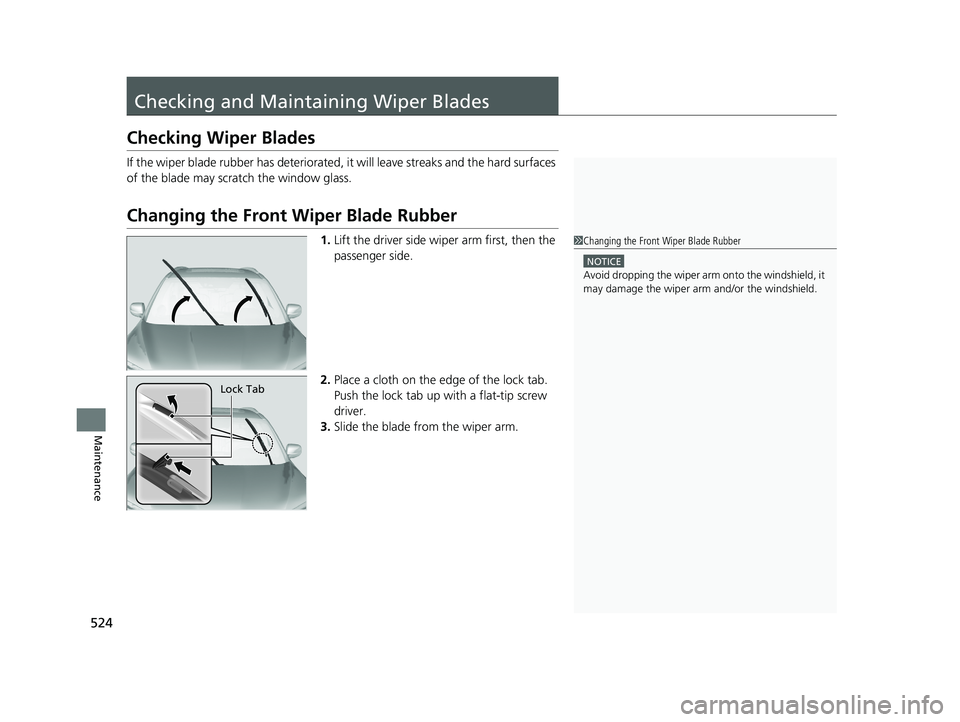
1. Lift the driver side wiper arm first, then the
passenger side.
2. Place a cloth on the edge of the lock tab.
Push the lock tab up with a flat-tip screw
driver.
3. Slide the blade from the wiper arm.1Changing the Front Wiper Blade Rubber
NOTICE
Avoid dropping the wiper arm onto the windshield, it
may damage the wiper arm and/or the windshield.
Lock Tab
21 PASSPORT-31TGS6200.book 524 ページ 2020年9月4日 金曜日 午後2時35分