buttons HONDA PILOT 2008 1.G Navigation Manual
[x] Cancel search | Manufacturer: HONDA, Model Year: 2008, Model line: PILOT, Model: HONDA PILOT 2008 1.GPages: 137, PDF Size: 8.33 MB
Page 10 of 137
10Navigation System
Getting Started
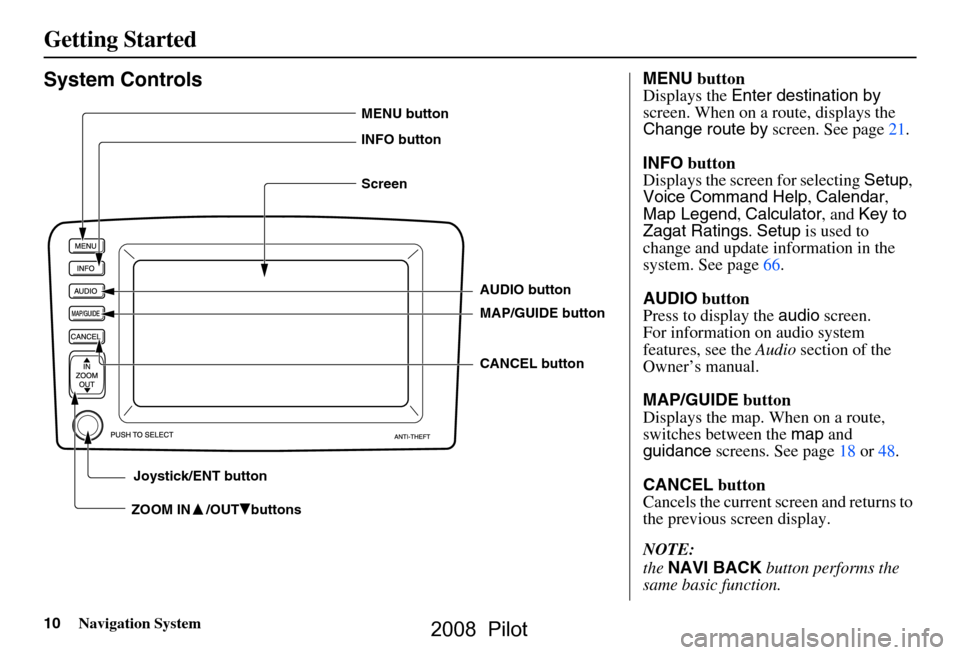
System Controls
ZOOM IN /OUT buttons
AUDIO button
MAP/GUIDE button
CANCEL button
MENU button
INFO button
Screen
Joystick/ENT button
MENU button
Displays the Enter destination by
screen. When on a route, displays the
Change route by screen. See page
21.
INFO button
Displays the screen for selecting Setup,
Voice Command Help , Calendar ,
Map Legend , Calculator , and Key to
Zagat Ratings . Setup is used to
change and update information in the
system. See page
66.
AUDIO button
Press to display the audio screen.
For information on audio system
features, see the Audio section of the
Owner’s manual.
MAP/GUIDE button
Displays the map. When on a route,
switches between the map and
guidance screens. See page
18 or 48.
CANCEL button
Cancels the current screen and returns to
the previous screen display.
NOTE:
the NAVI BACK button performs the
same basic function.
2008 Pilot
Page 11 of 137
Navigation System11
Getting Started
Joystick/ENT button
Moves left, right, up and down, to move
the highlighting around the display, to
scroll through lists, or to look around a
displayed map. After making a selection
in a menu or list, push in on the joystick
to enter the selection into the system.
In almost all cases, you can enter a
selection into the system by using the
voice control system , highlighting the
item and pushing in on the joystick, or
by touching the appropriate item you
wish to select.
ZOOM IN /OUT buttons
Press ZOOM IN to zoom in (to show
more detail), or ZOOM OUT to zoom
out (to show more area and less detail)
while a map screen is displayed.
ZOOM IN reduces the scale (showing
less area with greater detail). ZOOM
OUT increases the scale (showing more
area with less detail). See page52 Screen
All selections and instructions are
displayed on the screen. In addition, the
display is a “touch screen” – you can
enter information into the system by
touching the images (icons) on the
screen with your finger.
For example, if you need to enter a
street name, a keyboard will be
displayed. You can type in the street
name by saying or selecting the
individual character
s on the screen.
Clean the screen with a soft damp cloth.
You may use a mild cleanser intended
for use on liquid crystal displays
(LCDs). Harsher chemicals may
damage the screen. NOTE:
Whenever you shift to R (reverse), the
rear view is shown on the navigation
system screen. See page95.
2008 Pilot
Page 12 of 137
12Navigation System
Getting Started
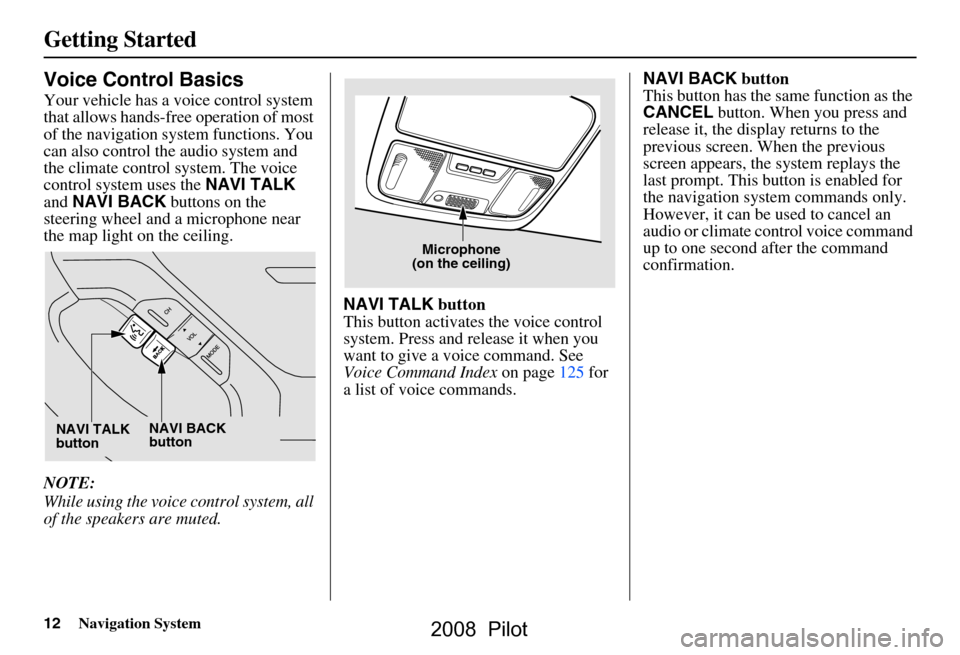
Voice Control Basics
Your vehicle has a voice control system
that allows hands-free operation of most
of the navigation system functions. You
can also control the audio system and
the climate control system. The voice
control system uses the NAVI TALK
and NAVI BACK buttons on the
steering wheel and a microphone near
the map light on the ceiling.
NOTE:
While using the voice control system, all
of the speakers are muted. NAVI TALK
button
This button activates the voice control
system. Press and release it when you
want to give a voice command. See
Voice Command Index on page125 for
a list of voice commands. NAVI BACK
button
This button has the same function as the
CANCEL button. When you press and
release it, the disp lay returns to the
previous screen. When the previous
screen appears, the system replays the
last prompt. This button is enabled for
the navigation system commands only.
However, it can be used to cancel an
audio or climate control voice command
up to one second after the command
confirmation.
NAVI TALK
button NAVI BACK
button
Microphone
(on the ceiling)
2008 Pilot
Page 14 of 137
14Navigation System
Getting Started
After pressing and releasing the NAVI TALK button, wait for the
beep, then give a voice command.
Give a voice command in a clear, natural speaking voice without
pausing between words.
If the system cannot recognize your command because of background
noise, speak louder.
If more than one pe rson is speaking at
the same time, the system may
misinterpret your command.
If you are still having trouble with the voice control sy stem, refer to Voice
Command Help on the
Information screen.Selecting an Item (Button)
on the Screen
On most screens, there are items that
can be selected (like buttons with titles
such as OK or Return ). To select an
item on any screen, do one of the
following:
Use the voice control system and say the name of the desired item. Almost
all selectable items on the screen,
including some listed items, are
recognized by the voice control
system.
Touch the desired item on the screen.
Move the highlighting to the desired item with the joystick, then push in
on the joystick.
Tip:
If items are grayed out (very dark
colored), this means that they cannot be
selected.
Selecting an Item in a List
To scroll through a list, do one of the
following:
Use the joystick to scroll through the list item by item.
Use the voice control system and say “Next ” or “ Previous ” or use the “on
screen” scroll up or down buttons, or
the ZOOM buttons to scroll through
the list page by page.
If you cannot find the desired name, or
have made an error, return to the
previous screen by pressing the
CANCEL or the NAVI BACK button.
To select the desired item in the list, do
one of the following:
Use the voice control system, and say the item number of the desired item.
Touch the item on the screen.
Use the joystick to move the highlighting to the it em, then push in
on the joystick.
2008 Pilot
Page 17 of 137
Navigation System17
Getting Started
Read this disclaimer carefully so you
understand it before continuing. Push in
on the joystick, or touch OK, and the
map screen will appear on the display.
The “OK” cannot be activated by voice.
If you do not press the joystick or touch
OK , the screen will go dark after 30
seconds. To return to the Disclaimer
screen, press any navigation or voice
control button.
NOTE:
If you do not select OK, and then enter
the Setup or Information screens, some
items are not available, and will show
up as darkened buttons (grayed out).
See System Function Diagram on
page20.
If you have entered any Calendar
reminders, they are displayed after you
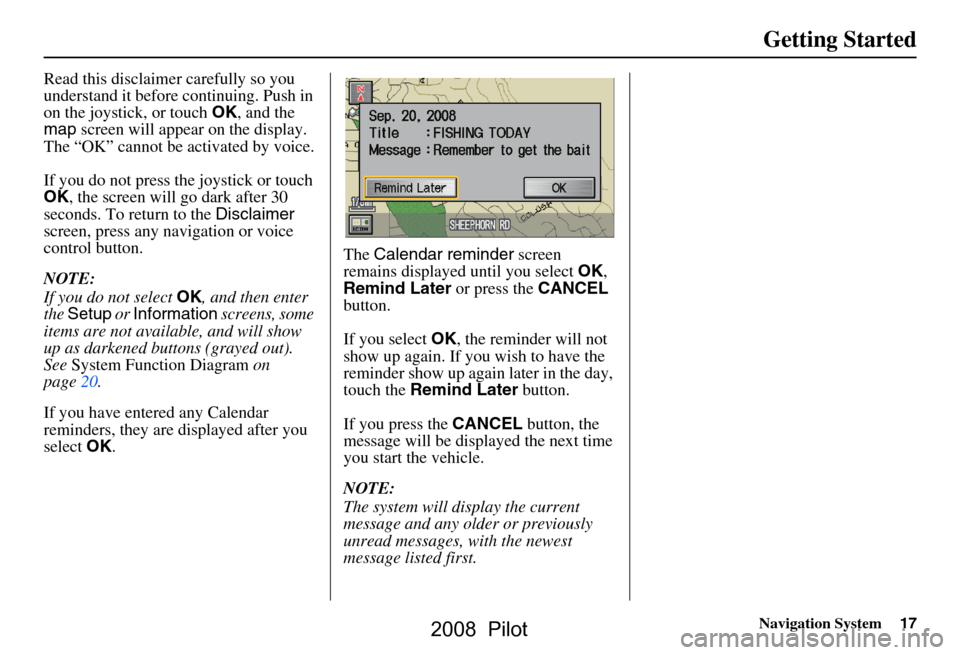
select OK. The
Calendar reminder screen
remains displayed until you select OK,
Remind Later or press the CANCEL
button.
If you select OK, the reminder will not
show up again. If you wish to have the
reminder show up again later in the day,
touch the Remind Later button.
If you press the CANCEL button, the
message will be displayed the next time
you start the vehicle.
NOTE:
The system will display the current
message and any older or previously
unread messages, with the newest
message listed first.
2008 Pilot
Page 19 of 137
Navigation System19
Getting Started
Map Screen Description
Zoom In/Out
Use the ZOOM buttons to change the
scale of the map. Zooming in increases
the detail, while zooming out gives you
a wide area view. After changing the
scale, give the system a few moments to
update the display.
Map Scrolling
To view other areas on the map, move
the joystick left, right, up, or down. The
map will shift in that direction. To
return the map to your current location,
press either the MAP/GUIDE, the
CANCEL , or the NAVI BACK button.
The display automatically changes to
the map screen when you reach your
destination. Press the MENU button to
return to the Enter destination by
screen.
Displaying Current Location
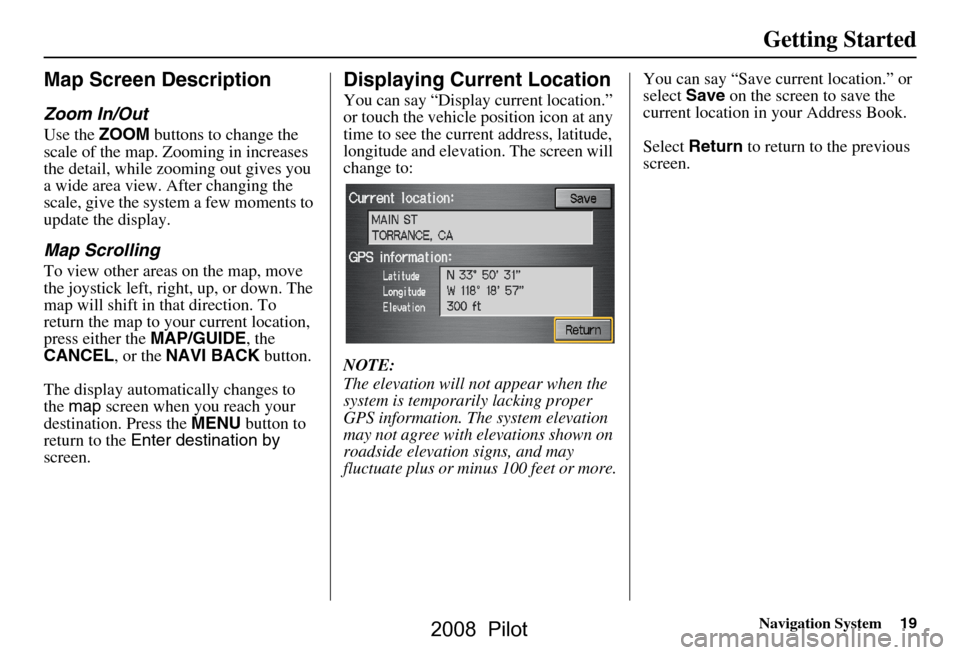
You can say “Display current location.”
or touch the vehicle position icon at any
time to see the current address, latitude,
longitude and elevation. The screen will
change to:
NOTE:
The elevation will not appear when the
system is temporarily lacking proper
GPS information. The system elevation
may not agree with elevations shown on
roadside elevation signs, and may
fluctuate plus or minus 100 feet or more. You can say “Save current location.” or
select
Save on the screen to save the
current location in your Address Book.
Select Return to return to the previous
screen.
2008 Pilot
Page 36 of 137
36Navigation System
When you select a sorting method, the
list of restaurants will appear.
Once you select a restaurant, the system
then displays the Calculate route to
screen (see Driving to Your Destination
on page43).
NOTE:
See Key to Zagat Ratings on page70 for
details on the key to ratings.By Map Input
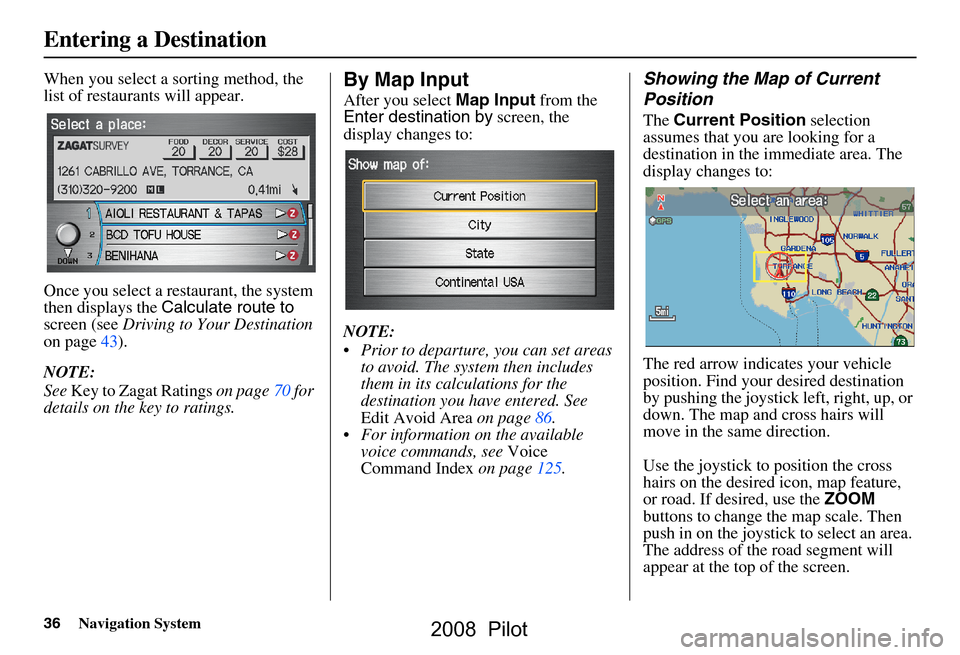
After you select Map Input from the
Enter destination by screen, the
display changes to:
NOTE:
Prior to departure, you can set areas to avoid. The system then includes
them in its calculations for the
destination you have entered. See
Edit Avoid Area on page86.
For information on the available voice commands, see Voice
Command Index on page125.
Showing the Map of Current
Position
The Current Position selection
assumes that you are looking for a
destination in the immediate area. The
display changes to:
The red arrow indicates your vehicle
position. Find your desired destination
by pushing the joystick left, right, up, or
down. The map and cross hairs will
move in the same direction.
Use the joystick to position the cross
hairs on the desired icon, map feature,
or road. If desired, use the ZOOM
buttons to change the map scale. Then
push in on the joystick to select an area.
The address of the road segment will
appear at the top of the screen.
Entering a Destination
2008 Pilot
Page 37 of 137
Navigation System37
The yellow box indicat es the area you
will see when you click on the current
map with the joystick.
NOTE:
The address of the road segment will be
displayed on the 1/20, 1/8, 1/4, or 1/2
mile (80, 200, 400, or 800 meter) scale
map.
If this is the desired destination, push in
on the joystick again. If not, use the
joystick to reposition the cross hairs,
then push in on th e joystick again to
display the new address.
Once you select an address, the system
then displays the Calculate route to
screen (see Driving to Your Destination
on page43).Showing the Map of City
With the City selection, the display
changes to the Enter city name screen.
When you have entered the desired city,
the display changes to a map. The
starting location will be the central
position in the selected city.
See Showing the Map of Current
Position on page36 for instructions on
finding and entering your desired
destination.
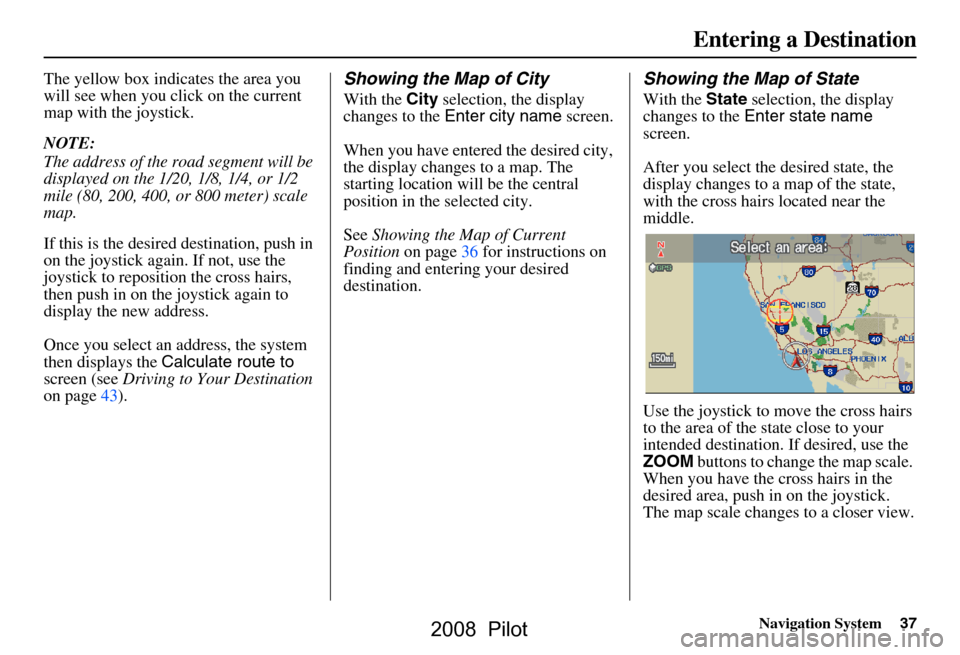
Showing the Map of State
With the State selection, the display
changes to the Enter state name
screen.
After you select the desired state, the
display changes to a map of the state,
with the cross hair s located near the
middle.
Use the joystick to move the cross hairs
to the area of the state close to your
intended destination. If desired, use the
ZOOM buttons to change the map scale.
When you have the cross hairs in the
desired area, push in on the joystick.
The map scale changes to a closer view.
Entering a Destination
2008 Pilot
Page 38 of 137
38Navigation System
Move the cross hairs to the desired
destination, then push in on the joystick.
The address of the location you have
selected will appear at the top of the
screen.
The yellow box indicat es the area you
will see when you click on the current
map with the joystick.
NOTE:
The address of the road segment will be
displayed on the 1/20, 1/8, 1/4, or 1/2
mile (80, 200, 400, or 800 meter) scale
map.
If this is the desired address, push in on
the joystick again. If not, use the
joystick to reposition the cross hairs,
then push in on th e joystick again to
display the new address.
Once you select an address, the system
then displays the Calculate route to
screen (see Driving to Your Destination
on page43).Showing the Map of Continental
USA
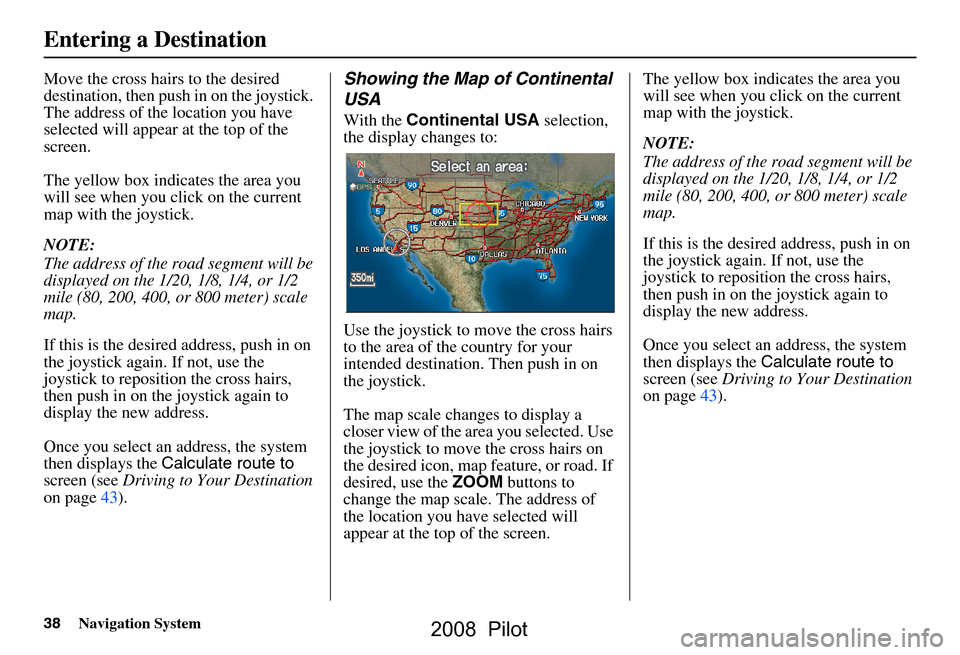
With the Continental USA selection,
the display changes to:
Use the joystick to move the cross hairs
to the area of the country for your
intended destination. Then push in on
the joystick.
The map scale changes to display a
closer view of the area you selected. Use
the joystick to move the cross hairs on
the desired icon, map feature, or road. If
desired, use the ZOOM buttons to
change the map scale. The address of
the location you ha ve selected will
appear at the top of the screen. The yellow box indicates the area you
will see when you click on the current
map with the joystick.
NOTE:
The address of the road segment will be
displayed on the 1/20, 1/8, 1/4, or 1/2
mile (80, 200, 400, or 800 meter) scale
map.
If this is the desired address, push in on
the joystick again. If not, use the
joystick to reposition the cross hairs,
then push in on th
e joystick again to
display the new address.
Once you select an address, the system
then displays the Calculate route to
screen (see Driving to Your Destination
on page43).
Entering a Destination
2008 Pilot
Page 44 of 137
44Navigation System
Driving to Your Destination
Changing the Routing Method
The system lets you select the way you
want to drive to your destination. Select
the desired method using the CHANGE
METHOD scroll bar back ( ) or
forward ( ) buttons.
The following methods are available to
change after you have set a destination:
While on a map screen, press the
MENU button. The Change route by
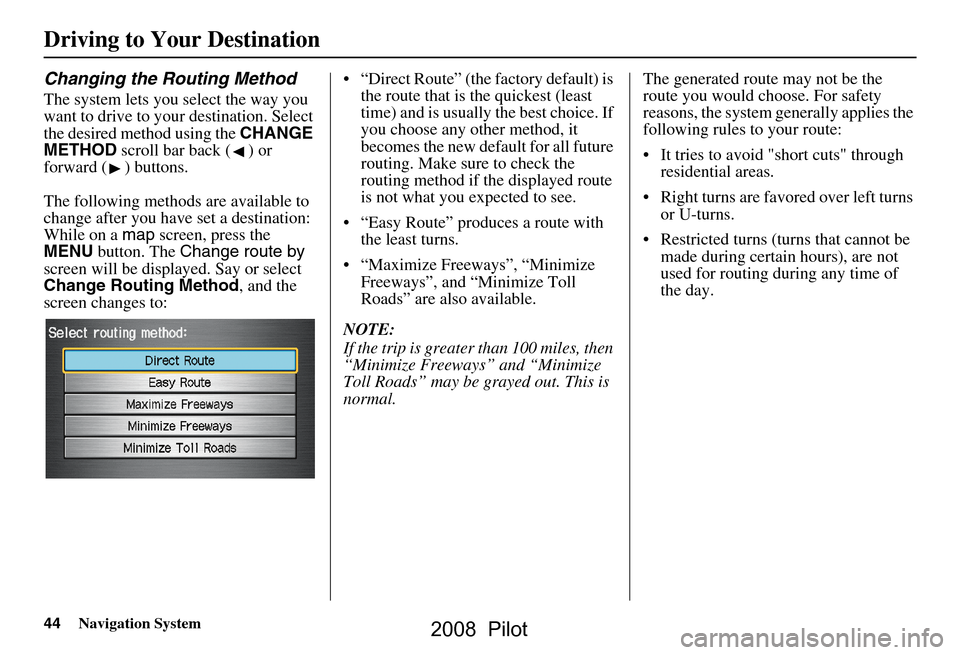
screen will be displayed. Say or select
Change Routing Method , and the
screen changes to: “Direct Route” (the factory default) is
the route that is the quickest (least
time) and is usually the best choice. If
you choose any other method, it
becomes the new default for all future
routing. Make sure to check the
routing method if the displayed route
is not what you expected to see.
“Easy Route” produces a route with the least turns.
“Maximize Freeways”, “Minimize Freeways”, and “Minimize Toll
Roads” are also available.
NOTE:
If the trip is greater than 100 miles, then
“Minimize Freeways” and “Minimize
Toll Roads” may be grayed out. This is
normal. The generated route may not be the
route you would choose. For safety
reasons, the system
generally applies the
following rules to your route:
It tries to avoid "short cuts" through residential areas.
Right turns are favored over left turns or U-turns.
Restricted turns (turns that cannot be made during certain hours), are not
used for routing during any time of
the day.
2008 Pilot