button battery HONDA PILOT 2013 2.G Owners Manual
[x] Cancel search | Manufacturer: HONDA, Model Year: 2013, Model line: PILOT, Model: HONDA PILOT 2013 2.GPages: 488, PDF Size: 10.18 MB
Page 70 of 488
69
uuIndicatorsu
Continued
Instrument Panel
IndicatorNameOn/BlinkingExplanationMessage*
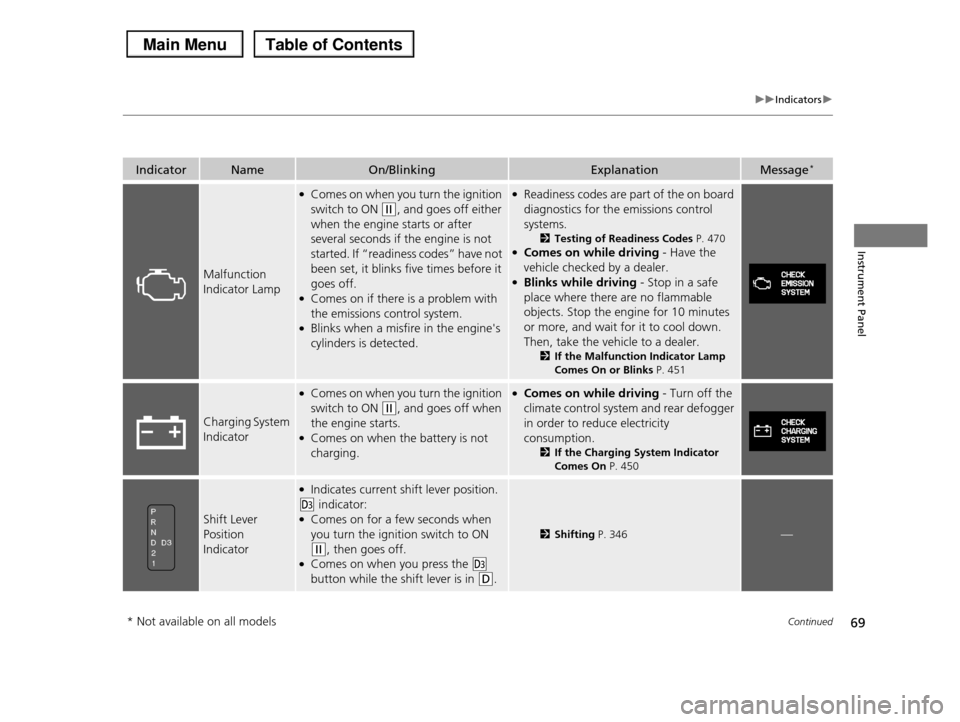
Malfunction
Indicator Lamp
●Comes on when you turn the ignition
switch to ON (w, and goes off either
when the engine starts or after
several seconds if the engine is not
started. If “readiness codes” have not
been set, it blinks five times before it
goes off.●Comes on if there is a problem with
the emissions control system.●Blinks when a misfire in the engine's
cylinders is detected.
●Readiness codes are part of the on board
diagnostics for the emissions control
systems.
2Testing of Readiness Codes P. 470●Comes on while driving - Have the
vehicle checked by a dealer.●Blinks while driving - Stop in a safe
place where there are no flammable
objects. Stop the engine for 10 minutes
or more, and wait for it to cool down.
Then, take the vehicle to a dealer.
2If the Malfunction Indicator Lamp
Comes On or Blinks P. 451
Charging System
Indicator
●Comes on when you turn the ignition
switch to ON (w, and goes off when
the engine starts.●Comes on when the battery is not
charging.
●Comes on while driving - Turn off the
climate control system and rear defogger
in order to reduce electricity
consumption.
2If the Charging System Indicator
Comes On P. 450
Shift Lever
Position
Indicator
●Indicates current shift lever position.
(d indicator:●Comes on for a few seconds when
you turn the ignition switch to ON
(w, then goes off.●Comes on when you press the (d
button while the shift lever is in (D.
2Shifting P. 346—
* Not available on all models
Page 102 of 488
101
uuLocking and Unlocking the DoorsuLocking/Unlocking the Doors from the Outside
Continued
Controls
Locking/Unlocking the Doors from the Outside
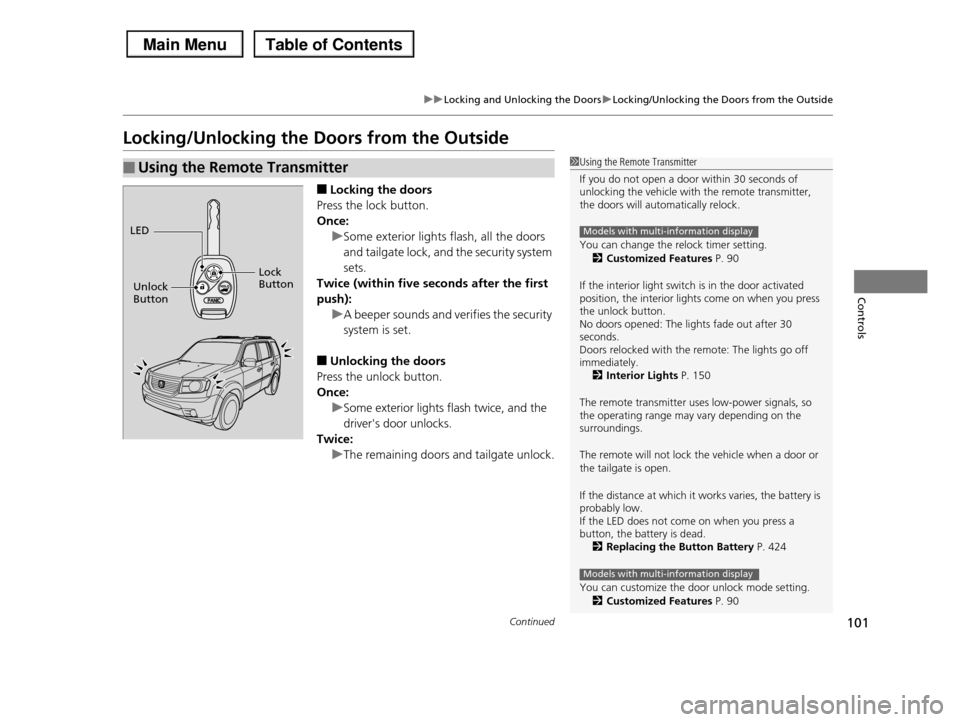
■Locking the doors
Press the lock button.
Once:
uSome exterior lights flash, all the doors
and tailgate lock, and the security system
sets.
Twice (within five seconds after the first
push):
uA beeper sounds and verifies the security
system is set.
■Unlocking the doors
Press the unlock button.
Once:
uSome exterior lights flash twice, and the
driver's door unlocks.
Twice:
uThe remaining doors and tailgate unlock.
■Using the Remote Transmitter1Using the Remote Transmitter
If you do not open a door within 30 seconds of unlocking the vehicle with the remote transmitter, the doors will automatically relock.
You can change the relock timer setting.
2Customized Features P. 90
If the interior light switch is in the door activated position, the interior lights come on when you press the unlock button. No doors opened: The lights fade out after 30 seconds.Doors relocked with the remote: The lights go off immediately.2Interior Lights P. 150
The remote transmitter uses low-power signals, so the operating range may vary depending on the surroundings.
The remote will not lock the vehicle when a door or the tailgate is open.
If the distance at which it works varies, the battery is probably low.If the LED does not come on when you press a button, the battery is dead.2Replacing the Button Battery P. 424
You can customize the door unlock mode setting.
2Customized Features P. 90
Models with multi-information display
Models with multi-information display
LED
Unlock Button
Lock Button
Page 113 of 488
112
uuOpening and Closing the TailgateuOpening/Closing the Power Tailgate*
Controls
Opening/Closing the Power Tailgate*
The power tailgate can be operated by pressing the power tailgate button on the
remote transmitter, pressing the power tailgate button on the driver's door, or
pressing the button on the tailgate.
■The power tailgate can be opened when:
•The tailgate and glass hatch are fully closed.
•The shift lever is in (P.
•The key is not in the ignition switch when using the remote transmitter.
•You have changed the PTG KEYLESS OPEN MODE setting to WHEN
UNLOCKED, you need to unlock the tailgate before you press the tailgate button
to open it.
2Customized Features P. 90
■The power tailgate can be closed when:
•The tailgate is fully open.
•The key is not in the ignition switch when using the remote transmitter.
1Opening/Closing the Power Tailgate*
The power tailgate may not open or close under the following conditions:
•The vehicle is parked on a steep hill.
•The vehicle is swayed in a strong wind.•The tailgate or the roof is covered with snow or ice.
If you close the power tailgate when all the doors are locked, the power tailgate locks automatically.
If you replace the battery or the power tailgate fuse while the tailgate is open, the power tailgate may be
disabled. The power tailgate resumes once you
manually close the tailgate.
Installing aftermarket components other than
genuine Honda accessories on the power tailgate may prevent it from fully opening or closing.
Make sure the power tailgate is fully open before you get your luggage in and out.
Make sure the power tailgate is fully closed before you start the vehicle.
* Not available on all models
Page 120 of 488
119
uuSecurity SystemuSecurity System Alarm*
Controls
■Setting the security system alarm
The security system alarm automatically sets when the following conditions have
been met:
•The ignition switch is in LOCK (0, and the key has been removed from the
ignition switch.
•The hood and tailgate are closed.
•All doors, the tailgate, and the glass hatch are locked with the key or the remote
transmitter.
■When the security system alarm sets
The security system alarm indicator in the instrument panel blinks. When the
blinking interval changes after about 15 seconds, the security system alarm is set.
■To cancel the security system alarm
The security system alarm is canceled when the vehicle is unlocked using the key or
remote transmitter. The security system alarm indicator goes off at the same time.
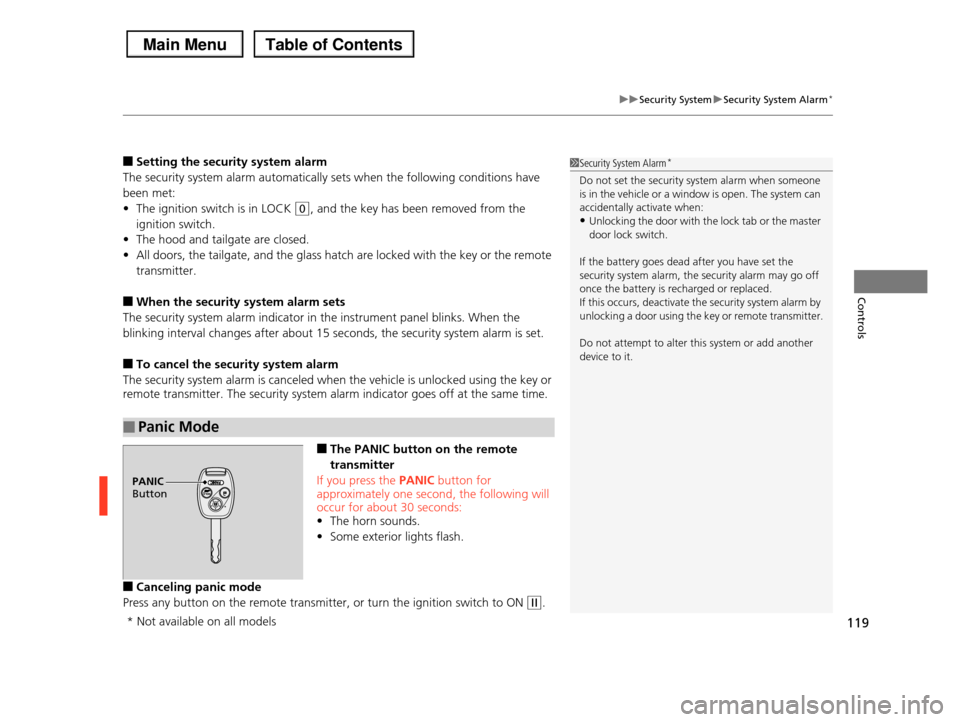
■The PANIC button on the remote
transmitter
If you press the PANIC button for
approximately one second, the following will occur for about 30 seconds:
•The horn sounds.
•Some exterior lights flash.
■Canceling panic mode
Press any button on the remote transmitter, or turn the ignition switch to ON (w.
■Panic Mode
1Security System Alarm*
Do not set the security system alarm when someone is in the vehicle or a window is open. The system can
accidentally activate when:
•Unlocking the door with the lock tab or the master door lock switch.
If the battery goes dead after you have set the security system alarm, the security alarm may go off
once the battery is recharged or replaced.
If this occurs, deactivate the security system alarm by unlocking a door using the key or remote transmitter.
Do not attempt to alter this system or add another device to it.
PANIC Button
* Not available on all models
Page 132 of 488
131
uuOperating the Switches Around the Steering WheeluRear Defogger/Heated Door Mirror* Button
Controls
Rear Defogger/Heated Door Mirror* Button
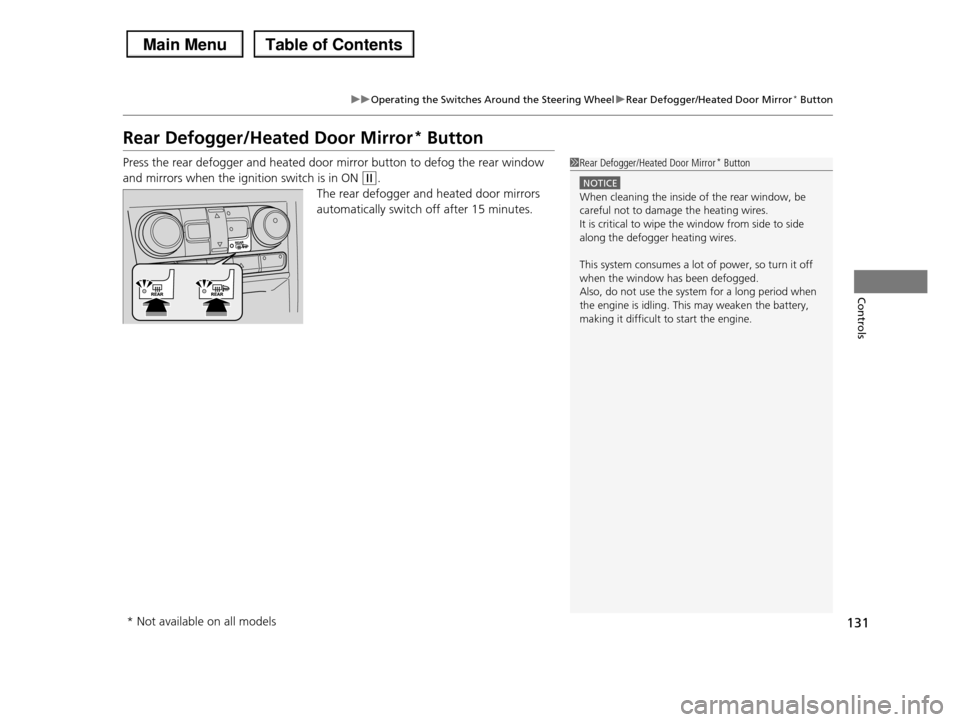
Press the rear defogger and heated door mirror button to defog the rear window
and mirrors when the ignition switch is in ON (w.
The rear defogger and heated door mirrors
automatically switch off after 15 minutes.
1Rear Defogger/Heated Door Mirror* Button
NOTICE
When cleaning the inside of the rear window, be careful not to damage the heating wires.
It is critical to wipe the window from side to side
along the defogger heating wires.
This system consumes a lot of power, so turn it off
when the window has been defogged. Also, do not use the system for a long period when
the engine is idling. This may weaken the battery,
making it difficult to start the engine.
* Not available on all models
Page 175 of 488
174
uuAudio SystemuAudio System Theft Protection
Features
Audio System Theft Protection
The audio system is disabled when it is disconnected from the power source, such as
when the battery is disconnected or goes dead.
■Reactivating the audio system
1.Turn the ignition switch to ON (w, and turn on the audio system.
uIf you turn the ignition switch to ACCESSORY (q, you will be requested to
enter the audio security code. See step 3.
2.Press and hold the power button again for more than two seconds.
uThe audio system is reactivated when the system’s control unit recognizes that
the system is in your vehicle.
If the control unit fails to recognize, ENTER CODE appears on the audio/
information screen.
3.Enter the audio security code using the preset buttons. If you enter an incorrect
digit, continue to the last digit, then try again. If you do not enter the code
correctly after 10 tries, leave the system for one hour before trying again, or visit
a dealer to have the system reset.
1Audio System Theft Protection
We recommend that you write down the serial
number in this owner’s manual.
You can find out about your serial number and
security code from a dealer.
You can register the security code at Owner Link
(owners.honda.com.), and find information on how to retrieve the serial number and obtain the code at
radio-navicode.honda.com.
See the Navigation System Manual for details.
U.S. models
Models with navigation system
Models without navigation system
Except LX models
Page 284 of 488
Continued283
uuBluetooth® HandsFreeLink®uHFL Menus
Features
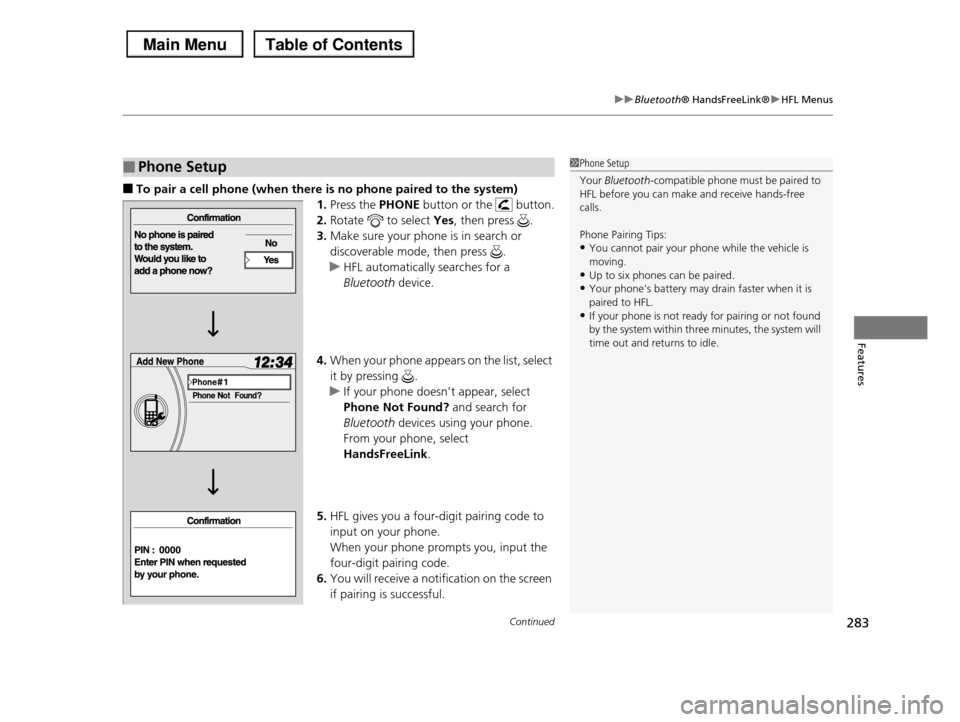
■To pair a cell phone (when there is no phone paired to the system)
1.Press the PHONE button or the button.
2.Rotate to select Yes, then press .
3.Make sure your phone is in search or
discoverable mode, then press .
uHFL automatically searches for a
Bluetooth device.
4.When your phone appears on the list, select
it by pressing .
uIf your phone doesn’t appear, select
Phone Not Found? and search for
Bluetooth devices using your phone.
From your phone, select
HandsFreeLink.
5.HFL gives you a four-digit pairing code to
input on your phone.
When your phone prompts you, input the
four-digit pairing code.
6.You will receive a notification on the screen
if pairing is successful.
■Phone Setup1Phone Setup
Your Bluetooth-compatible phone must be paired to HFL before you can make and receive hands-free
calls.
Phone Pairing Tips:
•You cannot pair your phone while the vehicle is
moving.•Up to six phones can be paired.
•Your phone's battery may drain faster when it is
paired to HFL.•If your phone is not ready for pairing or not found
by the system within three minutes, the system will
time out and returns to idle.
Page 306 of 488
Continued305
uuBluetooth® HandsFreeLink®uHFL Menus
Features
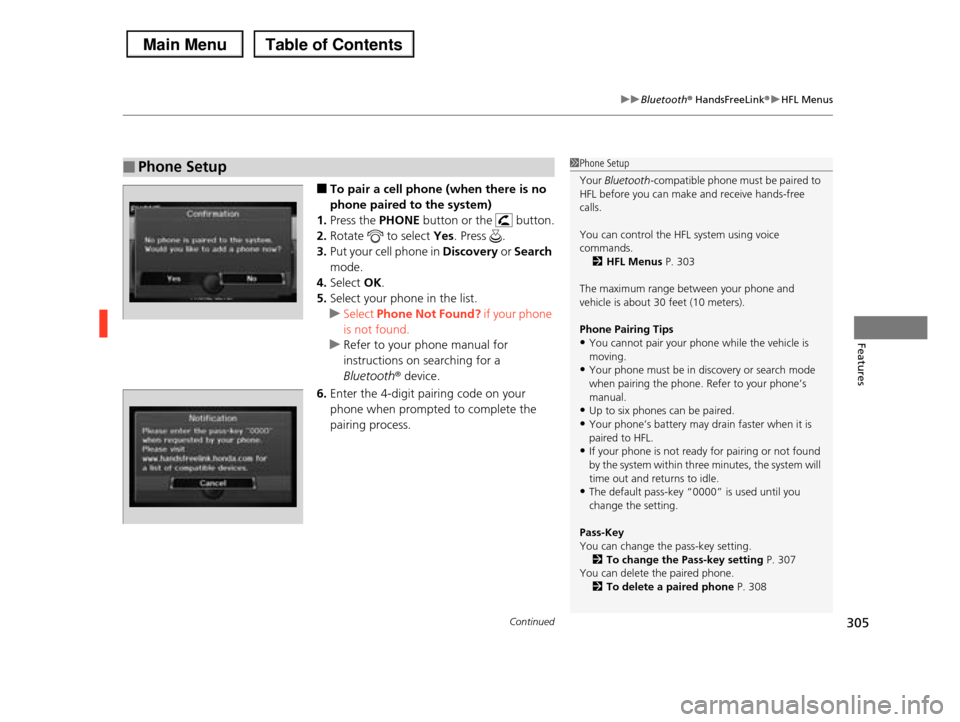
■To pair a cell phone (when there is no
phone paired to the system)
1.Press the PHONE button or the button.
2.Rotate to select Yes. Press .
3.Put your cell phone in Discovery or Search
mode.
4.Select OK.
5.Select your phone in the list.
uSelect Phone Not Found? if your phone
is not found.
uRefer to your phone manual for
instructions on searching for a
Bluetoothr device.
6.Enter the 4-digit pairing code on your
phone when prompted to complete the
pairing process.
■Phone Setup1Phone Setup
Your Bluetooth-compatible phone must be paired to HFL before you can make and receive hands-free
calls.
You can control the HFL system using voice
commands.
2HFL Menus P. 303
The maximum range between your phone and
vehicle is about 30 feet (10 meters).
Phone Pairing Tips
•You cannot pair your phone while the vehicle is moving.
•Your phone must be in discovery or search mode
when pairing the phone. Refer to your phone’s manual.
•Up to six phones can be paired.
•Your phone’s battery may drain faster when it is
paired to HFL.•If your phone is not ready for pairing or not found
by the system within three minutes, the system will
time out and returns to idle.•The default pass-key “0000” is used until you
change the setting.
Pass-Key
You can change the pass-key setting.
2To change the Pass-key setting P. 307You can delete the paired phone.
2To delete a paired phone P. 308
Page 320 of 488
319
uuBluetooth® HandsFreeLink®uHFL Menus
Features
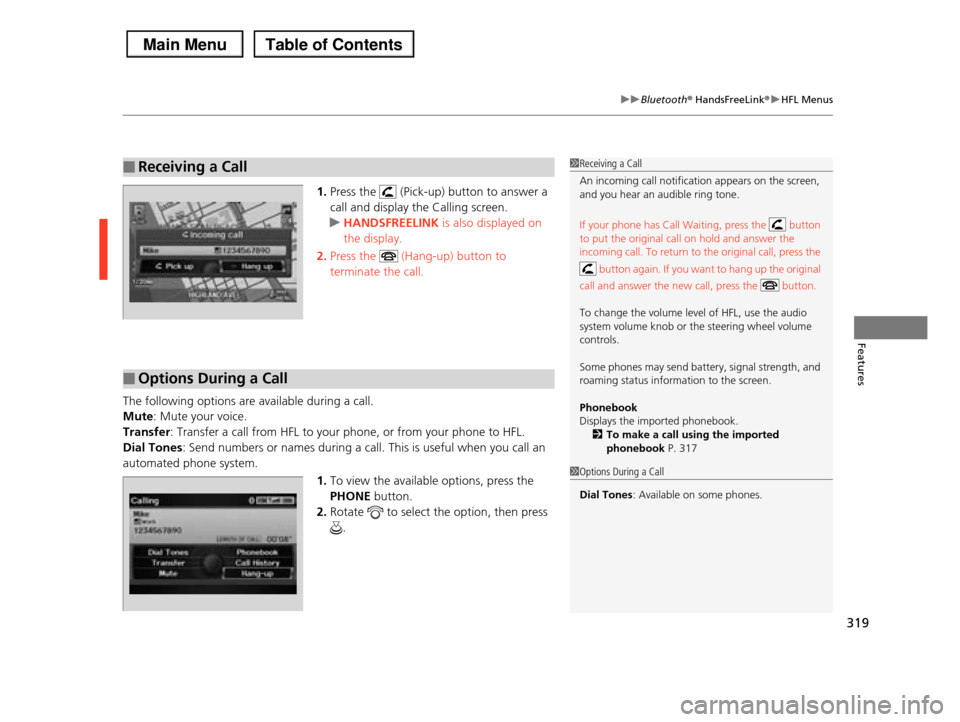
1.Press the (Pick-up) button to answer a
call and display the Calling screen.
uHANDSFREELINK is also displayed on
the display.
2.Press the (Hang-up) button to
terminate the call.
The following options are available during a call.
Mute: Mute your voice.
Transfer: Transfer a call from HFL to your phone, or from your phone to HFL.
Dial Tones: Send numbers or names during a call. This is useful when you call an
automated phone system.
1.To view the available options, press the
PHONE button.
2.Rotate to select the option, then press
.
■Receiving a Call1Receiving a Call
An incoming call notification appears on the screen, and you hear an audible ring tone.
If your phone has Call Waiting, press the button
to put the original call on hold and answer the
incoming call. To return to the original call, press the
button again. If you want to hang up the original
call and answer the new call, press the button.
To change the volume level of HFL, use the audio
system volume knob or the steering wheel volume
controls.
Some phones may send battery, signal strength, and
roaming status information to the screen.
Phonebook
Displays the imported phonebook.2To make a call using the imported
phonebook P. 317
■Options During a Call
1Options During a Call
Dial Tones: Available on some phones.
Page 378 of 488
377
Maintenance
This chapter discusses basic maintenance.
Before Performing MaintenanceInspection and Maintenance ............ 378Safety When Performing Maintenance..... 379Parts and Fluids Used in Maintenance Service ........................................... 380Maintenance Minder™.................... 381Maintenance Under the HoodMaintenance Items Under the Hood ..... 389Opening the Hood ........................... 390 Recommended Engine Oil ................ 392 Oil Check ......................................... 393Adding Engine Oil ............................ 394Changing the Engine Oil and Oil Filter ..... 395
Engine Coolant ................................ 397Transmission Fluid ............................ 399Brake Fluid ....................................... 400 Power Steering Fluid ........................ 400 Refilling Window Washer Fluid......... 401Replacing Light Bulbs....................... 402Checking and Maintaining Wiper Blades.... 410Checking and Maintaining TiresChecking Tires ................................. 414Tire and Loading Information Label ...... 415Tire Labeling .................................... 415DOT Tire Quality Grading (U.S. Vehicles)....... 417Wear Indicators................................ 419
Tire Service Life ................................ 419Tire and Wheel Replacement ........... 420Tire Rotation .................................... 421 Winter Tires ..................................... 422Battery............................................... 423Remote Transmitter CareReplacing the Button Battery ........... 424Remote Control and Wireless Headphone Care*........................... 425Climate Control System Maintenance..... 427Cleaning
Interior Care .................................... 428 Exterior Care.................................... 430
* Not available on all models