remote control HONDA PILOT 2014 2.G Owners Manual
[x] Cancel search | Manufacturer: HONDA, Model Year: 2014, Model line: PILOT, Model: HONDA PILOT 2014 2.GPages: 488, PDF Size: 12.11 MB
Page 1 of 488
Contents
This owner’s manual should be considered a permanent part of the
vehicle and should remain with the vehicle when it is sold.
This owner’s manual covers all models of your vehicle. You may find
desc
riptions of equipment and features that are not on your
particular model.
Images throughout this owner’s ma nual (inc
luding the front cover)
represent features and equipment that are available on some, but
not all, models. Your particular mo del may not have some of these
features.
This owner’s manual is for vehicles
sold in the United States and
Canada.
The information and specifications in clu
ded in this publication were
in effect at the time of approval for printing. Honda Motor Co., Ltd.
reserves the right, however, to discontinue or change specifications
or design at any time without notice and without incurring any
obligation.
2 Safe Driving P. 23
For Safe Driving P. 24 Seat Belts P. 29 Airbags P. 37
2 Instrument Panel P. 67
Indicators P. 68 Gauges and Displays P. 80
2 Controls P. 97
Setting the Clock P. 98 Locking and Unlocking the Doors P. 99
Opening and Closing the Moonroof * P. 123
Adjusting the Seats P. 137
2 Features P. 171
Audio System P. 172 Audio System Basic Operation P. 216
General Information on the Audio System P. 272
Compass
* P. 320
2 Driving P. 323
Before Driving P. 324 Towing a Trailer P. 329
Parking Your Vehicle P. 364 Rearview Camera * P. 369
Accessories and Modifications P. 375
2 Maintenance P. 377
Before Performing Maintenance P. 378 Maintenance Minder™ P. 381
Checking and Maintaining Wiper Blades P. 410
Remote Control and Wireless Headphone Care
* P. 425
2 Handling the Unexpected P. 433
Tools P. 434 If a Tire Goes Flat P. 435
Overheating P. 448 Indicator, Coming On/Blinking P. 450
2 Information P. 463
Specifications P. 464 Identification Numbers P. 466
Emissions Testing P. 470 Warranty Coverages P. 472
Gracenote ® End Us
er License Agreement P. 476
Page 2 of 488
Contents
Child Safety P. 52 Exhaust Gas Hazard P. 65 Safety Labels P. 66
Opening and Closing the Tailgate P. 110 Security System P. 118 Opening and Closing the Windows P. 120
Operating the Switches Around the Steering Wheel P. 124 Adjusting the Mirrors P. 135
Interior Lights/Interior Convenience Items P. 150 Climate Control System P. 165
Rear Entertainment System * P. 251 Audio Error Messages P. 266
HomeLink ® U
niversal Transceiver * P. 276 Bluetooth® Hands FreeLink® P. 278
Off-Highway Driving Guidelines P. 340 When Driving P. 342 Braking P. 360
Multi-View Rear Camera * P. 370 Refueling P. 371 Fuel Economy P. 374
Maintenance Under the Hood P. 389 Replacing Light Bulbs P. 402
Checking and Maintaining Tires P. 414 Battery P. 423 Remote Transmitter Care P. 424
Climate Control System Maintenance P. 427 Cleaning P. 428
Engine Does Not Start P. 444 Jump Starting P. 445 Shift Lever Does Not Move P. 447
Fuses P. 454 Emergency Towing P. 459 When You Cannot Open the Tailgate P. 461
Devices that Emit Radio Waves P. 467 Reporting Safety Defects P. 469
Authorized Manuals P. 474 Customer Service Information P. 475
Quick Reference GuideP. 2
Safe Driving P. 23
Instrument Panel P. 67
Controls P. 97
Features P. 171
Driving P. 323
Maintenance P. 377
Handling the Unexpected P. 433
Information P. 463
Index P. 478
Page 4 of 488
3
Quick Reference Guide
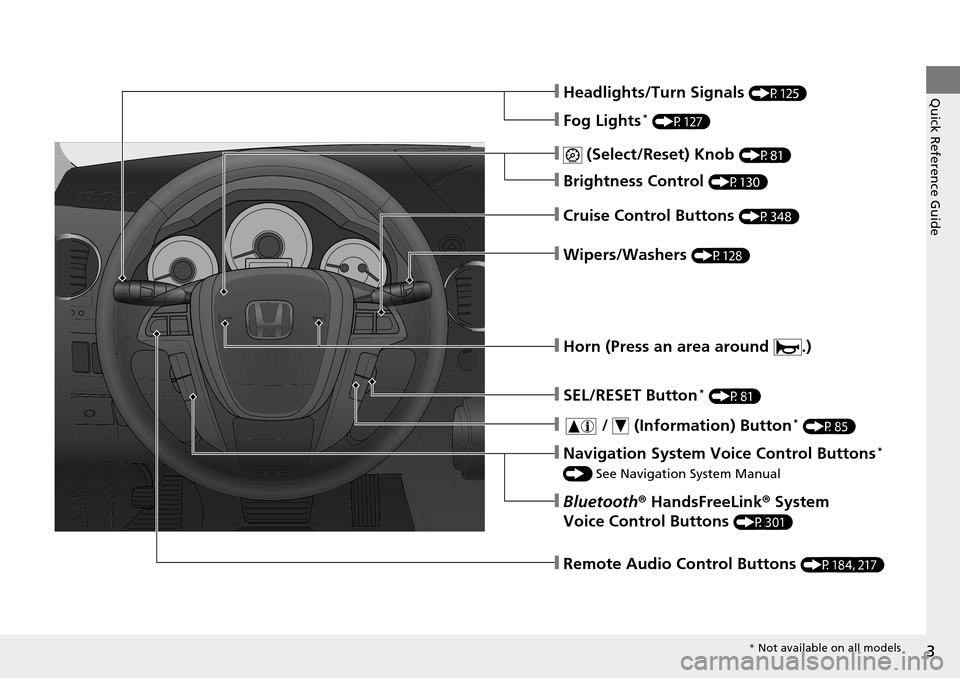
❙ (Select/Reset) Knob (P81)
❙Headlights/Turn Signals (P125)
❙Fog Lights * (P127)
❙Brightness Control (P130)
❙Cruise Control Buttons (P348)
❙Wipers/Washers (P128)
❙Horn (Press an area around .)
❙SEL/RESET Button * (P81)
❙ / (Information) Button * (P85)
❙Navigation System Voice Control Buttons *
() See Navigation System Manual
❙Bluetooth ® HandsFreeLink ® System
Voice Control Buttons
(P301)
❙Remote Audio Control Buttons (P184, 217)
* Not available on all models
Page 11 of 488
10
Quick Reference Guide
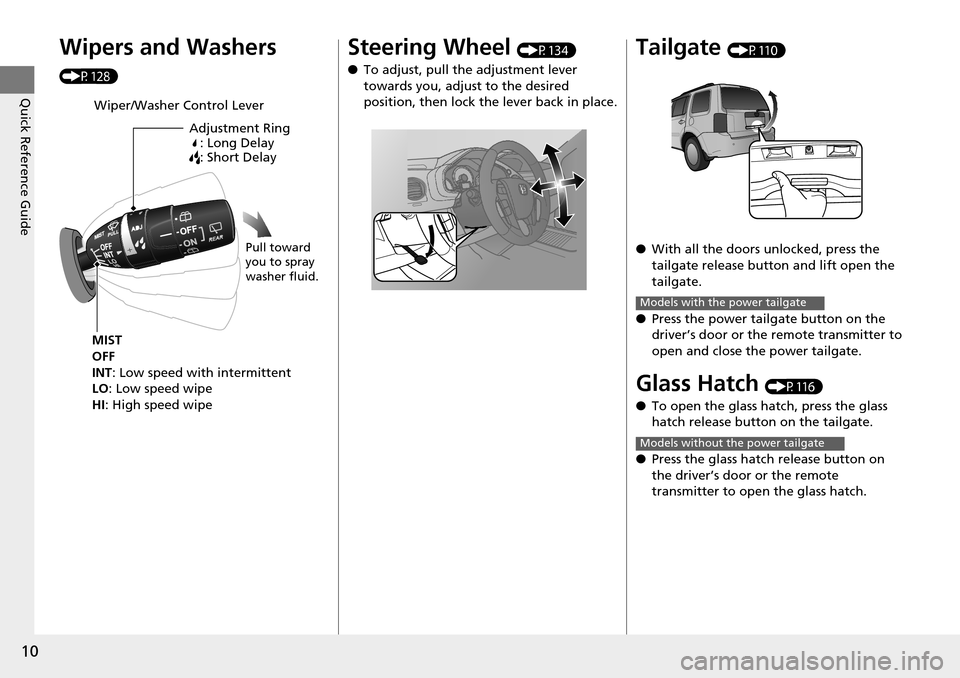
Wipers and Washers
(P128)
Wiper/Washer Control LeverAdjustment Ring: Long Delay
: Short Delay
MIST
OFF
INT : Low speed with intermittent
LO: Low speed wipe
HI : High speed wipe
Pull toward
you to spray
washer fluid.
Steering Wheel (P 134)
● To ad
just, pull the adjustment lever
towards you, adjust to the desired
position, then lock the lever back in place.
Tailgate (P 110)
● W
ith all the doors unlocked, press the
tailgate release button and lift open the
tailgate.
● Press the power tailgate butt
on on the
driver’s door or the remote transmitter to
open and close the power tailgate.
Glass Hatch (P 116)
● To open the glass ha
tch, press the glass
hatch release button on the tailgate.
● Press the glass hatch release butt
on on
the driver’s door or the remote
transmitter to open the glass hatch.
Models with the power tailgate
Models without the power tailgate
Page 14 of 488
13
Quick Reference Guide
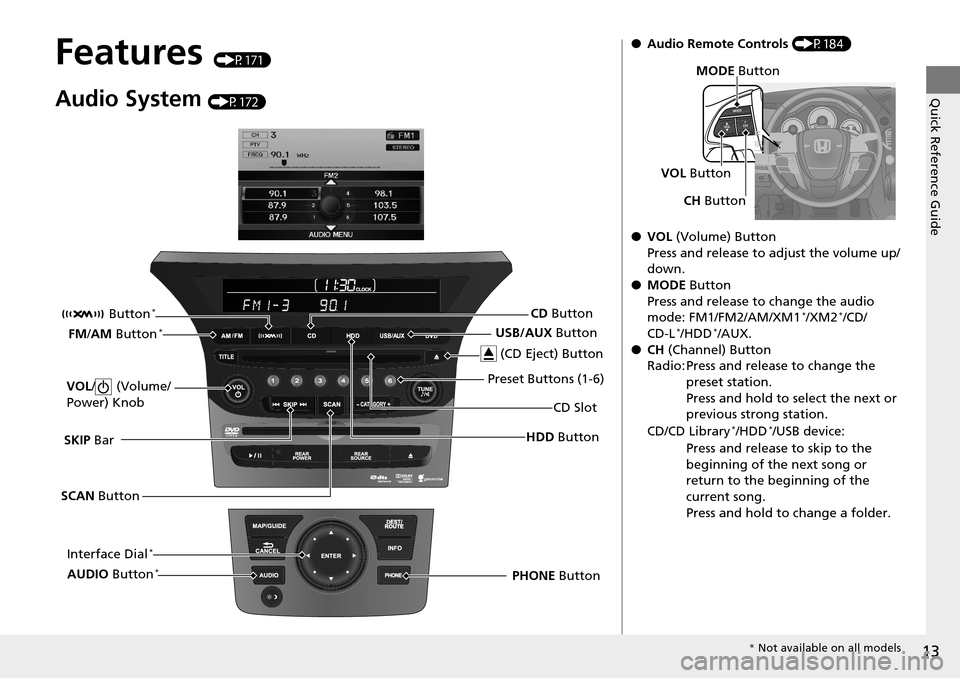
Features (P171)
Audio System (P 172)
SCAN Button
SKIP Bar
Interface Dial
*
HDD Button
VOL
/ (Volume/
Power) Knob
USB/AUX Button
CD Slot
(CD Eject) Button
Preset Buttons (1-6)
PHONE Button
Button
*
FM
/AM Button *
AUDIO Button *
CD Button
●Audio Remote Controls (P184)
● VOL (
Volume) Button
Press and release to adjust the volume up/
do
wn.
● MODE Bu
tton
Press and release to change the audio
m
ode: FM1/FM2/AM/XM1 */XM2 */CD/
CD-L */HDD */AUX.
● CH (C
hannel) Button
Radio: Press and release to change the
preset station.
Press and hold to select the next or
prev
ious strong station.
CD/CD Library
*/HDD */USB device:
Press and release to skip to the
be
ginning of the next song or
return to the beginning of the
current song.
Press and hold to change a folder.
VOL ButtonMODE Button
CH Button
* Not available on all models
Page 100 of 488
99Continued
Controls
Locking and Unlocking the Doors
Key Types and Functions
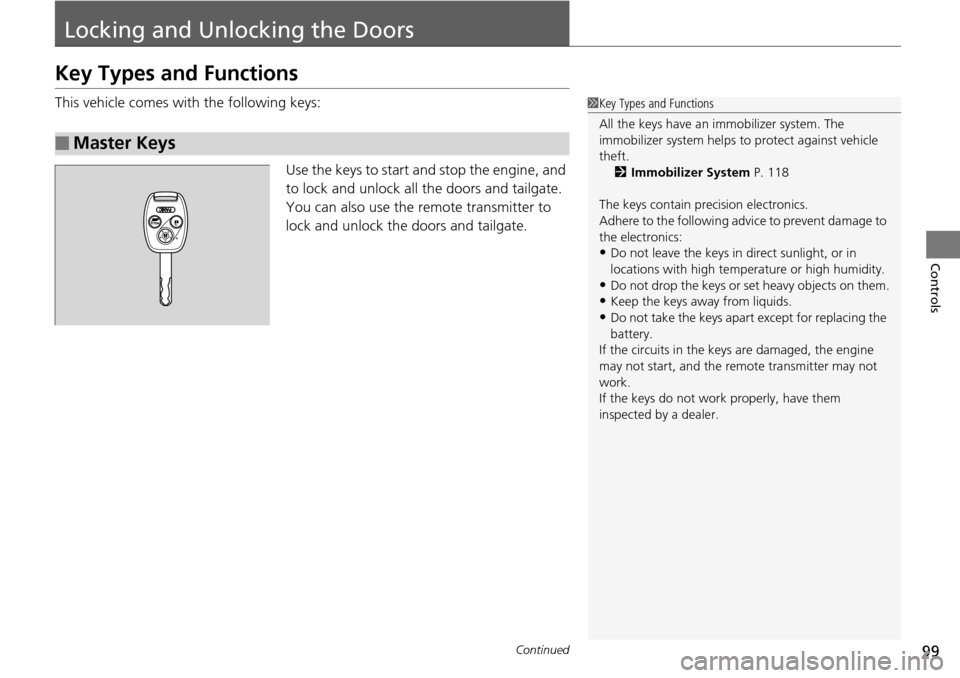
This vehicle comes with the following keys:
Use the keys to start and stop the engine, and
to
lock and unlock all the doors and tailgate.
You can also use the remote transmitter to
lock and unlock the doors and tailgate.
■Master Keys
1 Key Types and Functions
All the keys have an immobilizer system. The
immobilizer system helps to protect against vehicle
theft. 2 Immobilizer System P. 118
The keys contain precision electronics.
Adhere to the following advi ce to prevent damage to
the electronics:
•Do not leave the keys in direct sunlight, or in
locations with high temperature or high humidity.
•Do not drop the keys or set heavy objects on them.
•Keep the keys away from liquids.
•Do not take the keys apart except for replacing the
battery.
If the circuits in the keys are damaged, the engine
may not start, and the remote transmitter may not
work.
If the keys do not work properly, have them
inspected by a dealer.
Page 102 of 488
101
uu Locking and Unlocking the Doors u Locking/Unlocking the Doors from the Outside
Continued
Controls
Locking/Unlocking the Doors from the Outside
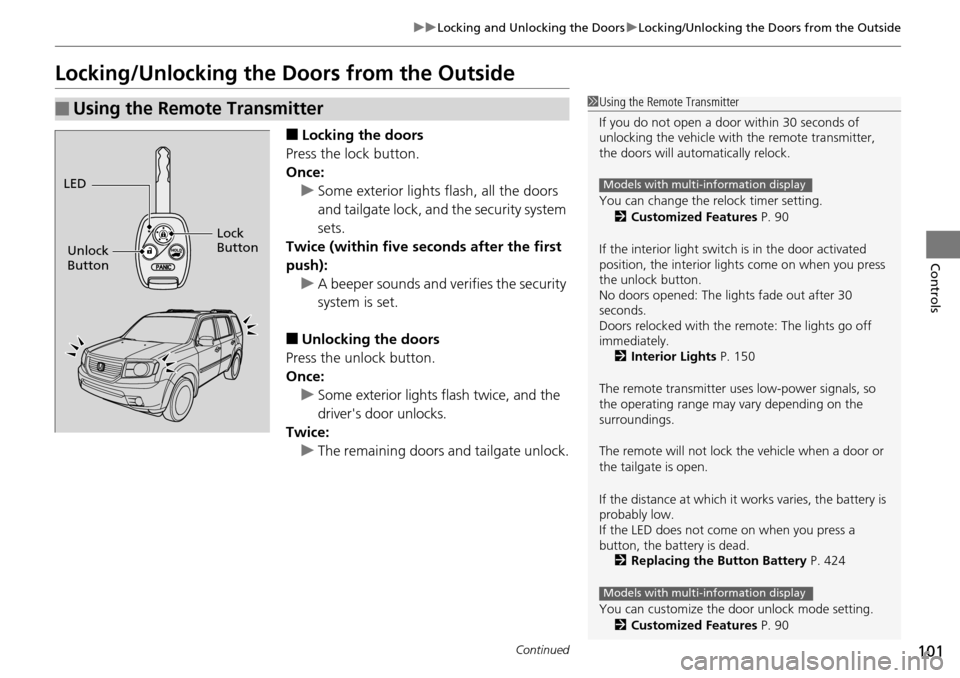
■Locking the doors
Press the lock button.
Once: u So
me exterior lights flash, all the doors
and tailgate lock, and the security system
sets.
Twice (within five se conds afte
r the first
push): u A beeper sounds and verifies
the security
system is set.
■Unlocking the doors
Press the unlock button.
Once: u S
ome exterior lights flash twice, and the
driver's door unlocks.
Twice:
u Th
e remaining doors and tailgate unlock.
■Using the Remote Transmitter1Using the Remote Transmitter
If you do not open a door within 30 seconds of
unlocking the vehicle with the remote transmitter,
the doors will automatically relock.
You can change the relock timer setting.
2 Customized Features P. 90
If the interior light switch is in the door activated
position, the interior light s come on when you press
the unlock button.
No doors opened: The li ghts fade out after 30
seconds.
Doors relocked with the remote: The lights go off
immediately. 2 Interior Lights P. 150
The remote transmitter us es low-power signals, so
the operating range may vary depending on the
surroundings.
The remote will not lock th e vehicle when a door or
the tailgate is open.
If the distance at which it works varies, the battery is
probably low.
If the LED does not come on when you press a
button, the battery is dead. 2 Replacing the Button Battery P. 424
You can customize the door unlock mode setting. 2 Customized Features P. 90
Models with multi-information display
Models with multi-information display
LED
Unlock
Button Lock
Button
Page 113 of 488
112
uu Opening and Closing the Tailgate u Opening/Closing the Power Tailgate *
Controls
Opening/Closing the Power Tailgate *
The power tailgate can be operated by pressing the power tailgate button on the
remote transmitter, pressing the power tailgate button on the driver's door, or
pressing the button on the tailgate.
■The power tailgate can be opened when:
• The tailgat
e and glass hatch are fully closed.
• The
shift lever is in (P
.
• The
key is not in the ignition switch when using the remote transmitter.
• You
have changed the PTG KEYLESS OPEN MODE setting to WHEN
UNLOCKED, you need to unlock the tailgate before you press the tailgate button
to open it.
2 Customized Features P. 90
■The power tailgate can be closed when:
• The tailgat
e is fully open.
• The
key is not in the ignition switch when using the remote transmitter.
1Opening/Closing the Power Tailgate *
The power tailgate may not open or close under the
following conditions:
•The vehicle is park ed on a steep hill.
•The vehicle is swayed in a strong wind.•The tailgate or the roof is covered with snow or ice.
If you close the power tail gate when all the doors are
locked, the power tailgate locks automatically.
If you replace the battery or the power tailgate fuse
while the tailgate is open, the power tailgate may be
disabled. The power tail gate resumes once you
manually close the tailgate.
Installing aftermarket components other than
genuine Honda a ccessories on the power tailgate
may prevent it from fully opening or closing.
Make sure the power tailgate is fully open before you
get your luggage in and out.
Make sure the power tailgate is fully closed before
you start the vehicle.
* Not available on all models
Page 114 of 488
Continued113
uu Opening and Closing the Tailgate u Opening/Closing the Power Tailgate *
Controls
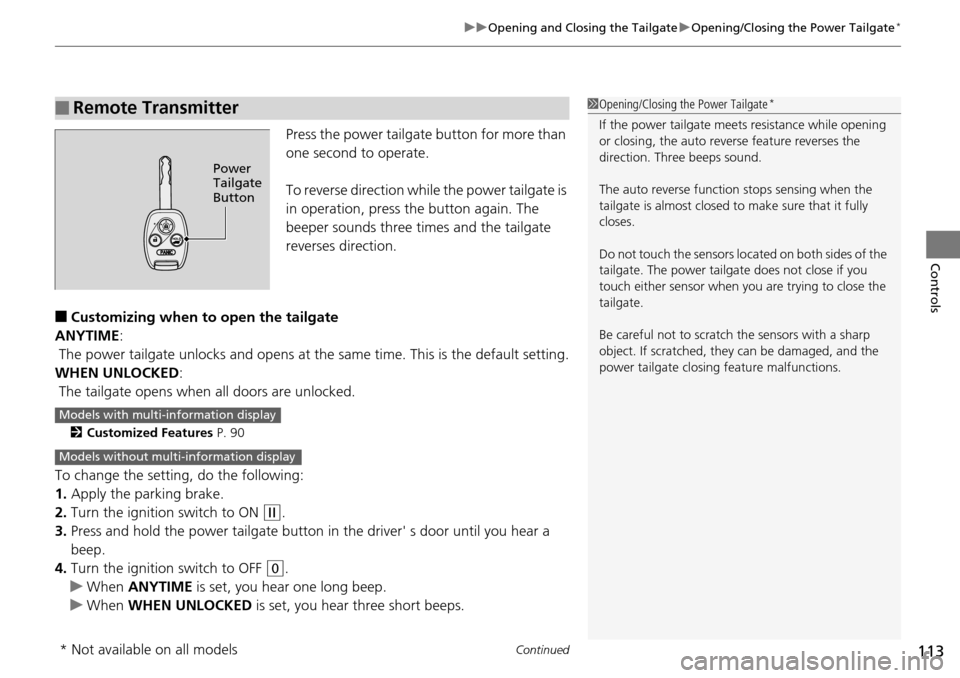
Press the power tailgate button for more than
one second to operate.
To reverse direction while the power tailgate is
in operation, press the button again. The
beeper sounds three times and the tailgate
reverses direction.
■Customizing when to open the tailgate
ANYTIME :
The power tailgate unlocks and opens at the same
time. This is the default setting.
WHEN UNLOCKED:
The tailgate opens when all doors
are unlocked.
2Customized Features P. 90
To change the setting , do the following:
1. Apply the parking brake.
2. Turn the ignition
switch to ON (w
.
3. Press and hold the power
tailgate button in the driver' s door until you hear a
beep.
4. Turn the ignition
switch to OFF (0
.
u When ANYTIME is
set, you hear one long beep.
u When WHEN UNLOCKED
is set, you hear three short beeps.
■Remote Transmitter1Opening/Closing the Power Tailgate *
If the power tailgate meet s resistance while opening
or closing, the auto reverse feature reverses the
direction. Three beeps sound.
The auto reverse function stops sensing when the
tailgate is almost closed to make sure that it fully
closes.
Do not touch the sensors lo cated on both sides of the
tailgate. The power tailga te does not close if you
touch either sensor when you are trying to close the
tailgate.
Be careful not to scratch the sensors with a sharp
object. If scratched, they can be damaged, and the
power tailgate closing feature malfunctions.
Power
Tailgate
Button
Models with multi- information display
Models without multi-information display
* Not available on all models
Page 117 of 488
116
uu Opening and Closing the Tailgate u Opening/Closing the Glass Hatch
Controls
Opening/Closing the Glass Hatch
The glass hatch can be operated by pressing the glass hatch release button * on the
remote transmitter, pressing the glass hatc h release button* on the driver's door, or
pressing the button on the tailgate.
■Opening the glass hatch
• Open
the glass hatch all the way.
u If it
is not fully opened, the glass hatch may come down accidentally by its own
weight.
• B
e careful when it is windy. The wind may cause the glass hatch to close.
■Closing the glass hatch
• To c
lose the glass hatch, lower it and press on the handle until it latches.
•Keep t
he glass hatch cl osed while driving to:
u Avoi
d possible damage.
uPr
event exhaust gas from leaking into the vehicle.
2 Carbon Monoxide Gas P. 65
1Opening/Closing the Glass Hatch
The rear wiper does not oper ate with the glass hatch
open.
* Not available on all models