sensor HONDA PILOT 2015 2.G Owner's Manual
[x] Cancel search | Manufacturer: HONDA, Model Year: 2015, Model line: PILOT, Model: HONDA PILOT 2015 2.GPages: 488, PDF Size: 11.34 MB
Page 171 of 488
170
uuClimate Control System uAutomatic Climate Control Sensors
Controls
Automatic Climate Control Sensors
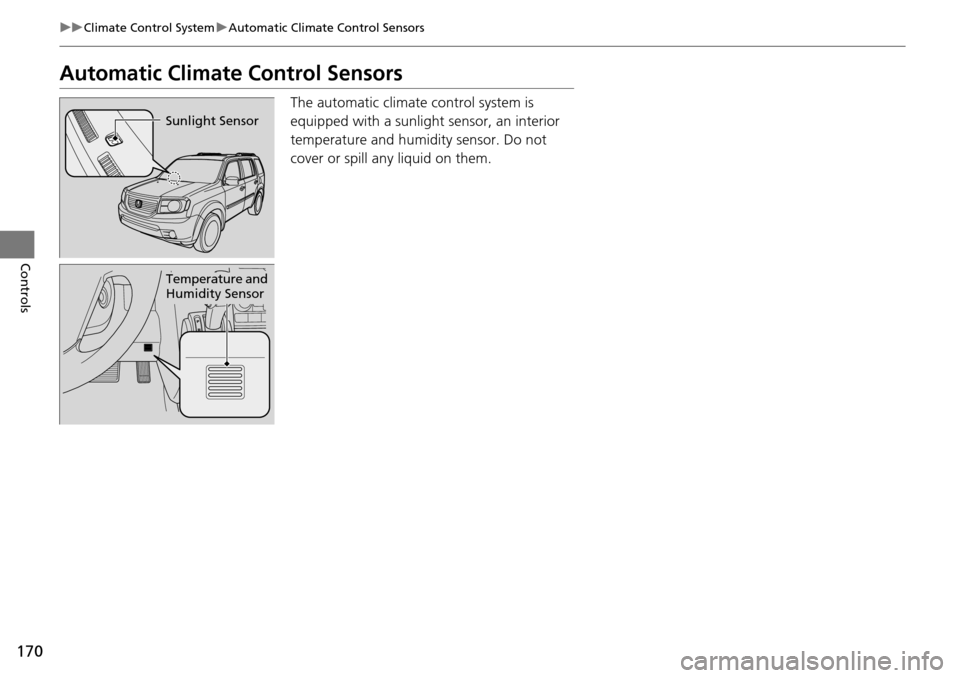
The automatic climate control system is
equipped with a sunlight sensor, an interior
temperature and humidity sensor. Do not
cover or spill any liquid on them.
Sunlight Sensor
Temperature and
Humidity Sensor
Page 324 of 488

323
Driving
This chapter discusses driving, refueling, and information on items such as accessories.
Before Driving
Driving Preparation .......................... 324
Maximum Load Limit........................ 327
Towing a Trailer Towing Preparation .......................... 329
Driving Safely with a Trailer .............. 338
Towing Your Vehicle ........................ 339
Off-Highway Driving Guidelines General Information ......................... 340
Important Safety Precautions............ 340
Avoiding Trouble ............................. 341
When Driving Starting the Engine .......................... 342
Precautions While Driving................. 344 Automatic Transmission ................... 345
Shifting ............................................ 346
Cruise Control ................................. 348
VSA® (Vehicle Stability Assist), aka ESC
(Electronic Stability Control), System ...... 352
VTM (Variable Torque Management)-4 r
System*............................................. 354TPMS (Tire Pressure Monitoring System) ... 355Tire Pressure Monitoring System (TPMS) - Required Federal Explanation ......... 357
Braking Brake System ................................... 360
ABS (Anti-lock Brake System) ........... 362 Brake Assist System ......................... 363
Parking Your Vehicle When Stopped ................................ 364
Parking Sensor System
*................... 365
Rearview Camera*............................ 369
Multi-View Rear Camera*................ 370
Refueling
Fuel Information .............................. 371
How to Refuel ................................. 372
Fuel Economy .................................... 374
Accessories and Modifications Accessories ...................................... 375
Modifications................................... 375
* Not available on all models
Page 327 of 488
326
uuBefore Driving uDriving Preparation
Driving
• Be sure items placed on the floor behind the front seats cannot roll under the
seats.
u They can interfere with the driver's ability to operate the pedals, the operation
of the seats, or the operation of the sensors under the seats.
• Everyone in the vehicle must fasten their seat belt.
2Fastening a Seat Belt P. 32
•Make sure that the indicators in the ins trument panel come on when you start the
vehicle, and go off soon after.
u Always have a dealer check the vehicle if a problem is indicated.
2 Indicators P. 68
Page 366 of 488
365
uuParking Your Vehicle uParking Sensor System*
Continued
Driving
Parking Sensor System*
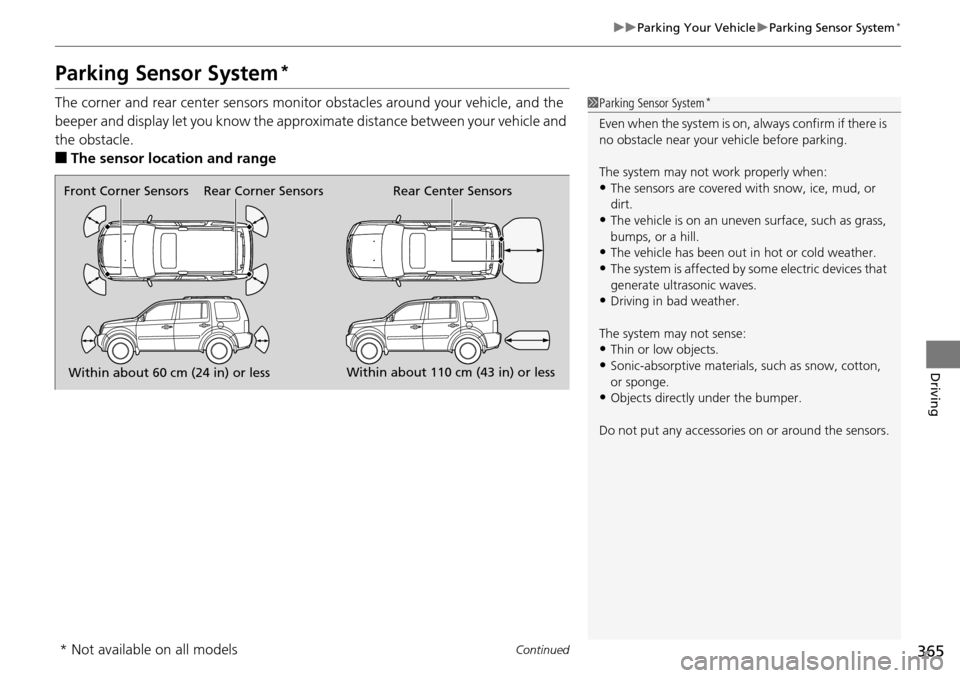
The corner and rear center sensors monito r obstacles around your vehicle, and the
beeper and display let you know the approx imate distance between your vehicle and
the obstacle.
■The sensor location and range
1 Parking Sensor System*
Even when the system is on, always confirm if there is
no obstacle near your ve hicle before parking.
The system may not work properly when:
•The sensors are covered with snow, ice, mud, or
dirt.
•The vehicle is on an uneven surface, such as grass,
bumps, or a hill.
•The vehicle has been out in hot or cold weather.•The system is affected by some electric devices that
generate ultrasonic waves.
•Driving in bad weather.
The system may not sense:
•Thin or low objects.•Sonic-absorptive materials, such as snow, cotton,
or sponge.
•Objects directly under the bumper.
Do not put any accessories on or around the sensors.
Within about 60 cm (24 in) or less Within about 110 cm (43 in) or less
Front Corner Sensors Rear Center Sensors
Rear Corner Sensors
* Not available on all models
Page 367 of 488
uuParking Your Vehicle uParking Sensor System*
366
Driving
■When you activate the system
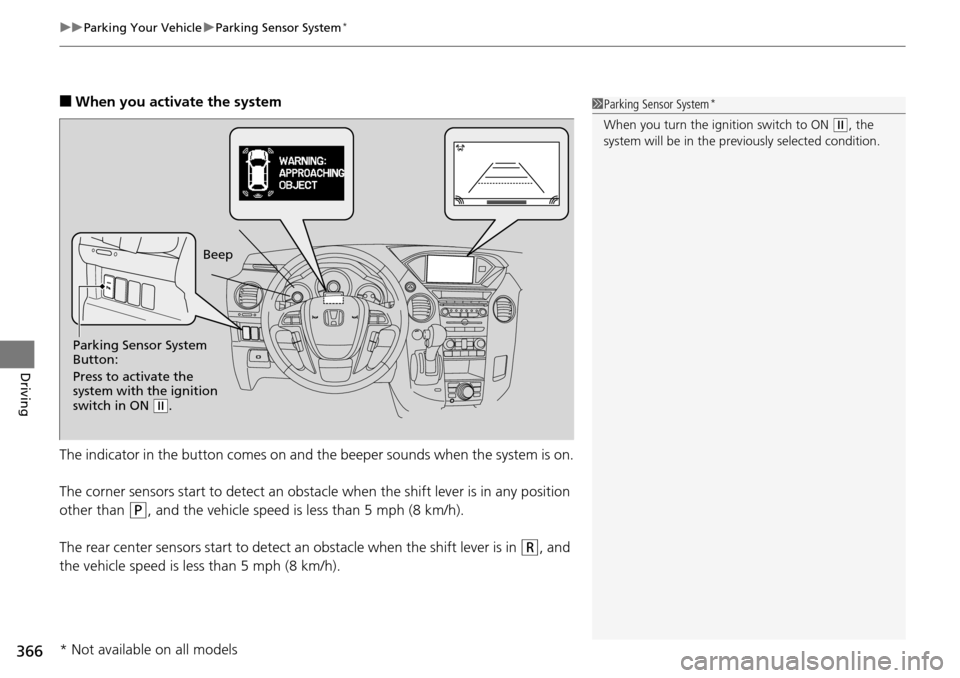
The indicator in the button comes on and th e beeper sounds when the system is on.
The corner sensors start to detect an obstac le when the shift lever is in any position
other than
(P, and the vehicle speed is less than 5 mph (8 km/h).
The rear center sensors start to detect an obstacle when the shift lever is in
(R, and
the vehicle speed is le ss than 5 mph (8 km/h).
1Parking Sensor System*
When you turn the ignition switch to ON (w, the
system will be in the pr eviously selected condition.
Parking Sensor System
Button:
Press to activate the
system with the ignition
switch in ON
(w. Beep
* Not available on all models
Page 368 of 488
367
uuParking Your Vehicle uParking Sensor System*
Continued
Driving
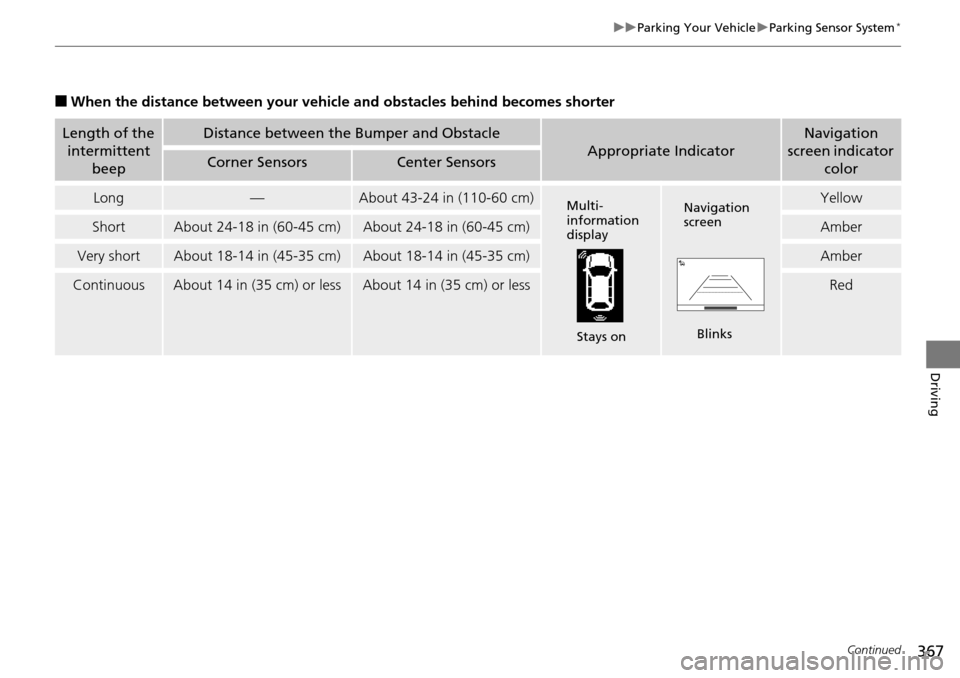
■When the distance between your vehicle and obstacles behind becomes shorter
Length of the
intermittent
beepDistance between the Bumper and Obstacle
Appropriate Indicator
Navigation
screen indicator
color
Corner SensorsCenter Sensors
Long—About 43-24 in (110-60 cm)Yellow
ShortAbout 24-18 in (60-45 cm)About 24-18 in (60-45 cm)Amber
Very shortAbout 18-14 in (45-35 cm)About 18-14 in (45-35 cm)Amber
ContinuousAbout 14 in (35 cm) or lessAbout 14 in (35 cm) or lessRed
Multi-
information
display
Stays onNavigation
screen
Blinks
Page 369 of 488
uuParking Your Vehicle uParking Sensor System*
368
Driving
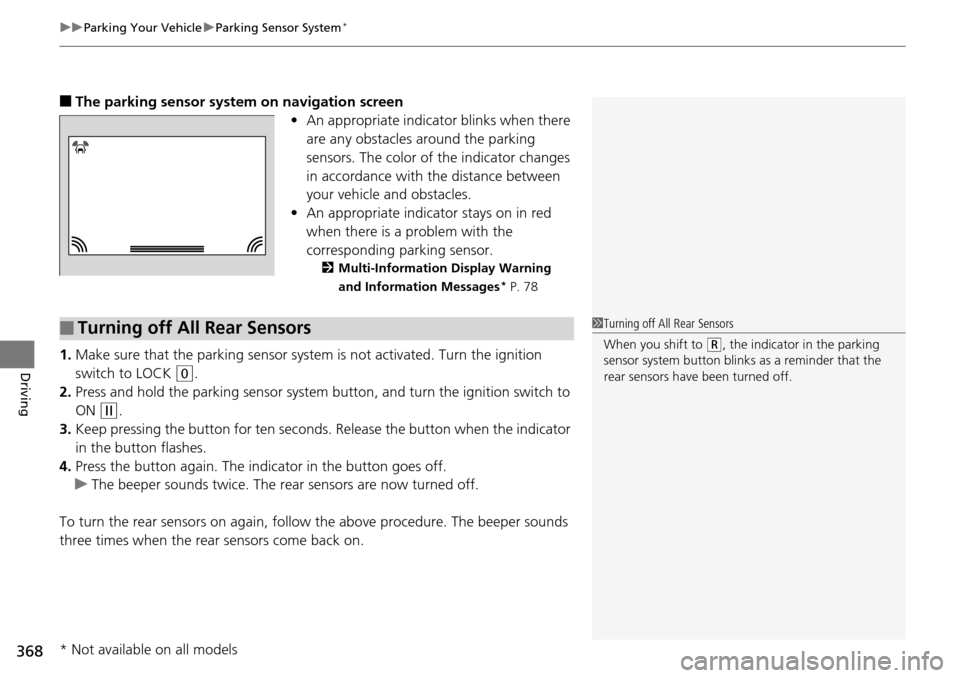
■The parking sensor system on navigation screen
•An appropriate indicato r blinks when there
are any obstacles around the parking
sensors. The color of the indicator changes
in accordance with the distance between
your vehicle and obstacles.
• An appropriate indica tor stays on in red
when there is a problem with the
corresponding parking sensor.
2 Multi-Information Display Warning
and Information Messages* P. 78
1.Make sure that the parking sensor system is not activated. Turn the ignition
switch to LOCK
(0.
2. Press and hold the parking sensor system button, and turn the ignition switch to
ON
(w.
3. Keep pressing the button for ten seconds. Release the button when the indicator
in the button flashes.
4. Press the button again. The indi cator in the button goes off.
u The beeper sounds twice. The re ar sensors are now turned off.
To turn the rear sensors on again, follo w the above procedure. The beeper sounds
three times when the rear sensors come back on.
■Turning off All Rear Sensors1 Turning off All Rear Sensors
When you shift to
(R, the indicator in the parking
sensor system button blinks as a reminder that the
rear sensors have been turned off.
* Not available on all models
Page 402 of 488
401
uuMaintenance Under the Hood uRefilling Window Washer Fluid
Maintenance
Refilling Window Washer Fluid
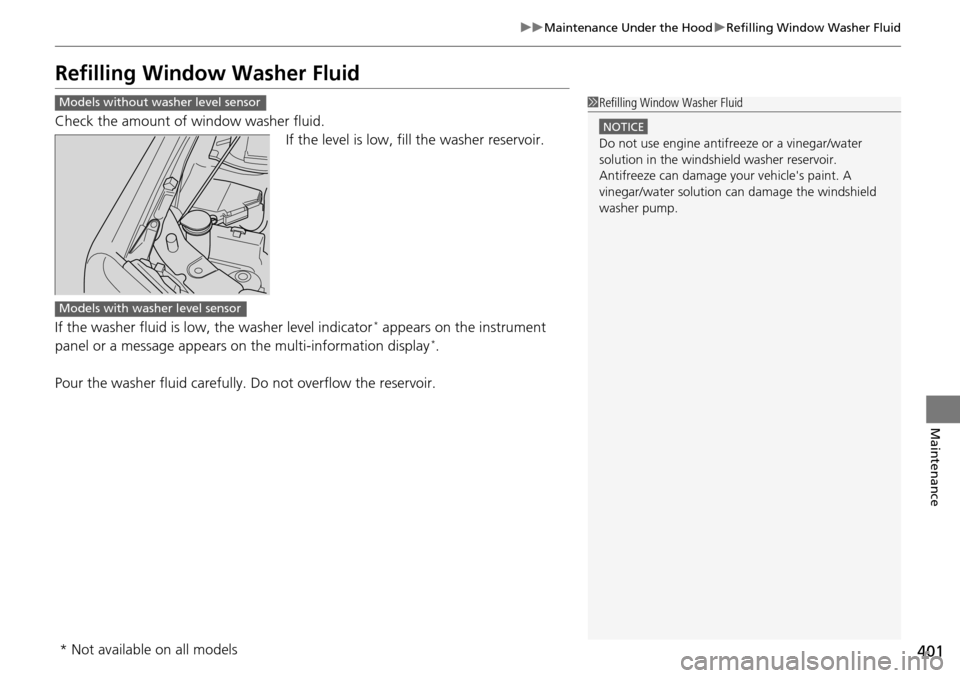
Check the amount of window washer fluid.
If the level is low, fill the washer reservoir.
If the washer fluid is low, the washer level indicator
* appears on the instrument
panel or a message appears on the multi-information display*.
Pour the washer fluid carefully. Do not overflow the reservoir.
Models without washer level sensor1Refilling Window Washer Fluid
NOTICE
Do not use engine antifreeze or a vinegar/water
solution in the windshield washer reservoir.
Antifreeze can damage y our vehicle's paint. A
vinegar/water solution ca n damage the windshield
washer pump.
Models with washer level sensor
* Not available on all models
Page 436 of 488
435Continued
Handling the Unexpected
If a Tire Goes Flat
Changing a Flat Tire
If a tire goes flat while driving, grasp the steering wheel firmly, and brake gradually
to reduce speed. Then, stop in a safe plac e. Replace the flat tire with a compact
spare tire. Go to a dealer as soon as possib le to have the full-size tire repaired or
replaced.
1. Park the vehicle on firm, level, and non-slippery surface and apply the parking
brake.
2. Move the shift lever to
(P.
3. Turn on the hazard warning lights an d turn the ignition switch to LOCK
(0.
1Changing a Flat Tire
Periodically check the tire pressure of the compact
spare. It should be set to the specified pressure.
Specified Pressure: 60 psi (420 kPa, 4.2 kgf/cm
2)
When driving with the compact spare tire, keep the
vehicle speed under 50 mph (80 km/h). Replace with
a full-size tire as soon as possible.
The compact spare tire and wheel in your vehicle are
specifically for this model.
Do not use them with another vehicle.
Do not use another type of compact spare tire or
wheel with your vehicle.
Do not mount tire chains on a compact spare tire.
If a chain-mounted front tire goes flat, remove one of
the full-size rear tires and replace it with the compact
spare tire. Remove the flat front tire and replace it
with the full-size tire that was removed from the rear.
Mount the tire chains on the front tire.
Do not use a puncture-repairi ng agent on a flat tire,
as it can damage the tire pressure sensor.
Page 444 of 488
443
uuIf a Tire Goes Flat uChanging a Flat Tire
Handling the Unexpected
If you replace a flat tire with the spare ti re, the low tire pressure indicator comes on
while you are driving. After driving for a few miles (kilometers), the indicator will go
off and the TPMS indicator comes on, but this is normal.
If you replace the tire with a specified re gular tire, the low tire pressure or TPMS
indicator will go off after a few miles (kilometers).
If you replace a flat tire with the spare tire, the low tire pressure/TPMS indicator
comes on while you are driving. After dr iving for a few miles (kilometers), the
indicator will start blinking for a short time and then stay on. CHECK TPMS
SYSTEM appears on the multi-information display, but this is normal.
If you replace the tire with a specified regular tire, the warning message on the
multi-information display and the low tire pressure/TPMS indicator will go off after
a few miles (kilometers).
■TPMS and the Spare Tire1 TPMS and the Spare Tire
The system cannot monitor th e pressure of the spare
tire. Manually check the spare tire pressure to be sure
that it is correct.
Use TPMS specific wheels. Each is equipped with a
tire pressure sensor mounted inside the tire behind
the valve stem.
Models with info rmation display
Models with multi- information display