belt HONDA PILOT 2015 2.G Service Manual
[x] Cancel search | Manufacturer: HONDA, Model Year: 2015, Model line: PILOT, Model: HONDA PILOT 2015 2.GPages: 488, PDF Size: 11.34 MB
Page 145 of 488
uuAdjusting the Seats uAdjusting the Seat Positions
144
Controls
Head restraints can be removed for cleaning or repair.
To remove a head restraint:
Pull the restraint up as far as it will go. Then push the release button, and pull the
restraint up and out.
To reinstall a head restraint:
Insert the legs back in place, then adjust the head restraint to an appropriate height
while pressing the release butto n. Pull up on the restraint to make sure it is locked
in position.
After all occupants have adjusted their seats and head restraints, and put on their
seat belts, it is very important that they continue to sit upright, well back in their
seats, with their feet on the floor, until the vehicle is safely parked and the engine is
off.
Sitting improperly can increase the chance of injury during a crash. For example, if
an occupant slouches, lies down, turns si deways, sits forward, leans forward or
sideways, or puts one or both feet up, the chance of injury during a crash is greatly
increased.
In addition, an occupant who is out of position in the front seat can be seriously or
fatally injured in a crash by striking interior parts of the vehicle or being struck by an
inflating front airbag.
■Removing and Reinstalling the Head Restraints
■Maintain a Proper Sitting Position
1 Removing and Reinstalling the Head Restraints
3WARNING
Failure to reinstall, or correctly reinstall, the
head restraints can result in severe injury
during a crash.
Always replace the he ad restraints before
driving.
1 Maintain a Proper Sitting Position
3WARNING
Sitting improperly or out of position can
result in serious injury or death in a crash.
Always sit upright, well back in the seat,
with your feet on the floor.
Page 146 of 488
145
uuAdjusting the Seats uAdjusting the Seat Positions
Controls
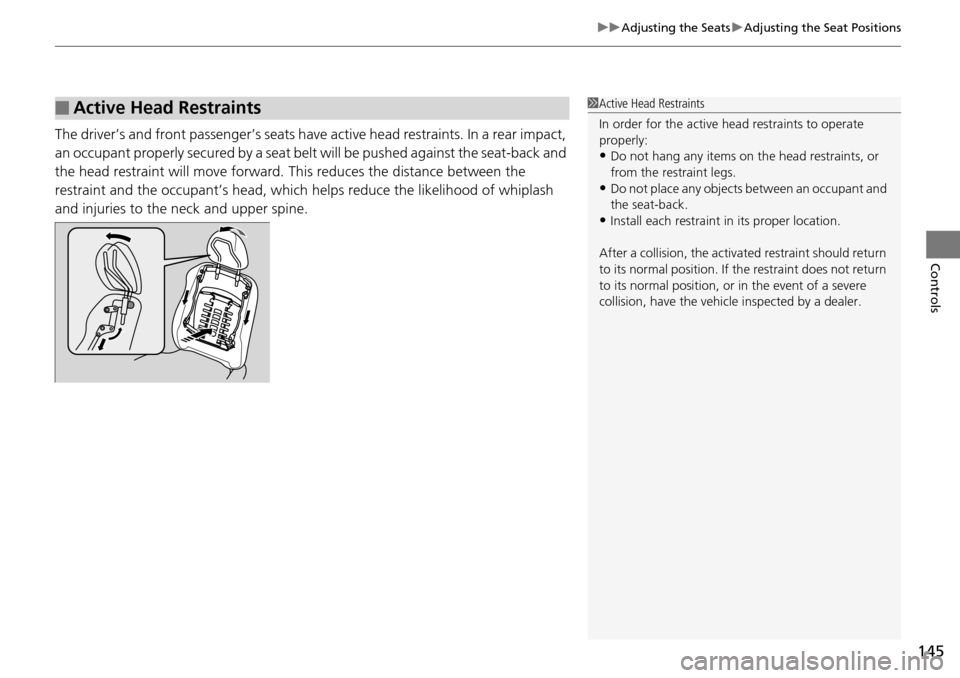
The driver’s and front passenger’s seats have active head restraints. In a rear impact,
an occupant properly secured by a seat belt will be pushed against the seat-back and
the head restraint will move forward. This reduces the distance between the
restraint and the occupant’s head, which helps reduce the likelihood of whiplash
and injuries to the neck and upper spine.
■Active Head Restraints1 Active Head Restraints
In order for the active head restraints to operate
properly:
•Do not hang any items on the head restraints, or
from the restraint legs.
•Do not place any objects between an occupant and
the seat-back.
•Install each restraint in its proper location.
After a collision, th e activated restraint should return
to its normal position. If the restraint does not return
to its normal position, or in the event of a severe
collision, have the vehicl e inspected by a dealer.
Page 147 of 488
146
uuAdjusting the Seats uRear Seats
Controls
Rear Seats
The second row seats can fold down separa tely to allow for additional storage
space.
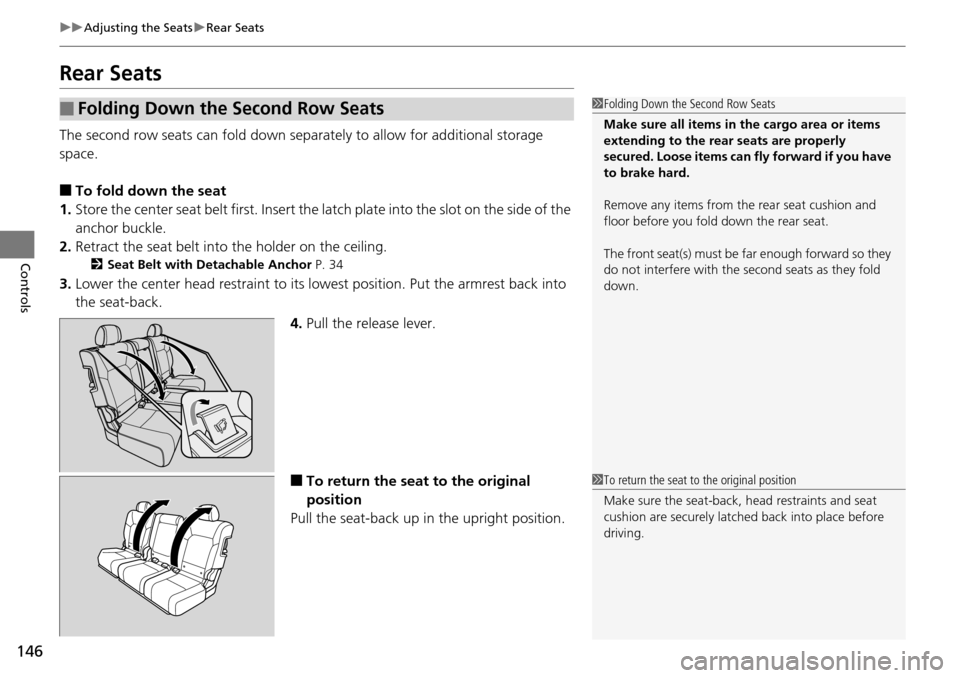
■To fold down the seat
1. Store the center seat belt first. Insert the latch plate into the slot on the side of the
anchor buckle.
2. Retract the seat belt into the holder on the ceiling.
2Seat Belt with Detachable Anchor P. 34
3.Lower the center head restraint to its lo west position. Put the armrest back into
the seat-back.
4.Pull the release lever.
■To return the seat to the original
position
Pull the seat-back up in the upright position.
■Folding Down the Second Row Seats1 Folding Down the Second Row Seats
Make sure all items in the cargo area or items
extending to the rear seats are properly
secured. Loose items can fly forward if you have
to brake hard.
Remove any items from th e rear seat cushion and
floor before you fold down the rear seat.
The front seat(s) must be far enough forward so they
do not interfere with the second seats as they fold
down.
1 To return the seat to the original position
Make sure the seat-back, head restraints and seat
cushion are securely latche d back into place before
driving.
Page 148 of 488
Continued147
uuAdjusting the Seats uRear Seats
Controls
The third row seats can fold down separately to allow for additional storage space.
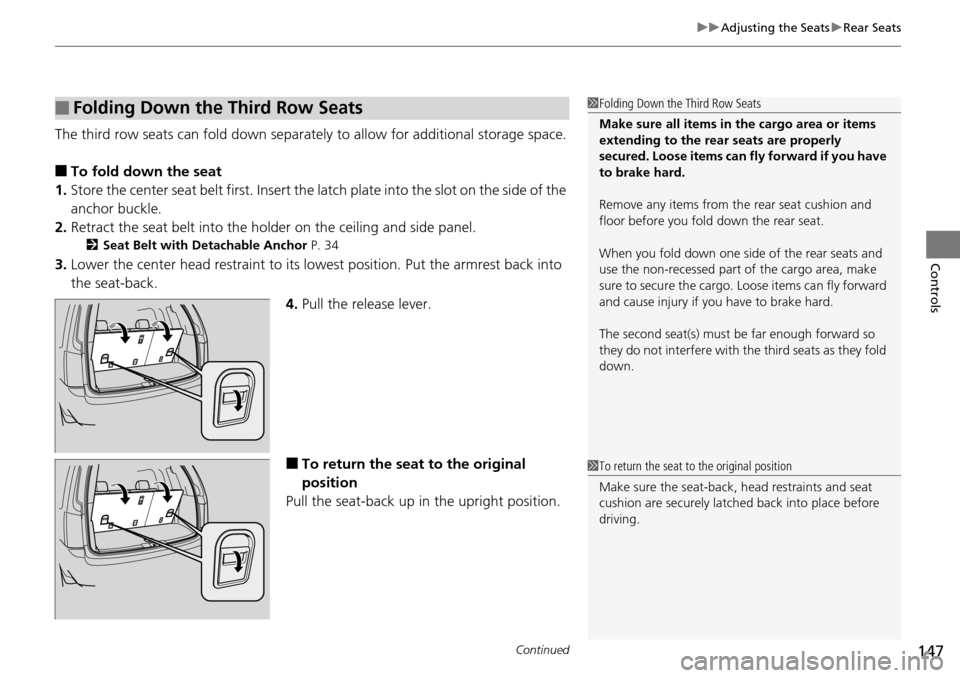
■To fold down the seat
1. Store the center seat belt first. Insert the la tch plate into the slot on the side of the
anchor buckle.
2. Retract the seat belt into the holder on the ceiling and side panel.
2 Seat Belt with Detachable Anchor P. 34
3.Lower the center head restraint to its lo west position. Put the armrest back into
the seat-back.
4.Pull the release lever.
■To return the seat to the original
position
Pull the seat-back up in the upright position.
■Folding Down the Third Row Seats1 Folding Down the Third Row Seats
Make sure all items in the cargo area or items
extending to the rear seats are properly
secured. Loose items can fly forward if you have
to brake hard.
Remove any items from th e rear seat cushion and
floor before you fold down the rear seat.
When you fold down one side of the rear seats and
use the non-recessed part of the cargo area, make
sure to secure the cargo. Loose items can fly forward
and cause injury if you have to brake hard.
The second seat(s) must be far enough forward so
they do not interfere with the third seats as they fold
down.
1 To return the seat to the original position
Make sure the seat-back, head restraints and seat
cushion are securely latche d back into place before
driving.
Page 149 of 488
uuAdjusting the Seats uRear Seats
148
Controls
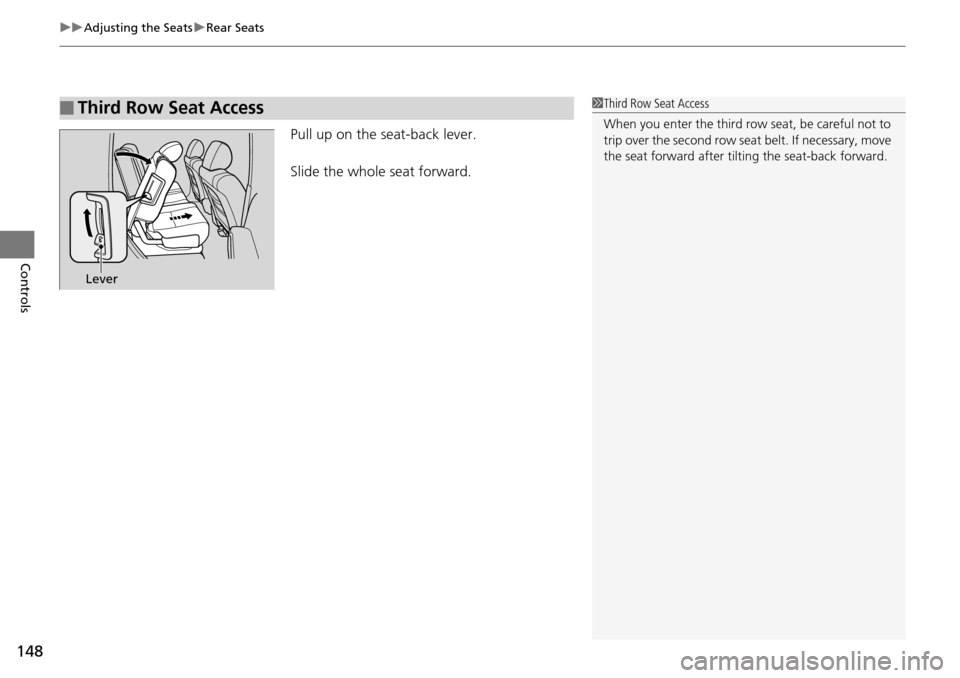
Pull up on the seat-back lever.
Slide the whole seat forward.
■Third Row Seat Access1Third Row Seat Access
When you enter the third row seat, be careful not to
trip over the second row seat belt. If necessary, move
the seat forward after tilting the seat-back forward.
Lever
Page 153 of 488
152
uuInterior Lights/Interior Convenience Items uInterior Convenience Items
Controls
Interior Convenience Items
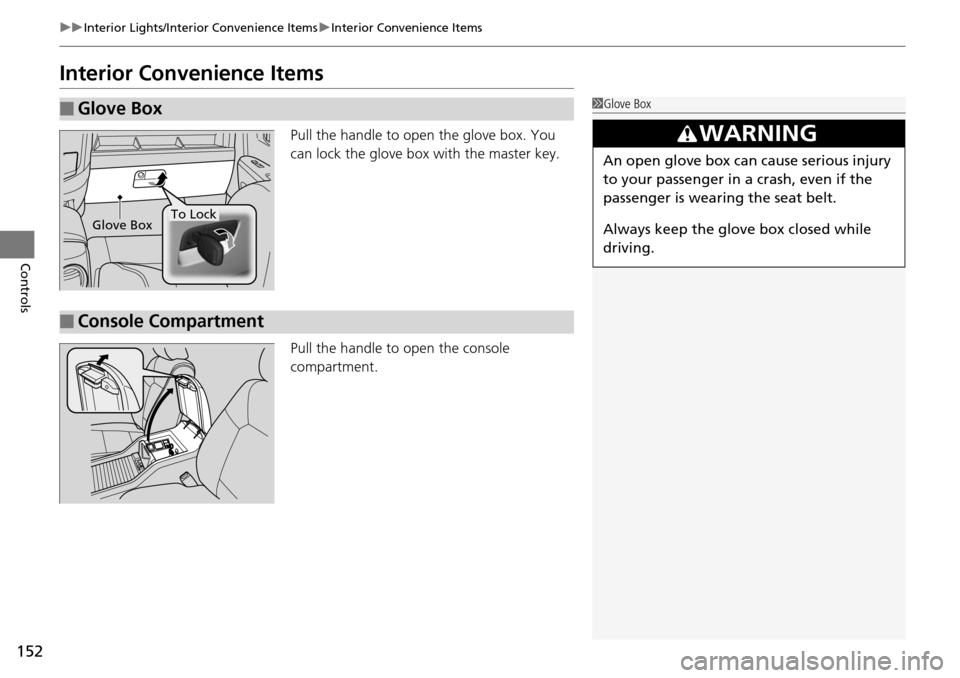
Pull the handle to open the glove box. You
can lock the glove box with the master key.
Pull the handle to open the console
compartment.
■Glove Box1 Glove Box
3WARNING
An open glove box can cause serious injury
to your passenger in a crash, even if the
passenger is wearing the seat belt.
Always keep the glove box closed while
driving.
Glove BoxTo Lock
■Console Compartment
Page 327 of 488
326
uuBefore Driving uDriving Preparation
Driving
• Be sure items placed on the floor behind the front seats cannot roll under the
seats.
u They can interfere with the driver's ability to operate the pedals, the operation
of the seats, or the operation of the sensors under the seats.
• Everyone in the vehicle must fasten their seat belt.
2Fastening a Seat Belt P. 32
•Make sure that the indicators in the ins trument panel come on when you start the
vehicle, and go off soon after.
u Always have a dealer check the vehicle if a problem is indicated.
2 Indicators P. 68
Page 341 of 488
340
Driving
Off-Highway Driving Guidelines
General Information
Your vehicle has been designed primarily for use on pavement, however, its higher
ground clearance allows you to occasionally travel on unpaved roads. It is not
designed for trail-blazing, or othe r challenging off-road activities.
If you decide to drive on unpaved roads, you will find that it requires somewhat
different driving skills and that your vehicle will handle somewhat differently than it
does on pavement. Pay attention to the precautions and tips in this section, and get
acquainted with your vehicle before leaving the pavement.
Important Safety Precautions
To avoid loss of control or rollover, be sure to follow all precautions and
recommendations:
• Be sure to store cargo properly and do not exceed your cargo load limits.
2 Maximum Load Limit P. 327
•Whenever you drive, make sure you and your passengers always wear seat belts.
• Keep your speed low, and never go faster than the conditions allow.
• It’s up to you to continually assess the situation and drive within the limits.
1Off-Highway Driving Guidelines
Failure to operate your vehi cle correctly might result
in a crash or a rollover. 2 Important Handling Information P. 26
2 Precautions While Driving P. 344
3WARNING
Improperly operating this vehicle on or off
pavement can cause a crash or rollover in
which you and your passengers can be
seriously injured or killed.
•Follow all instructions and guidelines in
this owner’s manual.
• Keep your speed low, and don’t drive
faster than conditions permit.
Page 384 of 488
383
uuMaintenance Minder™ uTo Use Maintenance MinderTM
Continued
Maintenance
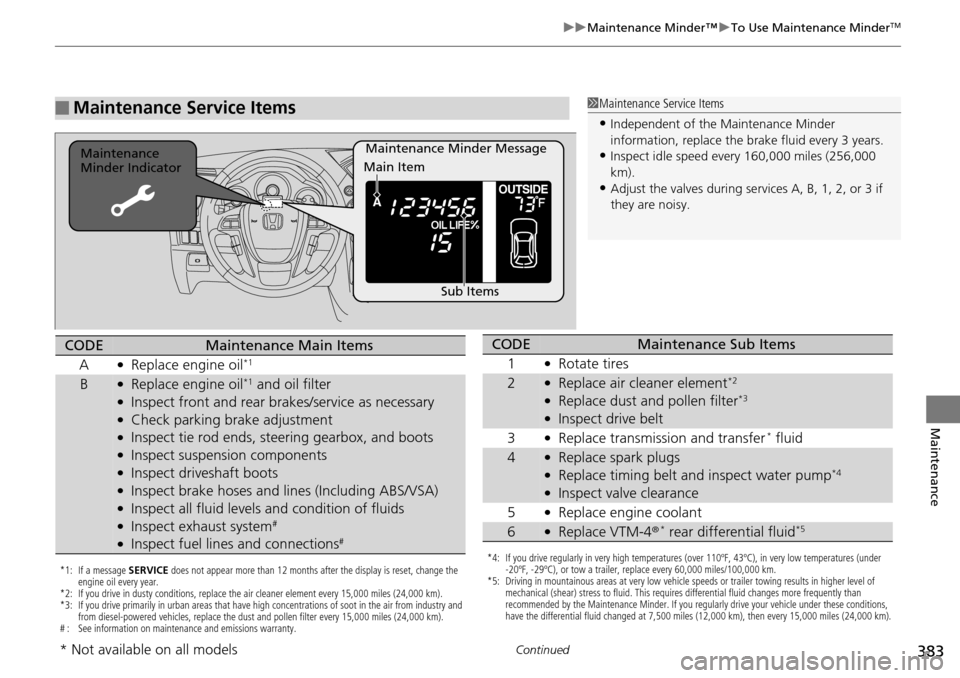
■Maintenance Service Items1Maintenance Service Items
•Independent of the Maintenance Minder
information, replace the brake fluid every 3 years.
•Inspect idle speed every 160,000 miles (256,000
km).
•Adjust the valves during services A, B, 1, 2, or 3 if
they are noisy.
Maintenance Minder Message
Maintenance
Minder Indicator
Sub Items
Main Item
*1: If a message
SERVICE does not appear more than 12 months after the display is reset, change the
engine oil every year.
*2: If you drive in dusty conditions, replace the air cleaner element every 15,000 miles (24,000 km).
*3: If you drive primarily in urban areas that have high concentrations of soot in the air from industry and from diesel-powered vehicles, replace the dust and pollen filter every 15,000 miles (24,000 km).
# : See information on maintenance and emissions warranty.
CODEMaintenance Main Items
A
●Replace engine oil*1
B●Replace engine oil*1 and oil filter●Inspect front and rear bra kes/service as necessary●Check parking brake adjustment●Inspect tie rod ends, steering gearbox, and boots●Inspect suspension components●Inspect driveshaft boots●Inspect brake hoses and li nes (Including ABS/VSA)●Inspect all fluid levels and condition of fluids●Inspect exhaust system#
●Inspect fuel lines and connections#
*4: If you drive regularly in very high temperatures (over 110ºF, 43ºC), in very low temperatures (under
-20ºF, -29ºC), or tow a trailer, replace every 60,000 miles/100,000 km.
*5: Driving in mountainous areas at very low vehicle speeds or trailer towing results in higher level of mechanical (shear) stress to fluid. This requires differential fluid changes more frequently than
recommended by the Maintenance Minder. If you regularly drive your vehicle under these conditions,
have the differential fluid changed at 7,500 miles (12,000 km), then every 15,000 miles (24,000 km).
CODEMaintenance Sub Items
1
●Rotate tires
2●Replace air cleaner element*2
●Replace dust and pollen filter*3
●Inspect drive belt
3
●Replace transmission and transfer* fluid
4●Replace spark plugs●Replace timing belt and inspect water pump*4
●Inspect valve clearance
5
●Replace engine coolant
6●Replace VTM-4 r* rear differential fluid*5
* Not available on all models
Page 388 of 488
387
uuMaintenance Minder™ uTo Use Maintenance MinderTM
Continued
Maintenance
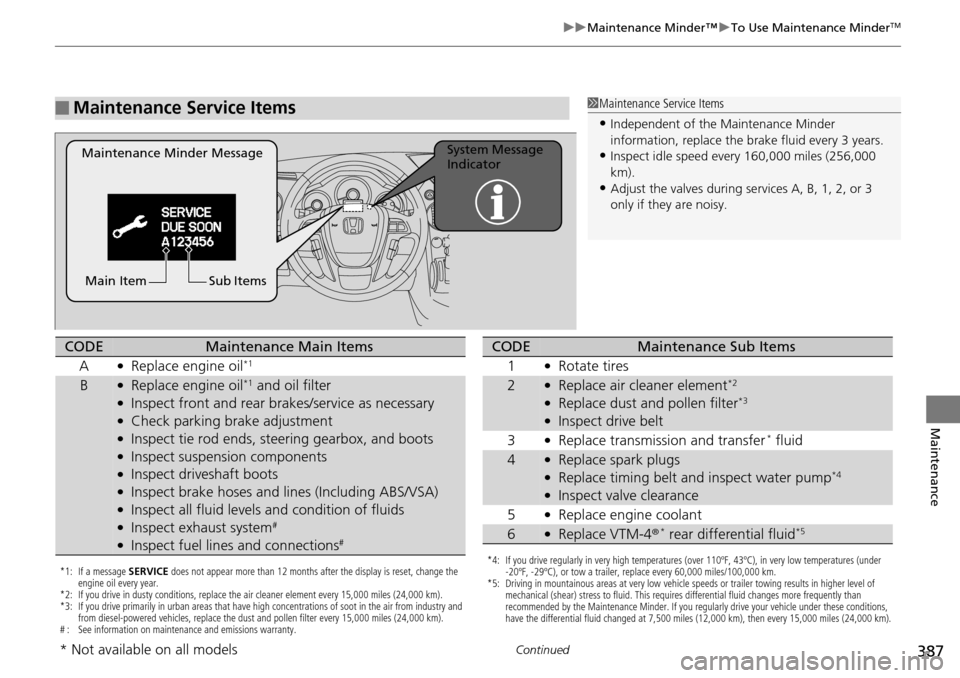
■Maintenance Service Items1Maintenance Service Items
•Independent of the Maintenance Minder
information, replace the brake fluid every 3 years.
•Inspect idle speed every 160,000 miles (256,000
km).
•Adjust the valves during services A, B, 1, 2, or 3
only if they are noisy.
Maintenance Minder Message System Message
Indicator
Sub Items
Main Item
*1: If a message SERVICE does not appear more than 12 months after the display is reset, change the
engine oil every year.
*2: If you drive in dusty conditions, replace the air cleaner element every 15,000 miles (24,000 km).
*3: If you drive primarily in urban areas that have high concentrations of soot in the air from industry and from diesel-powered vehicles, replace the dust and pollen filter every 15,000 miles (24,000 km).
# : See information on maintenance and emissions warranty.
CODEMaintenance Main Items
A
●Replace engine oil*1
B●Replace engine oil*1 and oil filter●Inspect front and rear bra kes/service as necessary●Check parking brake adjustment●Inspect tie rod ends, steering gearbox, and boots●Inspect suspension components●Inspect driveshaft boots●Inspect brake hoses and li nes (Including ABS/VSA)●Inspect all fluid levels and condition of fluids●Inspect exhaust system#
●Inspect fuel lines and connections#
*4: If you drive regularly in very high temperatures (over 110ºF, 43ºC), in very low temperatures (under
-20ºF, -29ºC), or tow a trailer, replace every 60,000 miles/100,000 km.
*5: Driving in mountainous areas at very low vehicle speeds or trailer towing results in higher level of mechanical (shear) stress to fluid. This requires differential fluid changes more frequently than
recommended by the Maintenance Minder. If you regularly drive your vehicle under these conditions,
have the differential fluid changed at 7,500 miles (12,000 km), then every 15,000 miles (24,000 km).
CODEMaintenance Sub Items
1
●Rotate tires
2●Replace air cleaner element*2
●Replace dust and pollen filter*3
●Inspect drive belt
3
●Replace transmission and transfer* fluid
4●Replace spark plugs●Replace timing belt and inspect water pump*4
●Inspect valve clearance
5
●Replace engine coolant
6●Replace VTM-4 r* rear differential fluid*5
* Not available on all models