change time HONDA PILOT 2016 3.G User Guide
[x] Cancel search | Manufacturer: HONDA, Model Year: 2016, Model line: PILOT, Model: HONDA PILOT 2016 3.GPages: 661, PDF Size: 37.79 MB
Page 189 of 661
188
Controls
Interior Lights/Interior Convenience Items
Interior Lights
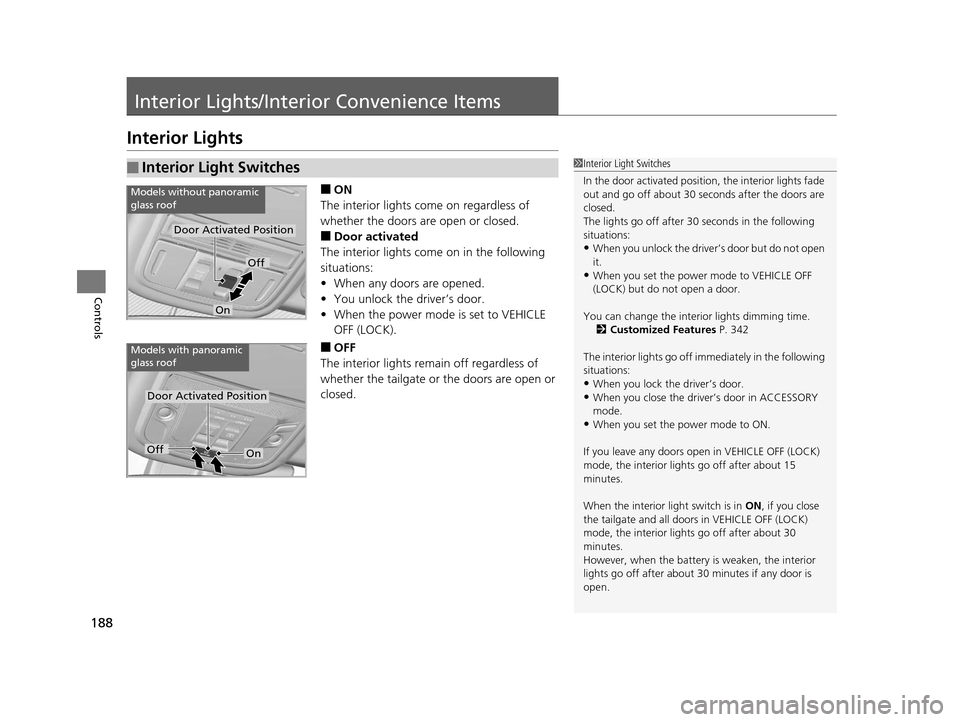
■ON
The interior lights come on regardless of
whether the doors are open or closed.
■Door activated
The interior lights come on in the following
situations:
• When any doors are opened.
• You unlock the driver’s door.
• When the power mode is set to VEHICLE
OFF (LOCK).
■OFF
The interior lights remain off regardless of
whether the tailgate or the doors are open or
closed.
■Interior Light Switches1 Interior Light Switches
In the door activated position, the interior lights fade
out and go off about 30 se conds after the doors are
closed.
The lights go off after 30 seconds in the following
situations:
•When you unlock the driver’s door but do not open
it.
•When you set the power mode to VEHICLE OFF
(LOCK) but do not open a door.
You can change the interi or lights dimming time.
2 Customized Features P. 342
The interior lights go off i mmediately in the following
situations:
•When you lock the driver’s door.
•When you close the driver’s door in ACCESSORY
mode.
•When you set the power mode to ON.
If you leave any doors open in VEHICLE OFF (LOCK)
mode, the interior light s go off after about 15
minutes.
When the interior light switch is in ON, if you close
the tailgate and all doors in VEHICLE OFF (LOCK)
mode, the interior light s go off after about 30
minutes.
However, when the battery is weaken, the interior
lights go off after about 30 minutes if any door is
open.
Door Activated Position
Off
On
Models without panoramic
glass roof
Door Activated Position
Models with panoramic
glass roof
OffOn
16 PILOT-31TG76000.book 188 ページ 2015年6月15日 月曜日 午前11時30分
Page 202 of 661
Continued201
uuInterior Lights/Interior Convenience Items uInterior Convenience Items
Controls
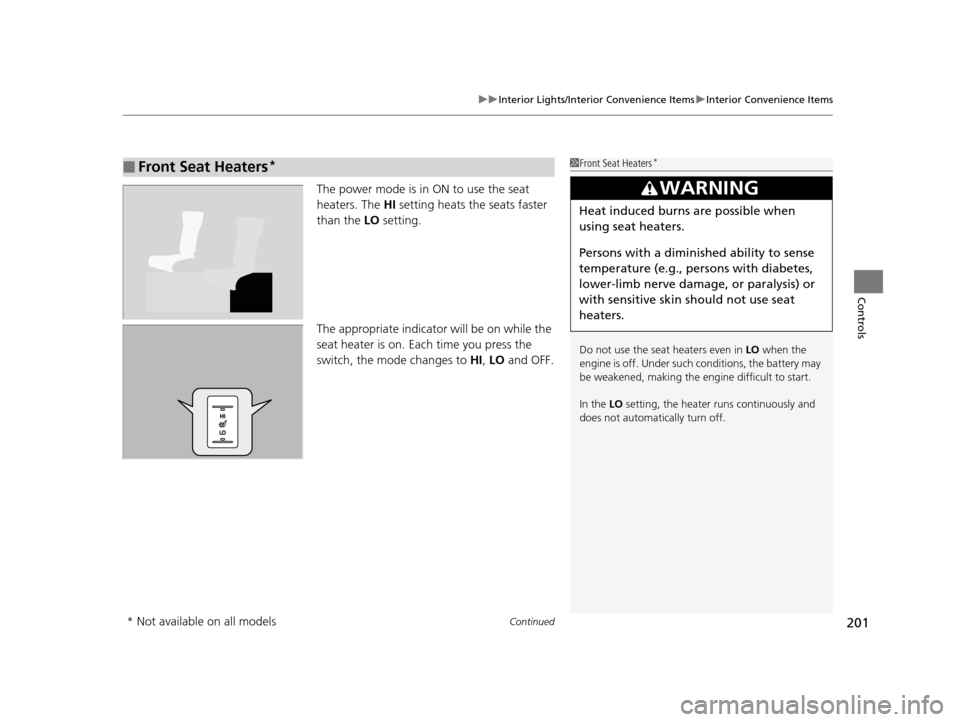
The power mode is in ON to use the seat
heaters. The HI setting heats the seats faster
than the LO setting.
The appropriate indicato r will be on while the
seat heater is on. Each time you press the
switch, the mode changes to HI, LO and OFF.
■Front Seat Heaters*1Front Seat Heaters*
Do not use the seat heaters even in LO when the
engine is off. Under such conditions, the battery may
be weakened, making the engine difficult to start.
In the LO setting, the heater runs continuously and
does not automatically turn off.
3WARNING
Heat induced burns are possible when
using seat heaters.
Persons with a diminished ability to sense
temperature (e.g., persons with diabetes,
lower-limb nerve damage, or paralysis) or
with sensitive skin should not use seat
heaters.
* Not available on all models
16 PILOT-31TG76000.book 201 ページ 2015年6月15日 月曜日 午前11時30分
Page 211 of 661
210
Controls
Climate Control System*
Using Automatic Climate Control
The automatic climate control system maintains the interior temperature you select.
The system also selects the proper mix of heated or cooled air that will as quickly as
possible, raise or lower the interior temperature to your preference.
Use the system when the engine is running.
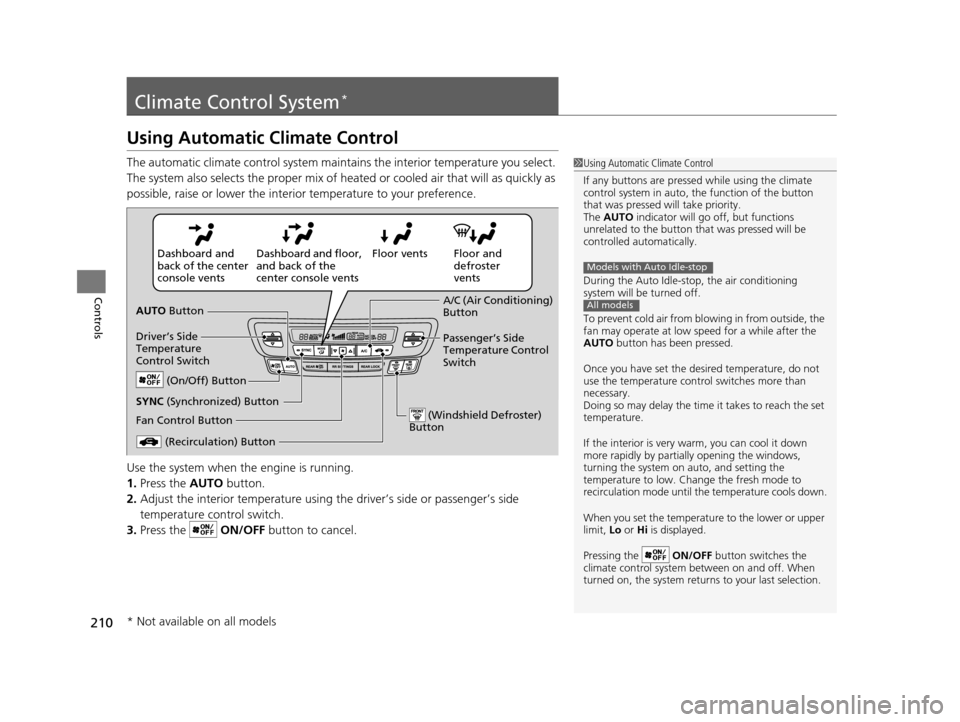
1. Press the AUTO button.
2. Adjust the interior temperature using the driver’s side or passenger’s side
temperature control switch.
3. Press the ON/OFF button to cancel.1Using Automatic Climate Control
If any buttons are presse d while using the climate
control system in auto, the function of the button
that was pressed will take priority.
The AUTO indicator will go off, but functions
unrelated to the button th at was pressed will be
controlled automatically.
During the Auto Idle-stop, the air conditioning
system will be turned off.
To prevent cold air from bl owing in from outside, the
fan may operate at low speed for a while after the
AUTO button has been pressed.
Once you have set the de sired temperature, do not
use the temperature control switches more than
necessary.
Doing so may delay the time it takes to reach the set
temperature.
If the interior is very warm, you can cool it down
more rapidly by partial ly opening the windows,
turning the system on auto, and setting the
temperature to low. Change the fresh mode to
recirculation mode until the temperature cools down.
When you set the temperat ure to the lower or upper
limit, Lo or Hi is displayed.
Pressing the ON/OFF button switches the
climate control system be tween on and off. When
turned on, the system returns to your last selection.
Models with Auto Idle-stop
All models
Floor and
defroster
vents
Floor vents
Dashboard and floor,
and back of the
center console vents
Dashboard and
back of the center
console vents
AUTO Button
Driver’s Side
Temperature
Control Switch
(Recirculation) Button
Fan Control Button A/C (Air Conditioning)
Button
Passenger’s Side
Temperature Control
Switch
(On/Off) Button
(Windshield Defroster)
Button
SYNC (Synchronized) Button
* Not available on all models
16 PILOT-31TG76000.book 210 ページ 2015年6月15日 月曜日 午前11時30分
Page 225 of 661
224
Features
Audio System Basic Operation
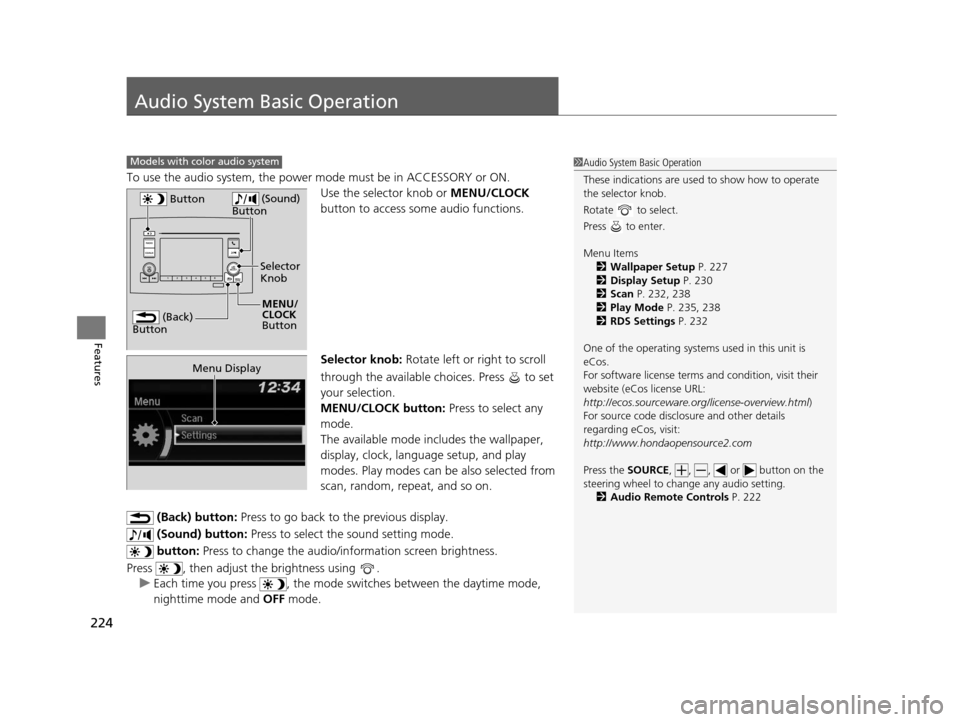
To use the audio system, the power mode must be in ACCESSORY or ON.
Use the selector knob or MENU/CLOCK
button to access some audio functions.
Selector knob: Rotate left or right to scroll
through the available choices. Press to set
your selection.
MENU/CLOCK button: Press to select any
mode.
The available mode includes the wallpaper,
display, clock, langu age setup, and play
modes. Play modes can be also selected from
scan, random, rep eat, and so on.
(Back) button: Press to go back to the previous display.
(Sound) button: Press to select the sound setting mode.
button: Press to change the audio/information screen brightness.
Press , then adjust th e brightness using .
u Each time you press , the mode switches between the daytime mode,
nighttime mode and OFF mode.
Models with color audio system1Audio System Basic Operation
These indications are used to show how to operate
the selector knob.
Rotate to select.
Press to enter.
Menu Items 2 Wallpaper Setup P. 227
2 Display Setup P. 230
2 Scan P. 232, 238
2 Play Mode P. 235, 238
2 RDS Settings P. 232
One of the operating system s used in this unit is
eCos.
For software license terms and condition, visit their
website (eCos license URL:
http://ecos.sourceware.org/license-overview.html )
For source code disclo sure and other details
regarding eCos, visit:
http://www.hondaopensource2.com
Press the SOURCE, , , or button on the
steering wheel to cha nge any audio setting.
2 Audio Remote Controls P. 222
(Back)
Button
Selector
Knob
MENU/
CLOCK
Button
Button
(Sound)
Button
Menu Display
16 PILOT-31TG76000.book 224 ページ 2015年6月15日 月曜日 午前11時30分
Page 228 of 661
Continued227
uuAudio System Basic Operation uAudio/Information Screen
Features
You can change, store, and delete the wa llpaper on the audio/information screen.
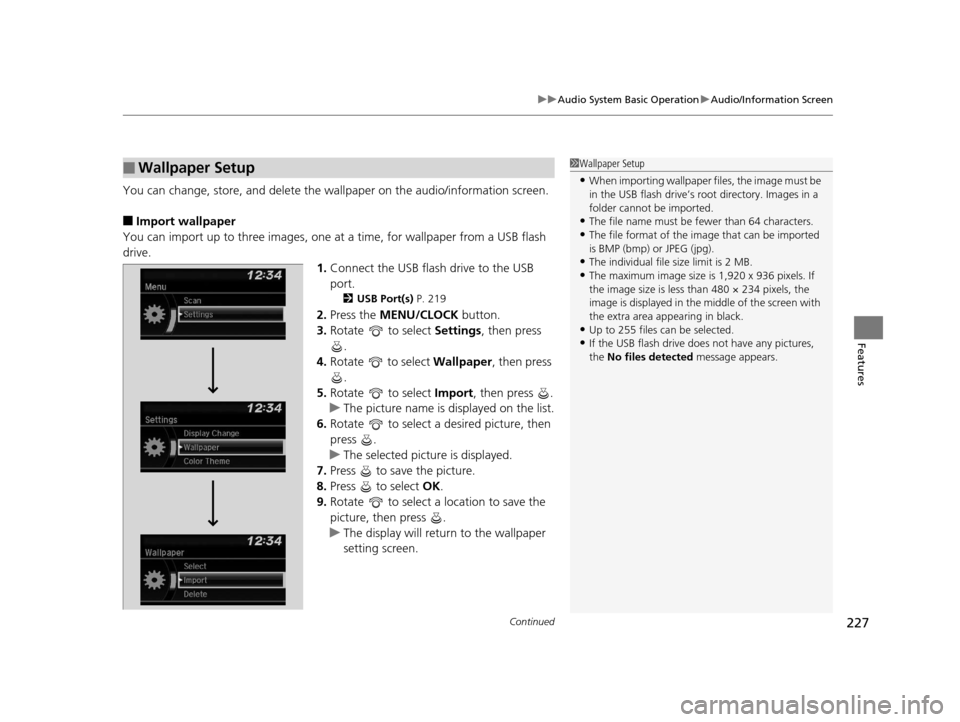
■Import wallpaper
You can import up to three images, one at a time, for wallpaper from a USB flash
drive.
1.Connect the USB flash drive to the USB
port.
2 USB Port(s) P. 219
2.Press the MENU/CLOCK button.
3. Rotate to select Settings, then press
.
4. Rotate to select Wallpaper, then press
.
5. Rotate to select Import, then press .
u The picture name is displayed on the list.
6. Rotate to select a desired picture, then
press .
u The selected picture is displayed.
7. Press to save the picture.
8. Press to select OK.
9. Rotate to select a location to save the
picture, then press .
u The display will return to the wallpaper
setting screen.
■Wallpaper Setup1Wallpaper Setup
•When importing wallpaper files, the image must be
in the USB flash drive’s root directory. Images in a
folder cannot be imported.
•The file name must be fewer than 64 characters.
•The file format of the im age that can be imported
is BMP (bmp) or JPEG (jpg).
•The individual file size limit is 2 MB.
•The maximum image size is 1,920 x 936 pixels. If
the image size is less than 480 × 234 pixels, the
image is displayed in the middle of the screen with
the extra area appearing in black.
•Up to 255 files can be selected.
•If the USB flash drive doe s not have any pictures,
the No files detected message appears.
16 PILOT-31TG76000.book 227 ページ 2015年6月15日 月曜日 午前11時30分
Page 233 of 661
uuAudio System Basic Operation uPlaying AM/FM Radio
232
Features
Provides text data information related to your selected RDS capable FM station.
■To find an RDS station from Station List
1. Press while listening to an FM station.
2. Rotate to select the station, then press .
■Update List
Updates your available station list at any time.
1. Press while listening to an FM station.
2. Rotate to select Update List, then press .
■Radio text
Displays the radio text informat ion of the selected RDS station.
1. Press the MENU/CLOCK button.
2. Rotate to select Settings, then press .
3. Rotate to select RDS Settings, then press .
4. Rotate to select Radio Text, then press .
■Scan
Samples each of the strongest stations on the selected band for 10 seconds.
1. Press the MENU/CLOCK button.
2. Rotate to select Scan, then press .
To turn off scan, press .
■Radio Data System (RDS)1 Playing AM/FM Radio
The ST indicator appears on the display indicating
stereo FM broadcasts.
Stereo reproduction in AM is not available.
You can store 6 AM stations and 12 FM stations into
reset button memory. FM1 and FM2 let you store 6
stations each.
Switching the Audio Mode
Press the SOURCE button on the steering wheel.
2 Audio Remote Controls P. 222
1Radio Data System (RDS)
When you select an RDS-capable FM station, the RDS
automatically turns on, and the frequency display
changes to the station name. However, when the
signals of that station become weak, the display
changes from the statio n name to the frequency.
16 PILOT-31TG76000.book 232 ページ 2015年6月15日 月曜日 午前11時30分
Page 240 of 661
239
uuAudio System Basic Operation uPlaying Bluetooth ® Audio
Continued
Features
Playing Bluetooth ® Audio
Your audio system allows you to listen to music from your Bluetooth-compatible
phone.
This function is available when the phone is paired an d connected to the vehicle’s
Bluetooth ® HandsFreeLink ® (HFL) system.
2Phone Setup P. 387
1Playing Bluetooth ® Audio
Not all Bluetooth -enabled phones with streaming
audio capabilities are compatible with the system.
For a list of compatible phones:
•U.S.: Visit www.handsfreelink.honda.com , or call
1-888-528-7876.
•Canada: Visit www.handsfreelink.ca , or call 1-888-
528-7876.
In some states, it may be il legal to perform some data
device functions while driving.
Only one phone can be used with HFL at a time.
When there are more than two paired phones in the
vehicle, the first paired phone the system finds is
automatically connected.
If more than one phone is paired to the HFL system,
there may be a delay before the system begins to
play.
In some cases, the name of the artist, album, or track
may not appear correctly.
Some functions may not be available on some
devices.
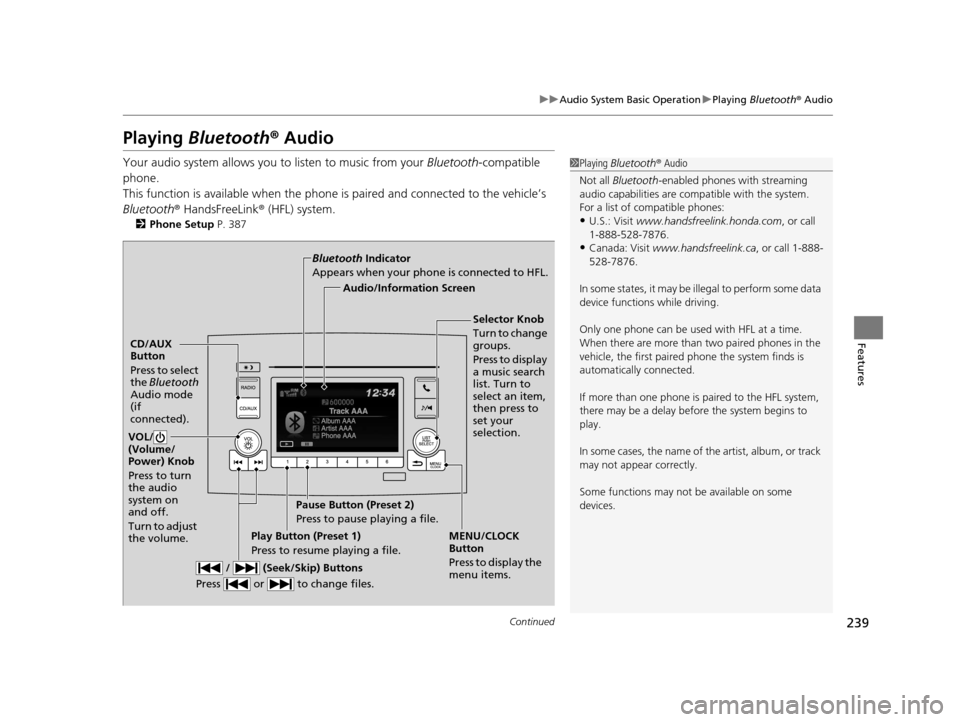
CD/AUX
Button
Press to select
the Bluetooth
Audio mode
(if
connected).
VOL/
(Volume/
Power) Knob
Press to turn
the audio
system on
and off.
Turn to adjust
the volume.
MENU/CLOCK
Button
Press to display the
menu items.
Audio/Information Screen
Bluetooth
Indicator
Appears when your phone is connected to HFL.
/ (Seek/Skip) Buttons
Press or to change files.Play Button (Preset 1)
Press to resume playing a file. Pause Button (Preset 2)
Press to pause playing a file.
Selector Knob
Turn to change
groups.
Press to display
a music search
list. Turn to
select an item,
then press to
set your
selection.
16 PILOT-31TG76000.book 239 ページ 2015年6月15日 月曜日 午前11時30分
Page 243 of 661
242
Features
Audio System Basic Operation
To use the audio system function, the power mode must be in ACCESSORY or ON.
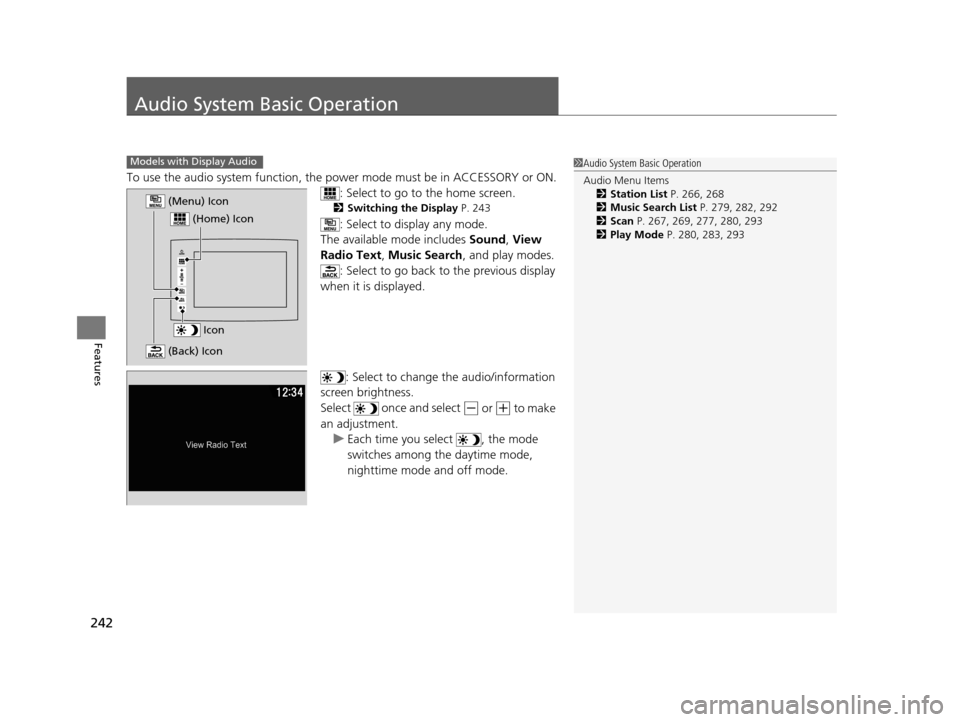
: Select to go to the home screen.
2Switching the Display P. 243
: Select to display any mode.
The available mode includes Sound, View
Radio Text, Music Search , and play modes.
: Select to go back to the previous display
when it is displayed.
: Select to change the audio/information
screen brightness.
Select once and select
(- or (+ to make
an adjustment. u Each time you select , the mode
switches among the daytime mode,
nighttime mode and off mode.
Models with Display Audio1Audio System Basic Operation
Audio Menu Items
2 Station List P. 266, 268
2 Music Search List P. 279, 282, 292
2 Scan P. 267, 269, 277, 280, 293
2 Play Mode P. 280, 283, 293
Icon
(Home) Icon
(Menu) Icon
(Back) Icon
16 PILOT-31TG76000.book 242 ページ 2015年6月15日 月曜日 午前11時30分
Page 249 of 661
uuAudio System Basic Operation uAudio/Information Screen
248
Features
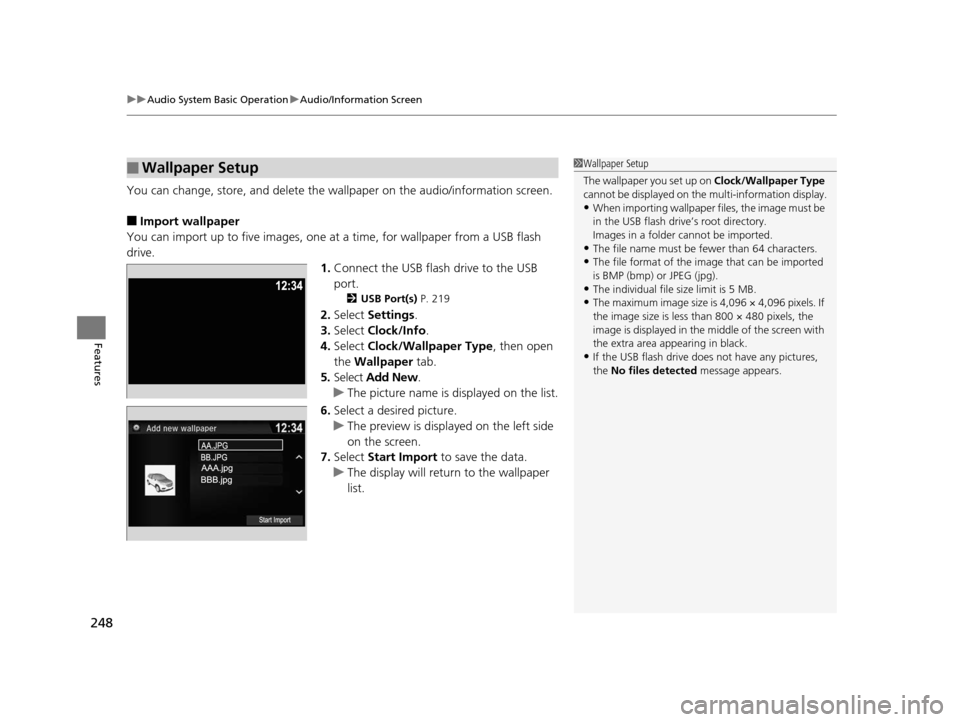
You can change, store, and delete the wa llpaper on the audio/information screen.
■Import wallpaper
You can import up to five images, one at a time, for wallpaper from a USB flash
drive.
1.Connect the USB flash drive to the USB
port.
2 USB Port(s) P. 219
2.Select Settings .
3. Select Clock/Info .
4. Select Clock/Wallpaper Type , then open
the Wallpaper tab.
5. Select Add New .
u The picture name is displayed on the list.
6. Select a desired picture.
u The preview is displayed on the left side
on the screen.
7. Select Start Import to save the data.
u The display will return to the wallpaper
list.
■Wallpaper Setup1Wallpaper Setup
The wallpaper you set up on Clock/Wallpaper Type
cannot be displayed on the multi-information display.
•When importing wallpaper files, the image must be
in the USB flash drive’s root directory.
Images in a folder cannot be imported.
•The file name must be fewer than 64 characters.
•The file format of the image that can be imported
is BMP (bmp) or JPEG (jpg).
•The individual file size limit is 5 MB.
•The maximum image size is 4,096 × 4,096 pixels. If
the image size is less than 800 × 480 pixels, the
image is displayed in the middle of the screen with
the extra area appearing in black.
•If the USB flash drive doe s not have any pictures,
the No files detected message appears.
16 PILOT-31TG76000.book 248 ページ 2015年6月15日 月曜日 午前11時30分
Page 269 of 661
uuAudio System Basic Operation uPlaying AM/FM Radio
268
Features
Displays the subchannel list when an HD RadioTM station is selected while listening to
an FM station.
1. Select .
2. Select HD Subchannel .
3. Select the channel number.
Provides text data information related to your selected RDS-capable FM station.
■To find an RDS station from Station List
1. Select the open/close icon to display a list while listening to an FM station.
2. Select the Station List tab.
3. Select the station.
■Manual update
Updates your available station list at any time.
1. Select the open/close icon to display a list while listening to an FM station.
2. Select the Station List tab.
3. Select Refresh .
■HD Subchannel
■Radio Data System (RDS)
Models with HD RadioTM
1Radio Data System (RDS)
When you select an RDS-capable FM station, the RDS
automatically turns on, and the frequency display
changes to the station name. However, when the
signals of that station become weak, the display
changes from the statio n name to the frequency.
16 PILOT-31TG76000.book 268 ページ 2015年6月15日 月曜日 午前11時30分