lights HONDA PILOT 2016 3.G Manual PDF
[x] Cancel search | Manufacturer: HONDA, Model Year: 2016, Model line: PILOT, Model: HONDA PILOT 2016 3.GPages: 661, PDF Size: 37.79 MB
Page 581 of 661
580
uuReplacing Light Bulbs uBack-Up Light
Maintenance
Back-Up Light
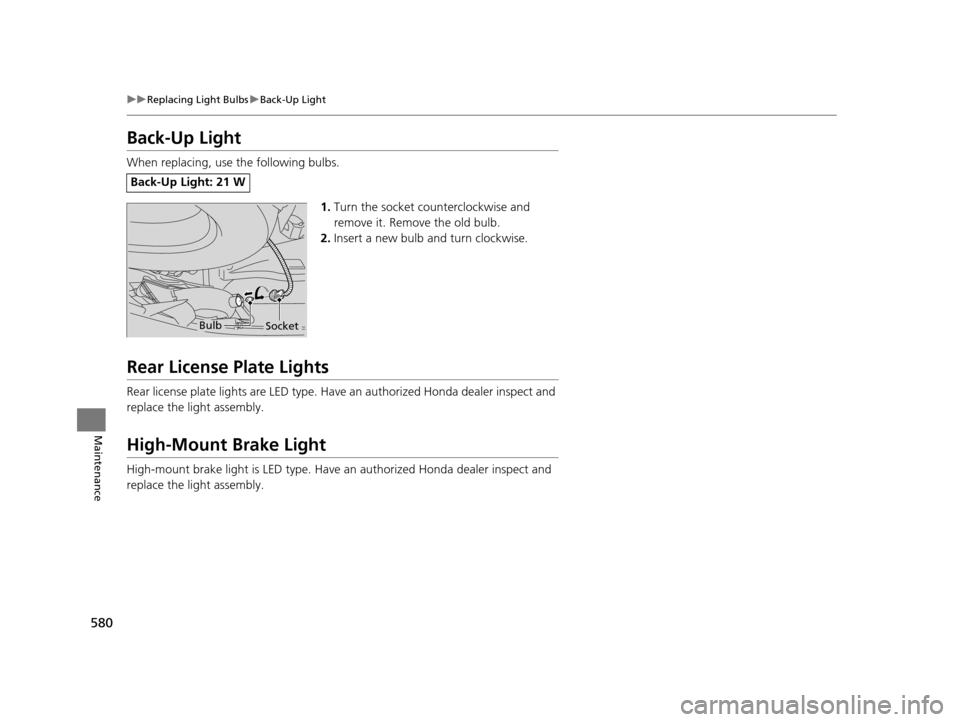
When replacing, use the following bulbs.
1.Turn the socket counterclockwise and
remove it. Remove the old bulb.
2. Insert a new bulb and turn clockwise.
Rear License Plate Lights
Rear license plate lights are LED type. Have an authorized Hond a dealer inspect and
replace the light assembly.
High-Mount Brake Light
High-mount brake light is LED type. Have an authorized Honda dealer inspect and
replace the light assembly.
Back-Up Light: 21 W
BulbSocket
16 PILOT-31TG76000.book 580 ページ 2015年6月15日 月曜日 午前11時30分
Page 605 of 661
604
uuCleaning uExterior Care
Maintenance
The inside lenses of exterior lights (headlig hts, brake lights, etc.) may fog temporarily
if you have driven in the rain, or after the vehicle has been run through a car wash.
Dew condensation also may build up inside the lenses when there is a significant
enough difference between the ambient and inside lens temperatures (similar to
vehicle windows fogging up in rainy conditions). These conditions are natural
processes, not structural design problems in the exterior lights.
Lens design characteristics may result in mo isture developing on the light lens frame
surfaces. This also is not a malfunction.
However, if you see large amounts wate r accumulation, or large water drops
building up inside the lenses, have your vehicle inspected by a dealer.
■Fogged Exterior Light Lenses
16 PILOT-31TG76000.book 604 ページ 2015年6月15日 月曜日 午前11時30分
Page 608 of 661
607Continued
Handling the Unexpected
If a Tire Goes Flat
Changing a Flat Tire
If a tire goes flat while driving, grasp the steering wheel firmly, and brake gradually
to reduce speed. Then, stop in a safe plac e. Replace the flat tire with a compact
spare tire. Go to a dealer as soon as possib le to have the full-size tire repaired or
replaced.
1. Park the vehicle on firm, level, non-slip pery surface and apply the parking brake.
2. Change the gear position to
(P.
3. Turn on the hazard warning lights an d set the power mode to VEHICLE OFF
(LOCK).
1 Changing a Flat Tire
Periodically check the tire pressure of the compact
spare. It should be set to the specified pressure.
Specified Pressure: 60 psi (420 kPa, 4.2 kgf/cm
2)
When driving with the compact spare tire, keep the
vehicle speed under 50 mph (80 km/h). Replace with
a full-size tire as soon as possible.
The compact spare tire and wheel in your vehicle are
specifically for this model. Do not use them with
another vehicle. Do not us e another type of compact
spare tire or wheel with your vehicle.
Do not mount tire chains on a compact spare tire.
If a chain-mounted front tire goes flat, remove one of
the full-size rear tires and replace it with the compact
spare tire. Remove the flat front tire and replace it
with the full-size tire that was removed from the rear.
Mount the tire chains on the front tire.
Do not use a puncture-repairi ng agent on a flat tire,
as it can damage the tire pressure sensor.
16 PILOT-31TG76000.book 607 ページ 2015年6月15日 月曜日 午前11時30分
Page 616 of 661
615
Handling the Unexpected
Engine Does Not Start
Checking the Engine
If the engine does not start, check the starter.
Starter conditionChecklist
Starter doesn’t turn or turns
over slowly.
The battery may be dead. Check
each of the items on the right and
respond accordingly.Check for a message on the MID.
●If the To Start, Hold Remote Near Start Button message appears
2If the Smart Entry Remote Battery is Weak P. 616
uMake sure the smart entry remote is in its operating range.
2 ENGINE START/STOP Button Operating Range P. 151
Check the brightness of the interior lights.
Turn on the interior lights and check the brightness.
●If the interior lights are dim or do not come on at all
2 Battery P. 594●If the interior lights come on normally 2 Fuses P. 628
The starter turns over normally
but the engine doesn’t start.
There may be a problem with the
fuse. Check each of the items on
the right and respond accordingly. Review the engine start procedure.
Follow its instructions, and try
to start the engine again.
2 Starting the Engine P. 461
Check the immobilizer system indicator.
When the immobilizer system indicator is blinking, the engine cannot be started.
2Immobilizer System P. 144
Check the fuel level.
There should be enough fuel in the tank.
2 Fuel Gauge P. 113
Check the fuse.
Check all fuses, or have the vehicle checked by a dealer.
2Inspecting and Changing Fuses P. 632
If the problem continues:
2Emergency Towing P. 633
1Checking the Engine
If you must start the vehi cle immediately, use an
assisting vehicle to jump start it.
2 Jump Starting P. 619
16 PILOT-31TG76000.book 615 ページ 2015年6月15日 月曜日 午前11時30分
Page 620 of 661
619Continued
Handling the Unexpected
Jump Starting
Turn off the power to electric devices, such as audio and lights. Turn off the engine,
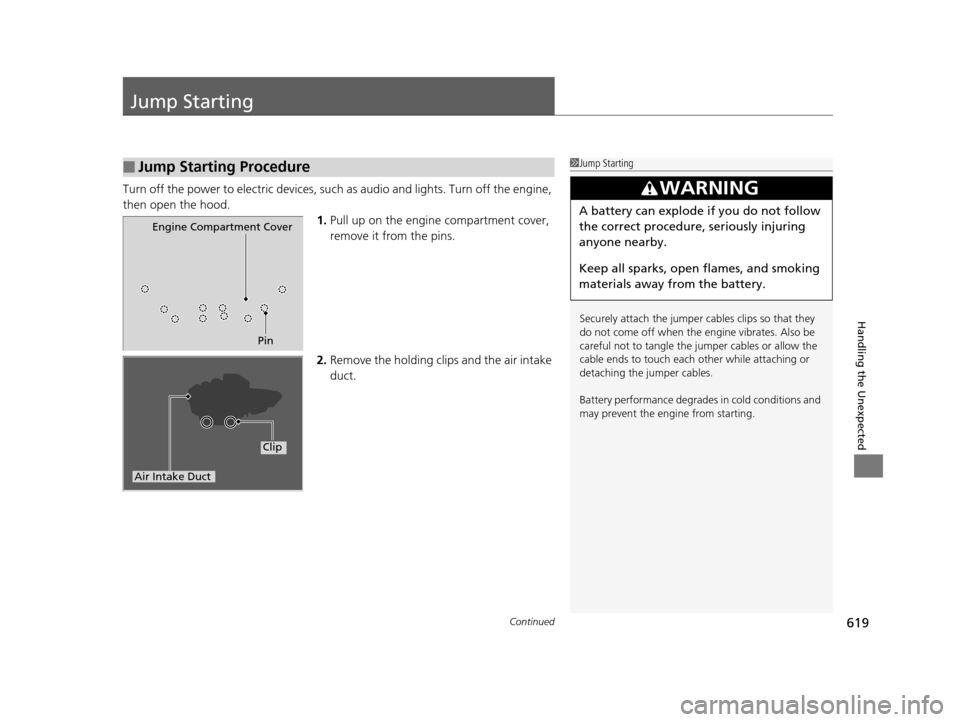
then open the hood. 1.Pull up on the engine compartment cover,
remove it from the pins.
2. Remove the holding clip s and the air intake
duct.
■Jump Starting Procedure1 Jump Starting
Securely attach the jumper cables clips so that they
do not come off when the e ngine vibrates. Also be
careful not to tangle the ju mper cables or allow the
cable ends to touch each other while attaching or
detaching the jumper cables.
Battery performance degrades in cold conditions and
may prevent the engi ne from starting.
3WARNING
A battery can explode if you do not follow
the correct procedure, seriously injuring
anyone nearby.
Keep all sparks, open flames, and smoking
materials away from the battery.
Pin
Engine Compartment Cover
Air Intake Duct
Clip
16 PILOT-31TG76000.book 619 ページ 2015年6月15日 月曜日 午前11時30分
Page 623 of 661
622
Handling the Unexpected
Overheating
How to Handle Overheating
Overheating symptoms are as follows:
•The temperature gauge needle is at the mark or the engine suddenly loses
power.
• Steam or spray comes out of the engine compartment.
■First thing to do
1. Immediately park the vehicle in a safe place.
2. Turn off all accessories and turn on the hazard warning lights.
u No steam or spray present: Keep the engine running and open the hood.
u Steam or spray is present: Turn off the engine and wait until it subsides.
Then, open the hood.
1 How to Handle Overheating
NOTICE
Continuing to drive with the temperature gauge
needle at the mark may damage the engine.
3WARNING
Steam and spray from an overheated
engine can seriously scald you.
Do not open the hood if steam is coming
out.
H
H
16 PILOT-31TG76000.book 622 ページ 2015年6月15日 月曜日 午前11時30分
Page 625 of 661
624
Handling the Unexpected
Indicator, Coming On/Blinking
If the Low Oil Pressure Indicator Comes On
■Reasons for the indicator to come on
Comes on when the engine oil pressure is low.
■What to do as soon as the indicator comes on
1. Immediately park the vehicle on level ground in a safe place.
2. If necessary, turn the ha zard warning lights on.
■What to do after parking the vehicle
1. Stop the engine and let it sit for about three minutes.
2. Open the hood and check the oil level.
2 Oil Check P. 567
3.Start the engine and check the low oil pressure indicator.
u The indicator goes off: Start driving again.
u The indicator does not go off within 10 seconds: Stop the engine
and contact a dealer for repairs immediately.
If the Charging System Indicator Comes On
■Reasons for the indicator to come on
Comes on when the battery is not being charged.
■What to do when the indicator comes on
Turn off the climate con trol system, rear defogger, and other electrical
systems, and immediately contact a dealer for repairs.
1 If the Low Oil Pressure Indicator Comes On
NOTICE
Running the engine with low oil pressure can cause
serious mechanical damage almost immediately.
1If the Charging System Indicator Comes On
If you need to stop temporarily, do not turn off the
engine. Restarting the engi ne may rapidly discharge
the battery.
16 PILOT-31TG76000.book 624 ページ 2015年6月15日 月曜日 午前11時30分
Page 628 of 661
627
uuIndicator, Coming On/Blinking uIf the Low Tire Pressure/Tire Pressure Monitoring System (TPMS) Indicator Comes On or Blinks
Handling the Unexpected
If the Low Tire Pressure/T ire Pressure Monitoring
System (TPMS) Indicator Comes On or Blinks
■Reasons for the indicator to come on or blink
A tire pressure is significantly low. If there is a problem with the TPMS
with Tire Fill Assist or the compact spare tire
* is installed, the indicator
blinks for about one minute, and then stays on.
■What to do when th e indicator comes on
Stop your vehicle in a safe place. Ch eck the tire pressure and adjust the
pressure to the specified level. The spec ified tire pressure is on a label on
the driver side doorjamb.
■What to do when the indicator blinks
Have the tire inspected by a dealer as soon as possible. If the compact
spare tire
* causes the indicator to blink, ch ange the tire to a full-size tire.
The indicator goes off after driving for a few miles (kilometers).
If the Transmission Indicator Blinks along with the
Warning Message*
■Reasons for the indicator to blink
There is a problem with the transmission.
■What to do when the indicator blinks
• Immediately have your vehicle inspected by a dealer.
• Select
(N after starting the engine.
u Check if the
(N position in the instrume nt panel and the indicator
on the
(N button light/blink.
u The engine cannot be turned on unless the parking brake is set.
2 Starting the Engine P. 461
1If the Low Tire Pressure/Tire Pressure Monitoring System (TPMS)
Indicator Comes On or Blinks
NOTICE
Driving on an extremely unde rinflated tire can cause
it to overheat. An overheated tire can fail. Always
inflate your tires to the prescribed level.
TPMS with Tire Fill Assist provides visual and audible
assistance during tire pre ssure adjustment. With the
power mode in ON, while y ou adjust tire pressure up
or down, the system alerts you as follows:
Below recommended pressure: The beeper
sounds and exterior lights flash once every five
seconds.
At recommended pressure: The beeper sounds
and exterior lights flash ra pidly for ~ five seconds.
Above recommended pressure: The beeper
sounds and lights flash twice every three seconds.
1 If the Transmission Indicator Blinks along with the Warning
Message*
You may not be able to start the engine.
Make sure to set the pa rking brake when parking
your vehicle.
Call a professional towing service if you need to tow
your vehicle. 2 Emergency Towing P. 633
* Not available on all models
16 PILOT-31TG76000.book 627 ページ 2015年6月15日 月曜日 午前11時30分
Page 631 of 661
630
uuFuses uFuse Locations
Handling the Unexpected
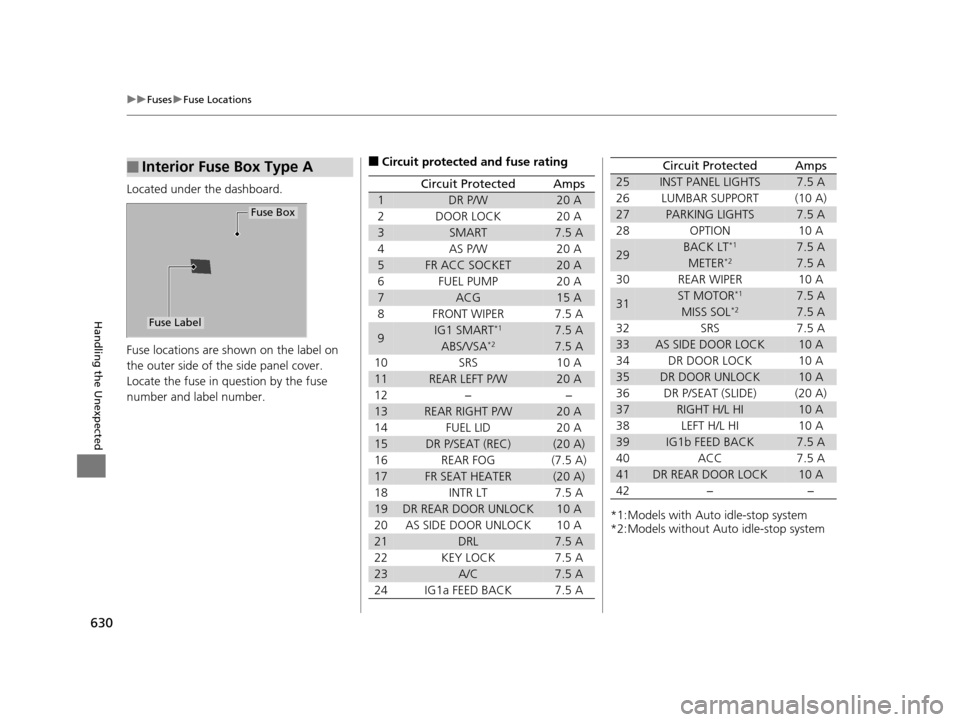
Located under the dashboard.
Fuse locations are shown on the label on
the outer side of the side panel cover.
Locate the fuse in question by the fuse
number and label number.
■Interior Fuse Box Type A
Fuse Box
Fuse Label
■Circuit protected and fuse rating
Circuit ProtectedAmps
1DR P/W20 A
2DOOR LOCK20 A
3SMART7.5 A
4AS P/W20 A
5FR ACC SOCKET20 A
6FUEL PUMP20 A
7ACG15 A
8FRONT WIPER7.5 A
9IG1 SMART*17.5 A
ABS/VSA*27.5 A
10SRS10 A
11REAR LEFT P/W20 A
12−−
13REAR RIGHT P/W20 A
14FUEL LID20 A
15DR P/SEAT (REC)(20 A)
16REAR FOG(7.5 A)
17FR SEAT HEATER(20 A)
18INTR LT7.5 A
19DR REAR DOOR UNLOCK10 A
20AS SIDE DOOR UNLOCK10 A
21DRL7.5 A
22KEY LOCK7.5 A
23A/C7.5 A
24IG1a FEED BACK7.5 A
*1:Models with Auto idle-stop system
*2:Models without Auto idle-stop system
25INST PANEL LIGHTS7.5 A
26LUMBAR SUPPORT(10 A)
27PARKING LIGHTS7.5 A
28OPTION10 A
29BACK LT*17.5 A
METER*27.5 A
30REAR WIPER10 A
31ST MOTOR*17.5 A
MISS SOL*27.5 A
32SRS7.5 A
33AS SIDE DOOR LOCK10 A
34DR DOOR LOCK10 A
35DR DOOR UNLOCK10 A
36DR P/SEAT (SLIDE)(20 A)
37RIGHT H/L HI10 A
38LEFT H/L HI10 A
39IG1b FEED BACK7.5 A
40ACC7.5 A
41DR REAR DOOR LOCK10 A
42−−
Circuit ProtectedAmps
16 PILOT-31TG76000.book 630 ページ 2015年6月15日 月曜日 午前11時30分
Page 639 of 661
638
Information
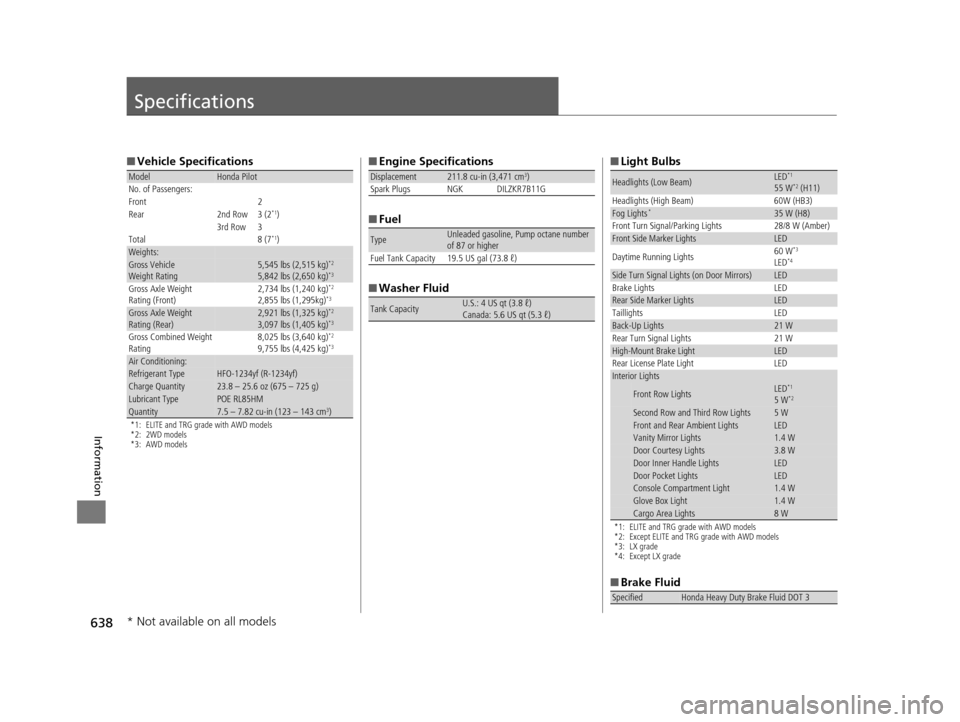
Specifications
■Vehicle Specifications
*1: ELITE and TRG grade with AWD models
*2: 2WD models
*3: AWD models
ModelHonda Pilot
No. of Passengers:
Front 2
Rear 2nd Row 3 (2
*1)
3rd Row 3
Total 8 (7
*1)Weights:Gross Vehicle
Weight Rating5,545 lbs (2,515 kg)*2
5,842 lbs (2,650 kg)*3
Gross Axle Weight
Rating (Front)2,734 lbs (1,240 kg)*2
2,855 lbs (1,295kg)*3
Gross Axle Weight
Rating (Rear)2,921 lbs (1,325 kg)*2
3,097 lbs (1,405 kg)*3
Gross Combined Weight
Rating 8,025 lbs (3,640 kg)*2
9,755 lbs (4,425 kg)*3
Air Conditioning:Refrigerant TypeHFO-1234yf (R-1234yf)Charge Quantity23.8 – 25.6 oz (675 – 725 g)Lubricant TypePOE RL85HMQuantity7.5 – 7.82 cu-in (123 – 143 cm3)
■
Engine Specifications
■ Fuel
■ Washer Fluid
Displacement211.8 cu-in (3,471 cm3)
Spark Plugs NGK DILZKR7B11G
TypeUnleaded gasoline, Pump octane number
of 87 or higher
Fuel Tank Capacity 19.5 US gal (73.8 ℓ)
Tank CapacityU.S.: 4 US qt (3.8 ℓ)
Canada: 5.6 US qt (5.3 ℓ)
■ Light Bulbs
*1: ELITE and TRG grade with AWD models
*2: Except ELITE and TRG grade with AWD models
*3: LX grade
*4: Except LX grade
■Brake Fluid
Headlights (Low Beam)LED*1
55 W*2 (H11)
Headlights (High Beam) 60W (HB3)
Fog Lights*35 W (H8)
Front Turn Signal/Parking Lights 28/8 W (Amber)
Front Side Marker LightsLED
Daytime Running Lights 60 W*3
LED*4
Side Turn Signal Lights (on Door Mirrors)LED
Brake Lights LED
Rear Side Marker LightsLED
Taillights LED
Back-Up Lights21 W
Rear Turn Signal Lights 21 W
High-Mount Brake LightLED
Rear License Plate Light LED
Interior Lights
Front Row LightsLED*1
5 W*2
Second Row and Third Row Lights5 WFront and Rear Ambient LightsLEDVanity Mirror Lights 1.4 WDoor Courtesy Lights3.8 WDoor Inner Handle LightsLEDDoor Pocket LightsLEDConsole Compartment Light1.4 WGlove Box Light1.4 WCargo Area Lights8 W
SpecifiedHonda Heavy Duty Brake Fluid DOT 3
* Not available on all models
16 PILOT-31TG76000.book 638 ページ 2015年6月15日 月曜日 午前11時30分