mirror HONDA PILOT 2016 3.G Quick Guide
[x] Cancel search | Manufacturer: HONDA, Model Year: 2016, Model line: PILOT, Model: HONDA PILOT 2016 3.GPages: 89, PDF Size: 5.82 MB
Page 3 of 89
Honda Automobile Customer Service
Your authorized Honda dealer should be able to answer any questions you h\
ave
about your vehicle. However, if you are dissatisfied with the information you receive,
you can call Honda Automobile Customer Service (see page 163).
Honda Roadside Assistance
24-hour emergency road service is available to you in the United States \
and Canada
throughout your 3-year/36,000-mile warranty term. Services include jump starting,
flat tire and lockout assistance, towing, and more (limitations apply\
). This Owner’s Guide is intended to help you quickly get acquainted with your
2016 Honda Pilot. It provides basic information and instructions on technology and
convenience features, as well as emergency procedures and how to get ass\
istance.
This guide is for vehicles sold in the United States and Canada. It cove\
rs all models,
so you may find descriptions of features and equipment that are not in\
your vehicle.
Images throughout this guide are from U.S. vehicles and represent featur\
es and
equipment that are available on some, but not all, models.
This guide is not intended to be a substitute for the Owner’s Manual. The Owner
Information CD enclosed in your glove box kit includes the Owner’s Manual,
Navigation Manual, and vehicle and tire warranties in electronic format.\
This
information can be viewed on a computer (PC or Mac platform) and saved or printed
for your reference. You can also visit owners.honda.com (U.S.) or myhonda.ca
(Canada) to view the complete and most current information.
If you are the first registered owner of your vehicle, you may request\
a complimentary
printed copy of the Owner’s Manual, Navigation Manual, or Vehicle Warranty within
the first six months of vehicle purchase. To request a copy, visit owners.honda.com
and create or log in to your account. In Canada, please request a copy f\
rom your
Honda dealer.
American Honda Motor Company strives to be proactive in protecting our
environment and natural resources. By using electronic delivery for a co\
nsiderable
portion of the information typically found in a vehicle owner’s manual, we are further
reducing our impact on the environment.
INTRODUCTIONTABLE OF CONTENTS
Call (800) 999-1009 (U.S.) or (888) 946-6329 (Canada)
Call (866) 864-5211 (U.S) or (800) 465-7587 (Canada)
VISUAL INDEX .......................................1
Steering Wheel and Nearby Controls ...1
Dashboard and Ceiling Controls
........2
SAFETY INFORMATION
........................3
Important Safety Information
..............3
Seat Belts
...............................................5
Airbags
....................................................9
Child Safety
..........................................15
Safety Label Locations
.......................23
Reporting Safety Defects
...................23
INSTRUMENT PANEL
.........................24
Malfunction Indicators
......................24
Condition Indicators
...........................26
On/Off Indicators
.................................27
Multi-Information Display (MID)
......28
VEHICLE CONTROLS
...........................29
Using the Remote Transmitter
..........29
Smart Entry System*
...........................30
Tailgate Operation
..............................31
Power Tailgate Operation*
...............32
Door Operation
....................................33
Power Window Operation
................34
Power Moonroof Operation*
...........35
Panoramic Glass Roof*
.....................36
Interior and Exterior Lights
...............37
One-Touch Turn Signal
.......................38
Auto High Beam System*
..................39
Wiper Operation
..................................40
Adjusting the Seats
............................42
Rear Seats
...........................................46
Driving Position Memory System*
...49
Adjusting the Steering Wheel
..........49
Adjusting the Mirrors
.........................50
HomeLink
® Garage Opener* .............51 Air Conditioning System*
.................52
Climate Control System*
..................53
Seat Heaters*
......................................55
Customized Features
..........................56
Setting the Clock
.................................57
AUDIO AND CONNECTIVITY
.............58
Basic Audio Operation
.......................58
Models with color audio system
Color Audio System
............................62
FM/AM Radio
.......................................63
iPod
®...................................................... 64
USB Flash Drive
..................................65
Bluetooth
® Audio ................................66
Models with touchscreen
Touchscreen Operation
.....................67
HondaLink
® ..........................................69
Wi-Fi Connection
................................70
Aha™ Radio
.........................................70
FM/AM Radio
......................................71
SiriusXM
® Radio* ...............................72
Compact Disc (CD)*
...........................73
iPod
®...................................................... 74
USB Flash Drive
..................................75
Bluetooth
® Audio ................................76
Pandora
® ..............................................77
Rear Entertainment System (RES)*
...78
BLUETOOTH
® HANDSFREELINK® ....81
Models with color audio system
Basic HFL Operation
...........................81
Pairing a Phone
...................................82
Making a Call
......................................83
Models with touchscreen
Basic HFL Operation
...........................84
Pairing a Phone
...................................86
*if equipped
Page 4 of 89
| 1
VISUAL INDEX
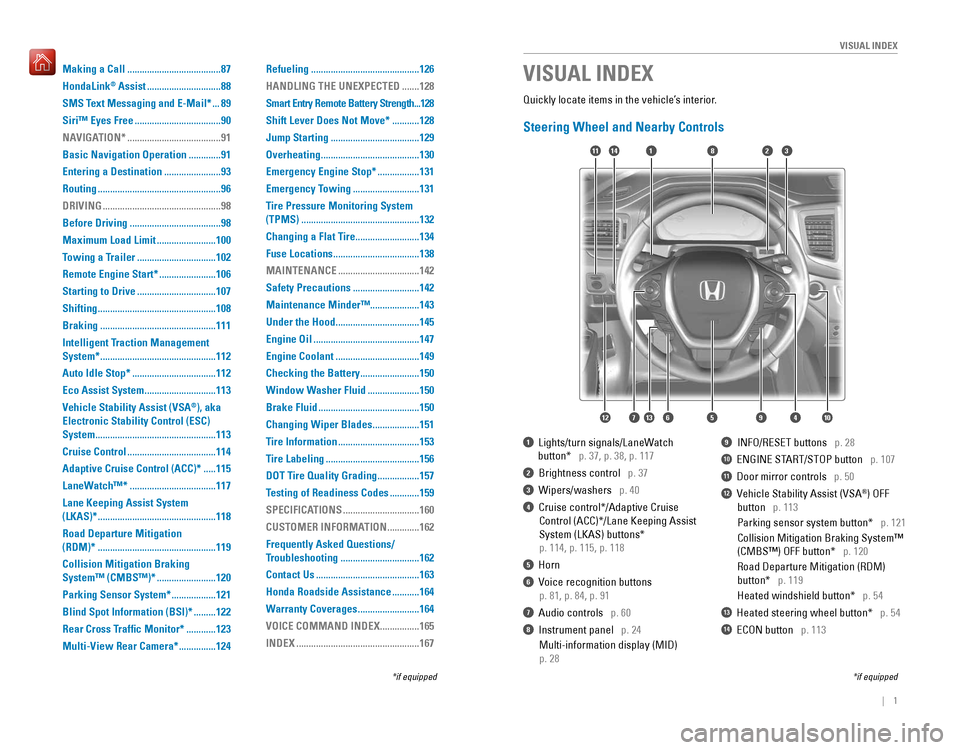
Quickly locate items in the vehicle’s interior.
Steering Wheel and Nearby Controls
1 Lights/turn signals/LaneWatch
button* p. 37, p. 38, p. 117
2 Brightness control p. 37
3 Wipers/washers p. 40
4 Cruise control*/Adaptive Cruise
Control (ACC)*/Lane Keeping Assist
System (LKAS) buttons*
p. 114, p. 115, p. 118
5 Horn
6 Voice recognition buttons
p. 81, p. 84, p. 91
7 Audio controls p. 60
8 Instrument panel p. 24
Multi-information display (MID)
p. 28
9 INFO/RESET buttons p. 28
10 ENGINE START/STOP button p. 107
11 Door mirror controls p. 50
12 Vehicle Stability Assist (VSA®) OFF
button p. 113
Parking sensor system button* p. 121
Collision Mitigation Braking System™
(CMBS™) OFF button* p. 120
Road Departure Mitigation (RDM)
button* p. 119
Heated windshield button* p. 54
13 Heated steering wheel button* p. 54
14 ECON button p. 113
VISUAL INDEX
*if equipped
*if equipped
1
74596131210
1114823
Making a Call ......................................87
HondaLink
® Assist ..............................88
SMS Text Messaging and E-Mail*
...89
Siri™ Eyes Free
...................................90
NAVIGATION*
......................................91
Basic Navigation Operation
.............91
Entering a Destination
.......................93
Routing
..................................................96
DRIVING
................................................98
Before Driving
.....................................98
Maximum Load Limit
........................100
Towing a Trailer
................................102
Remote Engine Start*
.......................106
Starting to Drive
................................107
Shifting
................................................108
Braking
...............................................111
Intelligent Traction Management
System*
...............................................112
Auto Idle Stop*
..................................112
Eco Assist System
.............................113
Vehicle Stability Assist (VSA
®), aka
Electronic Stability Control (ESC)
System
.................................................113
Cruise Control
....................................114
Adaptive Cruise Control (ACC)*
.....115
LaneWatch™*
...................................117
Lane Keeping Assist System
(LKAS)*
................................................118
Road Departure Mitigation
(RDM)*
................................................119
Collision Mitigation Braking
System™ (CMBS™)*
........................120
Parking Sensor System*
..................121
Blind Spot Information (BSI)*
.........122
Rear Cross Traffic Monitor*
............123
Multi-View Rear Camera*
...............124 Refueling
............................................126
HANDLING THE UNEXPECTED
.......128
Smart Entry Remote Battery Strength
...128
Shift Lever Does Not Move*
...........128
Jump Starting
....................................129
Overheating
........................................130
Emergency Engine Stop*
.................131
Emergency Towing
...........................131
Tire Pressure Monitoring System
(TPMS)
................................................132
Changing a Flat Tire
..........................134
Fuse Locations
...................................138
MAINTENANCE
.................................142
Safety Precautions
...........................142
Maintenance Minder™ ....................143
Under the Hood
..................................145
Engine Oil
...........................................147
Engine Coolant
..................................149
Checking the Battery
........................150
Window Washer Fluid
.....................150
Brake Fluid
.........................................150
Changing Wiper Blades
...................151
Tire Information
.................................153
Tire Labeling
......................................156
DOT Tire Quality Grading
.................157
Testing of Readiness Codes
............159
SPECIFICATIONS
...............................160
CUSTOMER INFORMATION
.............162
Frequently Asked Questions/
Troubleshooting
................................162
Contact Us
..........................................163
Honda Roadside Assistance
...........164
Warranty Coverages
.........................164
VOICE COMMAND INDEX
................165
INDEX
..................................................167
Page 5 of 89
2 || 3
SAFETYVISUAL INDEX
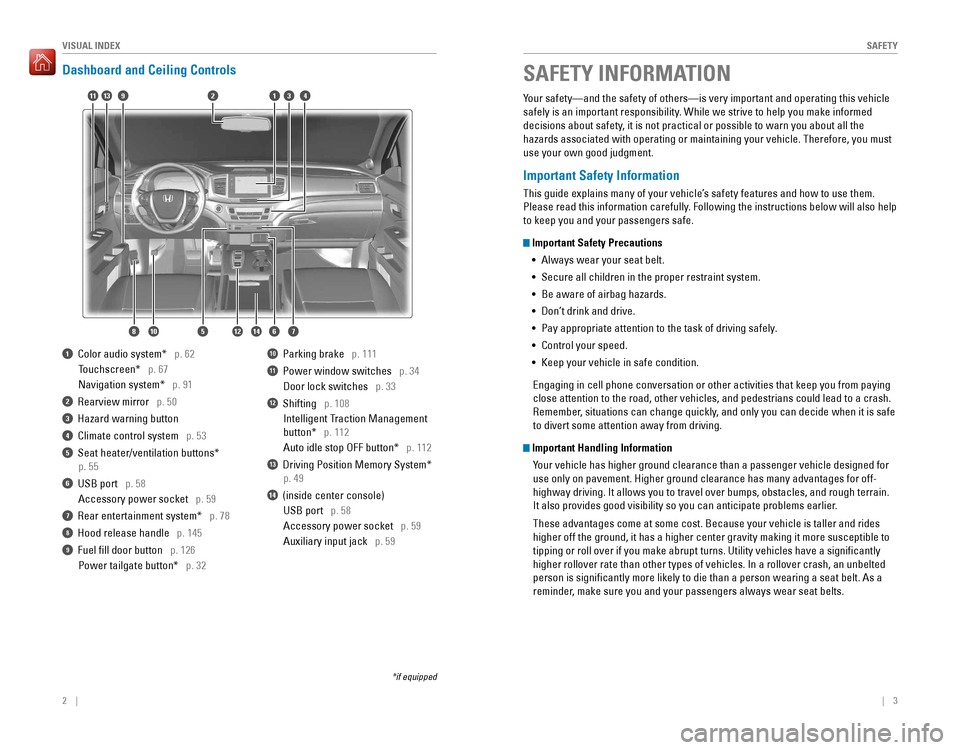
Dashboard and Ceiling Controls
1 Color audio system* p. 62
Touchscreen* p. 67
Navigation system* p. 91
2 Rearview mirror p. 50
3 Hazard warning button
4 Climate control system p. 53
5 Seat heater/ventilation buttons*
p. 55
6 USB port p. 58
Accessory power socket p. 59
7 Rear entertainment system* p. 78
8 Hood release handle p. 145
9 Fuel fill door button p. 126
Power tailgate button* p. 32
10 Parking brake p. 111
11 Power window switches p. 34
Door lock switches p. 33
12 Shifting p. 108
Intelligent Traction Management
button* p. 112
Auto idle stop OFF button* p. 112
13 Driving Position Memory System*
p. 49
14 (inside center console)
USB port p. 58
Accessory power socket p. 59
Auxiliary input jack p. 59
*if equipped
Your safety—and the safety of others—is very important and operatin\
g this vehicle
safely is an important responsibility. While we strive to help you make informed
decisions about safety, it is not practical or possible to warn you about all the
hazards associated with operating or maintaining your vehicle. Therefore\
, you must
use your own good judgment.
Important Safety Information
This guide explains many of your vehicle’s safety features and how to use them.
Please read this information carefully. Following the instructions below will also help
to keep you and your passengers safe.
Important Safety Precautions
• Always wear your seat belt.
• Secure all children in the proper restraint system.
• Be aware of airbag hazards.
• Don’t drink and drive.
• Pay appropriate attention to the task of driving safely.
• Control your speed.
• Keep your vehicle in safe condition.
Engaging in cell phone conversation or other activities that keep you fr\
om paying
close attention to the road, other vehicles, and pedestrians could lead \
to a crash.
Remember, situations can change quickly, and only you can decide when it is safe
to divert some attention away from driving.
Important Handling Information Your vehicle has higher ground clearance than a passenger vehicle designe\
d for
use only on pavement. Higher ground clearance has many advantages for of\
f-
highway driving. It allows you to travel over bumps, obstacles, and roug\
h terrain.
It also provides good visibility so you can anticipate problems earlier.
These advantages come at some cost. Because your vehicle is taller and r\
ides
higher off the ground, it has a higher center gravity making it more sus\
ceptible to
tipping or roll over if you make abrupt turns. Utility vehicles have a s\
ignificantly
higher rollover rate than other types of vehicles. In a rollover crash, \
an unbelted
person is significantly more likely to die than a person wearing a sea\
t belt. As a
reminder, make sure you and your passengers always wear seat belts.
SAFETY INFORMATION
9
1087
341
65
211
12
13
14
Page 28 of 89
48 || 49
VEHICLE CONTROLSVEHICLE CONTROLS
Folding Down the Third-Row Seat
Separately fold down the left and right halves of the third-row seat to \
make room
for cargo.
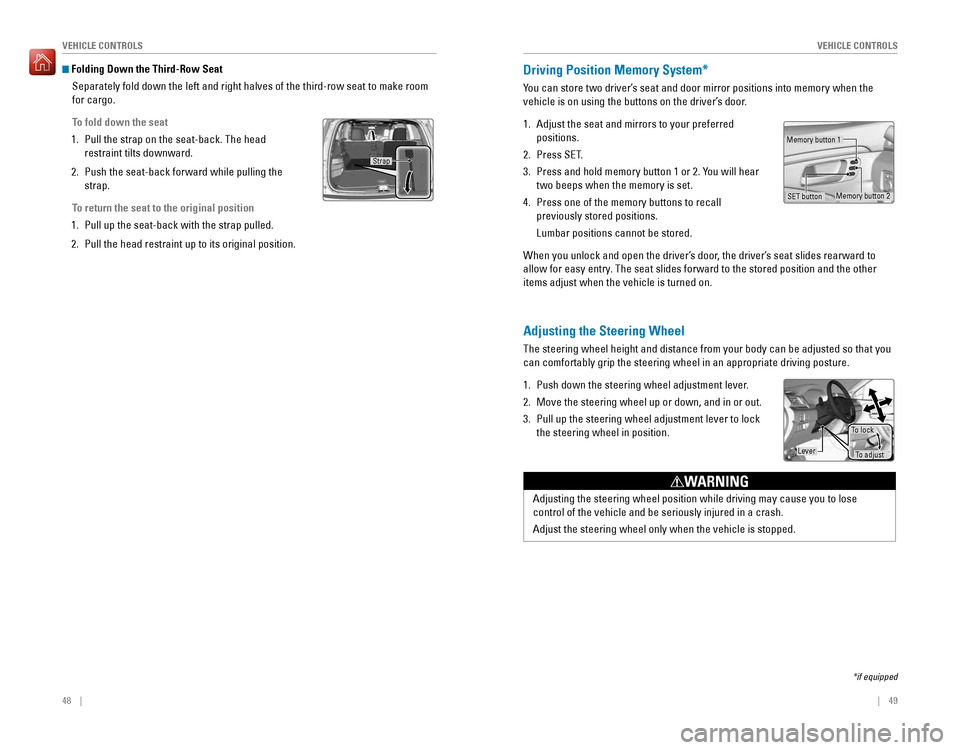
To fold down the seat
1. Pull the strap on the seat-back. The head
restraint tilts downward.
2. Push the seat-back forward while pulling the
strap.
To return the seat to the original position
1. Pull up the seat-back with the strap pulled.
2. Pull the head restraint up to its original position.
Strap
Adjusting the Steering Wheel
The steering wheel height and distance from your body can be adjusted so\
that you
can comfortably grip the steering wheel in an appropriate driving postur\
e.
1. Push down the steering wheel adjustment lever.
2. Move the steering wheel up or down, and in or out.
3. Pull up the steering wheel adjustment lever to lock
the steering wheel in position.
Adjusting the steering wheel position while driving may cause you to los\
e
control of the vehicle and be seriously injured in a crash.
Adjust the steering wheel only when the vehicle is stopped.
WARNING
To adjust
To lock
Lever
Driving Position Memory System*
You can store two driver’s seat and door mirror positions into memory when the
vehicle is on using the buttons on the driver’s door.
1. Adjust the seat and mirrors to your preferred
positions.
2. Press SET.
3. Press and hold memory button 1 or 2. You will hear
two beeps when the memory is set.
4. Press one of the memory buttons to recall
previously stored positions.
Lumbar positions cannot be stored.
When you unlock and open the driver’s door, the driver’s seat slides rearward to
allow for easy entry. The seat slides forward to the stored position and the other
items adjust when the vehicle is turned on.
Memory button 1
SET button
*if equipped
Memory button 2
Page 29 of 89
50 || 51
VEHICLE CONTROLSVEHICLE CONTROLS
*if equipped
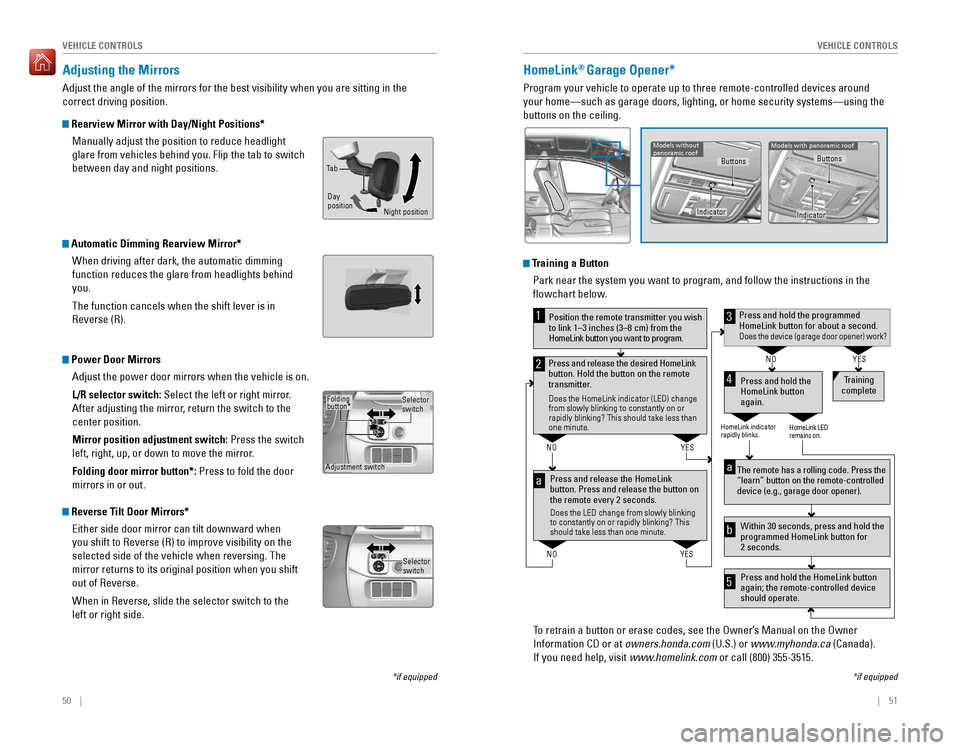
Adjusting the Mirrors
Adjust the angle of the mirrors for the best visibility when you are sit\
ting in the
correct driving position.
Rearview Mirror with Day/Night Positions*
Manually adjust the position to reduce headlight
glare from vehicles behind you. Flip the tab to switch
between day and night positions.
Automatic Dimming Rearview Mirror*When driving after dark, the automatic dimming
function reduces the glare from headlights behind
you.
The function cancels when the shift lever is in
Reverse (R).
Power Door MirrorsAdjust the power door mirrors when the vehicle is on.
L/R selector switch: Select the left or right mirror.
After adjusting the mirror, return the switch to the
center position.
Mirror position adjustment switch: Press the switch
left, right, up, or down to move the mirror.
Folding door mirror button*: Press to fold the door
mirrors in or out.
Reverse Tilt Door Mirrors*Either side door mirror can tilt downward when
you shift to Reverse (R) to improve visibility on the
selected side of the vehicle when reversing. The
mirror returns to its original position when you shift
out of Reverse.
When in Reverse, slide the selector switch to the
left or right side.
Night position
Ta b
Day
position
Folding button*
Adjustment switch Selector
switch
Selectorswitch
Models without
panoramic roof
HomeLink® Garage Opener*
Program your vehicle to operate up to three remote-controlled devices ar\
ound
your home—such as garage doors, lighting, or home security systems—\
using the
buttons on the ceiling.
Training a Button
Park near the system you want to program, and follow the instructions in\
the
flowchart below.
To retrain a button or erase codes, see the Owner’s Manual on the Owner
Information CD or at owners.honda.com (U.S.) or www.myhonda.ca (Canada).
If you need help, visit www.homelink.com or call (800) 355-3515.
Press and release the HomeLink
button. Press and release the button on
the remote every 2 seconds.
Does the LED change from slowly blinking
to constantly on or rapidly blinking? This
should take less than one minute.
Press and hold the
HomeLink button
again. Training
complete
YES
NO
HomeLink indicator
rapidly blinks. HomeLink LED
remains on.
YES
NO
YES
NO
Position the remote transmitter you wish
to link 1–3 inches (3–8 cm) from the
HomeLink button you want to program.1
Press and release the desired HomeLink
button. Hold the button on the remote
transmitter.
Does the HomeLink indicator (LED) change
from slowly blinking to constantly on or
rapidly blinking? This should take less than
one minute.
2
aThe remote has a rolling code. Press the
“learn” button on the remote-controlled
device (e.g., garage door opener) .
Press and hold the HomeLink button
again; the remote-controlled device
should operate. Within 30 seconds, press and hold the
programmed HomeLink button for
2 seconds.a
Press and hold the programmed HomeLink button for about a second.Does the device (garage door opener) work?
3
b
4
5
*if equipped
Indicator
Models with panoramic roof
Buttons
Indicator
Buttons
Page 30 of 89
52 || 53
VEHICLE CONTROLSVEHICLE CONTROLS
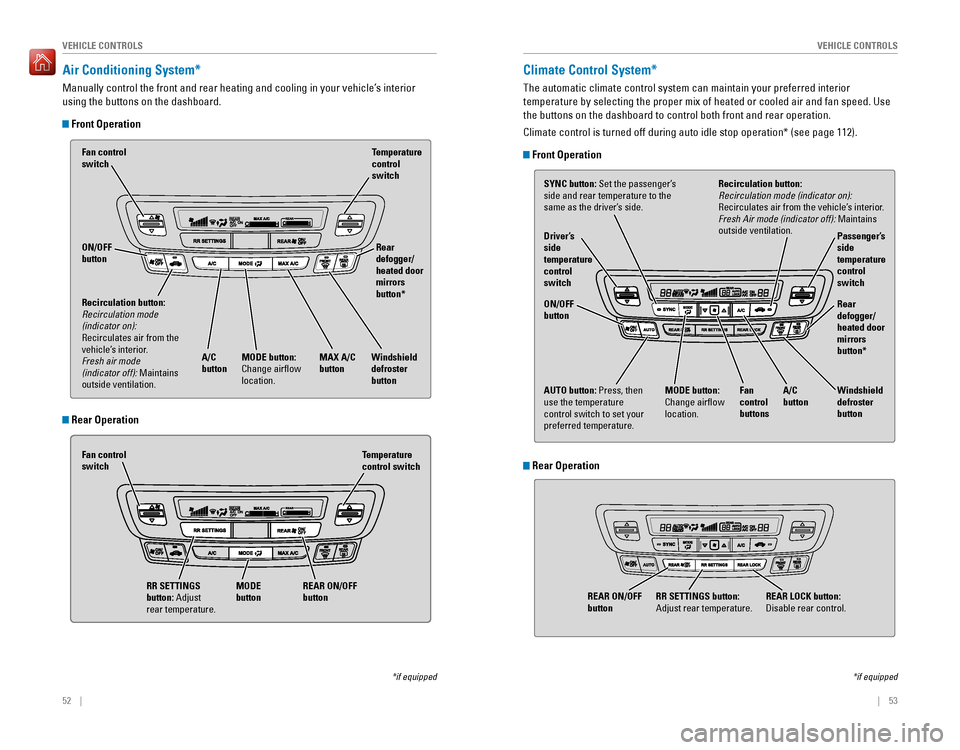
Air Conditioning System*
Manually control the front and rear heating and cooling in your vehicle’\
s interior
using the buttons on the dashboard.
Front Operation
Fan control switch
A/C
buttonMAX A/C
button Windshield
defroster
buttonTemperature
control
switch
RR SETTINGS
button: Adjust
rear temperature. Temperature
control switch
Recirculation button:
Recirculation mode
(indicator on):
Recirculates air from the
vehicle’s interior.
Fresh air mode
(indicator off): Maintains
outside ventilation.
Rear
defogger/
heated door
mirrors
button*
Fan control
switch ON/OFF
button
REAR ON/OFF
button
MODE
button
MODE button:
Change airflow
location.
*if equipped
Rear Operation
Climate Control System*
The automatic climate control system can maintain your preferred interio\
r
temperature by selecting the proper mix of heated or cooled air and fan \
speed. Use
the buttons on the dashboard to control both front and rear operation.
Climate control is turned off during auto idle stop operation* (see pag\
e 112).
Front Operation
AUTO button: Press, then
use the temperature
control switch to set your
preferred temperature. SYNC button: Set the passenger’s
side and rear temperature to the
same as the driver’s side.
Driver’s
side
temperature
control
switch
A/C
buttonPassenger’s
side
temperature
control
switch
Recirculation button:
Recirculation mode (indicator on):
Recirculates air from the vehicle’s interior.
Fresh Air mode (indicator off): Maintains
outside ventilation.
Rear
defogger/
heated door
mirrors
button*
Windshield
defroster
button
Fan
control
buttons
ON/OFF
buttonMODE button:
Change airflow
location.
*if equipped
Rear Operation
REAR LOCK button:
Disable rear control.
RR SETTINGS button:
Adjust rear temperature.
REAR ON/OFF
button
Page 53 of 89
98 || 99
DRIVING
DRIVING
DRIVING
Learn about preparation for driving, as well as other features.
Before Driving
Check the following items before you begin driving.
Exterior Checks
• Make sure there are no obstructions on the windows, door mirrors, exterior
lights, or other parts of the vehicle.
• Remove any frost, snow, or ice.
• Make sure the hood is securely closed.
• Heat from the engine and exhaust can ignite flammable materials left u\
nder
the hood, causing a fire. If you’ve parked your vehicle for an exte\
nded period,
inspect and remove any debris that may have collected, such as dried grass
and leaves that have fallen or have been carried in for use as a nest by\
a small
animal. Also check under the hood for leftover flammable materials aft\
er you or
someone else has performed maintenance on your vehicle.
• Make sure the tires are in good condition.
• Make sure there are no people or objects behind or around the vehicle.
Interior Checks
• Store or secure all items on board properly.
• Do not pile items higher than the seat height.
• Do not place anything in the front seat footwells. Make sure to secure t\
he floor
mats.
• If you have any animals on board, do not let them move freely around in \
the
vehicle.
• Securely close and lock all doors and the tailgate.
• Adjust your seating position, mirrors, and steering wheel properly.
• Make sure items placed on the floor behind the front seats cannot roll\
under the
seats.
• Everyone in the vehicle must fasten their seat belt.
• Make sure that the indicators in the instrument panel come on when you s\
tart
the vehicle, and go off soon after.
If the doors are frozen shut, use warm water around the door edges to me\
lt any
ice. Do not try to force them open, as this can damage the rubber trim a\
round the
doors. When done, wipe dry to avoid further freezing.
NOTICE
Improper accessories or modifications can affect your vehicle’s handling, and
stability, and performance, and cause a crash in which you can be seriously
hurt or killed.
Follow all instructions in the vehicle owner’s manual regarding accessories
and modifications.
WARNING
In addition:
• During the first 600 miles (1,000 km) of operation, avoid sudden acc\
eleration or
full throttle operation so as to not damage the engine or powertrain.
• Avoid hard braking for the first 200 miles (300 km). You should also follow this
when the brake pads are replaced.
Driving Guidelines for Your Utility Vehicle
Utility vehicles have a significantly higher rollover rate than other \
types of
vehicles.
To prevent rollovers or loss of control:
• Take corners at slower speeds than you would with a passenger vehicle.
• Avoid sharp turns and abrupt maneuvers whenever possible.
• Do not modify your vehicle in any way that you would raise the center of\
gravity.
• Do not carry heavy cargo on the roof.
• Never carry more than 165 lbs (75 kg) of cargo on the roof rack (Hond\
a
accessory).
Your vehicle has been designed primarily for use on pavement, however, its higher
ground clearance allows you to occasionally travel on unpaved roads. It \
is not
designed for trail-blazing, or other challenging off-road activities.
If you decide to drive on unpaved roads, you will find that it require\
s somewhat
different driving skills and that your vehicle will handle somewhat diff\
erently than
it does on pavement. Pay attention to the precautions and tips in this s\
ection, and
get acquainted with your vehicle before leaving the pavement.
Improperly operating this vehicle on or off pavement can cause a crash o\
r
rollover in which you and your passengers can be seriously injured or ki\
lled.
• Follow all instructions and guidelines in this owner’s guide.
• Keep your speed low, and don’t drive faster than conditions permit.
WARNING
Page 62 of 89
116 || 117
DRIVING
DRIVING
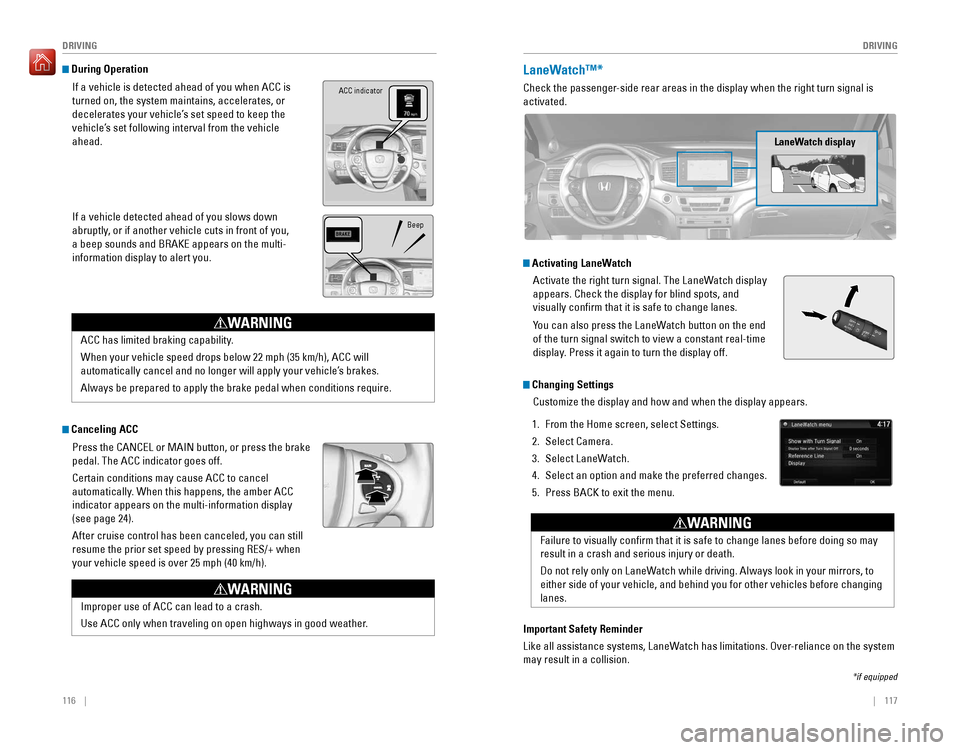
During Operation
If a vehicle is detected ahead of you when ACC is
turned on, the system maintains, accelerates, or
decelerates your vehicle’s set speed to keep the
vehicle’s set following interval from the vehicle
ahead.
If a vehicle detected ahead of you slows down
abruptly, or if another vehicle cuts in front of you,
a beep sounds and BRAKE appears on the multi-
information display to alert you.
ACC has limited braking capability.
When your vehicle speed drops below 22 mph (35 km/h), ACC will
automatically cancel and no longer will apply your vehicle’s brakes.
Always be prepared to apply the brake pedal when conditions require.
WARNING
Canceling ACCPress the CANCEL or MAIN button, or press the brake
pedal. The ACC indicator goes off.
Certain conditions may cause ACC to cancel
automatically. When this happens, the amber ACC
indicator appears on the multi-information display
(see page 24).
After cruise control has been canceled, you can still
resume the prior set speed by pressing RES/+ when
your vehicle speed is over 25 mph (40 km/h).
Improper use of ACC can lead to a crash.
Use ACC only when traveling on open highways in good weather.
WARNING
Beep
ACC indicator
LaneWatch™*
Check the passenger-side rear areas in the display when the right turn signal is
activated.
LaneWatch display
Activating LaneWatchActivate the right turn signal. The LaneWatch display
appears. Check the display for blind spots, and
visually confirm that it is safe to change lanes.
You can also press the LaneWatch button on the end
of the turn signal switch to view a constant real-time
display. Press it again to turn the display off.
*if equipped
Failure to visually confirm that it is safe to change lanes before doi\
ng so may
result in a crash and serious injury or death.
Do not rely only on LaneWatch while driving. Always look in your mirrors, to
either side of your vehicle, and behind you for other vehicles before ch\
anging
lanes.
WARNING
Important Safety Reminder
Like all assistance systems, LaneWatch has limitations. Over-reliance on the system
may result in a collision.
Changing SettingsCustomize the display and how and when the display appears.
1. From the Home screen, select Settings.
2. Select Camera.
3. Select LaneWatch.
4. Select an option and make the preferred changes.
5. Press BACK to exit the menu.
Page 65 of 89
122 || 123
DRIVING
DRIVING
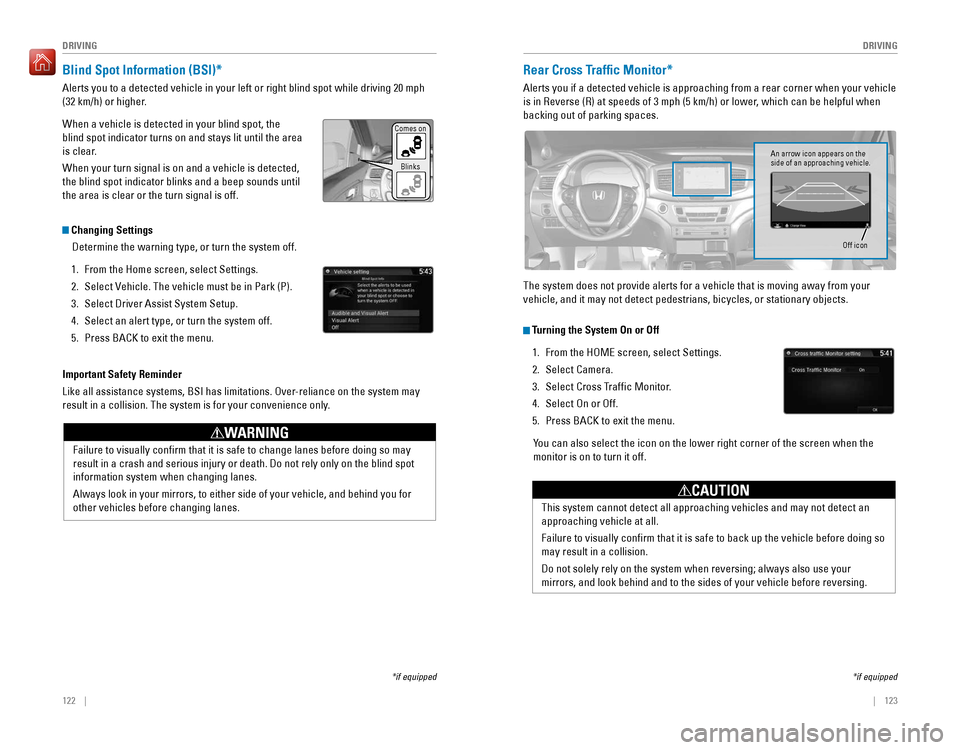
Blind Spot Information (BSI)*
Alerts you to a detected vehicle in your left or right blind spot while \
driving 20 mph
(32 km/h) or higher.
When a vehicle is detected in your blind spot, the
blind spot indicator turns on and stays lit until the area
is clear.
When your turn signal is on and a vehicle is detected,
the blind spot indicator blinks and a beep sounds until
the area is clear or the turn signal is off.
Important Safety Reminder
Like all assistance systems, BSI has limitations. Over-reliance on the system may
result in a collision. The system is for your convenience only.
Failure to visually confirm that it is safe to change lanes before doi\
ng so may
result in a crash and serious injury or death. Do not rely only on the b\
lind spot
information system when changing lanes.
Always look in your mirrors, to either side of your vehicle, and behind \
you for
other vehicles before changing lanes.
WARNING
Changing SettingsDetermine the warning type, or turn the system off.
1. From the Home screen, select Settings.
2. Select Vehicle. The vehicle must be in Park (P).
3. Select Driver Assist System Setup.
4. Select an alert type, or turn the system off.
5. Press BACK to exit the menu.
*if equipped
Comes on
Blinks
Rear Cross Traffic Monitor*
Alerts you if a detected vehicle is approaching from a rear corner when \
your vehicle
is in Reverse (R) at speeds of 3 mph (5 km/h) or lower, which can be helpful when
backing out of parking spaces.
Turning the System On or Off
1. From the HOME screen, select Settings.
2. Select Camera.
3. Select Cross Traffic Monitor.
4. Select On or Off.
5. Press BACK to exit the menu.
You can also select the icon on the lower right corner of the screen when\
the
monitor is on to turn it off.
*if equipped
The system does not provide alerts for a vehicle that is moving away fro\
m your
vehicle, and it may not detect pedestrians, bicycles, or stationary obje\
cts.
This system cannot detect all approaching vehicles and may not detect an\
approaching vehicle at all.
Failure to visually confirm that it is safe to back up the vehicle bef\
ore doing so
may result in a collision.
Do not solely rely on the system when reversing; always also use your
mirrors, and look behind and to the sides of your vehicle before reversi\
ng.
CAUTION
An arrow icon appears on the
side of an approaching vehicle. Off icon
Page 84 of 89
160 || 161
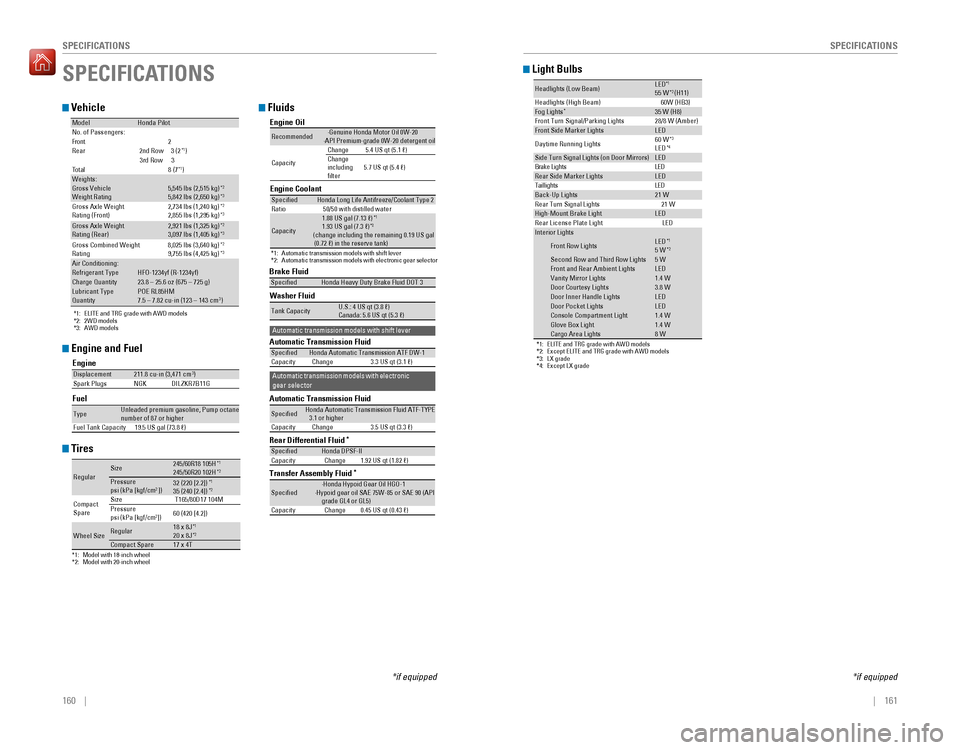
SPECIFICATIONS
SPECIFICATIONS
Vehicle
*1: ELITE and TRG grade with AWD models
*2: 2WD models
*3: AWD models
ModelHonda PilotNo. of Passengers:
2
tnorF
Rear 2nd Row3 (2
*1)
3rd Row3 7( 8
latoT
*1)Weights:Gross Vehicle
Weight Rating5,545 lbs (2,515 kg)*25,842 lbs (2,650 kg)*3Gross Axle Weight
Rating (Front)2,734 lbs (1,240 kg)*22,855 lbs (1,295 kg)*3
Gross Axle Weight
Rating (Rear)2,921 lbs (1,325 kg)*23,097 lbs (1,405 kg)*3
Gross Combined Weight
Rating 8,025 lbs (3,640 kg
)*29,755 lbs (4,425 kg)*3Air Conditioning:Refrigerant TypeHFO-1234yf (R-1234yf)Charge Quantity23.8 – 25.6 oz (675 – 725 g)Lubricant TypePOE RL85HMQuantity 7.5 – 7.82 cu-in (123 – 143 cm )3
Engine and Fuel
Engine
FuelDisplacement211.8 cu-in (3,471 cm3)
Spark Plugs NGKD ILZKR7B11G
TypeUnleaded premium gasoline, Pump octane number of 87 or higher
Fuel Tank Capacity 19.5 US gal (73.8 �)
Tires
*1:Model with 18-inch wheel*2:Model with 20-inch wheel
RegularSize245/60R18 105H*1245/50R20 102H*2Pressure
psi (kPa [kgf/cm2])35 (240 [2.4])
Compact
Spar e Size
T165/80D17 104M
Pressure
psi (kPa [kgf/cm
2]) 60 (420 [4.2])
Wheel SizeRegula
r18 x 8J*120 x 8J*2Compact Spar e17 x 4T
*232 (220 [2.2])*1
Fluids
Washer Fluid
Tank Capacit yU.S.: 4 US qt (3.8 �)
Canada: 5.6 US qt (5.3 �)
Brake FluidSpeci�edHonda Heavy Duty Brake Fluid DOT 3
Automatic Transmission Fluid
Automatic Transmission Fluid
Rear Differential Fluid*
Transfer Assembly Fluid*
Speci�edHonda Automatic Transmission ATF DW-1
Capacity Change3 .3 US qt (3.1 �)
Speci�edHonda Automatic Transmission Fluid ATF-TYPE
3.1 or highe r
Capacity Change3 .5 US qt (3.3 �)
Speci�edHonda DPSF-I I
Capacity Change 1.92 US qt (1.82 �)
Speci�ed·Honda Hypoid Gear Oil HGO- 1
·Hypoid gear oil SAE 75W-85 or SAE 90 (API
grade GL4 or GL5)
Capacity Change 0.45 US qt (0.43 �)
Automatic transmission models with shift lever
Automatic transmission models with electronic
gear selector
Engine Oi l
Engine Coolan t
*1: Automatic transmission models with shift lever
*2:Automatic transmission models with electronic gear selector
Recommended·Genuine Honda Motor Oil 0W-2 0
·API Premium-grade 0W-20 detergent oi l
Capacity Change
5.4 US qt (5.1 �)
Change
including
�lter 5.7 US qt (5.4 �)
Speci�e
dHonda Long Life Antifreeze/Coolant Type 2
Ratio 50/50 with distilled wate r
Capacity
1.88 US gal (7.13 �)*1
1.93 US gal (7.3 �)*2(change including the remaining 0.19 US gal
(0.72 �) in the reserve tank )
SPECIFICATIONS
*if equipped
Light Bulbs
*1: ELITE and TRG grade with AWD models
*2: Except ELITE and TRG grade with AWD models
*3: LX grade
*4: Except LX grade
Headlights (Low Beam)LED*155 W*2 (H11 )
Headlights (High Beam) 60W (HB3)
Fog Lights*35 W (H8)
Front Turn Signal/Parking Lights
Front Side Marker LightsLE D
Daytime Running Lights 60
W*3LED*4Side Turn Signal Lights (on Door Mirrors)LED
DEL
sthgiL ekarB
Rear Side Marker LightsLE D
DEL
sthgilliaT
Back-Up Lights21 W
Rear Turn Signal Lights 21 W
High-M ount Brake Ligh tLED
Rear License Plate Light LED
Interi or Lights
Front Row LightsLED
5 W
Second Row and Third Row Light s5 WFront and Rear Ambient LightsLE DVanity Mirror Lights 1.4 WDoor Courtesy Light s3.8 WDoor Inner Handle Light sLEDDoor Pocket LightsLEDConsole Compartment Ligh t1.4 WGlove Box Ligh t1.4 WCargo Area Lights8 W
*1
*2
28/8 W (Amber)
*if equipped