remote control HONDA PILOT 2016 3.G Quick Guide
[x] Cancel search | Manufacturer: HONDA, Model Year: 2016, Model line: PILOT, Model: HONDA PILOT 2016 3.GPages: 89, PDF Size: 5.82 MB
Page 3 of 89
Honda Automobile Customer Service
Your authorized Honda dealer should be able to answer any questions you h\
ave
about your vehicle. However, if you are dissatisfied with the information you receive,
you can call Honda Automobile Customer Service (see page 163).
Honda Roadside Assistance
24-hour emergency road service is available to you in the United States \
and Canada
throughout your 3-year/36,000-mile warranty term. Services include jump starting,
flat tire and lockout assistance, towing, and more (limitations apply\
). This Owner’s Guide is intended to help you quickly get acquainted with your
2016 Honda Pilot. It provides basic information and instructions on technology and
convenience features, as well as emergency procedures and how to get ass\
istance.
This guide is for vehicles sold in the United States and Canada. It cove\
rs all models,
so you may find descriptions of features and equipment that are not in\
your vehicle.
Images throughout this guide are from U.S. vehicles and represent featur\
es and
equipment that are available on some, but not all, models.
This guide is not intended to be a substitute for the Owner’s Manual. The Owner
Information CD enclosed in your glove box kit includes the Owner’s Manual,
Navigation Manual, and vehicle and tire warranties in electronic format.\
This
information can be viewed on a computer (PC or Mac platform) and saved or printed
for your reference. You can also visit owners.honda.com (U.S.) or myhonda.ca
(Canada) to view the complete and most current information.
If you are the first registered owner of your vehicle, you may request\
a complimentary
printed copy of the Owner’s Manual, Navigation Manual, or Vehicle Warranty within
the first six months of vehicle purchase. To request a copy, visit owners.honda.com
and create or log in to your account. In Canada, please request a copy f\
rom your
Honda dealer.
American Honda Motor Company strives to be proactive in protecting our
environment and natural resources. By using electronic delivery for a co\
nsiderable
portion of the information typically found in a vehicle owner’s manual, we are further
reducing our impact on the environment.
INTRODUCTIONTABLE OF CONTENTS
Call (800) 999-1009 (U.S.) or (888) 946-6329 (Canada)
Call (866) 864-5211 (U.S) or (800) 465-7587 (Canada)
VISUAL INDEX .......................................1
Steering Wheel and Nearby Controls ...1
Dashboard and Ceiling Controls
........2
SAFETY INFORMATION
........................3
Important Safety Information
..............3
Seat Belts
...............................................5
Airbags
....................................................9
Child Safety
..........................................15
Safety Label Locations
.......................23
Reporting Safety Defects
...................23
INSTRUMENT PANEL
.........................24
Malfunction Indicators
......................24
Condition Indicators
...........................26
On/Off Indicators
.................................27
Multi-Information Display (MID)
......28
VEHICLE CONTROLS
...........................29
Using the Remote Transmitter
..........29
Smart Entry System*
...........................30
Tailgate Operation
..............................31
Power Tailgate Operation*
...............32
Door Operation
....................................33
Power Window Operation
................34
Power Moonroof Operation*
...........35
Panoramic Glass Roof*
.....................36
Interior and Exterior Lights
...............37
One-Touch Turn Signal
.......................38
Auto High Beam System*
..................39
Wiper Operation
..................................40
Adjusting the Seats
............................42
Rear Seats
...........................................46
Driving Position Memory System*
...49
Adjusting the Steering Wheel
..........49
Adjusting the Mirrors
.........................50
HomeLink
® Garage Opener* .............51 Air Conditioning System*
.................52
Climate Control System*
..................53
Seat Heaters*
......................................55
Customized Features
..........................56
Setting the Clock
.................................57
AUDIO AND CONNECTIVITY
.............58
Basic Audio Operation
.......................58
Models with color audio system
Color Audio System
............................62
FM/AM Radio
.......................................63
iPod
®...................................................... 64
USB Flash Drive
..................................65
Bluetooth
® Audio ................................66
Models with touchscreen
Touchscreen Operation
.....................67
HondaLink
® ..........................................69
Wi-Fi Connection
................................70
Aha™ Radio
.........................................70
FM/AM Radio
......................................71
SiriusXM
® Radio* ...............................72
Compact Disc (CD)*
...........................73
iPod
®...................................................... 74
USB Flash Drive
..................................75
Bluetooth
® Audio ................................76
Pandora
® ..............................................77
Rear Entertainment System (RES)*
...78
BLUETOOTH
® HANDSFREELINK® ....81
Models with color audio system
Basic HFL Operation
...........................81
Pairing a Phone
...................................82
Making a Call
......................................83
Models with touchscreen
Basic HFL Operation
...........................84
Pairing a Phone
...................................86
*if equipped
Page 4 of 89
| 1
VISUAL INDEX
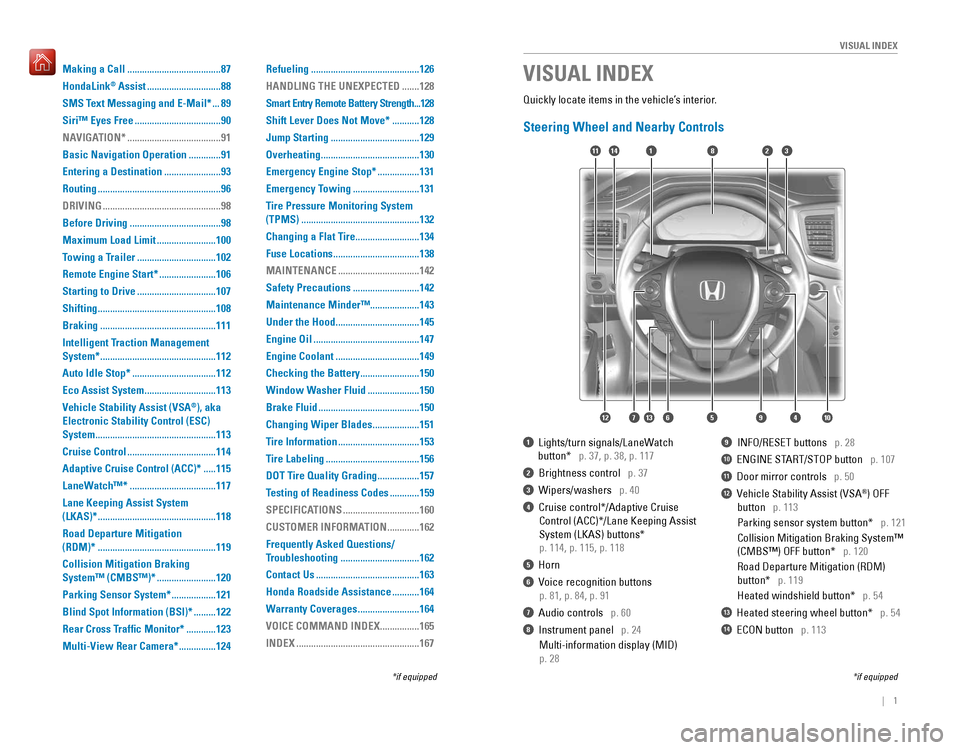
Quickly locate items in the vehicle’s interior.
Steering Wheel and Nearby Controls
1 Lights/turn signals/LaneWatch
button* p. 37, p. 38, p. 117
2 Brightness control p. 37
3 Wipers/washers p. 40
4 Cruise control*/Adaptive Cruise
Control (ACC)*/Lane Keeping Assist
System (LKAS) buttons*
p. 114, p. 115, p. 118
5 Horn
6 Voice recognition buttons
p. 81, p. 84, p. 91
7 Audio controls p. 60
8 Instrument panel p. 24
Multi-information display (MID)
p. 28
9 INFO/RESET buttons p. 28
10 ENGINE START/STOP button p. 107
11 Door mirror controls p. 50
12 Vehicle Stability Assist (VSA®) OFF
button p. 113
Parking sensor system button* p. 121
Collision Mitigation Braking System™
(CMBS™) OFF button* p. 120
Road Departure Mitigation (RDM)
button* p. 119
Heated windshield button* p. 54
13 Heated steering wheel button* p. 54
14 ECON button p. 113
VISUAL INDEX
*if equipped
*if equipped
1
74596131210
1114823
Making a Call ......................................87
HondaLink
® Assist ..............................88
SMS Text Messaging and E-Mail*
...89
Siri™ Eyes Free
...................................90
NAVIGATION*
......................................91
Basic Navigation Operation
.............91
Entering a Destination
.......................93
Routing
..................................................96
DRIVING
................................................98
Before Driving
.....................................98
Maximum Load Limit
........................100
Towing a Trailer
................................102
Remote Engine Start*
.......................106
Starting to Drive
................................107
Shifting
................................................108
Braking
...............................................111
Intelligent Traction Management
System*
...............................................112
Auto Idle Stop*
..................................112
Eco Assist System
.............................113
Vehicle Stability Assist (VSA
®), aka
Electronic Stability Control (ESC)
System
.................................................113
Cruise Control
....................................114
Adaptive Cruise Control (ACC)*
.....115
LaneWatch™*
...................................117
Lane Keeping Assist System
(LKAS)*
................................................118
Road Departure Mitigation
(RDM)*
................................................119
Collision Mitigation Braking
System™ (CMBS™)*
........................120
Parking Sensor System*
..................121
Blind Spot Information (BSI)*
.........122
Rear Cross Traffic Monitor*
............123
Multi-View Rear Camera*
...............124 Refueling
............................................126
HANDLING THE UNEXPECTED
.......128
Smart Entry Remote Battery Strength
...128
Shift Lever Does Not Move*
...........128
Jump Starting
....................................129
Overheating
........................................130
Emergency Engine Stop*
.................131
Emergency Towing
...........................131
Tire Pressure Monitoring System
(TPMS)
................................................132
Changing a Flat Tire
..........................134
Fuse Locations
...................................138
MAINTENANCE
.................................142
Safety Precautions
...........................142
Maintenance Minder™ ....................143
Under the Hood
..................................145
Engine Oil
...........................................147
Engine Coolant
..................................149
Checking the Battery
........................150
Window Washer Fluid
.....................150
Brake Fluid
.........................................150
Changing Wiper Blades
...................151
Tire Information
.................................153
Tire Labeling
......................................156
DOT Tire Quality Grading
.................157
Testing of Readiness Codes
............159
SPECIFICATIONS
...............................160
CUSTOMER INFORMATION
.............162
Frequently Asked Questions/
Troubleshooting
................................162
Contact Us
..........................................163
Honda Roadside Assistance
...........164
Warranty Coverages
.........................164
VOICE COMMAND INDEX
................165
INDEX
..................................................167
Page 17 of 89
26 || 27
INSTRUMENT PANELINSTRUMENT PANEL
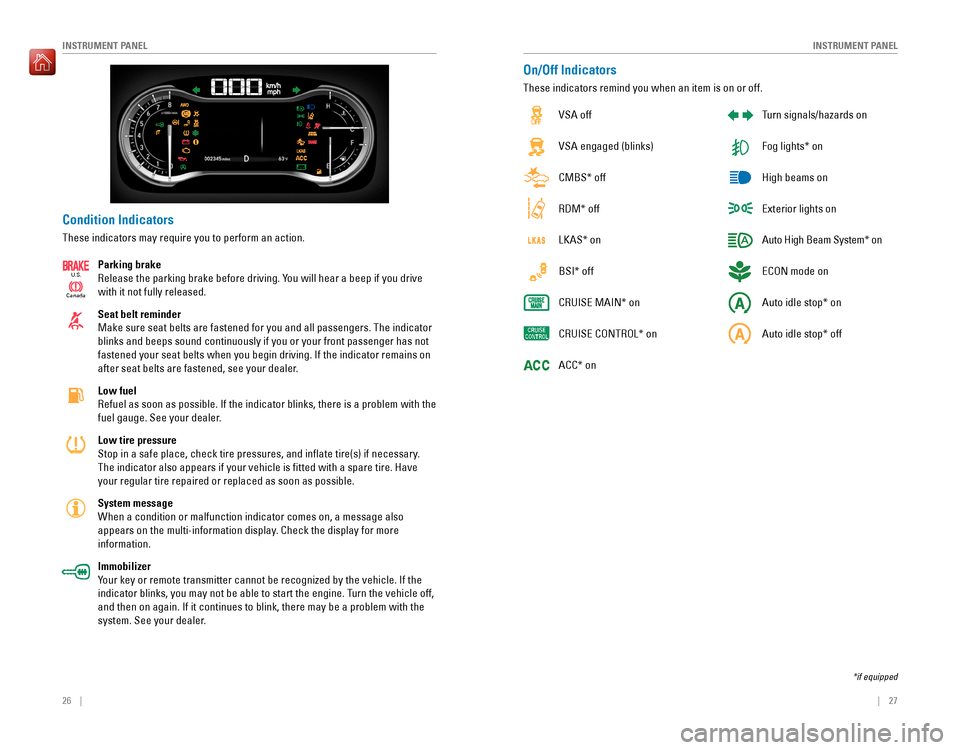
Condition Indicators
These indicators may require you to perform an action.
Parking brake
Release the parking brake before driving. You will hear a beep if you drive
with it not fully released.
Seat belt reminder
Make sure seat belts are fastened for you and all passengers. The indica\
tor
blinks and beeps sound continuously if you or your front passenger has not
fastened your seat belts when you begin driving. If the indicator remain\
s on
after seat belts are fastened, see your dealer.
Low fuel
Refuel as soon as possible. If the indicator blinks, there is a problem \
with the
fuel gauge. See your dealer.
Low tire pressure
Stop in a safe place, check tire pressures, and inflate tire(s) if n\
ecessary.
The indicator also appears if your vehicle is fitted with a spare tire\
. Have
your regular tire repaired or replaced as soon as possible.
System message
When a condition or malfunction indicator comes on, a message also
appears on the multi-information display. Check the display for more
information.
Immobilizer
Your key or remote transmitter cannot be recognized by the vehicle. If th\
e
indicator blinks, you may not be able to start the engine. Turn the vehicle off,
and then on again. If it continues to blink, there may be a problem with\
the
system. See your dealer.
Canada
U.S.
On/Off Indicators
These indicators remind you when an item is on or off.
VSA off
VSA engaged (blinks)
CMBS* off
RDM* off
LKAS* on
BSI* off
CRUISE MAIN* on
CRUISE CONTROL* on
ACC* on Turn signals/hazards on
Fog lights* on
High beams on
Exterior lights on
Auto High Beam System* on
ECON mode on
Auto idle stop* on
Auto idle stop* off
*if equipped
Page 18 of 89
28 || 29
VEHICLE CONTROLSINSTRUMENT PANEL
Multi-Information Display (MID)
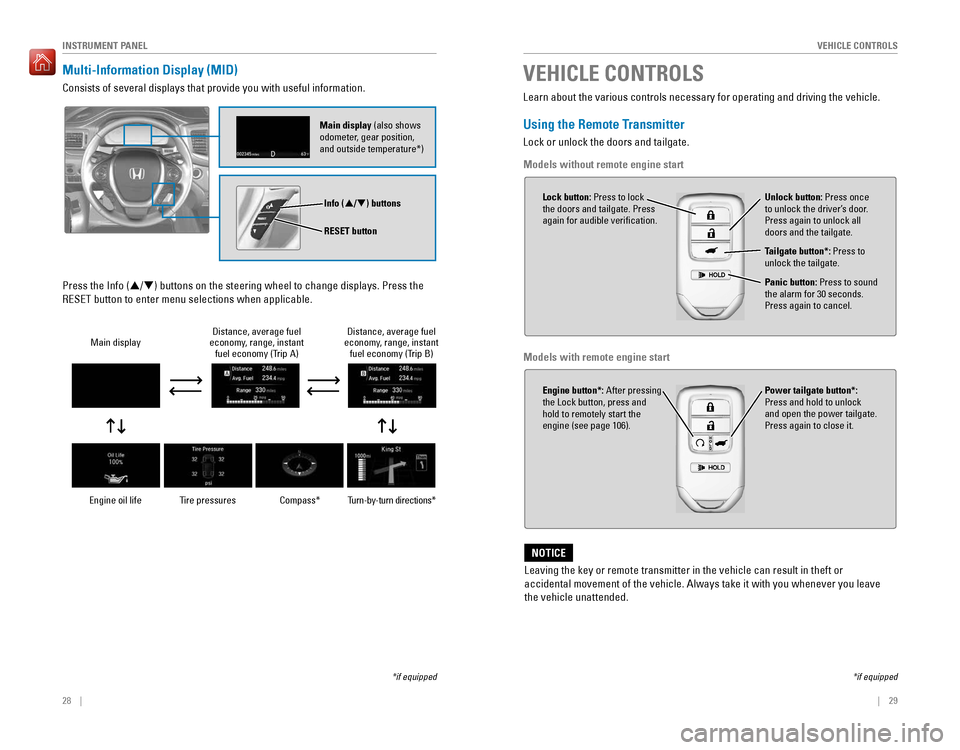
Consists of several displays that provide you with useful information.
Tire pressuresDistance, average fuel
economy, range, instant fuel economy (Trip A)
Main display
Compass*Distance, average fuel
economy, range, instant fuel economy (Trip B)
Turn-by-turn directions*
Press the Info (p/q) buttons on the steering wheel to change displays. Press the
RESET button to enter menu selections when applicable.
*if equipped
Info (p/q) buttons
RESET button
Engine oil life
Learn about the various controls necessary for operating and driving the\
vehicle.
Using the Remote Transmitter
Lock or unlock the doors and tailgate.
Models without remote engine start
Unlock button: Press once
to unlock the driver’s door.
Press again to unlock all
doors and the tailgate.
Power tailgate button*:
Press and hold to unlock
and open the power tailgate.
Press again to close it.
Lock button: Press to lock
the doors and tailgate. Press
again for audible verification.
Panic button: Press to sound
the alarm for 30 seconds.
Press again to cancel.
VEHICLE CONTROLS
*if equipped
Leaving the key or remote transmitter in the vehicle can result in theft\
or
accidental movement of the vehicle. Always take it with you whenever you\
leave
the vehicle unattended.
NOTICE
Tailgate button*: Press to
unlock the tailgate.
Engine button*: After pressing
the Lock button, press and
hold to remotely start the
engine (see page 106).
Main display (also shows
odometer, gear position,
and outside temperature*)
Models with remote engine start
Page 19 of 89
30 || 31
VEHICLE CONTROLSVEHICLE CONTROLS
Smart Entry System*
When you carry the remote transmitter (for example, in a pocket or purs\
e) and it
is outside the vehicle and within range (about 32 inches or 80 cm), yo\
u can lock or
unlock the doors and tailgate without handling the transmitter.
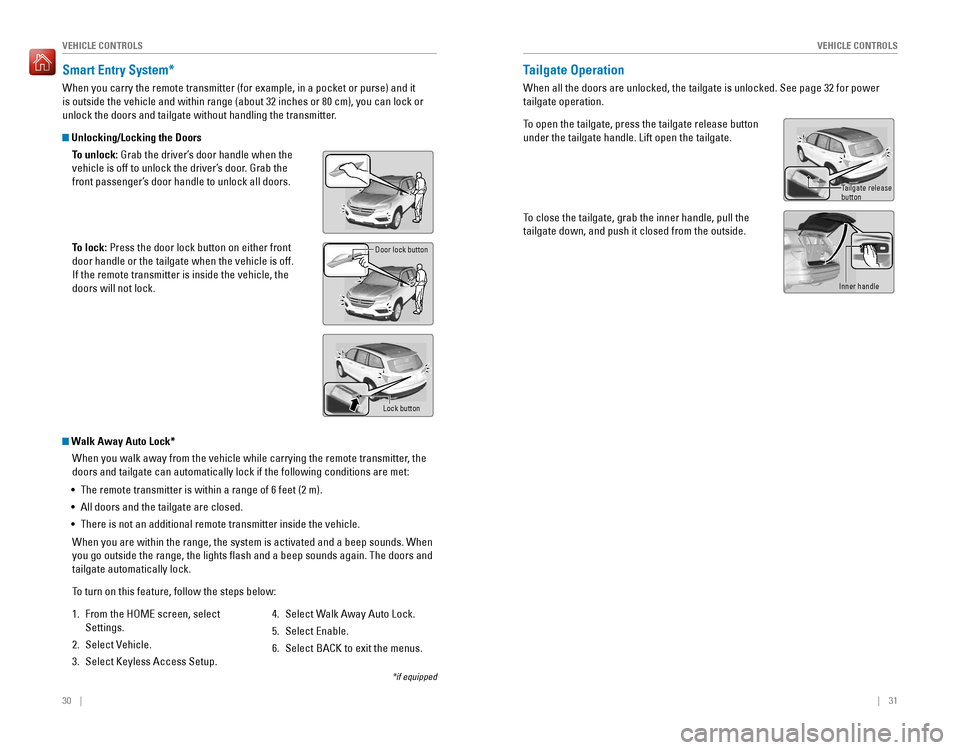
Unlocking/Locking the Doors
To unlock: Grab the driver’s door handle when the
vehicle is off to unlock the driver’s door. Grab the
front passenger’s door handle to unlock all doors.
To lock: Press the door lock button on either front
door handle or the tailgate when the vehicle is off.
If the remote transmitter is inside the vehicle, the
doors will not lock.
Door lock button
*if equipped
Walk Away Auto Lock*When you walk away from the vehicle while carrying the remote transmitter, the
doors and tailgate can automatically lock if the following conditions ar\
e met:
• The remote transmitter is within a range of 6 feet (2 m).
• All doors and the tailgate are closed.
• There is not an additional remote transmitter inside the vehicle.
When you are within the range, the system is activated and a beep sounds\
. When
you go outside the range, the lights flash and a beep sounds again. Th\
e doors and
tailgate automatically lock.
To turn on this feature, follow the steps below:
1. From the HOME screen, select
Settings.
2. Select Vehicle.
3. Select Keyless Access Setup.
4. Select Walk Away Auto Lock.
5. Select Enable.
6. Select BACK to exit the menus.
Lock button
Tailgate Operation
When all the doors are unlocked, the tailgate is unlocked. See page 32 f\
or power
tailgate operation.
To open the tailgate, press the tailgate release button
under the tailgate handle. Lift open the tailgate.
To close the tailgate, grab the inner handle, pull the
tailgate down, and push it closed from the outside.
Tailgate releasebutton
Inner handle
Page 29 of 89
50 || 51
VEHICLE CONTROLSVEHICLE CONTROLS
*if equipped
Adjusting the Mirrors
Adjust the angle of the mirrors for the best visibility when you are sit\
ting in the
correct driving position.
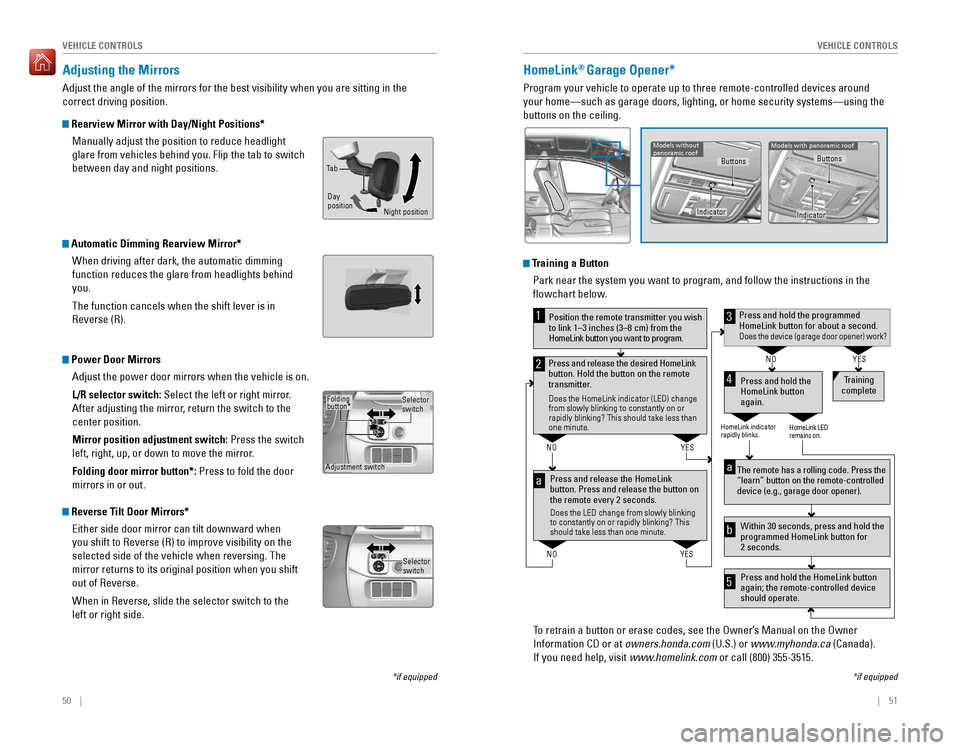
Rearview Mirror with Day/Night Positions*
Manually adjust the position to reduce headlight
glare from vehicles behind you. Flip the tab to switch
between day and night positions.
Automatic Dimming Rearview Mirror*When driving after dark, the automatic dimming
function reduces the glare from headlights behind
you.
The function cancels when the shift lever is in
Reverse (R).
Power Door MirrorsAdjust the power door mirrors when the vehicle is on.
L/R selector switch: Select the left or right mirror.
After adjusting the mirror, return the switch to the
center position.
Mirror position adjustment switch: Press the switch
left, right, up, or down to move the mirror.
Folding door mirror button*: Press to fold the door
mirrors in or out.
Reverse Tilt Door Mirrors*Either side door mirror can tilt downward when
you shift to Reverse (R) to improve visibility on the
selected side of the vehicle when reversing. The
mirror returns to its original position when you shift
out of Reverse.
When in Reverse, slide the selector switch to the
left or right side.
Night position
Ta b
Day
position
Folding button*
Adjustment switch Selector
switch
Selectorswitch
Models without
panoramic roof
HomeLink® Garage Opener*
Program your vehicle to operate up to three remote-controlled devices ar\
ound
your home—such as garage doors, lighting, or home security systems—\
using the
buttons on the ceiling.
Training a Button
Park near the system you want to program, and follow the instructions in\
the
flowchart below.
To retrain a button or erase codes, see the Owner’s Manual on the Owner
Information CD or at owners.honda.com (U.S.) or www.myhonda.ca (Canada).
If you need help, visit www.homelink.com or call (800) 355-3515.
Press and release the HomeLink
button. Press and release the button on
the remote every 2 seconds.
Does the LED change from slowly blinking
to constantly on or rapidly blinking? This
should take less than one minute.
Press and hold the
HomeLink button
again. Training
complete
YES
NO
HomeLink indicator
rapidly blinks. HomeLink LED
remains on.
YES
NO
YES
NO
Position the remote transmitter you wish
to link 1–3 inches (3–8 cm) from the
HomeLink button you want to program.1
Press and release the desired HomeLink
button. Hold the button on the remote
transmitter.
Does the HomeLink indicator (LED) change
from slowly blinking to constantly on or
rapidly blinking? This should take less than
one minute.
2
aThe remote has a rolling code. Press the
“learn” button on the remote-controlled
device (e.g., garage door opener) .
Press and hold the HomeLink button
again; the remote-controlled device
should operate. Within 30 seconds, press and hold the
programmed HomeLink button for
2 seconds.a
Press and hold the programmed HomeLink button for about a second.Does the device (garage door opener) work?
3
b
4
5
*if equipped
Indicator
Models with panoramic roof
Buttons
Indicator
Buttons
Page 37 of 89
66 || 67
AUDIO AND CONNECTIVITY
AUDIO AND CONNECTIVITY
Models with color audio system
Bluetooth® Audio
Play streaming or stored audio from your compatible phone through the ve\
hicle’s
audio system. Visit handsfreelink.com (U.S.) or handsfreelink.ca (Canada) to check
phone compatibility. Standard data rates apply with your phone service provider.
Connect your phone to Bluetooth
® HandsFreeLink® (see page 82).
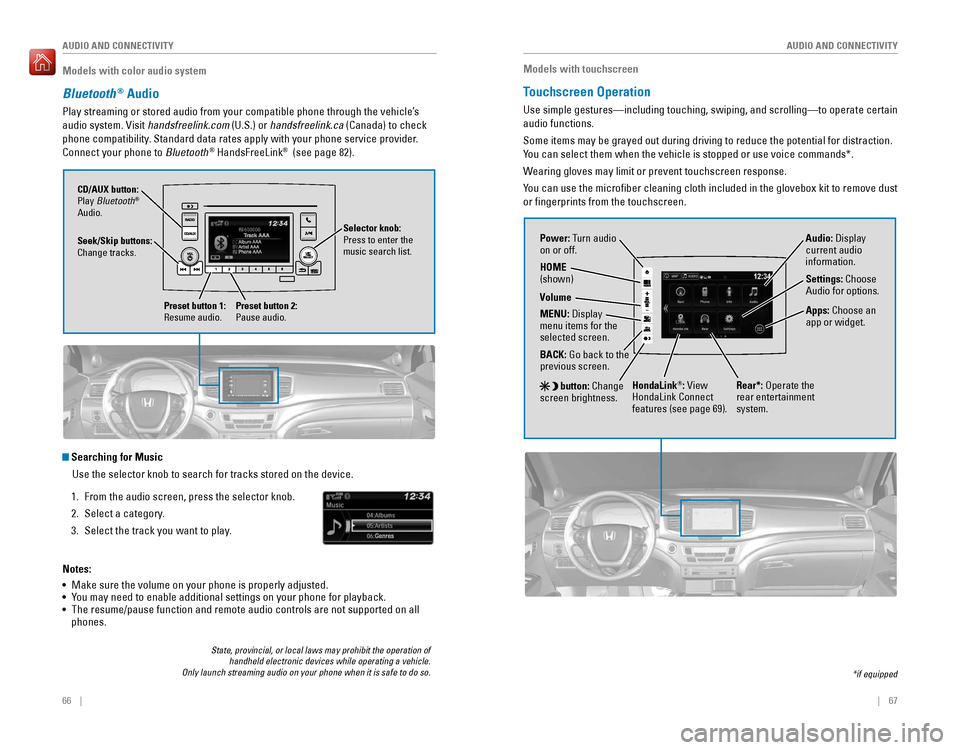
Seek/Skip buttons:
Change tracks. CD/AUX button:
Play Bluetooth
®
Audio.
Preset button 1:
Resume audio.
Preset button 2:
Pause audio.
State, provincial, or local laws may prohibit the operation of handheld electronic devices while operating a vehicle.
Only launch streaming audio on your phone when it is safe to do so.
Searching for Music
Use the selector knob to search for tracks stored on the device.
1. From the audio screen, press the selector knob.
2. Select a category.
3. Select the track you want to play.
Notes:
• Make sure the volume on your phone is properly adjusted.
• You may need to enable additional settings on your phone for playback.
• The resume/pause function and remote audio controls are not supported on\
all
phones.
Selector knob:
Press to enter the
music search list.
Models with touchscreen
Touchscreen Operation
Use simple gestures—including touching, swiping, and scrolling—to \
operate certain
audio functions.
Some items may be grayed out during driving to reduce the potential for \
distraction.
You can select them when the vehicle is stopped or use voice commands*.
Wearing gloves may limit or prevent touchscreen response.
You can use the microfiber cleaning cloth included in the glovebox kit \
to remove dust
or fingerprints from the touchscreen.
*if equipped
Power: Turn audio
on or off.
HOME
(shown)
MENU: Display
menu items for the
selected screen.
BACK: Go back to the
previous screen.
button: Change
screen brightness. Settings: Choose
Audio for options.
HondaLink®: View
HondaLink Connect
features (see page 69). Audio: Display
current audio
information.
Volume
Apps: Choose an
app or widget.
Rear*: Operate the
rear entertainment
system.
Page 42 of 89
76 || 77
AUDIO AND CONNECTIVITY
AUDIO AND CONNECTIVITY
Models with touchscreen
Bluetooth® Audio
Play streaming or stored audio from your compatible phone through the ve\
hicle’s
audio system. Visit handsfreelink.com (U.S.) or handsfreelink.ca (Canada) to check
phone compatibility. Standard data rates apply with your phone service provider.
Connect your phone to Bluetooth
® HandsFreeLink® (see page 86).
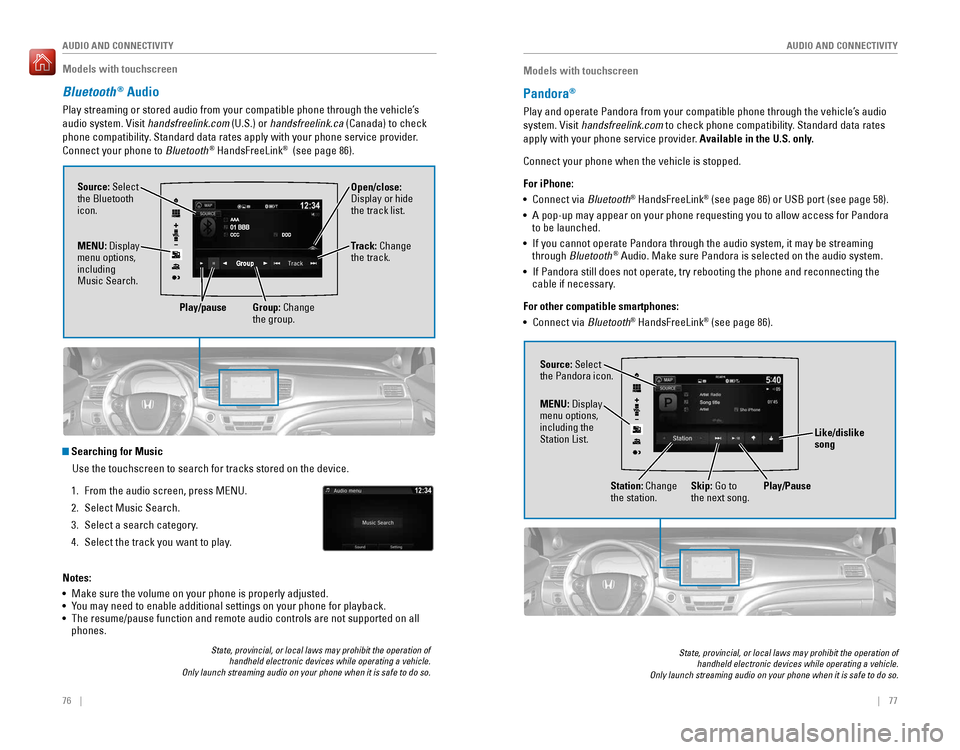
Source: Select
the Bluetooth
icon. Open/close:
Display or hide
the track list.
MENU: Display
menu options,
including
Music Search. Track: Change
the track.
Play/pause Group: Change
the group.
State, provincial, or local laws may prohibit the operation of
handheld electronic devices while operating a vehicle.
Only launch streaming audio on your phone when it is safe to do so.
Searching for Music
Use the touchscreen to search for tracks stored on the device.
1. From the audio screen, press MENU.
2. Select Music Search.
3. Select a search category.
4. Select the track you want to play.
Notes:
• Make sure the volume on your phone is properly adjusted.
• You may need to enable additional settings on your phone for playback.
• The resume/pause function and remote audio controls are not supported on\
all
phones.
Models with touchscreen
Pandora®
Play and operate Pandora from your compatible phone through the vehicle’\
s audio
system. Visit handsfreelink.com to check phone compatibility. Standard data rates
apply with your phone service provider. Available in the U.S. only.
Connect your phone when the vehicle is stopped.
For iPhone:
• Connect via Bluetooth
® HandsFreeLink® (see page 86) or USB port (see page 58).
• A pop-up may appear on your phone requesting you to allow access for Pan\
dora
to be launched.
• If you cannot operate Pandora through the audio system, it may be stream\
ing
through Bluetooth
® Audio. Make sure Pandora is selected on the audio system.
• If Pandora still does not operate, try rebooting the phone and reconnect\
ing the
cable if necessary.
For other compatible smartphones:
• Connect via Bluetooth
® HandsFreeLink® (see page 86).
State, provincial, or local laws may prohibit the operation of
handheld electronic devices while operating a vehicle.
Only launch streaming audio on your phone when it is safe to do so.
Source: Select
the Pandora icon.
Station: Change
the station. Skip: Go to
the next song.
MENU: Display
menu options,
including the
Station List.
Like/dislike
song
Play/Pause
Page 43 of 89
78 || 79
AUDIO AND CONNECTIVITY
AUDIO AND CONNECTIVITY
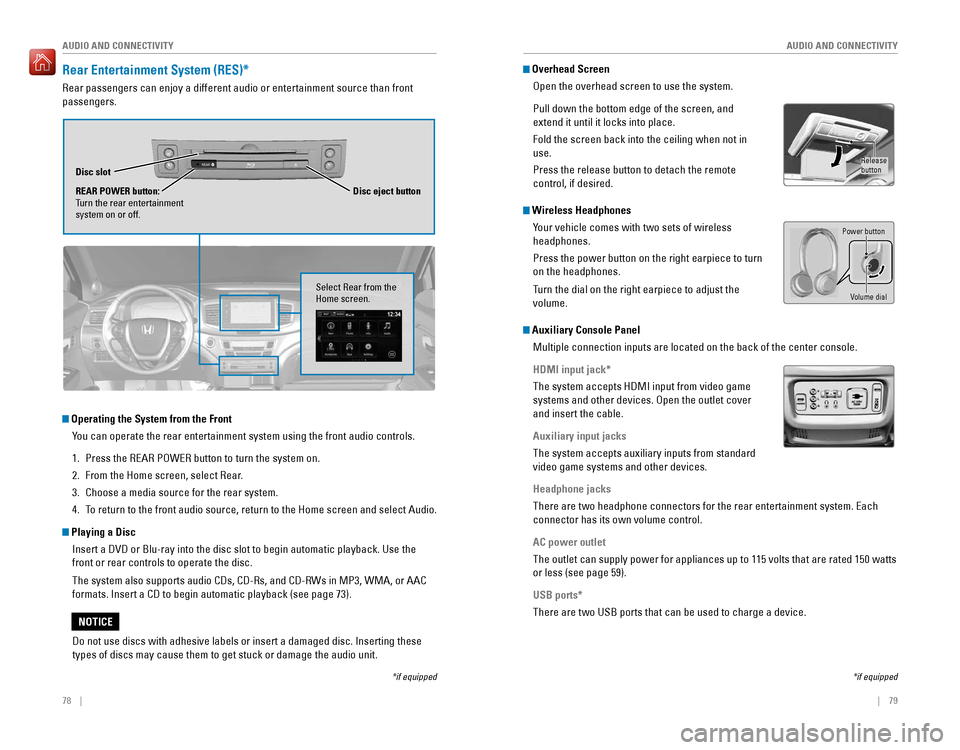
Rear Entertainment System (RES)*
Rear passengers can enjoy a different audio or entertainment source than\
front
passengers.
REARDisc slot
REAR POWER button:
Turn the rear entertainment
system on or off. Disc eject button
Operating the System from the Front
You can operate the rear entertainment system using the front audio contr\
ols.
1. Press the REAR POWER button to turn the system on.
2. From the Home screen, select Rear.
3. Choose a media source for the rear system.
4. To return to the front audio source, return to the Home screen and select\
Audio.
Playing a DiscInsert a DVD or Blu-ray into the disc slot to begin automatic playback. \
Use the
front or rear controls to operate the disc.
The system also supports audio CDs, CD-Rs, and CD-RWs in MP3, WMA, or AAC
formats. Insert a CD to begin automatic playback (see page 73).
*if equipped
Select Rear from the
Home screen.
Do not use discs with adhesive labels or insert a damaged disc. Insertin\
g these
types of discs may cause them to get stuck or damage the audio unit.
NOTICE
Overhead ScreenOpen the overhead screen to use the system.
Pull down the bottom edge of the screen, and
extend it until it locks into place.
Fold the screen back into the ceiling when not in
use.
Press the release button to detach the remote
control, if desired.
Wireless HeadphonesYour vehicle comes with two sets of wireless
headphones.
Press the power button on the right earpiece to turn
on the headphones.
Turn the dial on the right earpiece to adjust the
volume.
Auxiliary Console PanelMultiple connection inputs are located on the back of the center console\
.
HDMI input jack*
The system accepts HDMI input from video game
systems and other devices. Open the outlet cover
and insert the cable.
Auxiliary input jacks
The system accepts auxiliary inputs from standard
video game systems and other devices.
Headphone jacks
There are two headphone connectors for the rear entertainment system. Ea\
ch
connector has its own volume control.
AC power outlet
The outlet can supply power for appliances up to 115 volts that are rate\
d 150 watts
or less (see page 59).
USB ports*
There are two USB ports that can be used to charge a device.
*if equipped
Power button
Volume dial
Release
button
Page 44 of 89
| 8180 | AUDIO AND CONNECTIVITY
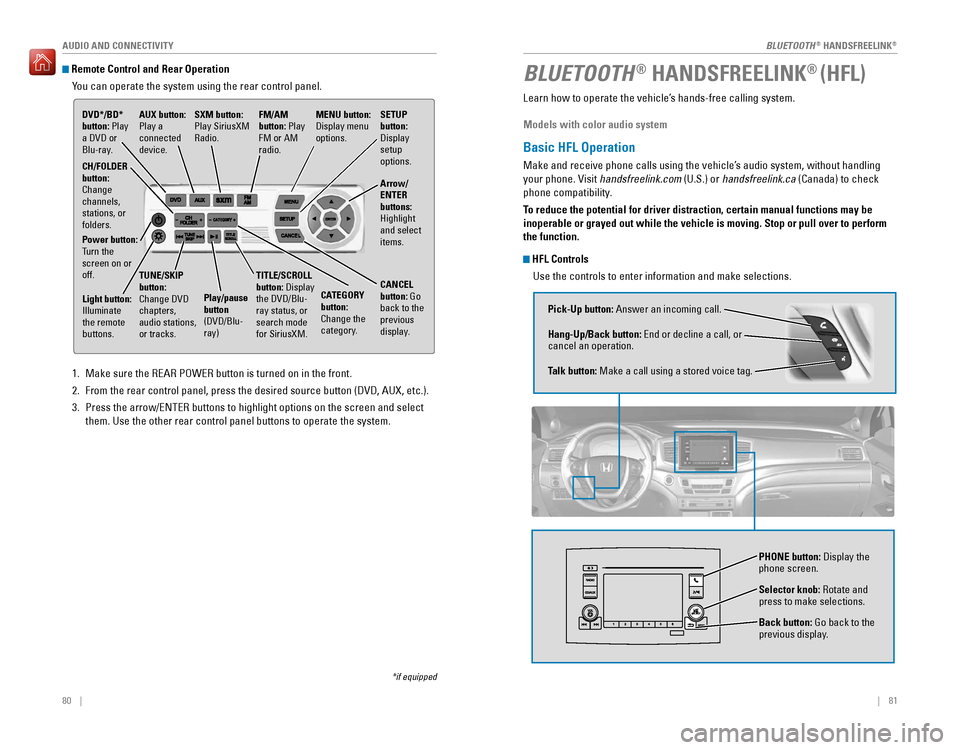
Remote Control and Rear OperationYou can operate the system using the rear control panel.
1. Make sure the REAR POWER button is turned on in the front.
2. From the rear control panel, press the desired source button (DVD, AUX,\
etc.).
3. Press the arrow/ENTER buttons to highlight options on the screen and sel\
ect
them. Use the other rear control panel buttons to operate the system.
DVD*/BD*
button: Play
a DVD or
Blu-ray.
CATEGORY
button:
Change the
category.
SXM button:
Play SiriusXM
Radio.
FM/AM
button: Play
FM or AM
radio.MENU button:
Display menu
options.
SETUP
button:
Display
setup
options.
Arrow/
ENTER
buttons:
Highlight
and select
items.
CH/FOLDER
button:
Change
channels,
stations, or
folders.
Power button:
Turn the
screen on or
off.
Light button:
Illuminate
the remote
buttons. TUNE/SKIP
button:
Change DVD
chapters,
audio stations,
or tracks.
Play/pause
button
(DVD/Blu-
ray)TITLE/SCROLL
button: Display
the DVD/Blu-
ray status, or
search mode
for SiriusXM.
CANCEL
button: Go
back to the
previous
display.
*if equipped
AUX button:
Play a
connected
device.
Learn how to operate the vehicle’s hands-free calling system.
Models with color audio system
Basic HFL Operation
Make and receive phone calls using the vehicle’s audio system, without handling
your phone. Visit handsfreelink.com (U.S.) or handsfreelink.ca (Canada) to check
phone compatibility.
To reduce the potential for driver distraction, certain manual functions \
may be
inoperable or grayed out while the vehicle is moving. Stop or pull over \
to perform
the function.
HFL Controls
Use the controls to enter information and make selections.
BLUETOOTH® HANDSFREELINK® (HFL)
Pick-Up button: Answer an incoming call.
Hang-Up/Back button: End or decline a call, or
cancel an operation.
Talk button: Make a call using a stored voice tag.
Selector knob: Rotate and
press to make selections.
Back button: Go back to the
previous display.
PHONE button: Display the
phone screen.
BLUETOOTH® HANDSFREELINK®
BLUETOOTH® HANDSFREELINK®