button HONDA PILOT 2020 Owner's Manual (in English)
[x] Cancel search | Manufacturer: HONDA, Model Year: 2020, Model line: PILOT, Model: HONDA PILOT 2020Pages: 743, PDF Size: 45.53 MB
Page 426 of 743
424
uuBlu-ray/DVD Rear Entertainment System*uDVD or Blu-rayTM Player Error Messages
Features
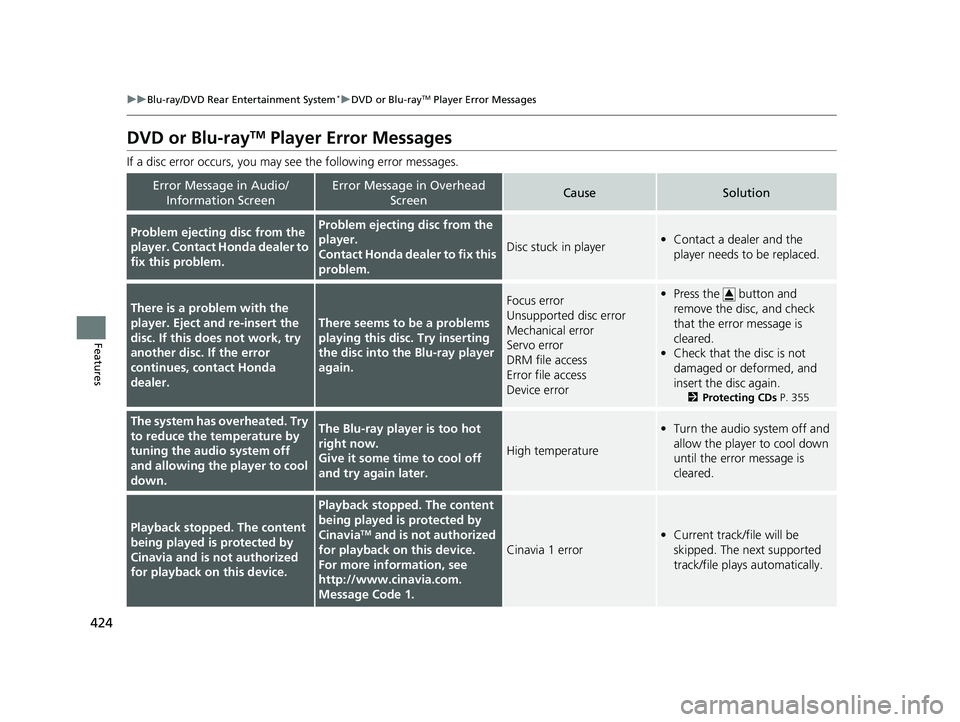
DVD or Blu-rayTM Player Error Messages
If a disc error occurs, you may see the following error messages.
Error Message in Audio/
Information ScreenError Message in Overhead ScreenCauseSolution
Problem ejecting disc from the
player. Contact Honda dealer to
fix this problem.Problem ejecting disc from the
player.
Contact Honda dealer to fix this
problem.
Disc stuck in player•Contact a dealer and the
player needs to be replaced.
There is a problem with the
player. Eject and re-insert the
disc. If this does not work, try
another disc. If the error
continues, contact Honda
dealer.
There seems to be a problems
playing this disc. Try inserting
the disc into the Blu-ray player
again.
Focus error
Unsupported disc error
Mechanical error
Servo error
DRM file access
Error file access
Device error•Press the button and
remove the disc, and check
that the error message is
cleared.
• Check that the disc is not
damaged or deformed, and
insert the disc again.
2 Protecting CDs P. 355
The system has overheated. Try
to reduce the temperature by
tuning the audio system off
and allowing the player to cool
down.The Blu-ray player is too hot
right now.
Give it some time to cool off
and try again later.
High temperature
•Turn the audio system off and
allow the player to cool down
until the error message is
cleared.
Playback stopped. The content
being played is protected by
Cinavia and is not authorized
for playback on this device.
Playback stopped. The content
being played is protected by
Cinavia
TM and is not authorized
for playback on this device.
For more information, see
http://www.cina via.com.
Message Code 1.
Cinavia 1 error
• Current track/file will be
skipped. The next supported
track/file plays automatically.
20 PILOT-31TG76401.book 424 ページ 2019年7月24日 水曜日 午後3時32分
Page 427 of 743
425
uuBlu-ray/DVD Rear Entertainment System*uDVD or Blu-rayTM Player Error Messages
Features
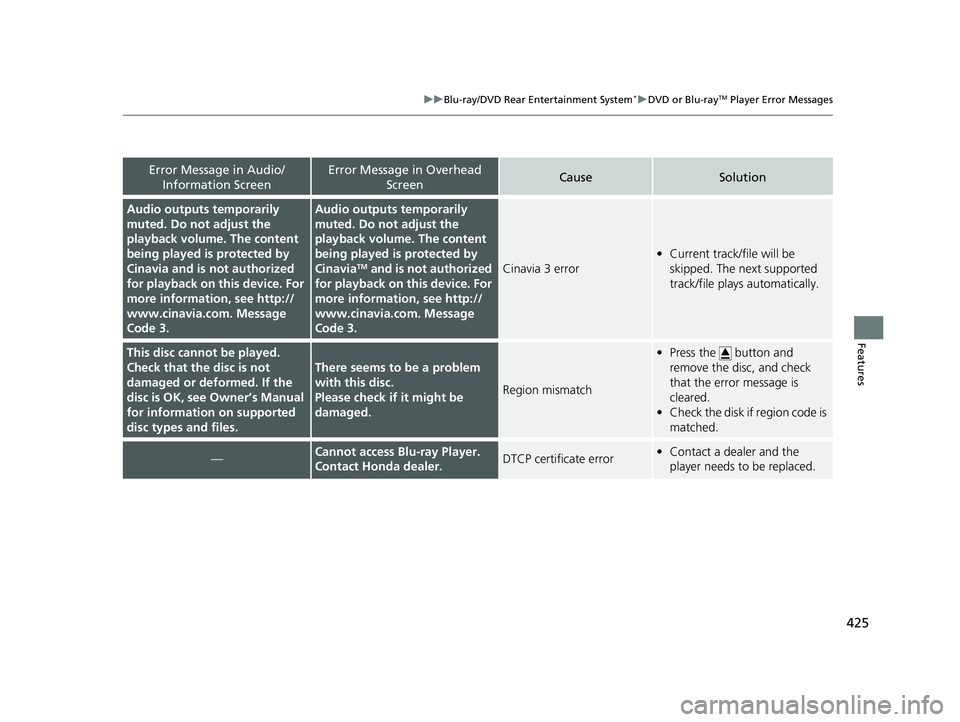
Error Message in Audio/
Information ScreenError Message in Overhead ScreenCauseSolution
Audio outputs temporarily
muted. Do not adjust the
playback volume. The content
being played is protected by
Cinavia and is not authorized
for playback on th is device. For
more information, see http://
www.cinavia.co m. Message
Code 3.Audio outputs temporarily
muted. Do not adjust the
playback volume. The content
being played is protected by
Cinavia
TM and is not authorized
for playback on this device. For
more information, see http://
www.cinavia.co m. Message
Code 3.Cinavia 3 error
• Current track/file will be
skipped. The next supported
track/file plays automatically.
This disc cannot be played.
Check that the disc is not
damaged or deformed. If the
disc is OK, see Owner’s Manual
for information on supported
disc types and files.
There seems to be a problem
with this disc.
Please check if it might be
damaged.
Region mismatch
•Press the button and
remove the disc, and check
that the error message is
cleared.
• Check the disk if region code is
matched.
—Cannot access Blu-ray Player.
Contact Honda dealer.DTCP certificate error•Contact a dealer and the
player needs to be replaced.
20 PILOT-31TG76401.book 425 ページ 2019年7月24日 水曜日 午後3時32分
Page 428 of 743
426
Features
Customized Features
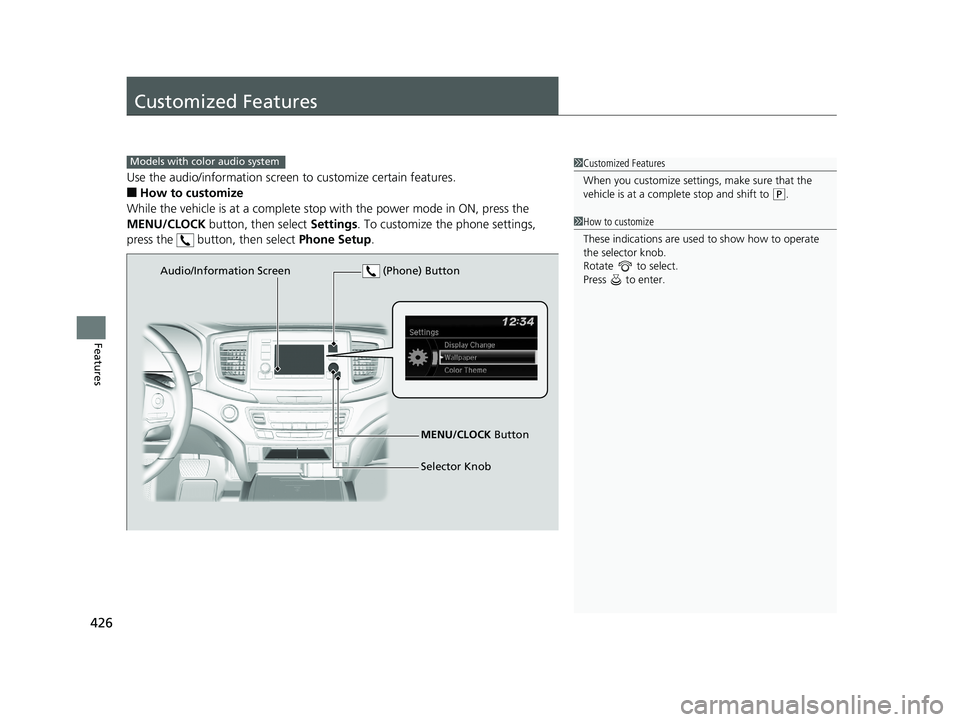
Use the audio/information screen to customize certain features.
■How to customize
While the vehicle is at a complete stop with the power mode in ON, press the
MENU/CLOCK button, then select Settings. To customize the phone settings,
press the button, then select Phone Setup.
1Customized Features
When you customize settings, make sure that the
vehicle is at a complete stop and shift to
(P.
Models with color audio system
1 How to customize
These indications are used to show how to operate
the selector knob.
Rotate to select.
Press to enter.
Audio/Information Screen
MENU/CLOCK Button
Selector Knob
(Phone) Button
20 PILOT-31TG76401.book 426 ページ 2019年7月24日 水曜日 午後3時32分
Page 429 of 743
427
uuCustomized Features u
Continued
Features
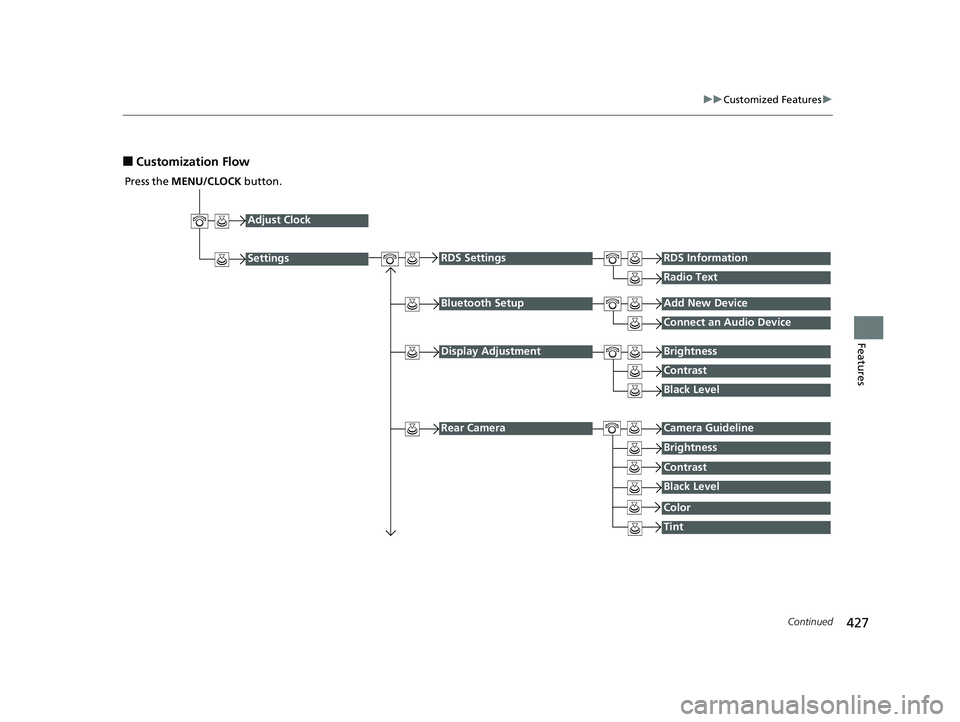
■Customization Flow
Press the MENU/CLOCK button.
Adjust Clock
Settings
Bluetooth SetupAdd New Device
Connect an Audio Device
Display AdjustmentBrightness
Contrast
Black Level
Rear CameraCamera Guideline
RDS SettingsRDS Information
Radio Text
Brightness
Contrast
Black Level
Color
Tint
20 PILOT-31TG76401.book 427 ページ 2019年7月24日 水曜日 午後3時32分
Page 431 of 743
429
uuCustomized Features u
Continued
Features
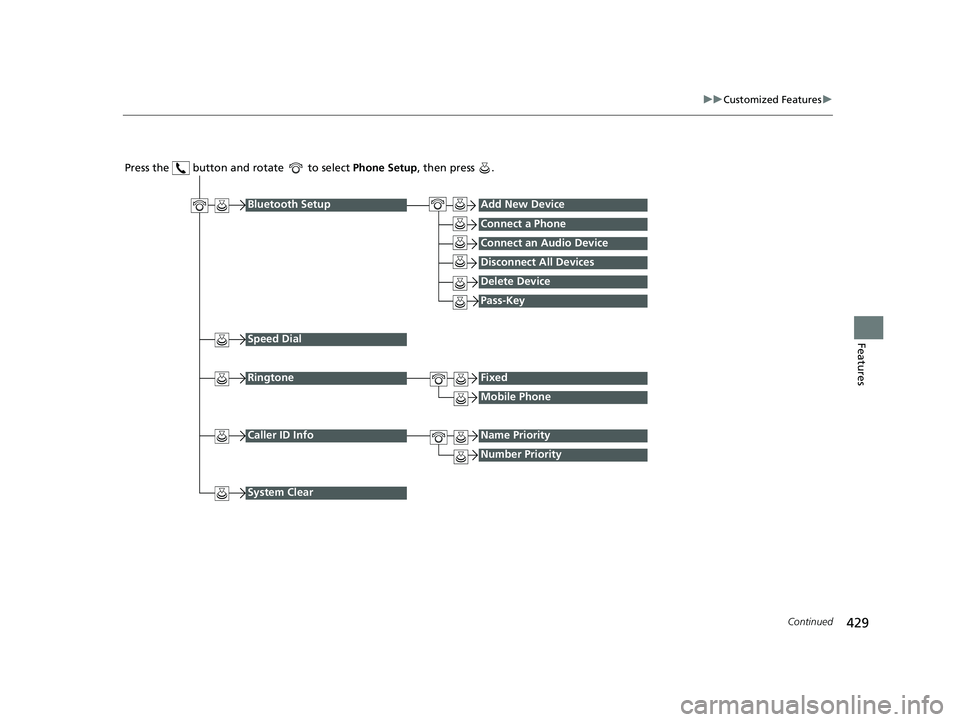
Press the button and rotate to select Phone Setup, then press .
RingtoneFixed
Mobile Phone
Bluetooth SetupAdd New Device
Connect a Phone
Connect an Audio Device
Disconnect All Devices
Delete Device
Pass-Key
Speed Dial
Caller ID InfoName Priority
Number Priority
System Clear
20 PILOT-31TG76401.book 429 ページ 2019年7月24日 水曜日 午後3時32分
Page 455 of 743
453
uuHomeLink ® Universal Transceiver*u Training HomeLink
Continued
Features
Training HomeLink
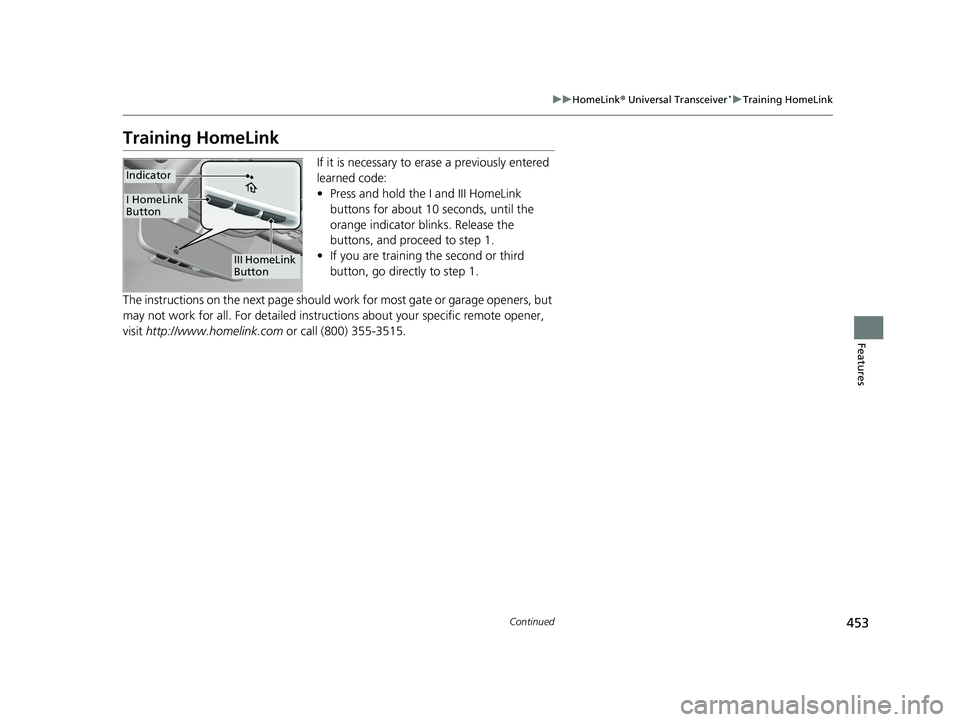
If it is necessary to er ase a previously entered
learned code:
• Press and hold the I and III HomeLink
buttons for about 10 seconds, until the
orange indicator blinks. Release the
buttons, and proceed to step 1.
• If you are training the second or third
button, go directly to step 1.
The instructions on the next page should work for most gate or garage openers, but
may not work for all. For detailed instructions about your specific remote opener,
visit http://www.homelink.com or call (800) 355-3515.
III HomeLink
Button
Indicator
I HomeLink
Button
20 PILOT-31TG76401.book 453 ページ 2019年7月24日 水曜日 午後3時32分
Page 456 of 743
uuHomeLink ® Universal Transceiver*u Training HomeLink
454
Features
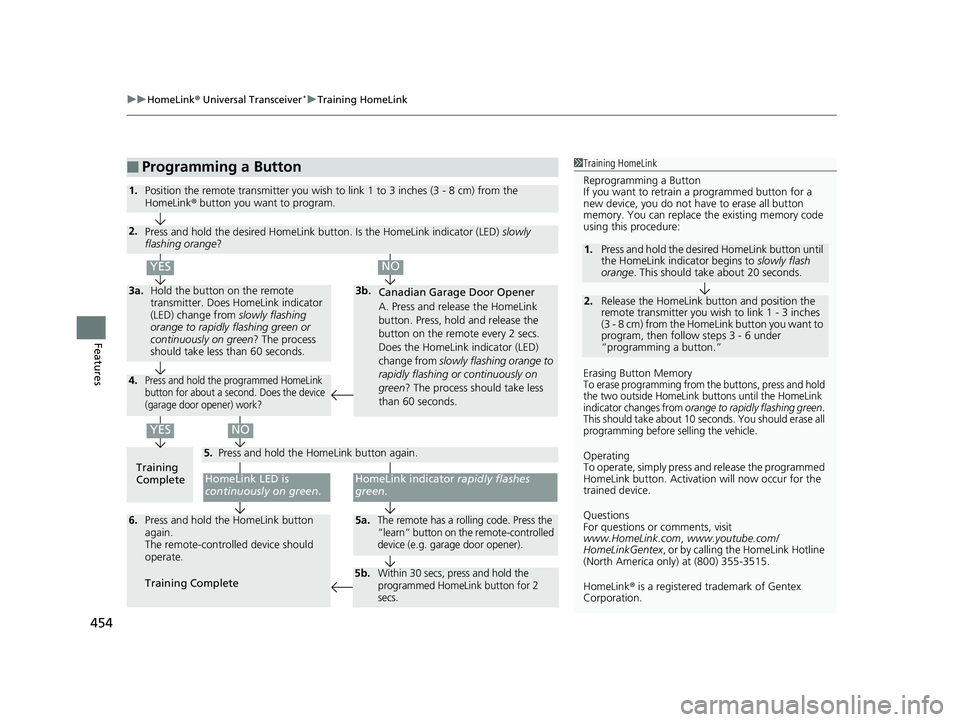
■Programming a Button1Training HomeLink
Reprogramming a Button
If you want to retrain a programmed button for a
new device, you do not ha ve to erase all button
memory. You can replace the existing memory code
using this procedure:
Erasing Button Memory
To erase programming from the buttons, press and hold
the two outside HomeLink buttons until the HomeLink
indicator changes from
orange to rapidly flashing green.
This should take about 10 seconds. You should erase all
programming before selling the vehicle.
Operating
To operate, simply press and release the programmed
HomeLink button. Activati on will now occur for the
trained device.
Questions
For questions or comments, visit
www.HomeLink.com , www.youtube.com/
HomeLinkGentex , or by calling the HomeLink Hotline
(North America only) at (800) 355-3515.
HomeLink® is a registered tra demark of Gentex
Corporation.
2.
1. Press and hold the desired HomeLink button until
the HomeLink indi
cator begins to slowly flash
orange . This should take about 20 seconds.
Release the HomeLink button and position the
remote transmitter you wish to link 1 - 3 inches
(3 - 8 cm) from the HomeLink button you want to
program, then follow steps 3 - 6 under
“programming a button.”
Training
CompleteHomeLink LED is
continuously on green .
YES
YES
1.Position the remote transmitter you wish to link 1 to 3 inches (3 - 8 cm) from the
HomeLink® button you want to program.
3b.
Canadian Garage Door Opener
A. Press and release the HomeLink
button. Press, hold and release the
button on the remote every 2 secs.
Does the HomeLink indicator (LED)
change from slowly flashing orange to
rapidly flashing or continuously on
green ? The process should take less
than 60 seconds.
NO
2. Press and hold the desired HomeLink button. Is the HomeLink indicator (LED) slowly
flashing orange ?
NO
3a.Hold the button on the remote
transmitter. Does HomeLink indicator
(LED) change from slowly flashing
orange to rapidly flashing green or
continuously on green ? The process
should take less than 60 seconds.
5. Press and hold the HomeLink button again.
HomeLink indicator rapidly flashes
green .
5a.The remote has a rolling code. Press the
“learn” button on th e remote-controlled
device (e.g. garage door opener).6. Press and hold the HomeLink button
again.
The remote-controll ed device should
operate.
Training Complete
5b.Within 30 secs, press and hold the
programmed HomeLink button for 2
secs.
4.Press and hold the programmed HomeLink
button for about a second. Does the device
(garage door opener) work?
20 PILOT-31TG76401.book 454 ページ 2019年7月24日 水曜日 午後3時32分
Page 457 of 743
455Continued
Features
Bluetooth® HandsFreeLink ®
Bluetooth® HandsFreeLink ® (HFL) allows you to place and receive phone calls using
your vehicle’s audio system, without handling your cell phone.
Using HFL
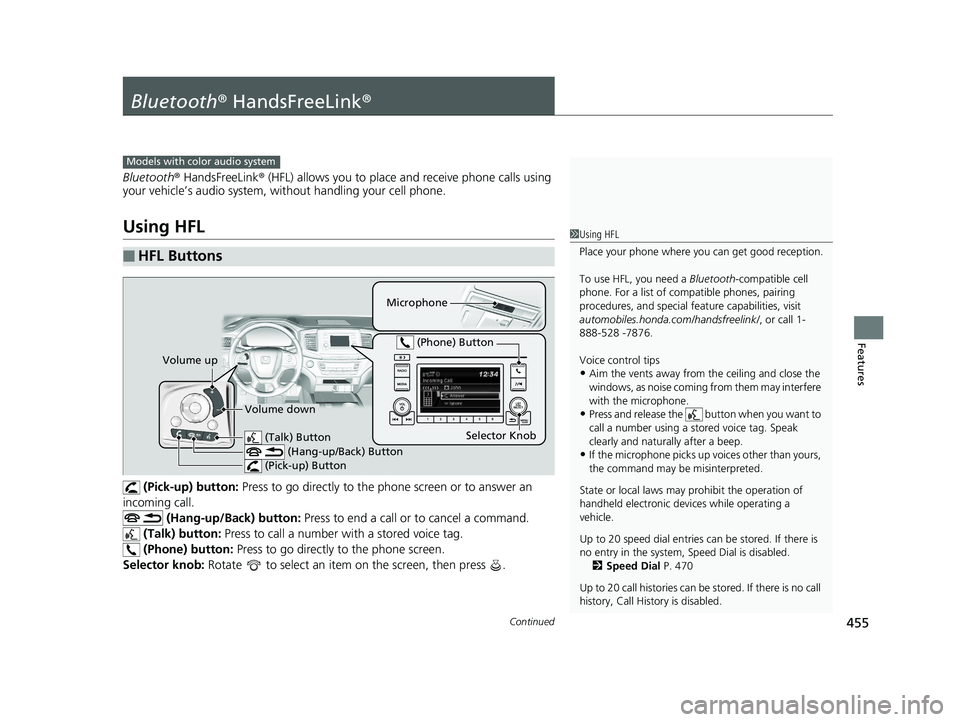
(Pick-up) button: Press to go directly to the p hone screen or to answer an
incoming call. (Hang-up/Back) button: Press to end a call or to cancel a command.
(Talk) button: Press to call a number wi th a stored voice tag.
(Phone) button: Press to go directly to the phone screen.
Selector knob: Rotate to select an item on the screen, then press .
■HFL Buttons
1Using HFL
Place your phone where y ou can get good reception.
To use HFL, you need a Bluetooth-compatible cell
phone. For a list of compatible phones, pairing
procedures, and special fe ature capabilities, visit
automobiles.honda.com /handsfreelink/, or call 1-
888-528 -7876.
Voice control tips
•Aim the vents away from the ceiling and close the
windows, as noise coming fr om them may interfere
with the microphone.
•Press and release the button when you want to
call a number using a st ored voice tag. Speak
clearly and naturally after a beep.
•If the microphone picks up vo ices other than yours,
the command may be misinterpreted.
State or local laws may pr ohibit the operation of
handheld electronic devi ces while operating a
vehicle.
Up to 20 speed dial entries can be stored. If there is
no entry in the system, Speed Dial is disabled. 2 Speed Dial P. 470
Up to 20 call histories can be stored. If there is no call
history, Call History is disabled.
Models with color audio system
Microphone
(Talk) Button (Hang-up/Back) Button
(Pick-up) Button
Selector Knob
(Phone) Button
Volume up
Volume down
20 PILOT-31TG76401.book 455 ページ 2019年7月24日 水曜日 午後3時32分
Page 463 of 743
Continued461
uuBluetooth ® HandsFreeLink ®u HFL Menus
Features
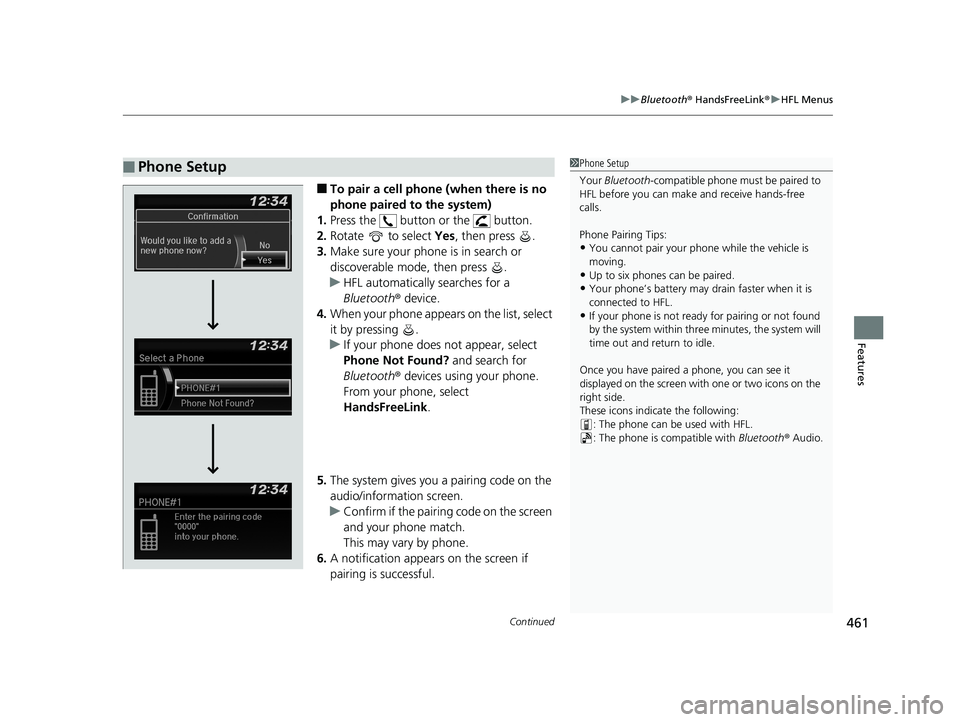
■To pair a cell phone (when there is no
phone paired to the system)
1. Press the button or the button.
2. Rotate to select Yes, then press .
3. Make sure your phone is in search or
discoverable mode, then press .
u HFL automatically searches for a
Bluetooth ® device.
4. When your phone appears on the list, select
it by pressing .
u If your phone does not appear, select
Phone Not Found? and search for
Bluetooth ® devices using your phone.
From your phone, select
HandsFreeLink .
5. The system gives you a pairing code on the
audio/information screen.
u Confirm if the pairing code on the screen
and your phone match.
This may vary by phone.
6. A notification appears on the screen if
pairing is successful.
■Phone Setup1Phone Setup
Your Bluetooth -compatible phone must be paired to
HFL before you can make and receive hands-free
calls.
Phone Pairing Tips:
•You cannot pair your phone while the vehicle is
moving.
•Up to six phones can be paired.
•Your phone’s battery may dr ain faster when it is
connected to HFL.
•If your phone is not ready for pairing or not found
by the system within three minutes, the system will
time out and return to idle.
Once you have paired a phone, you can see it
displayed on the screen with one or two icons on the
right side.
These icons indicate the following: : The phone can be used with HFL.
: The phone is compatible with Bluetooth ® Audio.
20 PILOT-31TG76401.book 461 ページ 2019年7月24日 水曜日 午後3時32分
Page 464 of 743
462
uuBluetooth ® HandsFreeLink ®u HFL Menus
Features
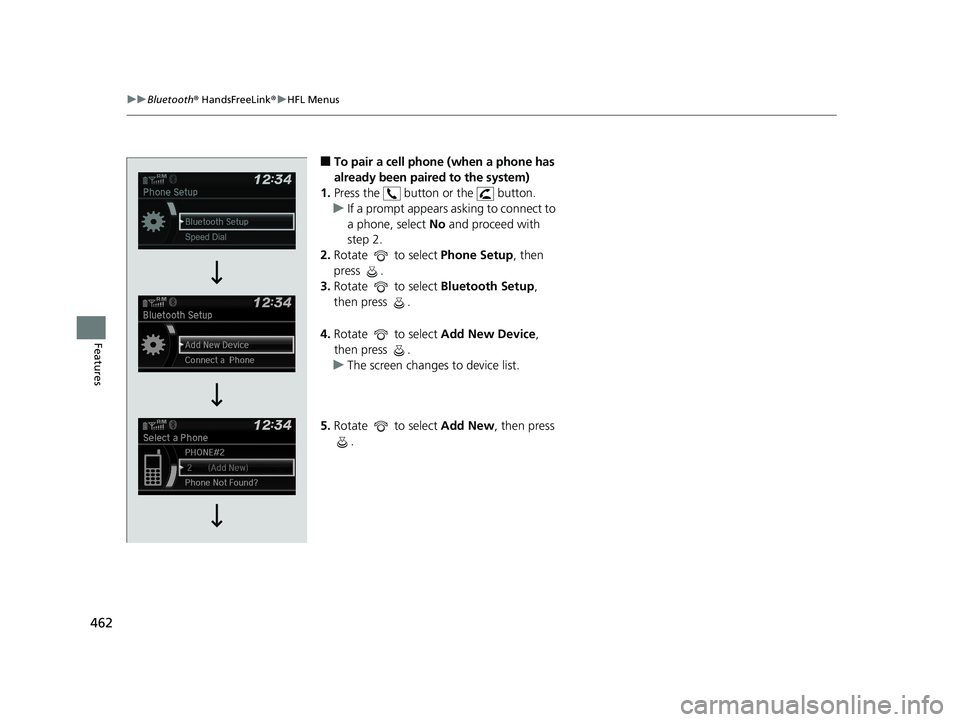
■To pair a cell phone (when a phone has
already been paired to the system)
1. Press the button or the button.
u If a prompt appears asking to connect to
a phone, select No and proceed with
step 2.
2. Rotate to select Phone Setup, then
press .
3. Rotate to select Bluetooth Setup,
then press .
4. Rotate to select Add New Device,
then press .
u The screen changes to device list.
5. Rotate to select Add New, then press
.
20 PILOT-31TG76401.book 462 ページ 2019年7月24日 水曜日 午後3時32分