check engine light HONDA PILOT 2020 (in English) User Guide
[x] Cancel search | Manufacturer: HONDA, Model Year: 2020, Model line: PILOT, Model: HONDA PILOT 2020Pages: 743, PDF Size: 45.53 MB
Page 613 of 743
 User Guide 611
uuBraking uBrake System
Driving
Your vehicle is equipped with disc brakes at all four wheels. A vacuum power assist
helps reduce the effort needed on the brake pedal. The brake assist system inc")
611
uuBraking uBrake System
Driving
Your vehicle is equipped with disc brakes at all four wheels. A vacuum power assist
helps reduce the effort needed on the brake pedal. The brake assist system increases
the stopping force when you depress the brake pedal hard in an emergency
situation. The anti-lock brake system (ABS) helps you retain steering control when
braking very hard.
2 Brake Assist System P. 613
2 Anti-lock Brake System (ABS) P. 612
■Foot Brake1Foot Brake
Check the brakes after driving through deep water,
or if there is a buildup of road surface water. If
necessary, dry the brakes by lightly depressing the
pedal several times.
If you hear a continuous me tallic friction sound when
applying the brakes, this is caused by the brake wear
indicator rubbing on the brake rotor and indicates
that the brake pads need to be replaced. Have the
vehicle checked by a deal er. If you hear only an
occasional squeak or squeal when you initially apply
the brake pedal, this may be normal and caused by
high frequency vibr ation of the brake pads against
the rotating brake disc.
Constantly using the brak e pedal while going down a
long hill builds up heat, which reduces the brake
effectiveness. Apply engine braking by taking your
foot off the accelerator pe dal and downshifting to a
lower gear.
Do not rest your foot on the brake pedal while
driving, as it will lightly apply the brakes and cause
them to lose effectiveness over time and reduce pad
life. It will also conf use drivers behind you.
20 PILOT-31TG76401.book 611 ページ 2019年7月24日 水曜日 午後3時32分
Page 614 of 743
 User Guide 612
uuBraking uAnti-lock Brake System (ABS)
Driving
Anti-lock Brake System (ABS)
Helps prevent the wheels from locking up, an d helps you retain steering control by
pumping the brakes rapidly, much f")
612
uuBraking uAnti-lock Brake System (ABS)
Driving
Anti-lock Brake System (ABS)
Helps prevent the wheels from locking up, an d helps you retain steering control by
pumping the brakes rapidly, much faster than you.
The electronic brake distribution (EBD) system, which is part of the ABS, also
balances the front-to-rear braking distri bution according to vehicle loading.
You should never pump the brake pedal. Let the ABS work for you by always
keeping firm, steady pressure on the brake pe dal. This is sometimes referred to as
“stomp and steer.”
■ABS operation
The brake pedal may pulsate slightly when the ABS is working. Depress the brake
pedal and keep holding the pedal firmly do wn. On dry pavement, you will need to
press on the brake pedal very hard before the ABS activates. However, you may feel
the ABS activate immediately if yo u are trying to stop on snow or ice.
ABS may activate when you depress the brake pedal when driving on:
• Wet or snow covered roads.
• Roads paved with stone.
• Roads with uneven surfaces, such as potholes, cracks, manholes, etc.
When the vehicle speed goes unde r 6 mph (10 km/h), the ABS stops.
■ABS1Anti-lock Brake System (ABS)
NOTICE
The ABS may not function correc tly if you use a tire of
the wrong size or type.
If the ABS indicator comes on while driving, there
may be a problem with the system.
While normal braking will not be affected, there is a
possibility that the ABS wi ll not be operating. Have
your vehicle checked by a dealer immediately.
The ABS is not designed for the purpose of reducing
the time or distance it takes for a vehicle to stop: It is
designed to limit brake lo ckup which can lead to
skidding and loss of steering control.
In the following cases, yo ur vehicle may need more
distance to stop than a vehicle without the ABS:
•You are driving on rough or uneven road surfaces,
such as gravel or snow.
•The tires are equipped with snow chains.
The following may be observed with the ABS system:
•Motor sounds coming from the engine
compartment when the brakes are applied, or when
system checks are being performed after the engine
has been started and while the vehicle accelerates.
•Brake pedal and/or the ve hicle body vibration when
ABS activates.
These vibrations and sou nds are normal to ABS
systems and are no cause for concern.
20 PILOT-31TG76401.book 612 ページ 2019年7月24日 水曜日 午後3時32分
Page 633 of 743
 User Guide 631
Maintenance
This chapter discusses basic maintenance.
Before Performing MaintenanceInspection and Maintenance ............ 632
Safety When Performing Maintenance ..633
Parts and Fluids Used in Mai")
631
Maintenance
This chapter discusses basic maintenance.
Before Performing MaintenanceInspection and Maintenance ............ 632
Safety When Performing Maintenance ..633
Parts and Fluids Used in Maintenance Service ........................................... 634
Maintenance Minder
TM..................... 635
Maintenance Under the Hood Maintenance Items Under the Hood .. 641
Opening the Hood ........................... 642
Engine Compartment Cover ............. 643
Recommended Engine Oil ................ 644
Oil Check ......................................... 645
Adding Engine Oil ............................ 646
Changing the Engine Oil and Oil Filter ...647 Engine Coolant ................................ 649
Transmission Fluid ............................ 651
Brake Fluid ....................................... 652
Refilling Window Washer Fluid......... 652
Replacing Light Bulbs ....................... 653Checking and Maintaining Wiper Blades... 658Checking and Maintaining Tires
Checking Tires ................................. 662
Tire and Loading Information Label .. 663
Tire Labeling .................................... 663
DOT Tire Quality Grading (U.S. Vehicles).. 665Wear Indicators................................ 667
Tire Service Life ................................ 667 Tire and Wheel Replacement ........... 668
Tire Rotation .................................... 669
Winter Tires ..................................... 670
Battery ............................................... 671
Remote Transmitter Care ................. 673
Remote Control and Wireless Headphone Care
*........................... 674Heating and Cooling System*/Climate
Control System* Maintenance............. 676Cleaning Interior Care .................................... 678
Exterior Care.................................... 680
Accessories and Modifications ........ 683
* Not available on all models
20 PILOT-31TG76401.book 631 ページ 2019年7月24日 水曜日 午後3時32分
Page 644 of 743
642
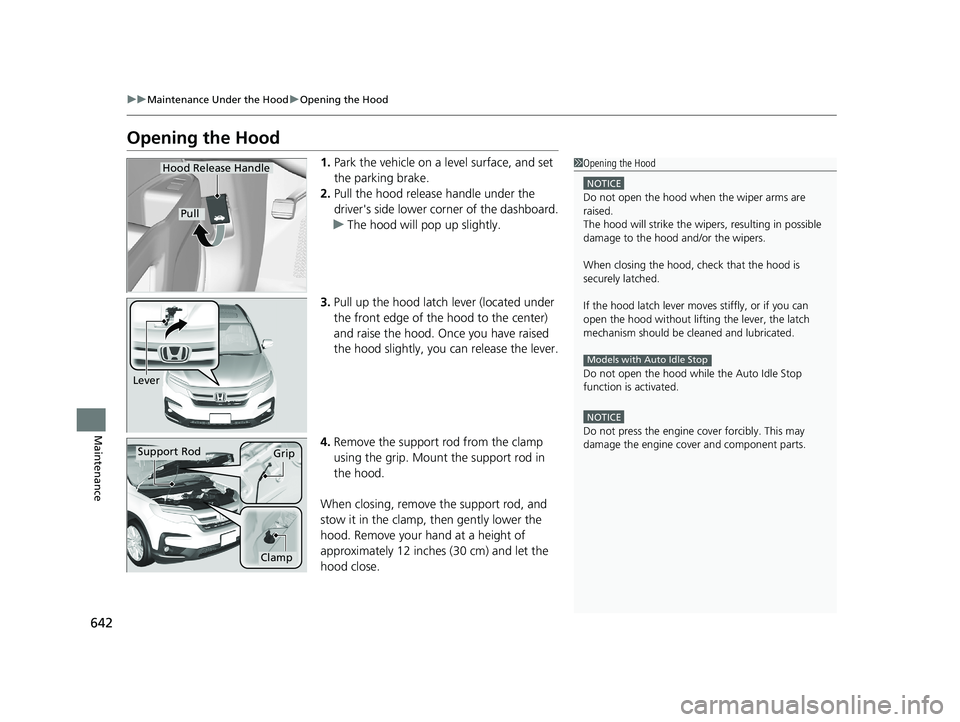
uuMaintenance Under the Hood uOpening the Hood
Maintenance
Opening the Hood
1. Park the vehicle on a level surface, and set
the parking brake.
2. Pull the hood release handle under the
driver's side lower co rner of the dashboard.
u The hood will pop up slightly.
3. Pull up the hood latch lever (located under
the front edge of the hood to the center)
and raise the hood. On ce you have raised
the hood slightly, you can release the lever.
4. Remove the support rod from the clamp
using the grip. Mount the support rod in
the hood.
When closing, remove the support rod, and
stow it in the clamp, then gently lower the
hood. Remove your hand at a height of
approximately 12 inches (30 cm) and let the
hood close.1 Opening the Hood
NOTICE
Do not open the hood when the wiper arms are
raised.
The hood will strike the wipe rs, resulting in possible
damage to the hood and/or the wipers.
When closing the hood, check that the hood is
securely latched.
If the hood latch lever moves stiffly, or if you can
open the hood without lifti ng the lever, the latch
mechanism should be cl eaned and lubricated.
Do not open the hood while the Auto Idle Stop
function is activated.
NOTICE
Do not press the engine cover forcibly. This may
damage the engine cover and component parts.
Models with Auto Idle Stop
Hood Release Handle
Pull
Lever
Support RodGrip
Clamp
20 PILOT-31TG76401.book 642 ページ 2019年7月24日 水曜日 午後3時32分
Page 650 of 743
 User Guide uuMaintenance Under the Hood uChanging the Engine Oil and Oil Filter
648
Maintenance
4. Remove the oil filter and dispose of the
remaining oil.
5. Check that the filter ga sket is not stuck to
the e")
uuMaintenance Under the Hood uChanging the Engine Oil and Oil Filter
648
Maintenance
4. Remove the oil filter and dispose of the
remaining oil.
5. Check that the filter ga sket is not stuck to
the engine contact surface.
u If it is stuck, you must detach it.
6. Wipe away dirt and dust adhering to the
contact surface of the oil filter base, and
install a new oil filter.
u Apply a light coat of new engine oil to
the oil filter rubber seal.
7. Put a new washer on the drain bolt, then
reinstall the drain bolt.
u Tightening torque:
29 lbf∙ft (39 N∙m, 4.0 kgf∙m)
8. Pour the recommended engine oil into the
engine.
u Engine oil change capacity (including
filter):
5.7 US qt (5.4 ℓ)
9. Reinstall the engine oil fill cap securely and
start the engine.
10. Run the engine for a few minutes, and
then check that there is no leak from the
drain bolt or oil filter.
11. Stop the engine, wait for three minutes,
and then check the oil level on the
dipstick.
u If necessary, add more engine oil.1Changing the Engine Oil and Oil Filter
You will need a special wrench to replace the oil
filter. You can buy this wrench from a dealer.
When installing the new oil filter, follow the
instructions supplied with the oil filter.
Reinstall the engine oil fill cap. Start the engine. The
low oil pressure indicator should go off within five
seconds. If it does not, turn off the engine, and check
your work.
Oil Filter
20 PILOT-31TG76401.book 648 ページ 2019年7月24日 水曜日 午後3時32分
Page 673 of 743
 User Guide 671
Maintenance
Battery
Checking the Battery
The condition of the battery is monitored by a
sensor located on the negative terminal of the
battery. If there is a problem with this sensor,
the drive")
671
Maintenance
Battery
Checking the Battery
The condition of the battery is monitored by a
sensor located on the negative terminal of the
battery. If there is a problem with this sensor,
the driver information interface will display a
warning message. If this happens, have your
vehicle inspected by a dealer.
Check the battery termin als for corrosion monthly.
To access the battery terminals:
1. Remove the engine compartment cover.
2 Engine Compartment Cover P. 643
2.Remove the clips using a Ph illips-head screwdriver, then remove the air intake
duct.
2 High Beam Headlights P. 653
If your vehicle’s battery is disconnected or goes dead:
•The audio system is disabled.
2 Audio System Theft Protection P. 247
•The clock resets*.
2 Clock P. 136
1Battery
WARNING: Battery post, terminals,
and related accessories contain lead
and lead compounds.
Wash your hands after handling.
When you find corrosion, cl ean the battery terminals
by applying a baking powder and water solution.
Clean the terminals with a damp towel. Cloth/towel
dry the battery. Coat the terminals with grease to
help prevent future corrosion.
When replacing the battery, the replacement must be
of the same specifications.
Consult a dealer for more information.
3WARNING
The battery gives off explosive hydrogen
gas during normal operation.
A spark or flame can cause the battery to
explode with enough force to kill or
seriously hurt you.
When conducting any battery
maintenance, wear prot ective clothing and
a face shield, or have a skilled technician do
it.
* Not available on all models
20 PILOT-31TG76401.book 671 ページ 2019年7月24日 水曜日 午後3時32分
Page 697 of 743
 User Guide 695
Handling the Unexpected
Engine Does Not Start
Checking the Engine
If the engine does not start, check the starter.
Starter conditionChecklist
Starter doesn’t turn or turns
over slowly.
The batt")
695
Handling the Unexpected
Engine Does Not Start
Checking the Engine
If the engine does not start, check the starter.
Starter conditionChecklist
Starter doesn’t turn or turns
over slowly.
The battery may be dead. Check
each of the items on the right and
respond accordingly.Check for a message on the driver information interface.
●If the To Start, Hold Remote Near Start Button message appears
2If the Smart Entry Remote Battery is Weak P. 696
uMake sure the smart entry remote is in its operating range.
2 ENGINE START/STOP Button Operating Range P. 171
Check the brightness of the interior lights.
Turn on the interior lights and check the brightness.
●If the interior lights are dim or do not come on at all
2 Battery P. 671●If the interior lights come on normally 2 Fuses P. 709
The starter turns over normally
but the engine doesn’t start.
There may be a problem with a
fuse. Check each of the items on
the right and respond accordingly. Review the engine start procedure.
Follow its instructions, and try
to start the engine again.
2 Starting the Engine P. 526
Check the immobilizer system indicator.
When the immobilizer system indicator is blinking, the engine cannot be started.
2Immobilizer System P. 163
Check the fuel level.
There should be enough fuel in the tank.
2 Fuel Gauge P. 110
Check the fuses.
Check all fuses, or have the vehicle checked by a dealer.
2Inspecting and Changing Fuses P. 713
If the problem continues:
2Emergency Towing P. 714
1Checking the Engine
If you must start the vehi cle immediately, use an
assisting vehicle or booster battery to jump start it.
2 Jump Starting P. 700
20 PILOT-31TG76401.book 695 ページ 2019年7月24日 水曜日 午後3時32分
Page 703 of 743
 User Guide 701
uuJump Starting u
Continued
Handling the Unexpected
3.Pull up on the engine cover, remove it from
the pins.
u Start on the passenger side and lift the
outermost edge of the cover.
u Move towards")
701
uuJump Starting u
Continued
Handling the Unexpected
3.Pull up on the engine cover, remove it from
the pins.
u Start on the passenger side and lift the
outermost edge of the cover.
u Move towards the driver side while
applying uniform upward pressure.
4. Connect the first jumper cable to your
vehicle’s battery + terminal.
5. Connect the other end of the first jumper
cable to the booster battery + terminal.
u Use a 12-volt booster battery only.
u When using an automotive battery
charger to boost your 12-volt battery,
select a lower charging voltage than 15
volts. Check the ch arger manual for the
proper setting.
6. Connect the second jumper cable to the
booster battery - terminal.
7. Connect the other end of the second
jumper cable to the engine hanger as
shown. Do not connect this jumper cable to
any other part.
8. If your vehicle is connected to another
vehicle, start the assisting vehicle’s engine
and increase its rpm slightly.
9. Attempt to start your ve hicle’s engine. If it
turns over slowly, check that the jumper
cables have good metal-to-metal contact.
Pin
Engine Cover
Booster Battery
20 PILOT-31TG76401.book 701 ページ 2019年7月24日 水曜日 午後3時32分
Page 707 of 743
 User Guide 705
Handling the Unexpected
Indicator, Coming On/Blinking
If the Low Oil Pressure Warning Appears
■Reasons for the warning to appear
Appears when the engine oil pressure is low.
■What to do as soo")
705
Handling the Unexpected
Indicator, Coming On/Blinking
If the Low Oil Pressure Warning Appears
■Reasons for the warning to appear
Appears when the engine oil pressure is low.
■What to do as soon as the warning appears
1. Immediately park the vehicle on level ground in a safe place.
2. If necessary, turn the hazard warning lights on.
■What to do after parking the vehicle
1. Stop the engine and let it sit for approximately three minutes.
2. Open the hood and check the oil level.
u Add oil as necessary.
2 Oil Check P. 645
3.Start the engine and check the low oil pressure warning.
u The warning disappears: Start driving again.
u The warning does not disappear within 10 seconds: Immediately
stop the engine and contact a dealer for repairs.
If the Charging System Indicator Comes On
■Reasons for the indicator to come on
Comes on when the battery is not being charged.
■What to do when th e indicator comes on
Turn off the heating and cooling system*/climate control system*, rear
defogger, and other electrical system s, and immediately contact a dealer
for repairs.
1 If the Low Oil Pressure Warning Appears
NOTICE
Running the engine with low oil pressure can cause
serious mechanical damage almost immediately.
1If the Charging System Indicator Comes On
If you need to stop temporarily, do not turn off the
engine. Restarting the engi ne may rapidly discharge
the battery.
* Not available on all models
20 PILOT-31TG76401.book 705 ページ 2019年7月24日 水曜日 午後3時32分
Page 709 of 743
 User Guide 707
uuIndicator, Comin g On/BlinkinguIf the Brake System Indicator (Red) Comes On
Handling the Unexpected
If the Brake System Indicator (Red) Comes On
■Reasons for the indicator to come on
• The b")
707
uuIndicator, Comin g On/BlinkinguIf the Brake System Indicator (Red) Comes On
Handling the Unexpected
If the Brake System Indicator (Red) Comes On
■Reasons for the indicator to come on
• The brake fluid is low.
• There is a malfunction in the brake system.
■What to do when the indica tor comes on while driving
Depress the brake pedal lightly to check pedal pressure.
• If normal, check the brake fluid level the next time you stop.
• If abnormal, take immediate acti on. If necessary, downshift the
transmission to slow the vehicle using engine braking.
If the Electric Power Steeri ng (EPS) System Indicator
Comes On
■Reasons for the indicator to come on
• Comes on when there is a problem with the EPS system.
• If you depress the accelerator pedal repeatedly to increase the engine
speed while the engine is idling, the indicator comes on, and
sometimes the steering wheel becomes harder to operate.
■What to do when th e indicator comes on
Stop the vehicle in a safe place and restart the engine.
If the indicator comes on and stays on, immediately have your vehicle
inspected by a dealer.
1 If the Brake System Indicator (Red) Comes On
Have your vehicle re paired immediately.
It is dangerous to drive with low brake fluid. If there
is no resistance from the brake pedal, stop
immediately in a safe plac e. If necessary downshift
the gears.
If the brake system indicator and ABS indicator come
on simultaneously, the elec tronic brake distribution
system is not working. Th is can result in vehicle
instability under sudden braking.
Have your vehicle inspecte d by a dealer immediately.U.S.
Canada
20 PILOT-31TG76401.book 707 ページ 2019年7月24日 水曜日 午後3時32分