check engine HONDA PILOT 2020 (in English) Owner's Guide
[x] Cancel search | Manufacturer: HONDA, Model Year: 2020, Model line: PILOT, Model: HONDA PILOT 2020Pages: 743, PDF Size: 45.53 MB
Page 554 of 743
 Owners Guide 552
uuWhen Driving uVehicle Stability AssistTM (VSA ®), aka Electronic Stability Control (ESC), System
Driving
Vehicle Stability AssistTM (VSA ®), aka Electronic
Stability Control (ESC), System
VSA")
552
uuWhen Driving uVehicle Stability AssistTM (VSA ®), aka Electronic Stability Control (ESC), System
Driving
Vehicle Stability AssistTM (VSA ®), aka Electronic
Stability Control (ESC), System
VSA ® helps to stabilize the vehicle during cornering if the vehicle turns more or less
than what was intended. It also assists in maintaining traction on slippery surfaces.
It does so by regulating engine output and selectively applying the brakes.
When VSA® activates, you may notice that the
engine does not respond to the accelerator.
You may also notice some noise from the
hydraulic system. You will also see the
indicator blink.
■VSA ® Operation
1 Vehicle Stability AssistTM (VSA ®), aka Electronic Stability Control
(ESC), System
The VSA ® may not function properl y if tire type and
size are mixed. Make sure to use the same size and
type of tire, and the air pressures as specified.
When the VSA ® system indicator comes on and stays
on while driving, there ma y be a problem with the
system. While this may not interfere with normal
driving, have your vehi cle checked by a dealer
immediately.
VSA ® cannot enhance stability in all driving situations
and does not control the entire braking system. You
still need to drive and corner at speeds appropriate
for the conditions and always leave a sufficient
margin of safety.
The main function of the VSA ® system is generally
known as Electronic Stab ility Control (ESC). The
system also includes a traction control function.
VSA® System
Indicator
20 PILOT-31TG76401.book 552 ページ 2019年7月24日 水曜日 午後3時32分
Page 555 of 743
 Owners Guide 553
uuWhen Driving uVehicle Stability AssistTM (VSA ®), aka Electronic Stability Control (ESC), System
Driving
This button is on the driver side control panel.
To partially disable VSA ® functional")
553
uuWhen Driving uVehicle Stability AssistTM (VSA ®), aka Electronic Stability Control (ESC), System
Driving
This button is on the driver side control panel.
To partially disable VSA ® functionality/
features, press and hold it until you hear a
beep.
The traction control stop s fully functioning,
allowing the wheels to spin more freely at low
speed. The VSA ® OFF indicator will also come
on and a message on the driver information
interface informs you that the mode is
changed.
Traction control mode can not be changed
during Mud or Sand modes. If you are driving
on mud or sand, Mud or Sand Intelligent
Traction Management modes can also be
used to free a stuck ve hicle. On other road
surfaces, change to Normal or Snow mode,
then press and hold the (VSA ® OFF) button.
To restore VSA ® functionality/features, press
the (VSA ® OFF) button until you hear a
beep.
VSA ® is turned on every time you start the
engine, even if you turned it off the last time
you drove the vehicle.
■VSA ® On and Off1 Vehicle Stability AssistTM (VSA® ), aka Electronic Stability Control
(ESC), System
With the button pressed, your vehicle will have
normal braking and corn ering ability, but VSA®
traction and stability enhancement becomes less
effective.
In certain unusual conditions when your vehicle gets
stuck in shallow mud or fr esh snow, it may be easier
to free it with the VSA ® temporarily switched off.
When the button is pressed, the traction control
function becomes less effective. This allows for the
wheels to spin more freely at low speed. You should
only attempt to free your vehicle with the VSA ® off if
you are not able to free it when the VSA ® is on.
Immediately after freeing your vehicle, be sure to
switch VSA ® on again. We do not recommend driving
your vehicle with the VSA ® system switched off.
You may hear a motor sound coming from the
engine compartment while system checks are being
performed immediately after starting the engine or
while driving. This is normal.
VSA ® OFF Indicator
AWD models
20 PILOT-31TG76401.book 553 ページ 2019年7月24日 水曜日 午後3時32分
Page 562 of 743
 Owners Guide 560
uuWhen Driving uIntelligent Variable Torque Management (i-VTM4TM) AWD System*
Driving
Intelligent Variable Torque Management (i-VTM4TM) AWD System*
The intelligent variable torque management (i-VT")
560
uuWhen Driving uIntelligent Variable Torque Management (i-VTM4TM) AWD System*
Driving
Intelligent Variable Torque Management (i-VTM4TM) AWD System*
The intelligent variable torque management (i-VTM4TM) AWD system is a full time all
wheel drive system that automatically co ntrols and transfers varying amount of
engine torque to all wheels independently according to the driving conditions.
You still need to exercise the same care when accelerating, steering, and braking
that you would in a two wheel drive vehicle.
Avoid continuously driving on slippery surfa ces where a wheel is likely to spin out,
and do not drive if the AWD indicator starts blinking. Driving continuously under
such conditions can damage the system's torque distribution unit.
If the AWD indicator blinks while driving, it indicates the differential temperature is
too high. If this happens, pull to the side of the road when it is safe, shift to park, an
idle the engine idle until the indicator goes out. If the indicator does not go out, take
your vehicle to a dealer to have it checked.1Intelligent Variable Torque Management (i-VTM4TM) AWD System*
NOTICE
Do not continuously spin the front tires of your
vehicle. Continuously spinning the front tires can
cause transmission or re ar differential damage.
The intelligent variable torque management
(i-VTM4
TM) AWD system may not function properly if
tire type and size are mixed. Make sure to use the
same size and type of tire , and the air pressures as
specified. 2 Tire and Wheel Replacement P. 668
* Not available on all models
20 PILOT-31TG76401.book 560 ページ 2019年7月24日 水曜日 午後3時32分
Page 613 of 743
 Owners Guide 611
uuBraking uBrake System
Driving
Your vehicle is equipped with disc brakes at all four wheels. A vacuum power assist
helps reduce the effort needed on the brake pedal. The brake assist system inc")
611
uuBraking uBrake System
Driving
Your vehicle is equipped with disc brakes at all four wheels. A vacuum power assist
helps reduce the effort needed on the brake pedal. The brake assist system increases
the stopping force when you depress the brake pedal hard in an emergency
situation. The anti-lock brake system (ABS) helps you retain steering control when
braking very hard.
2 Brake Assist System P. 613
2 Anti-lock Brake System (ABS) P. 612
■Foot Brake1Foot Brake
Check the brakes after driving through deep water,
or if there is a buildup of road surface water. If
necessary, dry the brakes by lightly depressing the
pedal several times.
If you hear a continuous me tallic friction sound when
applying the brakes, this is caused by the brake wear
indicator rubbing on the brake rotor and indicates
that the brake pads need to be replaced. Have the
vehicle checked by a deal er. If you hear only an
occasional squeak or squeal when you initially apply
the brake pedal, this may be normal and caused by
high frequency vibr ation of the brake pads against
the rotating brake disc.
Constantly using the brak e pedal while going down a
long hill builds up heat, which reduces the brake
effectiveness. Apply engine braking by taking your
foot off the accelerator pe dal and downshifting to a
lower gear.
Do not rest your foot on the brake pedal while
driving, as it will lightly apply the brakes and cause
them to lose effectiveness over time and reduce pad
life. It will also conf use drivers behind you.
20 PILOT-31TG76401.book 611 ページ 2019年7月24日 水曜日 午後3時32分
Page 614 of 743
 Owners Guide 612
uuBraking uAnti-lock Brake System (ABS)
Driving
Anti-lock Brake System (ABS)
Helps prevent the wheels from locking up, an d helps you retain steering control by
pumping the brakes rapidly, much f")
612
uuBraking uAnti-lock Brake System (ABS)
Driving
Anti-lock Brake System (ABS)
Helps prevent the wheels from locking up, an d helps you retain steering control by
pumping the brakes rapidly, much faster than you.
The electronic brake distribution (EBD) system, which is part of the ABS, also
balances the front-to-rear braking distri bution according to vehicle loading.
You should never pump the brake pedal. Let the ABS work for you by always
keeping firm, steady pressure on the brake pe dal. This is sometimes referred to as
“stomp and steer.”
■ABS operation
The brake pedal may pulsate slightly when the ABS is working. Depress the brake
pedal and keep holding the pedal firmly do wn. On dry pavement, you will need to
press on the brake pedal very hard before the ABS activates. However, you may feel
the ABS activate immediately if yo u are trying to stop on snow or ice.
ABS may activate when you depress the brake pedal when driving on:
• Wet or snow covered roads.
• Roads paved with stone.
• Roads with uneven surfaces, such as potholes, cracks, manholes, etc.
When the vehicle speed goes unde r 6 mph (10 km/h), the ABS stops.
■ABS1Anti-lock Brake System (ABS)
NOTICE
The ABS may not function correc tly if you use a tire of
the wrong size or type.
If the ABS indicator comes on while driving, there
may be a problem with the system.
While normal braking will not be affected, there is a
possibility that the ABS wi ll not be operating. Have
your vehicle checked by a dealer immediately.
The ABS is not designed for the purpose of reducing
the time or distance it takes for a vehicle to stop: It is
designed to limit brake lo ckup which can lead to
skidding and loss of steering control.
In the following cases, yo ur vehicle may need more
distance to stop than a vehicle without the ABS:
•You are driving on rough or uneven road surfaces,
such as gravel or snow.
•The tires are equipped with snow chains.
The following may be observed with the ABS system:
•Motor sounds coming from the engine
compartment when the brakes are applied, or when
system checks are being performed after the engine
has been started and while the vehicle accelerates.
•Brake pedal and/or the ve hicle body vibration when
ABS activates.
These vibrations and sou nds are normal to ABS
systems and are no cause for concern.
20 PILOT-31TG76401.book 612 ページ 2019年7月24日 水曜日 午後3時32分
Page 633 of 743
 Owners Guide 631
Maintenance
This chapter discusses basic maintenance.
Before Performing MaintenanceInspection and Maintenance ............ 632
Safety When Performing Maintenance ..633
Parts and Fluids Used in Mai")
631
Maintenance
This chapter discusses basic maintenance.
Before Performing MaintenanceInspection and Maintenance ............ 632
Safety When Performing Maintenance ..633
Parts and Fluids Used in Maintenance Service ........................................... 634
Maintenance Minder
TM..................... 635
Maintenance Under the Hood Maintenance Items Under the Hood .. 641
Opening the Hood ........................... 642
Engine Compartment Cover ............. 643
Recommended Engine Oil ................ 644
Oil Check ......................................... 645
Adding Engine Oil ............................ 646
Changing the Engine Oil and Oil Filter ...647 Engine Coolant ................................ 649
Transmission Fluid ............................ 651
Brake Fluid ....................................... 652
Refilling Window Washer Fluid......... 652
Replacing Light Bulbs ....................... 653Checking and Maintaining Wiper Blades... 658Checking and Maintaining Tires
Checking Tires ................................. 662
Tire and Loading Information Label .. 663
Tire Labeling .................................... 663
DOT Tire Quality Grading (U.S. Vehicles).. 665Wear Indicators................................ 667
Tire Service Life ................................ 667 Tire and Wheel Replacement ........... 668
Tire Rotation .................................... 669
Winter Tires ..................................... 670
Battery ............................................... 671
Remote Transmitter Care ................. 673
Remote Control and Wireless Headphone Care
*........................... 674Heating and Cooling System*/Climate
Control System* Maintenance............. 676Cleaning Interior Care .................................... 678
Exterior Care.................................... 680
Accessories and Modifications ........ 683
* Not available on all models
20 PILOT-31TG76401.book 631 ページ 2019年7月24日 水曜日 午後3時32分
Page 640 of 743
 Owners Guide 638
uuMaintenance MinderTMuTo Use Maintenance MinderTM
Maintenance
■Maintenance Service Items1Maintenance Service Items
•Adjust the valves during services A, B, 1, 2, or 3 if
they are noisy.
Main")
638
uuMaintenance MinderTMuTo Use Maintenance MinderTM
Maintenance
■Maintenance Service Items1Maintenance Service Items
•Adjust the valves during services A, B, 1, 2, or 3 if
they are noisy.
Maintenance Minder Message
System Message
Indicator
Sub Items
Main Item
U.S. models
*1: If the message Maintenance Due Now does not appear more than 12 months after the display
is reset, change the engine oil every year.
# : See information on maintenance and emissions warranty in the first column on page 727.
*2: If you drive in dusty conditions, replace every 15,000 miles (24,000 km).
*3: If you drive primarily in urban areas that have high concentrations of soot in the air from industry and
from diesel-powered vehicles, replace every 15,000 miles (24,000 km).
*4: If you drive regularly in very high temperatures (over 110°F, 43°C), in very low temperatures (under
-20°F, -29°C), replace every 60,000 miles (U.S.) /100,000 km (Canada).
CODEMaintenance Main Items
A
●Replace engine oil*1
B●Replace engine oil*1 and oil filter●Inspect front and rear brakes●Check parking brake adjustment●Inspect tie rod ends, steering gearbox, and boots●Inspect suspension components●Inspect driveshaft boots●Inspect brake hoses and li nes (Including ABS/VSA®)●Inspect all fluid levels and condition of fluids●Inspect exhaust system#
●Inspect fuel lines and connections#
*5: Driving in mountainous areas at very low vehicle speeds or trailer towing results in higher level of
mechanical (Shear) stress to fluid. This requires differential fluid changes more frequently than
recommended by the Maintenance Minder. If you regularly drive your vehicle under these conditions,
have the differential fluid changed at 7,500 miles (12,000 km), then every 15,000 miles (24,000 km).
*6: If a Maintenance Minder message does not appear more than 36 months after the display for item 7 is reset, change the brake fluid every 3 years.
CODEMaintenance Sub Items
1
●Rotate tires
2●Replace air cleaner element*2
●Replace dust and pollen filter*3
●Inspect drive belt
3
●Replace transmission fluid and transfer fluid*
4●Replace spark plugs●Replace timing belt and inspect water pump*4
●Inspect valve clearance
5
●Replace engine coolant
6●Replace rear differential fluid*, *5
7●Replace brake fluid*6
* Not available on all models
20 PILOT-31TG76401.book 638 ページ 2019年7月24日 水曜日 午後3時32分
Page 641 of 743
 Owners Guide 639
uuMaintenance MinderTMuTo Use Maintenance MinderTM
Continued
Maintenance
1Maintenance Service Items
•Adjust the valves during services A, 0, 9, 1, 2, or 3
if they are noisy.
Canadian models
*1:")
639
uuMaintenance MinderTMuTo Use Maintenance MinderTM
Continued
Maintenance
1Maintenance Service Items
•Adjust the valves during services A, 0, 9, 1, 2, or 3
if they are noisy.
Canadian models
*1: If the message Maintenance Due Now does not appear more than 12 months after the display
is reset, change the engine oil every year.
*2: If you drive in dusty conditions, replace every 24,000 km (15,000 miles).
*3: If you drive primarily in urban areas that have high concentrations of soot in the air from industry and from diesel-powered vehicles, replace every 24,000 km (15,000 miles).
*4: If you drive regularly in very high temperatures (over 43ºC, 110ºF), in very low temperatures (under -29ºC, -20ºF), replace every 100,000 km (60,000 miles).
*5: Driving in mountainous areas at very low vehicle speeds or trailer towing results in higher level of mechanical (Shear) stress to fluid. This requires differential fluid changes more frequently than
recommended by the Maintenance Minder. If you regularly drive your vehicle under these conditions,
have the differential fluid changed at 12,000km (7,500 miles), then every 24,000 km (15,000 miles).
*6: If a Maintenance Minder message does not appear more than 36 months after the display for item 7 is reset, change the brake fluid every 3 years.
# : See information on maintenance and emissions warranty in the first column on page 727.
CODEMaintenance Main Items
A
●Replace engine oil*1
0●Replace engine oil*1 and oil filter
CODEMaintenance Sub Items
1
●Rotate tires
2●Replace air cleaner element*2
●Replace dust and pollen filter*3
●Inspect drive belt
3
●Replace transmission fluid and transfer fluid*
4●Replace spark plugs●Replace timing belt and inspect water pump*4
●Inspect valve clearance
5
●Replace engine coolant
6●Replace rear differential fluid*,*5
7●Replace brake fluid*6
9●Service front and rear brakes●Check parking brake adjustment●Inspect tie rod ends, st eering gearbox, and boots●Inspect suspension components●Inspect driveshaft boots●Inspect brake hoses and lines (including ABS/VSA ®)●Inspect all fluid levels and condition of fluids●Inspect exhaust system#
●Inspect fuel lines and connections#
* Not available on all models
20 PILOT-31TG76401.book 639 ページ 2019年7月24日 水曜日 午後3時32分
Page 644 of 743
642
uuMaintenance Under the Hood uOpening the Hood
Maintenance
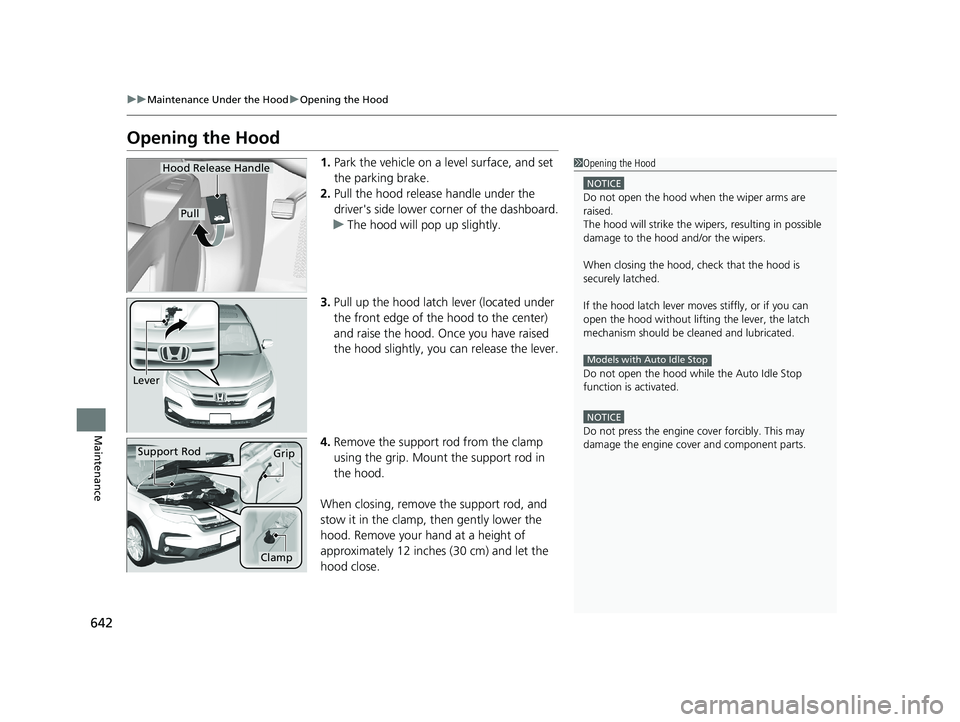
Opening the Hood
1. Park the vehicle on a level surface, and set
the parking brake.
2. Pull the hood release handle under the
driver's side lower co rner of the dashboard.
u The hood will pop up slightly.
3. Pull up the hood latch lever (located under
the front edge of the hood to the center)
and raise the hood. On ce you have raised
the hood slightly, you can release the lever.
4. Remove the support rod from the clamp
using the grip. Mount the support rod in
the hood.
When closing, remove the support rod, and
stow it in the clamp, then gently lower the
hood. Remove your hand at a height of
approximately 12 inches (30 cm) and let the
hood close.1 Opening the Hood
NOTICE
Do not open the hood when the wiper arms are
raised.
The hood will strike the wipe rs, resulting in possible
damage to the hood and/or the wipers.
When closing the hood, check that the hood is
securely latched.
If the hood latch lever moves stiffly, or if you can
open the hood without lifti ng the lever, the latch
mechanism should be cl eaned and lubricated.
Do not open the hood while the Auto Idle Stop
function is activated.
NOTICE
Do not press the engine cover forcibly. This may
damage the engine cover and component parts.
Models with Auto Idle Stop
Hood Release Handle
Pull
Lever
Support RodGrip
Clamp
20 PILOT-31TG76401.book 642 ページ 2019年7月24日 水曜日 午後3時32分
Page 647 of 743
 Owners Guide 645
uuMaintenance Under the Hood uOil Check
Maintenance
Oil Check
We recommend that you check the engi ne oil level every time you refuel.
Park the vehicle on level ground.
Wait approximately three mi")
645
uuMaintenance Under the Hood uOil Check
Maintenance
Oil Check
We recommend that you check the engi ne oil level every time you refuel.
Park the vehicle on level ground.
Wait approximately three minutes after turn ing the engine off before you check the
oil. 1.Remove the dipstick (orange).
2. Wipe the dipstick with a clean cloth or
paper towel.
3. Insert the dipstick back all the way into its
hole.
4. Remove the dipstick again, and check the
level. It should be between the upper and
lower marks. Add oil if necessary.1Oil Check
If the oil level is near or below the lower mark, slowly
add oil, being carefu l not to overfill.
Lower MarkUpper Mark
20 PILOT-31TG76401.book 645 ページ 2019年7月24日 水曜日 午後3時32分