LATCH HONDA PILOT 2022 User Guide
[x] Cancel search | Manufacturer: HONDA, Model Year: 2022, Model line: PILOT, Model: HONDA PILOT 2022Pages: 737, PDF Size: 28.84 MB
Page 71 of 737
Continued69
uuChild Safety uSafety of Infants and Small Children
Safe Driving
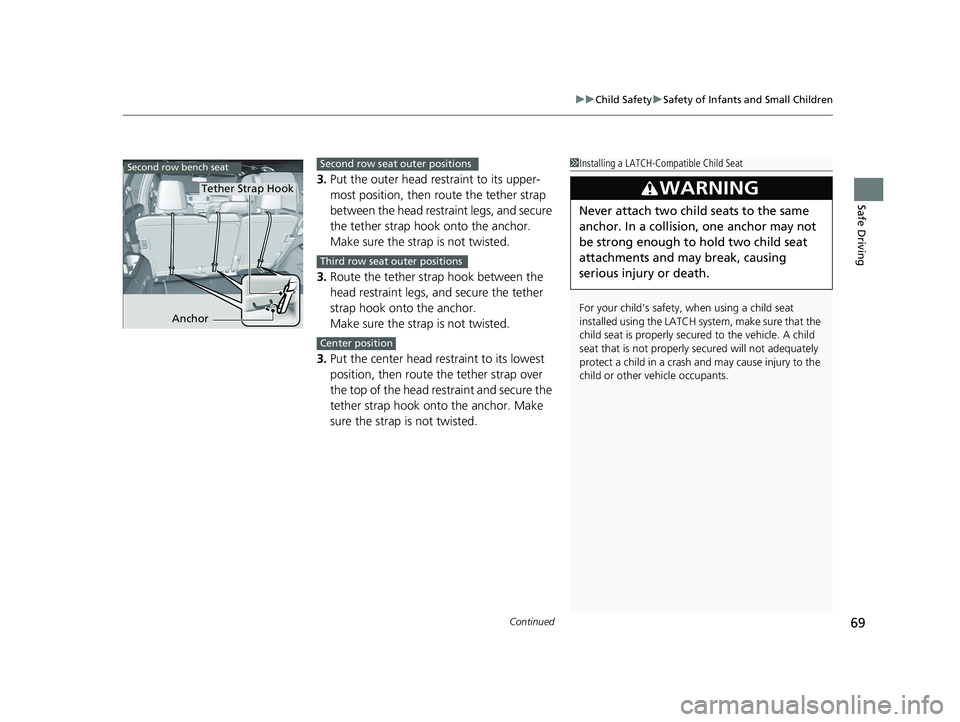
3. Put the outer head restraint to its upper-
most position, then route the tether strap
between the head restra int legs, and secure
the tether strap hook onto the anchor.
Make sure the strap is not twisted.
3. Route the tether strap hook between the
head restraint legs, and secure the tether
strap hook onto the anchor.
Make sure the strap is not twisted.
3. Put the center head restraint to its lowest
position, then route the tether strap over
the top of the head restraint and secure the
tether strap hook onto the anchor. Make
sure the strap is not twisted.
1Installing a LATCH-Compatible Child Seat
For your child’s safety, when using a child seat
installed using the LATCH system, make sure that the
child seat is properly secured to the vehicle. A child
seat that is not properly secured will not adequately
protect a child in a crash and may cause injury to the
child or other vehicle occupants.
3WARNING
Never attach two child seats to the same
anchor. In a collision, one anchor may not
be strong enough to hold two child seat
attachments and may break, causing
serious injury or death.
Tether Strap Hook
Anchor
Second row bench seatSecond row seat outer positions
Third row seat outer positions
Center position
22 PILOT-31TG76600.book 69 ページ 2021年6月11日 金曜日 午後4時40分
Page 73 of 737
Continued71
uuChild Safety uSafety of Infants and Small Children
Safe DrivingA child seat can be installed with a lap/should er belt in any rear seat or, if absolutely
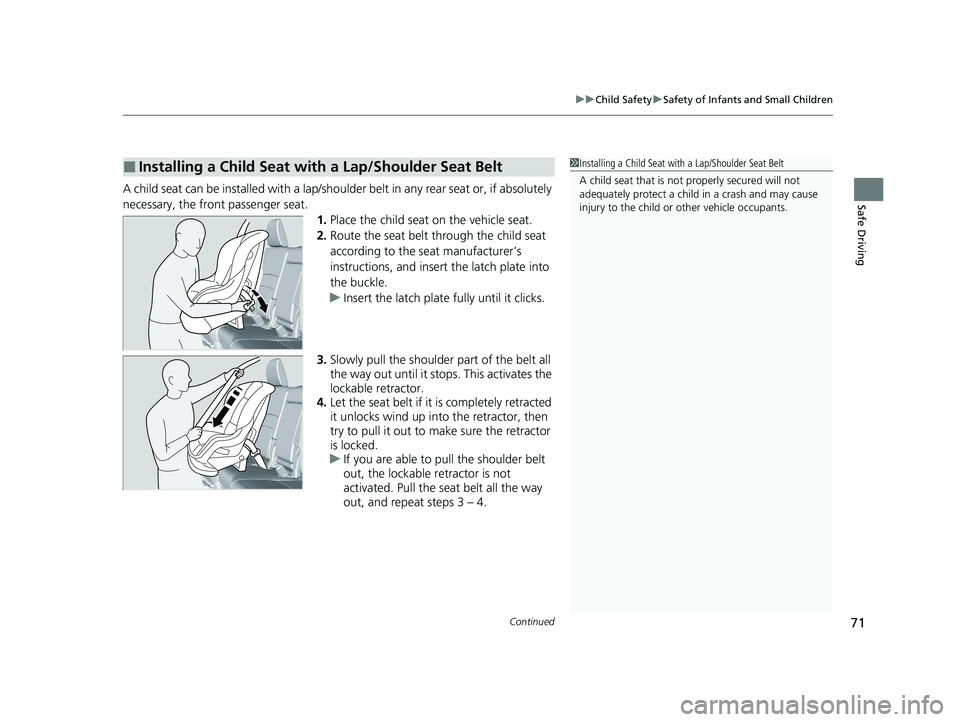
necessary, the front passenger seat. 1.Place the child seat on the vehicle seat.
2. Route the seat belt through the child seat
according to the seat manufacturer’s
instructions, and insert the latch plate into
the buckle.
u Insert the latch plate fully until it clicks.
3. Slowly pull the shoulder part of the belt all
the way out until it stops. This activates the
lockable retractor.
4. Let the seat belt if it is completely retracted
it unlocks wind up into the retractor, then
try to pull it out to make sure the retractor
is locked.
u If you are able to pull the shoulder belt
out, the lockable retractor is not
activated. Pull the seat belt all the way
out, and repeat steps 3 – 4.
■Installing a Child Seat with a Lap/Shoulder Seat Belt1Installing a Child Seat with a Lap/Shoulder Seat Belt
A child seat that is not properly secured will not
adequately protect a child in a crash and may cause
injury to the child or other vehicle occupants.
22 PILOT-31TG76600.book 71 ページ 2021年6月11日 金曜日 午後4時40分
Page 162 of 737
uuOpening and Closing the Tailgate uOpening/Closing the Power Tailgate*
160
Controls
If you manually close the power ta ilgate, it latches automatically.
Automatically lowers the power tailgate wh en there is a possibility that the fully
opened power tailgate can fall down by it s own weight (for example, by snow on
the tailgate). The beeper sounds while the power tailgate lowers.
■Auto-Closer
■Power Tailgate Fall Detection
1 Auto-Closer
The auto-closer feature does not activate if you press
the tailgate outer handle while the power tailgate is
closing.
Do not put any force on the tailgate while the power
tailgate is latching.
Keep your hands away from the tailgate when you
manually close the tailga te and let it latch
automatically. It is dange rous to put your hands
around the tailgate as it st arts to latch itself.
1Power Tailgate Fall Detection
If you try to manually close the power tailgate
immediately after it full y opens, the power tailgate
fall detection ma y be activated.
Once the power tailgate fall detection activates, wait
until the power tailgate full y closes. Keep away from
the power tailgate when it is in motion.
If the power tailgate fa ll detection constantly
activates, consult at a dealer.
22 PILOT-31TG76600.book 160 ページ 2021年6月11日 金曜日 午後4時40分
Page 204 of 737
202
uuAdjusting the Seats uHead Restraints
Controls
To reinstall a head restraint:
Insert the legs back in place, then adjust the head restraint to an appropriate height
while pressing the release button(s). Pull up on the restraint to make sure it is locked
in position.
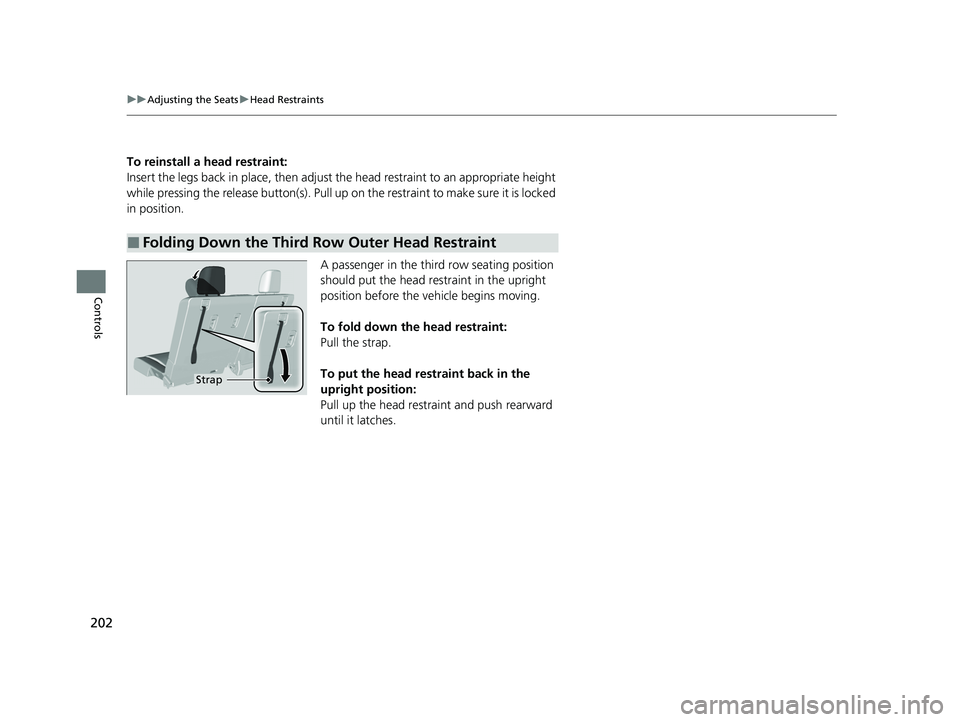
A passenger in the third row seating position
should put the head restraint in the upright
position before the vehicle begins moving.
To fold down the head restraint:
Pull the strap.
To put the head restraint back in the
upright position:
Pull up the head restraint and push rearward
until it latches.
■Folding Down the Third Row Outer Head Restraint
Strap
22 PILOT-31TG76600.book 202 ページ 2021年6月11日 金曜日 午後4時40分
Page 207 of 737
Continued205
uuAdjusting the Seats uRear Seats
Controls
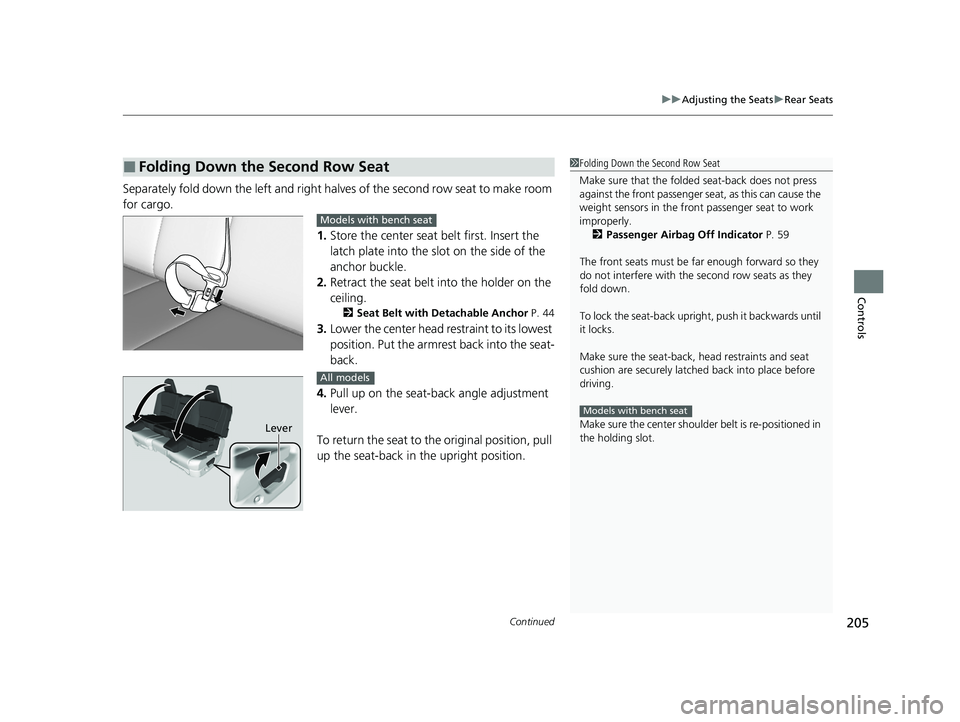
Separately fold down the left and right ha lves of the second row seat to make room
for cargo.
1.Store the center seat belt first. Insert the
latch plate into the slot on the side of the
anchor buckle.
2. Retract the seat belt into the holder on the
ceiling.
2 Seat Belt with Detachable Anchor P. 44
3.Lower the center head re straint to its lowest
position. Put the armrest back into the seat-
back.
4. Pull up on the seat-back angle adjustment
lever.
To return the seat to the original position, pull
up the seat-back in the upright position.
■Folding Down the Second Row Seat1 Folding Down the Second Row Seat
Make sure that the folded seat-back does not press
against the front passenger seat, as this can cause the
weight sensors in the front passenger seat to work
improperly. 2 Passenger Airbag Off Indicator P. 59
The front seats must be fa r enough forward so they
do not interfere with the second row seats as they
fold down.
To lock the seat-back upri ght, push it backwards until
it locks.
Make sure the seat-back, head restraints and seat
cushion are securely latche d back into place before
driving.
Make sure the center shoulde r belt is re-positioned in
the holding slot.
Models with bench seat
Models with bench seat
Lever
All models
22 PILOT-31TG76600.book 205 ページ 2021年6月11日 金曜日 午後4時40分
Page 208 of 737
uuAdjusting the Seats uRear Seats
206
Controls
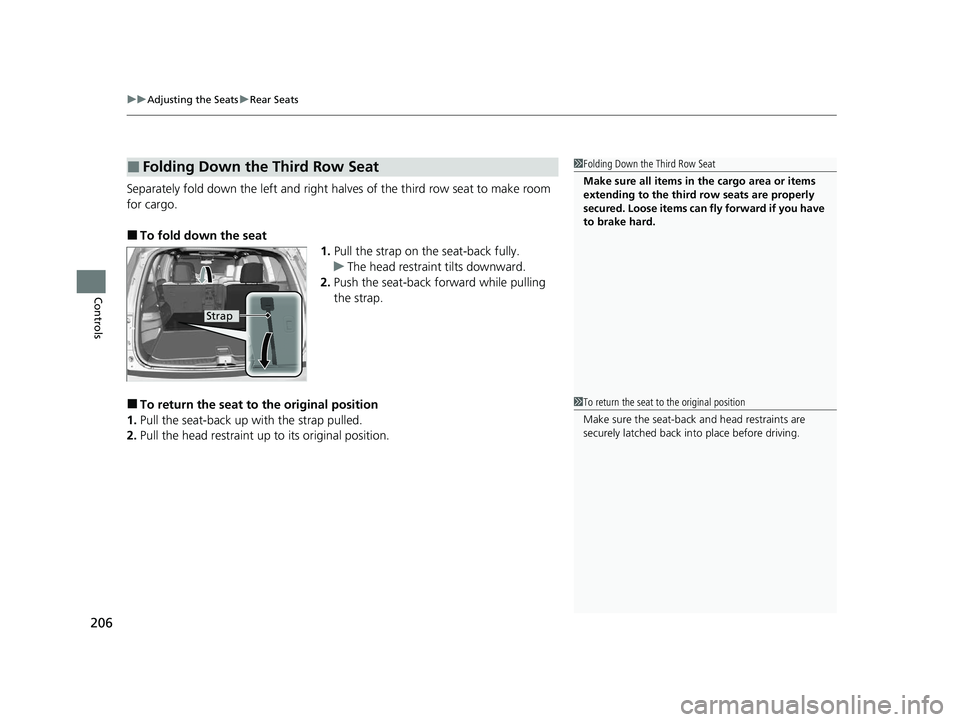
Separately fold down the left and right halv es of the third row seat to make room
for cargo.
■To fold down the seat 1.Pull the strap on the seat-back fully.
u The head restraint tilts downward.
2. Push the seat-back forward while pulling
the strap.
■To return the seat to the original position
1. Pull the seat-back up with the strap pulled.
2. Pull the head restraint up to its original position.
■Folding Down the Third Row Seat1Folding Down the Third Row Seat
Make sure all items in the cargo area or items
extending to the third row seats are properly
secured. Loose items can fly forward if you have
to brake hard.
Strap
1To return the seat to the original position
Make sure the seat-back and head restraints are
securely latched back in to place before driving.
22 PILOT-31TG76600.book 206 ページ 2021年6月11日 金曜日 午後4時40分
Page 225 of 737
Continued223
uuInterior Lights/Interior Convenience Items uInterior Convenience Items
Controls
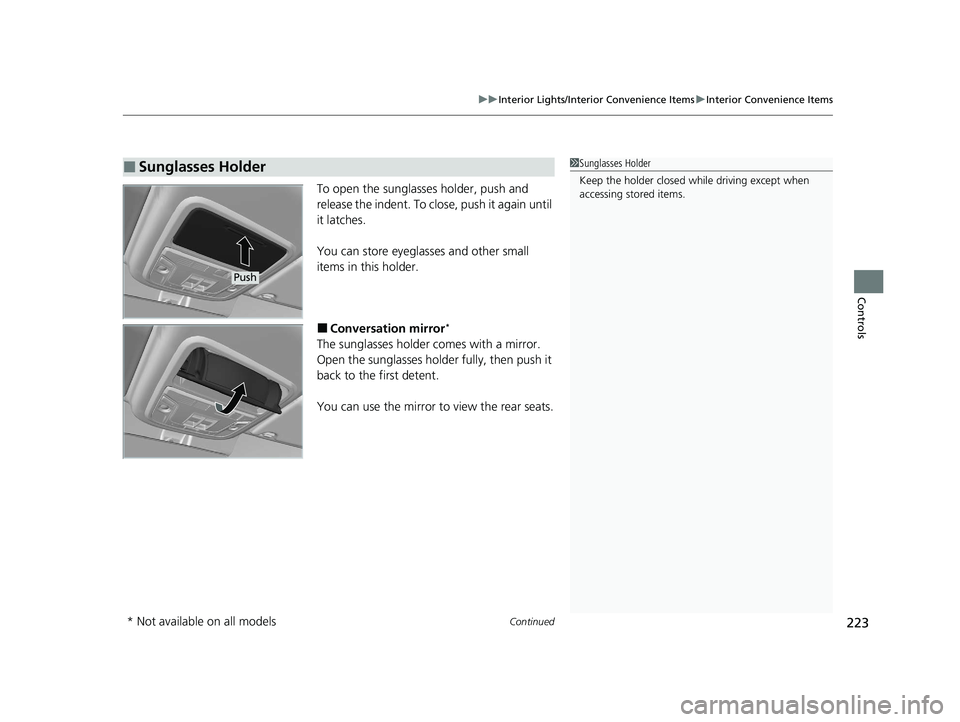
To open the sunglasses holder, push and
release the indent. To close, push it again until
it latches.
You can store eyeglasses and other small
items in this holder.
■Conversation mirror*
The sunglasses holder comes with a mirror.
Open the sunglasses holder fully, then push it
back to the first detent.
You can use the mirror to view the rear seats.
■Sunglasses Holder1Sunglasses Holder
Keep the holder closed wh ile driving except when
accessing stored items.
Push
* Not available on all models
22 PILOT-31TG76600.book 223 ページ 2021年6月11日 金曜日 午後4時40分
Page 379 of 737
377
uuBlu-ray/DVD Rear Entertainment System*uHDMITM Port
Features
HDMITM Port
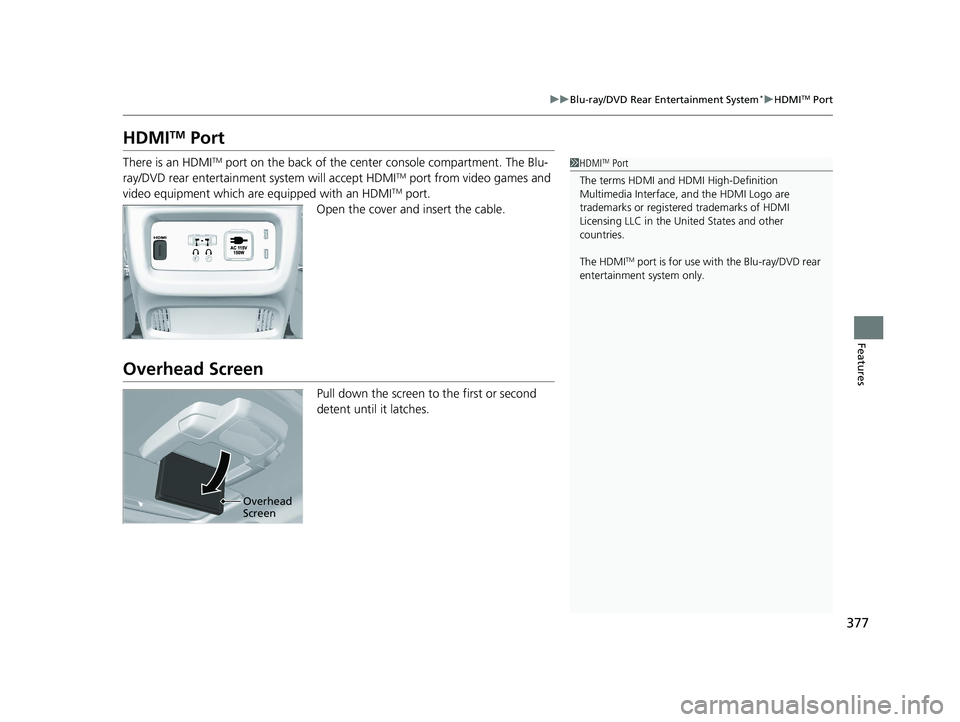
There is an HDMITM port on the back of the center console compartment. The Blu-
ray/DVD rear entertainment system will accept HDMITM port from video games and
video equipment which are equipped with an HDMITM port.
Open the cover and insert the cable.
Overhead Screen
Pull down the screen to the first or second
detent until it latches.
1 HDMITM Port
The terms HDMI and HDMI High-Definition
Multimedia Interface, and the HDMI Logo are
trademarks or registered trademarks of HDMI
Licensing LLC in the United States and other
countries.
The HDMI
TM port is for use with the Blu-ray/DVD rear
entertainment system only.
Overhead
Screen
22 PILOT-31TG76600.book 377 ページ 2021年6月11日 金曜日 午後4時40分
Page 543 of 737
Continued541
uuWhen Driving uAuto Idle Stop
Driving
The brake pedal is released.
■The engine restarts even if the brake pedal is depressed when:
• The Auto Idle Stop OFF button is pressed.
• When a steering wheel is operated.
• The transmission is put into
(R or (S, or when it is set from (N to (D.
u If you put the tra nsmission into
(P after the Auto Idle Stop activates, the Auto
Idle Stop continues to operate. In this case, the engine restarts when you
depress the brake pedal.
• The pressure on the brake pedal is reduced and the vehicle starts moving while
stopped on an incline.
• The pressure on the brake pedal is repeated ly applied and released slightly during
a stop.
• The battery charge becomes low.
• The accelerator pedal is depressed.
• The driver’s seat belt is unlatched.
• is ON (indicator on).
• The climate control system is in use, and the difference between the set
temperature and actual interior temperature becomes significant.
• The climate control system is being used to dehumidify the interior.
• The rear fan is set to maximum speed.
u Auto Idle Stop may not activate under other conditions when the rear climate
control system is in use.
• When the Intelligent Traction Mana gement is set to Snow, Mud
*, or Sand*.
■The Engine Automatically Restarts When1The Engine Automatically Restarts When
If you are using an electroni c device during Auto Idle
Stop, the device may tempor arily be turned off when
the engine restarts.
* Not available on all models
22 PILOT-31TG76600.book 541 ページ 2021年6月11日 金曜日 午後4時40分
Page 638 of 737
636
uuMaintenance Under the Hood uOpening the Hood
Maintenance
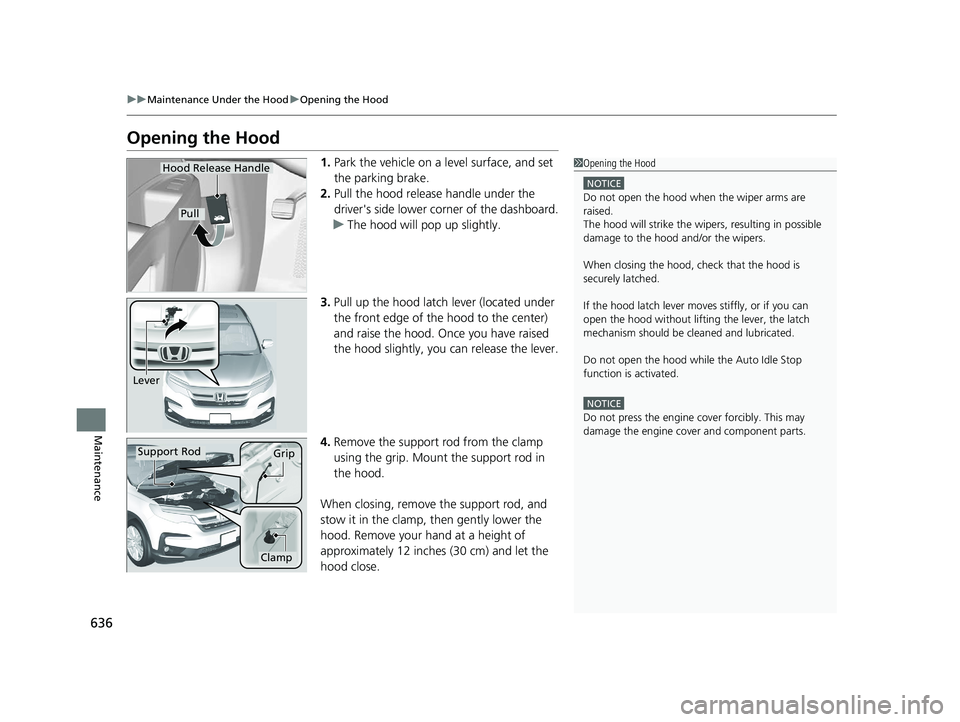
Opening the Hood
1. Park the vehicle on a level surface, and set
the parking brake.
2. Pull the hood release handle under the
driver's side lower corner of the dashboard.
u The hood will pop up slightly.
3. Pull up the hood latch lever (located under
the front edge of the hood to the center)
and raise the hood. Once you have raised
the hood slightly, you can release the lever.
4. Remove the support rod from the clamp
using the grip. Mount the support rod in
the hood.
When closing, remove the support rod, and
stow it in the clamp, then gently lower the
hood. Remove your hand at a height of
approximately 12 inches (30 cm) and let the
hood close.1 Opening the Hood
NOTICE
Do not open the hood when the wiper arms are
raised.
The hood will strike the wipe rs, resulting in possible
damage to the hood and/or the wipers.
When closing the hood, check that the hood is
securely latched.
If the hood latch lever moves stiffly, or if you can
open the hood without lifti ng the lever, the latch
mechanism should be cl eaned and lubricated.
Do not open the hood while the Auto Idle Stop
function is activated.
NOTICE
Do not press the engine cover forcibly. This may
damage the engine cover and component parts.
Hood Release Handle
Pull
Lever
Support RodGrip
Clamp
22 PILOT-31TG76600.book 636 ページ 2021年6月11日 金曜日 午後4時40分