dashboard HONDA PILOT 2023 User Guide
[x] Cancel search | Manufacturer: HONDA, Model Year: 2023, Model line: PILOT, Model: HONDA PILOT 2023Pages: 814, PDF Size: 29.02 MB
Page 227 of 814

226
uuOperating the Switches Around the Steering Wheel uAuto High-Beam
Controls
Auto High-Beam
The front sensor camera detects the light sources ahead of the vehicle such as the
lights of a preceding or oncoming vehicle, or street lights. When you are driving at
night, the system automatically switches the headlights between low beam and high
beam depending on the situation.
■Activating the system
When all of the following conditions have been met, the auto high-beam indicator
comes on and automatically switches between the high beam and low beam,
depending on the situation. •The power mode is in ON.
• The light switch is in AUTO.
• The lever is in the low beam position.
• The headlights have been automatically
activated.
• It is dark outside the vehicle.
If the auto high-beam indicator does not co me on even when all the conditions have
been met, carry out the following procedure and the indicator will come on.
• Pull the lever toward you for flashing the high beams then release it while driving.
• Turn the light switch to then turn the light switch to AUTO.
■How to Use the Auto High-Beam
1Auto High-Beam
The auto high-beam system does not always operate
in every situation. This syst em is just for assisting the
driver. Always observe your surroundings and
manually switch the head lights between high beam
and low beam if necessary.
If you find the timing of beam changes inconvenient
for driving, change the headlight beams manually.
The range and the distance at which the camera can
recognize light sources varies depending on
conditions surrounding your vehicle.
Regarding the handling of the camera mounted to
the inside of the windshiel d, refer to the following.
2 Front Sensor Camera P. 648
For the auto high-beam to work properly:
•Do not place an object that reflects light on the
dashboard.
•Keep the windshield around the camera clean.
When cleaning the windshield, be careful not to
apply the windshield cleans er to the camera lens.
•Do not attach an object, sticker, or film to the area
around the camera.
•Do not touch the camera lens.
If the camera receives a st rong impact, or repairing of
the area near the camera is required, consult a dealer.
Light Switch
Auto High-Beam
Indicator
23 PILOT-31T906000_03.book 226 ページ 2022年10月31日 月曜日 午前10時26分
Page 240 of 814

239Continued
Controls
Seats
Front Seats
Adjust the driver’s seat as far back as possible
while allowing you to ma intain full control of
the vehicle. You should be able to sit upright,
well back in the seat and be able to
adequately press the pedals without leaning
forward, and grip the steering wheel
comfortably. The passenger’s seat should be
adjusted in a similar manner, so that it is as far
back from the front airbag in the dashboard
as possible.
■Adjusting the front power seats*
1 Seats
Always make seat adjustments before driving.
Move back.
Allow sufficient
space.
■Adjusting the Seat Positions
1
Front Seats
The National Highway Traffic Safety Administration
and Transport Cana da recommend that drivers allow
at least 10 inches (25 cm) between the center of the
steering wheel and the chest.
3WARNING
Sitting too close to a front airbag can result
in serious injury or death if the front
airbags inflate.
Always sit as far back from the front
airbags as possible while maintaining
control of the vehicle.
1 Adjusting the Seat Positions
Once a seat is adjusted co rrectly, rock it back and
forth to make sure it is locked in position.Horizontal
Position
Adjustment
Height
Adjustment
(Driver’s seat only) Seat-back
Angle
Adjustment
* Not available on all models
23 PILOT-31T906000_03.book 239 ページ 2022年10月31日 月曜日 午前10時26分
Page 284 of 814

283Continued
Controls
Climate Control System
Using Automatic Climate Control
The automatic climate control system maintains the interior temperature you select.
The system also selects the proper mix of heat ed or cooled air that raises or lowers
the interior temperature to your pr eference as quickly as possible.
Use the system when the engine is running.
1. Press the AUTO button.
2. Adjust the interior temperature using the driver’s side or passenger’s side
temperature control switch.
3. Press the (ON/OFF) button to cancel.1Using Automatic Climate Control
If any buttons are presse d while using the climate
control system in auto, the function of the button
that was pressed will take priority.
The AUTO indicator will go off, but functions
unrelated to the button th at was pressed will be
controlled automatically.
During idle-stops, air-conditioning is suspended, and
only the blower remains active.
If you do not want air-cond itioning suspended, press
the Auto Idle Stop OFF button to cancel idle-stop.
To prevent cold air from bl owing in from outside, the
fan may not start i mmediately when the AUTO
button is pressed.
If the interior is very warm, you can cool it down
more rapidly by partial ly opening the windows,
turning the system on auto, and setting the
temperature to low. Change the fresh air mode to
recirculation mode until the temperature cools down.
When you set the temperat ure to the lower or upper
limit, Lo or Hi is displayed.
Pressing the button switches the climate
control system between on and off. When turned on,
the system returns to your last selection.
Floor and
windshield
defroster
vents
Floor vents
Dashboard and
floor vents’, and
back of the console
compartment
Dashboard
vents’ and back
of the console
compartment
Driver’s Side
Temperature
Control Dial Passenger’s
Side
Temperature
Control Dial
A/C (Air Conditioning) Button
(ON/OFF) Button
Fan
Control
Dial
(Recirculation)
Button
(Windshield Defroster) Button
AUTO Button SYNC (Synchronization)
Button
MODE
Control
Button
23 PILOT-31T906000_03.book 283 ページ 2022年10月31日 月曜日 午前10時26分
Page 320 of 814

Continued319
uuAudio System Basic Operation uApple CarPlay
Features
■Phone
Access the contact list, make phone calls, or listen to voicemail.
■Messages
Check and reply to text messages, or have messages read to you.
■Music
Play music stored on your iPhone.
■Maps
Display Apple Maps and use the navigation function just as you would on your
iPhone.
■Honda
Select the Honda icon to go back to the audio screen.
■
Go back to the Apple CarPlay Dashboard screen.
■
Go back to the Apple CarPlay menu screen.
1Apple CarPlay
Apple CarPlay Operating Requirements &
Limitations
Apple CarPlay requi res a compatible iPhone with an
active cellular connecti on and data plan. Your
carrier’s rate plans will apply.
Changes in operating systems, hardware, software,
and other technology integral to providing Apple
CarPlay functionality, as well as new or revised
governmental regulations, may result in a decrease or
cessation of Apple CarPlay functionality and services.
Honda cannot and does not pr ovide any warranty or
guarantee of future Appl e CarPlay performance or
functionality.
It is possible to use thir d-party apps if they are
compatible with Apple CarPlay. Refer to the Apple
homepage for information on compatible apps.
To adjust the ringtone volume, the guidance volume
of the navigation or Siri, or the audio volume, turn
the VOL / AUDIO (Volume/Power) knob while the
sound you want to adjust is playing.
23 PILOT-31T906000_03.book 319 ページ 2022年10月31日 月曜日 午前10時26分
Page 350 of 814

349
uuAudio System Basic Operation uVoice Control Operation
Continued
Features
Voice Control Operation
Your vehicle has a voice control syst em that allows hands-free operation.
The voice control system uses the ( Talk) button on the steering wheel and a
microphone near the map lights on the ceiling.
To achieve optimum voice recognition when using the voice control system:
• Make sure the correct screen is displa yed for the voice command that you are
using.
The system recognizes only certain commands.
Available voice commands:
2 Voice Portal Screen P. 350
•Close the windows and panoramic roof*.
• Adjust the dashboard and side vents so air does not blow onto the microphone
on the ceiling.
• Speak clearly in a natural speaking vo ice without pausing between words.
• Reduce any background noise if possible. The system may misinterpret your
command if more than one person is speaking at the same time.
■Voice Recognition
1Voice Control Operation
When you press the button, a helpful prompt asks
what you would like to do. Press and release the
button again to bypass this prompt and give a
command.
1 Voice Recognition
The voice control system can only be used from the
driver’s seat because the microphone unit removes
noises from the front passenger’s side.
* Not available on all models
23 PILOT-31T906000_03.book 349 ページ 2022年10月31日 月曜日 午前10時26分
Page 387 of 814

uuAudio System Basic Operation uApple CarPlay
386
Features
■Phone
Access the contact list, make phone calls, or listen to voicemail.
■Messages
Check and reply to text messages, or have messages read to you.
■Music
Play music stored on your iPhone.
■Maps
Display Apple Maps and use the navigation function just as you would on your
iPhone.
Only one navigation system (pre-installed navigation or Apple CarPlay) can give
directions at a time. When you are using one system, directions to any prior
destination set on the other system will be canceled, and the system you are
currently using will direct you to your destination.
■Honda
Select the Honda icon to go back to the home screen.
■
Go back to the Apple CarPlay Dashboard screen.
■
Go back to the Apple CarPlay menu screen.
1Apple CarPlay
Apple CarPlay Operating Requirements &
Limitations
Apple CarPlay requi res a compatible iPhone with an
active cellular connecti on and data plan. Your
carrier’s rate plans will apply.
Changes in operating systems, hardware, software,
and other technology integral to providing Apple
CarPlay functionality, as well as new or revised
governmental regulations, may result in a decrease or
cessation of Apple CarPlay functionality and services.
Honda cannot and does not pr ovide any warranty or
guarantee of future Appl e CarPlay performance or
functionality.
It is possible to use thir d-party apps if they are
compatible with Apple CarPlay. Refer to the Apple
homepage for information on compatible apps.
Models with navigation system
23 PILOT-31T906000_03.book 386 ページ 2022年10月31日 月曜日 午前10時26分
Page 513 of 814
 or more:
There are two common types of trailer brake s: surge")
uuTowing a Trailer uTowing Preparation
512
Driving
■Trailer brakes
Recommended for any trailer with a total weight of 1,000 lbs (450 kg) or more:
There are two common types of trailer brake s: surge and electric. Surge brakes are
common for boat trailers, since the brakes will get wet.
If you choose electric brakes, be sure they are electronically actuated. Do not
attempt to attach trailer brakes to your ve hicle’s hydraulic system, as it will lower
braking effectiveness and create a potential hazard.
The 4-pin gray connector installed in your vehicle has all of the circuits required to
install most electric trailer brake controllers.
Have a qualified mechanic install your trailer
brake controller following the trailer brake
controller manufacturer’s instructions. Failure
to properly install the trailer brake controller
may increase the distance it takes for you to
stop your vehicle when towing a trailer.
The trailer hitch harness is used to install the
controller for the electric trailer brakes.
Insert the trailer brake fuse into the engine
compartment fuse box.
2 Engine Compartment Fuse Box P. 778
1Trailer brakes
The 4-pin gray connector is located under the
dashboard near the driver’s side interior fuse box.
Electric Brake
(Pink)
Ground (Black) +B (Green) (20A)
Stop (Violet)
Trailer brake controller
connector’s terminals:
Electric Brake
(Brown)
+B (20A)
(Blue)
Ground
(Black)
Brake Lights
(Sky Blue)
23 PILOT-31T906000_03.book 512 ページ 2022年10月31日 月曜日 午前10時26分
Page 574 of 814

Driving
■How the system works
The CMBS
TM will be canceled when your vehicle stops or the system determines
there no")
Continued573
uuHonda Sensing ®u Collision Mitigation Braking SystemTM (CMBSTM)
Driving
■How the system works
The CMBS
TM will be canceled when your vehicle stops or the system determines
there no longer is the potential for a collision.
The CMBS
TM may also be canceled when a dr iver operates the steering wheel and
the brake or accelerator pe dal to avoid a collision.
1How the system works
The camera in the CMBS
TM is also designed to detect
pedestrians.
However, this pedestrian detection feature may not
activate or may not detect a pedestrian in front of
your vehicle under certain conditions.
Refer to the ones indicating the pedestrian detection
limitations from the list. 2 CMBS
TM Conditions and Limitations P. 577
The head-up warning uses a lens located at the front
end of the dashboard.
Do not cover the lens or spill any liquid on it.
Models with head-up display
Lens
A front sensor
camera is located
behind the
rearview mirror.
The system starts monitoring the roadway ahead when your vehicle speed is about
3 mph (5 km/h) or above and will search for a vehicle, pedestrian, or moving bicycle
in front of you.
The CMBS
TM activates when:●The speed difference between your vehicl e and a vehicle, pedestrian, or moving
bicycle detected in front of you becomes about 3 mph (5 km/h) and over with a
chance of a collision.
●Your vehicle drives at about 18 mph (30 km/h) or less and there is a chance of a
frontal collision with a detected oncoming vehicle when you turn left at an
intersection.
●Your vehicle speed is about 62 mph (100 km /h) or less and the system determines
there is a chance of a collision with:
- An oncoming or stationary vehicle detected in front of you.
- A pedestrian or moving bicycle detected in front of you.
When to use
The radar sensor is
behind the Honda
emblem on the
front grille.
23 PILOT-31T906000_03.book 573 ページ 2022年10月31日 月曜日 午前10時26分
Page 707 of 814
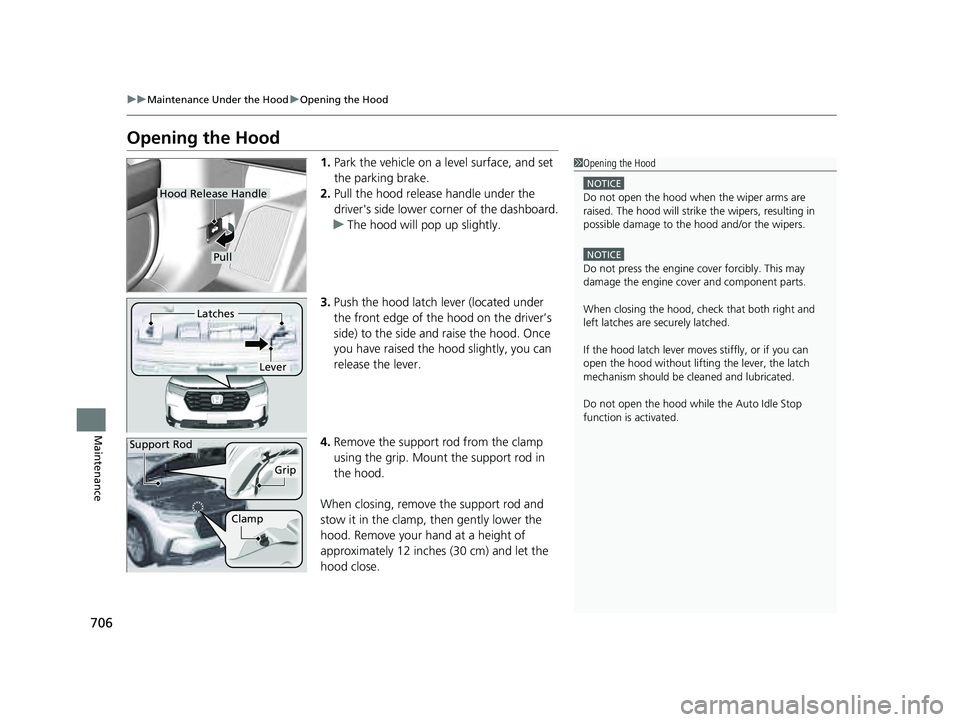
706
uuMaintenance Under the Hood uOpening the Hood
Maintenance
Opening the Hood
1. Park the vehicle on a level surface, and set
the parking brake.
2. Pull the hood release handle under the
driver's side lower corner of the dashboard.
u The hood will pop up slightly.
3. Push the hood latch lever (located under
the front edge of the hood on the driver’s
side) to the side and raise the hood. Once
you have raised the hood slightly, you can
release the lever.
4. Remove the support rod from the clamp
using the grip. Mount the support rod in
the hood.
When closing, remove the support rod and
stow it in the clamp, then gently lower the
hood. Remove your hand at a height of
approximately 12 inches (30 cm) and let the
hood close.1 Opening the Hood
NOTICE
Do not open the hood when the wiper arms are
raised. The hood will strike the wipers, resulting in
possible damage to the hood and/or the wipers.
NOTICE
Do not press the engine cover forcibly. This may
damage the engine cover and component parts.
When closing the hood, check that both right and
left latches are securely latched.
If the hood latch lever moves stiffly, or if you can
open the hood without lifti ng the lever, the latch
mechanism should be cl eaned and lubricated.
Do not open the hood while the Auto Idle Stop
function is activated.
Hood Release Handle
Pull
Lever
Latches
Support Rod
Grip
Clamp
23 PILOT-31T906000_03.book 706 ページ 2022年10月31日 月曜日 午前10時26分
Page 781 of 814

780
uuFuses uFuse Locations
Handling the Unexpected
Located under the dashboard.
Fuse locations are shown on the label on the side panel.
Locate the fuse in question by the fuse number and label number.
■Driver’s Side Interior Fuse Box
Fuse Box
Sub Fuse Box
Fuse Label
23 PILOT-31T906000_03.book 780 ページ 2022年10月31日 月曜日 午前10時26分