height HONDA PILOT 2023 User Guide
[x] Cancel search | Manufacturer: HONDA, Model Year: 2023, Model line: PILOT, Model: HONDA PILOT 2023Pages: 814, PDF Size: 29.02 MB
Page 256 of 814

255
uuSeats uHead Restraints
Continued
Controls
A passenger sitting in the second row* and third row center seating position should
adjust the height of their head restraint to an appropriate position before the vehicle
begins moving.
To raise the head restraint:
Pull it upward.
To lower the head restraint:
Push it down while pressing the right release
button.
■Changing the Second Row*/Third Row Center Seat Head
Restraint Position
* Not available on all models
23 PILOT-31T906000_03.book 255 ページ 2022年10月31日 月曜日 午前10時26分
Page 257 of 814

uuSeats uHead Restraints
256
Controls
Head restraints can be removed for cleaning or repair.
To remove a head restraint:
Pull the restraint up as far as it will go. Then, push the release button and pull the
restraint up and out.
To reinstall a head restraint:
Insert the legs back in place, then adjust the head restraint to an appropriate height
while pressing the release button. Pull up on the restraint to make sure it is locked
in position.
To remove a head restraint:
Pull the restraint up as far as it will go. Then push the release buttons which are
located on the both legs at the same time, and pull the restraint up and out.
To reinstall a head restraint:
Insert the legs back in place, then adjust the head restraint to an appropriate height
while pressing the right release button. Pull up on the restraint to make sure it is
locked in position.
■Removing and Reinstalling the Head Restraints1 Removing and Reinstalling the Head Restraints
To remove and install the front head restraint, recline
the seat-back slightly forward as the space between
the ceiling and the seat-back is limited.
3WARNING
Failure to reinstall, or correctly reinstall, the
head restraints can result in severe injury
during a crash.
Always replace the he ad restraints before
driving.
Except third row outer seat head restraints
Front and second row outer seat head restraints
Second row/third row center seat head restraint
23 PILOT-31T906000_03.book 256 ページ 2022年10月31日 月曜日 午前10時26分
Page 504 of 814

Continued503
uuBefore Driving uDriving Preparation
Driving
• Store or secure all items on board properly.
u Carrying too much cargo, or improperly storing it, can affect your vehicle’s
handling, stability, sto pping distance, and tires, and make it unsafe.
2Maximum Load Limit P. 505
•Do not pile items higher than the seat height.
u They can block your view and may be thrown forward in the event of sudden
braking.
• Do not place anything in the front seat footwells. Make sure to secure the floor
mat.
u An object or unsecured floor mat can in terfere with your brake and accelerator
pedal operation while driving.
• If you have any animals on board, do not let them move around in the vehicle.
u They may interfere with driving and a crash could occur.
• Securely close and lock al l doors and the tailgate.
2Locking/Unlocking the Doors from the Inside P. 192
•Adjust your seating position properly.
u Adjust the head restraint, too.
2Seats P. 239
2 Adjusting the Front and Second Row Outer Seat Head Restraint Positions
P. 253
• Adjust the mirrors and steering wheel properly.
u Adjust them while sitting in the proper driving position.
2 Adjusting the Steering Wheel P. 235
2 Mirrors P. 236
■Interior Checks1Interior Checks
The headlight aim is set by the factory, and does not
need to be adjusted. Howeve r, if you regularly carry
heavy items in the cargo area or tow a trailer, have
the aiming readjusted at a dealer or by a qualified
technician.
23 PILOT-31T906000_03.book 503 ページ 2022年10月31日 月曜日 午前10時26分
Page 521 of 814

520
uuOff-Highway Driving Guidelines uAvoiding Trouble
Driving
Avoiding Trouble
• Check Out Your Vehicle before you leave the pavement and make sure that all
scheduled maintenance has been comple ted. Pay special attention to the
condition of the tires, an d check the tire pressures.
• Remember the route you choose presents limits (too steep or bumpy), you have
limits (driving skill and comfort), and your ve hicle has limits (traction, stability, and
power). Failing to recognize these limits will likely put you and your passengers in
a hazardous situation.
• Accelerating and Braking should be done slowly and gradually. Trying to start
or stop too fast can cause a loss of traction and you could lose control.
• Avoiding Obstacles and Debris in the road reduces the likelihood of a rollover
or damage to your suspension or other components.
• Driving on Slopes increases your risk of a rollover, particularly if you attempt to
drive across a slope that is too steep. Going straight up or down a slope is usually
the safest. If you can’t clearly see all cond itions or obstacles on a slope, walk it
before you drive it. If there is any doubt whether you can safely pass, don’t try it.
Find another route. If you get stuck when climbing, do not try to turn around.
Back down slowly following the same route you took up the hill.
• Crossing a Stream - Avoid driving through deep water. If you encounter water
in your route (a small stream or large pu ddle, for example), evaluate it carefully
before going ahead. Make sure it is shallow, flowing slowly, and has firm ground
underneath. If you are not sure of the depth or the ground, turn around and find
another route. Driving through deep water can also damage your vehicle. When
driving in water that reaches around half of the wheel height, water can get into
the transmission and di fferential, diluting the lubric ant and causing an eventual
failure. It can also wash the grease out of the wheel bearings.
• If You Get Stuck, carefully go in the direction that you think will get you
unstuck. Do not spin the tires as this will only make things worse and could
damage the transmission. If you are unable to free yourself, your vehicle will need
to be towed. Front tow hook
* and trailer hitch* are provided for this purpose.
1 Avoiding Trouble
Spinning the tires can also damage the Intelligent
VTM4 (i-VTM4
TM) system.
Front Tow Hook:
The front tow hook is lacated by the underside of the
front bumper.
Rear Tow Hook:
Trailer Hitch safety chain loops and re ceiver are rated
for off-road recovery
Models with trailer hitch
Front Tow
Hook
Rear Tow Hook
* Not available on all models
23 PILOT-31T906000_03.book 520 ページ 2022年10月31日 月曜日 午前10時26分
Page 522 of 814

521
uuOff-Highway Driv ing GuidelinesuOff-Highway Driving
Continued
Driving
Off-Highway Driving
Your vehicle is designed, built and equipped with systems and features to provide
you with exceptional drivin g performance off-highway. Howe ver, due to the risks to
both you and other road users, including the risk of injury or death from loss of
control or crash, if you engage in off-h ighway driving, it is important to take
precautions before doing so.
When driving off-highway, yo u should always obey the posted speed limits and
other traffic laws, reduce speed as needed for traffic and environmental conditions,
and not engage in driving behaviors that may create heightened risks for yourself
and any other off-highway users who may be present (even if you are unaware of
them).
Your vehicle’s TRAIL or SAND mode and other systems are designed for increased
performance off-highway. Use of these sy stems may delay the intervention of
vehicle safety systems designed to minimize the risk of a loss of traction or steering
control, and can cause your vehicle to handle differently than you might expect or
would experience under normal driving conditions on pavement. Use of these
systems will not make up for a lack of a ppropriate driver experience and skill, and
will not allow the driver to overcome risks created by:
• A lack of proper vehicle maintenance
• Less than ideal road conditions and/or unfamiliarity with the driving environment
• Other traffic or off-highway users
1Off-Highway Driving
NOTICE
The vehicle warranty does not cover any damage or
failure resulting from off- highway driving, crawling,
competitive climbing of any sort whatsoever, or use
on an off-road course or similar-type venue. See
warranty book for details. 2 TRAIL Mode
* P. 551
Models with TRAIL and SAND mode
* Not available on all models
23 PILOT-31T906000_03.book 521 ページ 2022年10月31日 月曜日 午前10時26分
Page 580 of 814

Driving
■Examples of limitations on the correc t detection of the camera due to the
condition of the vehicle ahead of")
Continued579
uuHonda Sensing ®u Collision Mitigation Braking SystemTM (CMBSTM)
Driving
■Examples of limitations on the correc t detection of the camera due to the
condition of the vehicle ahead of you, oncoming vehicles, pedestrians, or
moving bicycles
• The distance between your vehicle and the vehicle ahead of you, oncoming
vehicle, pedestrian, or moving bicycle ahead of you is too short.
• The vehicle ahead of you, oncoming vehicle, pedestrian, or moving bicycle
suddenly cuts in front of or jumps out in front of you.
• The bicycle is stopped.
• The oncoming vehicle or vehicle ahead of you is sideways or facing diagonally.
• When the vehicle ahead of you, oncoming vehicle, pedestrian, or moving bicycle
blends in with the background, preventing the system from recognizing it.
• When several pedestrians are moving ahead of you in a group.
• When several bicycles are movi ng ahead of you in a group.
• When a pedestrian or moving bicy cle crosses the road too quickly.
• A pedestrian or moving bicycle approaches from the opposite direction.
• The headlights of the vehicle ahead of you or oncoming vehicle are lit on one side
or not lit on either side in a dark place.
• When part of a pedestrian (heads, limbs, etc.) is hidden by a load.
• When a pedestrian is bent over or squatting, when their hands are raised, or they
are running.
• When the pedestrian is shorte r than about 3.3 feet (1 meter) or taller than about
6.6 feet (2 meters) in height.
• When the pedestrian is push ing a stroller or bicycle.1Collision Mitigation Braking SystemTM (CMBSTM)
Make sure that all the tires are of the same specified
size, type and brand, and that they are evenly worn.
If you use tires of different sizes, types, brands, or
degree of wear, the syst em may not work properly.
Do not modify the suspensi on. Altering the height of
the vehicle may prevent the system from working
properly.
23 PILOT-31T906000_03.book 579 ページ 2022年10月31日 月曜日 午前10時26分
Page 680 of 814

679
uuSurround View Camera System*uDisplaying an Image From the Surround View Cameras
Driving
The following can be displaye d when the system is on.
Fixed Guideline : Helps you to get a sense of a distance between your vehicle and
the rear surroundings. The distance may appear differently than the actual distance.
Dynamic Guideline : Indicates vehicle direction while the steering wheel is in the
current position.
■Reference Lines and Guides1 Reference Lines and Guides
The positions/distances i ndicated by the guidelines
and camera views on the display may differ from the
actual positions/distances due to the changes in the
vehicle height, road condi tions, and other factors.
The guidelines should be us ed as a reference only.
The guidelines can be turn ed on and off using the
audio/information screen.
2 Customized Features P. 429
If you turn the guidelines off, they remain off until
you turn them back on.
23 PILOT-31T906000_03.book 679 ページ 2022年10月31日 月曜日 午前10時26分
Page 707 of 814
706
uuMaintenance Under the Hood uOpening the Hood
Maintenance
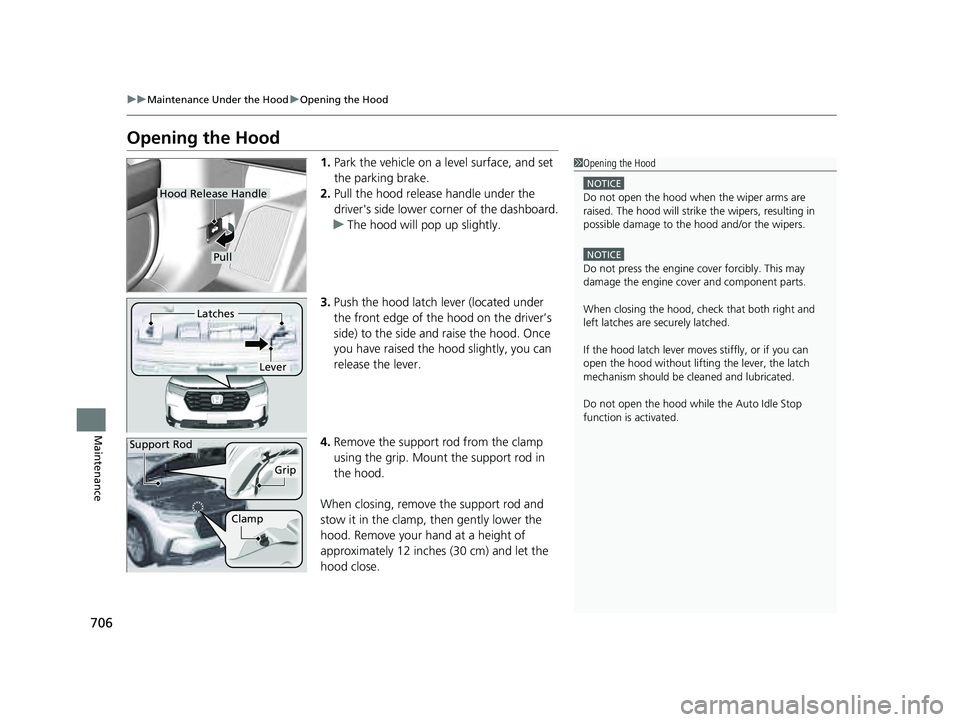
Opening the Hood
1. Park the vehicle on a level surface, and set
the parking brake.
2. Pull the hood release handle under the
driver's side lower corner of the dashboard.
u The hood will pop up slightly.
3. Push the hood latch lever (located under
the front edge of the hood on the driver’s
side) to the side and raise the hood. Once
you have raised the hood slightly, you can
release the lever.
4. Remove the support rod from the clamp
using the grip. Mount the support rod in
the hood.
When closing, remove the support rod and
stow it in the clamp, then gently lower the
hood. Remove your hand at a height of
approximately 12 inches (30 cm) and let the
hood close.1 Opening the Hood
NOTICE
Do not open the hood when the wiper arms are
raised. The hood will strike the wipers, resulting in
possible damage to the hood and/or the wipers.
NOTICE
Do not press the engine cover forcibly. This may
damage the engine cover and component parts.
When closing the hood, check that both right and
left latches are securely latched.
If the hood latch lever moves stiffly, or if you can
open the hood without lifti ng the lever, the latch
mechanism should be cl eaned and lubricated.
Do not open the hood while the Auto Idle Stop
function is activated.
Hood Release Handle
Pull
Lever
Latches
Support Rod
Grip
Clamp
23 PILOT-31T906000_03.book 706 ページ 2022年10月31日 月曜日 午前10時26分
Page 730 of 814

729
uuChecking and Maintaining Tires uTire and Loading Information Label
Continued
Maintenance
Tire and Loading Information Label
The label attached to the driver’s doorj amb provides necessary tire and loading
information.
Tire Labeling
The tires that came on your vehicle have a
number of markings. Those you should be
aware of are described as shown.
Whenever tires are replaced, they should be replaced with tires of the same size.
1Tire and Loading Information Label
The tire and loading informat ion label attached to the
driver’s doorjamb contains:
aThe number of people your vehicle can carry.
bThe total weight your vehicle can carry. Do not
exceed this weight.
cThe original tire sizes for front, rear, and spare.
dThe proper cold tire pressure for front, rear, and
spare.
Label
Example
Example Tire Size
Tire
Identification
Number (TIN)
Maximum
Tire Load
Maximum
Tire Pressure
Tire Size
■Tire Sizes
1 Tire Sizes
Following is an example of tire size with an
explanation of what each component means.
P235/60R18 102V
P: Vehicle type (P indi cates passenger vehicle).
235: Tire width in millimeters.
60: Aspect ratio (the tire’s section height as a
percentage of its width).
R: Tire construction code (R indicates radial).
18: Rim diameter in inches.
102: Load index (a numerical code associated with
the maximum load the tire can carry).
V: Speed symbol (an alphab etical code indicating the
maximum speed rating).
23 PILOT-31T906000_03.book 729 ページ 2022年10月31日 月曜日 午前10時26分