tow HONDA PILOT 2023 Workshop Manual
[x] Cancel search | Manufacturer: HONDA, Model Year: 2023, Model line: PILOT, Model: HONDA PILOT 2023Pages: 814, PDF Size: 29.02 MB
Page 655 of 814

uuBraking uBrake System
654
Driving
■Activating and deactivating the au tomatic parking brake feature
With the power mode is in ON, carry out th e following steps to either activate or
deactivate the automatic parking brake feature.
1. Put the transmission into
(P.
2. Without depressing the brake pedal, pull up the electric parking brake switch.
u Check that the parking brake and brake system indicator (red) has come on.
3. Pull up and hold the electric parking br ake switch. When you hear a beeping sound,
release the switch and within three se conds pull up and hold the switch again.
4. When you hear a sound indicating that the procedure is completed, release the
switch.
u Two beeps indicates that the feature has been activated.
u One beep indicates that the feature has been deactivated.
u When you have completed activating the feature, the parking brake will
remain applied after you turn off the engine.
u To confirm that the parking brake is ap plied, check if the parking brake and
brake system indicator (red) is on.
If you need to temporarily deactivate the feature while putting your vehicle through
a conveyor type car wash or when having your vehicle towed, follow the procedure
explained below.
1. Depress the brake pedal and bring the vehicle to a stop.
2. Set the power mode to VEHICLE OFF and then within two seconds push down the
electric parking brake switch.
u Activation and deactivation settings fo r the feature will not be affected.
u Before temporarily deactivating the feat ure, make sure to first turn off both
Adaptive Cruise Control (ACC) with Low Speed Follow and the automatic
brake hold system.
u To confirm that the parking brake is ap plied, check if the parking brake and
brake system indicator (red) is on.
1 Parking Brake
The parking brake may not be released automatically
while the following indicators are on:
•Parking brake and brake sy stem indicator (amber)
•VSA® system indicator•ABS indicator
•Supplemental restraint system indicator
In cold climates, the parking brake may freeze in
place if applied.
When parking the vehicle, chock the wheels and
make sure the automatic parking brake feature is
deactivated.
Also, when putting your vehicle through a conveyor-
type car wash or when ha ving your vehicle towed,
deactivate the automatic parking brake feature and
leave the parking brake released.
23 PILOT-31T906000_03.book 654 ページ 2022年10月31日 月曜日 午前10時26分
Page 665 of 814

uuParking Your Vehicle uParking Sensor System*
664
Driving
■Parking sensor system on and off
You can turn the system on and off us ing the driver information interface.
2Switching the Display P. 125, 154
2 Safety Support P. 136, 164
The front corner, rear corner and rear center sensors start to detect an obstacle
when the transmission is in
(R, and the vehicle speed is less than 5 mph (8 km/h).
The front corner and front center sensor s start to detect an obstacle when the
transmission is in any position other than
(P or (R, and the vehicle speed is less
than 5 mph (8 km/h).
1 Parking sensor system on and off
When you set the power mode to ON, the system will
be in the previously selected condition.
You can turn the rear park ing sensor system on and
off using the audio/information screen. 2 Customized Features P. 429
When the Drive Mode is in TOW mode, the rear
parking sensor system will turn off.
2 Drive Mode System P. 548
23 PILOT-31T906000_03.book 664 ページ 2022年10月31日 月曜日 午前10時26分
Page 670 of 814

Continued669
uuParking Your Vehicle uCross Traffic Monitor*
Driving
The system activates when:
• The power mode is in ON.
• The Cross Traffic Monitor is turned on.
2 Cross Traffic Monitor On and Off P. 671
•The transmission is in (R.
• Your vehicle is moving at 3 mph (5 km/h) or
lower.
When a vehicle is detected approaching from a rear corner, Cross Traffic Monitor
alerts you with a buzzer and a displayed warning.
The system will not detect a vehicle that approaches from directly behind your
vehicle, nor will it provide alerts about a detected vehicle when it moves directly
behind your vehicle.
The system does not provide alerts for a vehicle that is moving away from your
vehicle, and it may alert for pedestrians, bicycles, or stationary objects.
■How the System Works1 Cross Traffic Monitor*
Cross Traffic Monitor may not detect or may delay
alerting an approach ing vehicle, or may alert without
an approaching vehicle under the following
conditions:
•An obstacle, such as anothe r vehicle or a wall near
your vehicle's rear bumpe r, is blocking the radar
sensor's scope.
•Your vehicle is moving at a speed of about 3 mph
(5 km/h) or higher.
•A vehicle is approaching at a speed other than
between about 6 and 16 mph (10 and 25 km/h).
•The system picks up external interference such as
other radar sensors from an other vehicle or strong
radio wave transmitted fr om a facility nearby.
•Either corner of the rear bumper is covered with
snow, ice, mud or dirt.
•When there is bad weather.
•Your vehicle is on an incline.
•Your vehicle is tilted due to a heavy load in the rear.
•Your vehicle is reversing toward a wall, a pole, a
vehicle, and so on.
If the rear bumper or the sensors have been
improperly repaired or the rear bumper has been
deformed. Have a vehicle checked by a dealer.
For proper operation, always keep the rear bumper
corner area clean.
Do not cover the rear bumper corner area with labels
or stickers of any kind.
Radar sensors:
Underneath the rear bumper
corners
* Not available on all models
23 PILOT-31T906000_03.book 669 ページ 2022年10月31日 月曜日 午前10時26分
Page 694 of 814

693
uuBefore Performing Maintenance uSafety When Performing Maintenance
Maintenance
Safety When Performing Maintenance
Some of the most important safety precau tions are given here. However, we cannot
warn you of every conceivable hazard that can arise in performing maintenance.
Only you can decide whether you should perform a given task.
• To reduce the possibility of fire or explos ion, keep cigarettes, sparks, and flames
away from the battery and all fuel related parts.
• Never leave rags, towels, or other flammable objects under the hood.
u Heat from the engine and exhaust can ignite them, causing a fire.
•To clean parts, use a commercially available degreaser or parts cleaner, not gasoline.
•Wear eye protection and protective clothi ng when working with the battery or
compressed air.
• Engine exhaust contains carbon monoxide, which is poisonous and can kill you.
u Only operate the engine if th ere is sufficient ventilation.
• The vehicle must be in a stationary condition.
u Make sure your vehicle is parked on le vel ground, the parking brake is set, and
the engine is off.
• Be aware that hot parts can burn you.
u Make sure to let the engine and exhaust system cool thoroughly before
touching vehicle parts.
• Be aware that moving parts can injure you.
u Do not start the engine unless instruct ed, and keep your hands and limbs away
from moving parts.
u Do not open the hood while the Auto Idle Stop function is activated.
■Maintenance Safety
■Vehicle Safety
1Safety When Performing Maintenance
3WARNING
Improperly maintaining this vehicle or
failing to correct a pr oblem before driving
can cause a crash in which you can be
seriously hurt or killed.
Always follow the inspection and
maintenance recommendations according
to the schedules in this owner’s manual.
3WARNING
Failure to properly follow maintenance
instructions and precautions can cause you
to be seriously hurt or killed.
Always follow the procedures and
precautions in this owner’s manual.
23 PILOT-31T906000_03.book 693 ページ 2022年10月31日 月曜日 午前10時26分
Page 702 of 814

701
uuMaintenance MinderTMuTo Use Maintenance MinderTM
Continued
Maintenance
U.S. models
*1: If a Maintenance Minder message does not appear more than 12 months after the display is reset,
change the engine oil every year.
# : See information on maintenance and emissions warranty.
CODEMaintenance Main Items
A
●Replace engine oil*1
B●Replace engine oil*1 and oil filter●Inspect front and rear brakes●Inspect these items: • Tie rod ends, steering gearbox, and boots
• Suspension components
• Driveshaft boots
• Brake hoses and lines (including ABS/VSA®)
• All fluid levels and condition of fluids
• Exhaust system
#
•Fuel lines and connections#
*2: If you drive in dusty conditions, replace the air cleaner element every 15,000 miles (24,000 km).
*3: If you drive primarily in urban areas that have high concentrations of soot in the air from industry and
from diesel-powered vehicles, replace the dust and pollen filter every 15,000 miles (24,000 km).
*4: If you drive regularly in very high temperatures (over 110°F, 43°C), in very low temperatures (under -20°F, -29°C), or towing a trailer, replace every 60,000 miles (100,000 km).
*5: Driving in mountainous areas at very low vehicle speeds or trailer towing results in higher level of mechanical (Shear) stress to fluid. This requires differential fluid changes more frequently than
recommended by the Maintenance Minder. If you regularly drive your vehicle under these conditions,
have the differential fluid changed at 7,500 miles (12,000 km), then every 15,000 miles (24,000 km).
*6: If a Maintenance Minder message does not appear more than 36 months after the display for item 7 is reset, change the brake fluid every 3 years.
CODEMaintenance Sub Items
1
●Rotate tires
2●Replace air cleaner element*2
●Replace dust and pollen filter*3
●Inspect drive belt
3
●Replace transmission fluid●Replace transfer fluid*
4●Replace spark plugs●Replace timing belt and inspect water pump*4
5●Replace engine coolant
6●Replace rear differential fluid*, *5
7●Replace brake fluid*6
* Not available on all models
23 PILOT-31T906000_03.book 701 ページ 2022年10月31日 月曜日 午前10時26分
Page 703 of 814

702
uuMaintenance MinderTMuTo Use Maintenance MinderTM
Maintenance
Canadian models
*1: If a Maintenance Minder message does not appear more than 12 months after the display is reset,
change the engine oil every year.
*2: If you drive in dusty conditions, replace the air cleaner element every 24,000 km (15,000 miles).
*3: If you drive primarily in urban areas that have high concentrations of soot in the air from industry and from diesel-powered vehicles, replace the dust and pollen filter every 24,000 km (15,000 miles).
*4: If you drive regularly in very high temperatures (over 43°C, 110°F), in very low temperatures (under -29°C, -20°F), or towing a trailer, replace every 100,000 km (60,000 miles).
*5: Driving in mountainous areas at very low vehicle speeds or trailer towing results in higher level of mechanical (Shear) stress to fluid. This requires differential fluid changes more frequently than
recommended by the Maintenance Minder. If you regularly drive your vehicle under these conditions,
have the differential fluid changed at 12,000 km (7,500 miles), then every 24,000 km (15,000 miles).
*6: If a Maintenance Minder message does not appear more than 36 months after the display for item 7 is reset, change the brake fluid every 3 years.
# : See information on maintenance and emissions warranty.
CODEMaintenance Main Items
A
●Replace engine oil*1
0●Replace engine oil*1 and oil filter
CODEMaintenance Sub Items
1
●Rotate tires
2●Replace air cleaner element*2
●Replace dust and pollen filter*3
●Inspect drive belt
3
●Replace transmission fluid●Replace transfer fluid
4●Replace spark plugs●Replace timing belt and inspect water pump*4
5●Replace engine coolant
6●Replace rear differential fluid*5
7●Replace brake fluid*6
9●Service front and rear brakes●Inspect these items: • Tie rod ends, steering gearbox, and boots
• Suspension components
• Driveshaft boots
• Brake hoses and lines (including ABS/VSA ®)
• All fluid levels and condition of fluids
• Exhaust system
#
•Fuel lines and connections#
23 PILOT-31T906000_03.book 702 ページ 2022年10月31日 月曜日 午前10時26分
Page 707 of 814
706
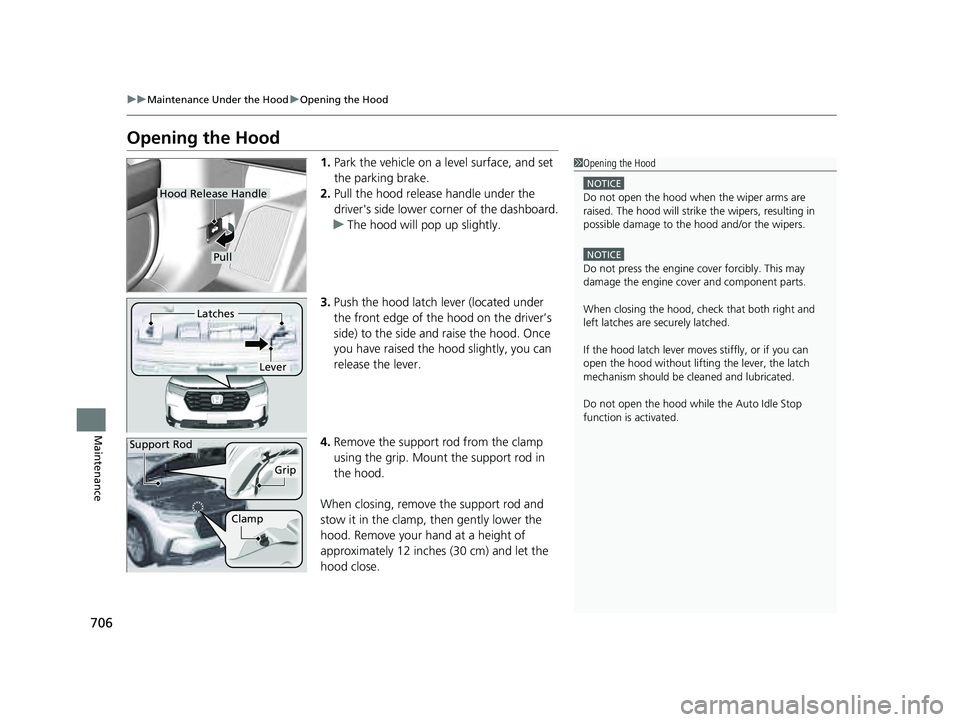
uuMaintenance Under the Hood uOpening the Hood
Maintenance
Opening the Hood
1. Park the vehicle on a level surface, and set
the parking brake.
2. Pull the hood release handle under the
driver's side lower corner of the dashboard.
u The hood will pop up slightly.
3. Push the hood latch lever (located under
the front edge of the hood on the driver’s
side) to the side and raise the hood. Once
you have raised the hood slightly, you can
release the lever.
4. Remove the support rod from the clamp
using the grip. Mount the support rod in
the hood.
When closing, remove the support rod and
stow it in the clamp, then gently lower the
hood. Remove your hand at a height of
approximately 12 inches (30 cm) and let the
hood close.1 Opening the Hood
NOTICE
Do not open the hood when the wiper arms are
raised. The hood will strike the wipers, resulting in
possible damage to the hood and/or the wipers.
NOTICE
Do not press the engine cover forcibly. This may
damage the engine cover and component parts.
When closing the hood, check that both right and
left latches are securely latched.
If the hood latch lever moves stiffly, or if you can
open the hood without lifti ng the lever, the latch
mechanism should be cl eaned and lubricated.
Do not open the hood while the Auto Idle Stop
function is activated.
Hood Release Handle
Pull
Lever
Latches
Support Rod
Grip
Clamp
23 PILOT-31T906000_03.book 706 ページ 2022年10月31日 月曜日 午前10時26分
Page 711 of 814

710
uuMaintenance Under the Hood uOil Check
Maintenance
Oil Check
We recommend that you check the engi ne oil level every time you refuel.
Park the vehicle on level ground.
Wait approximately three minutes after turn ing the engine off before you check the
oil. 1.Remove the dipstick (orange).
2. Wipe the dipstick with a clean cloth or
paper towel.
3. Insert the dipstick back all the way into its
hole.
4. Remove the dipstick again, and check the
level. It should be between the upper and
lower marks. Add oil if necessary.1Oil Check
If the oil level is near or below the lower mark, slowly
add oil, being carefu l not to overfill.
Lower MarkUpper Mark
23 PILOT-31T906000_03.book 710 ページ 2022年10月31日 月曜日 午前10時26分
Page 719 of 814

718
Maintenance
Replacing Light Bulbs
Headlights
Headlights are LED type. Have an authorized Honda dealer inspect and replace the
light assembly.
Fog Lights*
Fog lights are LED type. Have an authoriz ed Honda dealer inspect and replace the
light assembly.
Front Turn Signal Lights
Front turn signal lights are LED type. Have an authorized Honda dealer inspect and
replace the light assembly.
Front Side Marker Lights
Front side marker lights are LED type. Have an authorized Honda dealer inspect and
replace the light assembly.
Parking/Daytime Running Lights
Parking/daytime running lights are LED type . Have an authorized Honda dealer
inspect and replace the light assembly.
Side Turn Signal/Emergency Indicator Lights*
Door mirror side turn lights are LED type. Have an authorized Honda dealer inspect
and replace the light assembly.
1 Headlights
The headlight aim is set by the factory, and does not
need to be adjusted. Howeve r, if you regularly carry
heavy items in the cargo area or tow a trailer, have
the aiming readjusted at a dealer or by a qualified
technician.
* Not available on all models
23 PILOT-31T906000_03.book 718 ページ 2022年10月31日 月曜日 午前10時26分
Page 738 of 814

737
Maintenance
Battery
Checking the Battery
The condition of the battery is monitored by a
sensor located on the negative terminal of the
battery. If there is a problem with this sensor,
the driver information interface will display a
warning message. If this happens, have your
vehicle inspected by a dealer.
Check the battery termina ls for corrosion monthly.
If your vehicle’s battery is disconnected or goes dead:
• The audio system is disabled.
2 Audio System Theft Protection P. 295
•The clock resets*.
2 Clock P. 176
•
The immobilizer system needs to be reset.
2 Immobilizer System Indicator P. 112
1Battery
WARNING: Battery post, terminals,
and related accessories contain lead
and lead compounds.
Wash your hands after handling.
When you find corrosion, cl ean the battery terminals
by applying a baking powder and water solution.
Clean the terminals with a damp towel. Cloth/towel
dry the battery. Coat the terminals with grease to
help prevent future corrosion.
When replacing the battery, the replacement must be
of the same specifications.
Consult a dealer for more information.
3WARNING
The battery gives off explosive hydrogen
gas during normal operation.
A spark or flame can cause the battery to
explode with enough force to kill or
seriously hurt you.
When conducting any battery
maintenance, wear prot ective clothing and
a face shield, or have a skilled technician do
it.
Canadian models only
* Not available on all models
23 PILOT-31T906000_03.book 737 ページ 2022年10月31日 月曜日 午前10時26分