reset HONDA PRELUDE 1990 Owners Manual
[x] Cancel search | Manufacturer: HONDA, Model Year: 1990, Model line: PRELUDE, Model: HONDA PRELUDE 1990Pages: 143, PDF Size: 2.07 MB
Page 19 of 143

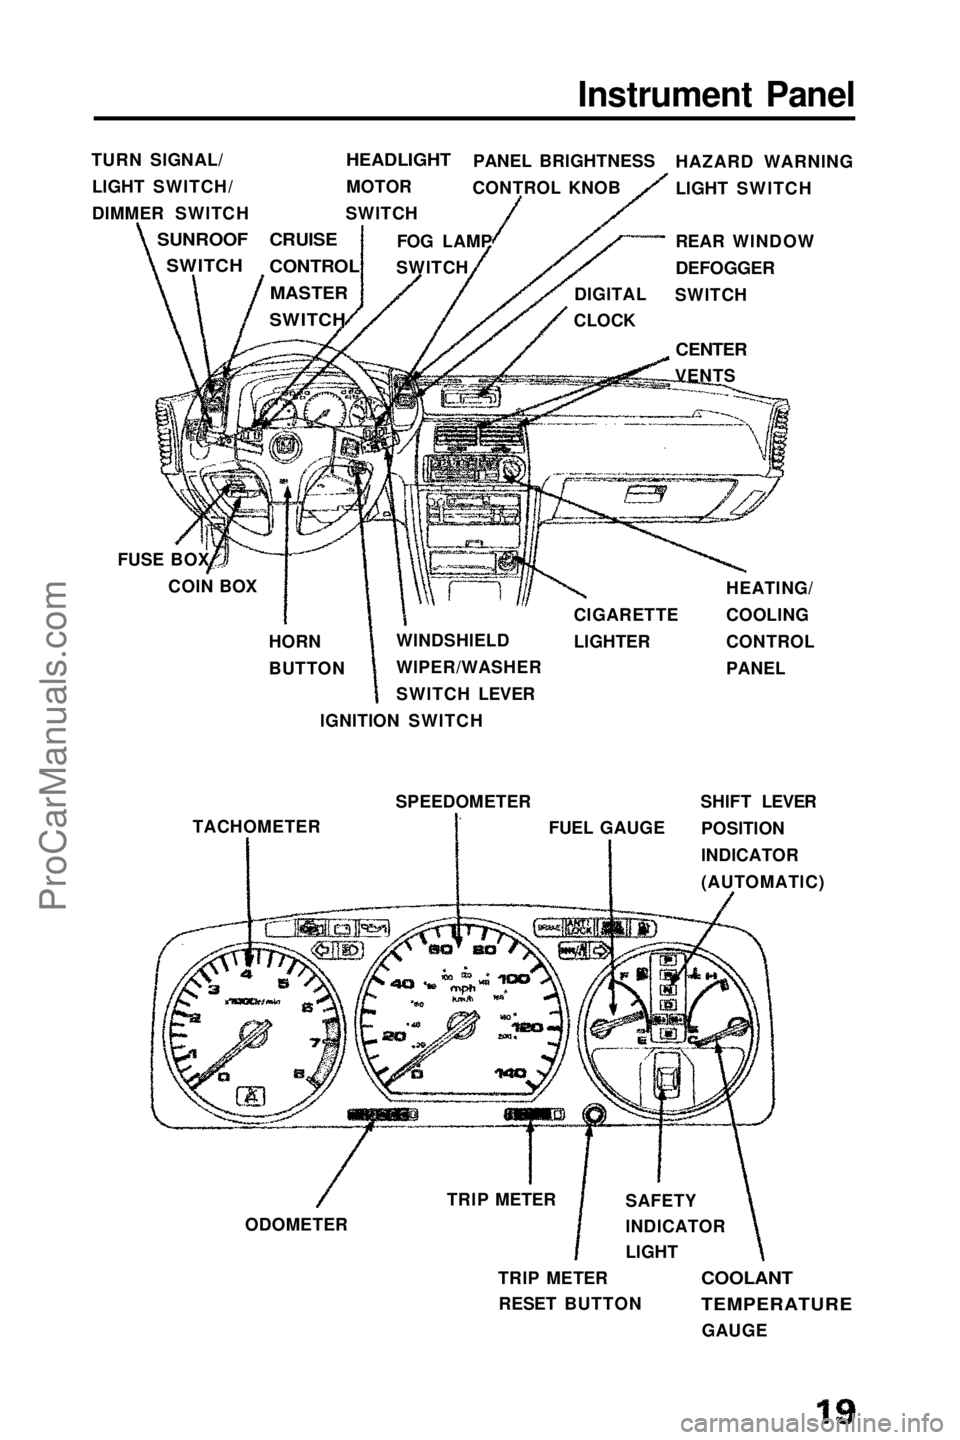
Instrument Panel
TURN SIGNAL/ LIGHT SWITCH/
DIMMER SWITCH
SUNROOFSWITCH
HEADLIGHT
MOTOR
SWITCH PANEL BRIGHTNESS
CONTROL KNOB HAZARD WARNING
LIGHT SWITCH
FOG LAMP
SWITCH REAR WINDOW
DEFOGGER
SWITCH
DIGITAL
CLOCK
CENTER
VENTS
CRUISE
CONTROL
MASTER
SWITCH
FUSE BOX COIN BOX
HORN
BUTTON WINDSHIELD
WIPER/WASHER
SWITCH LEVER
IGNITION SWITCH CIGARETTE
LIGHTER
HEATING/
COOLING
CONTROL
PANEL
TACHOMETER SPEEDOMETER
FUEL GAUGESHIFT LEVER
POSITION
INDICATOR
(AUTOMATIC)
ODOMETER TRIP METER
TRIP METERRESET BUTTON SAFETY
INDICATOR
LIGHT
COOLANT
TEMPERATURE
GAUGEProCarManuals.comMain Menu t s
Page 20 of 143

Speedometer
The speed is indicated in miles per hour (outside scale) and
kilometers per hour (inside).
Odometer
The numbers on the odometer indicate miles.
The odometer registers total distance traveled, and serves as your
guide for determining when periodic maintenance is due. Federal law makes it illegal to alter the odometer of any motor vehicle with the
intent to change the number of miles indicated.
Trip Meter
The numbers on the trip meter indicate miles.
The trip meter can be returned to zero by pushing in the resetbutton. Use it for checking fuel consumption or distance traveled per trip.
Tachometer
The tachometer indicates engine speed in revolutions per minute.The beginning of the RED ZONE indicates the maximum allowable
engine R.P.M. Do not run the engine with the tachometer indicator
needle in the RED ZONE.
Fuel Gauge
FUEL TANK CAPACITY: 60 l (15.9 US gal, 13.2 Imp gal)
As a convenience, the gauge continues to show the same fuel level as when the ignition was last on. After refueling, the gauge will
slowly change to the new fuel level when the ignition is switched on.
When the needle first indicates E (empty), you have a usable reserve left in the tank of about:
4 l
(1.1
US gal, 0,9 Imp gal)
Coolant Temperature GaugeCAUTION:
The needle should stay within the white range. If the needle reaches the red line at "H" (Hot), pull safely off the road, stop the
engine and check the coolant level in the reserve tank on the passenger side of the radiator under the hood.
Do not remove the radiator cap when the engine is hot. The
coolant is under pressure and may blow out and scald you.
GaugesProCarManuals.comMain Menu t s
Page 37 of 143

Clock
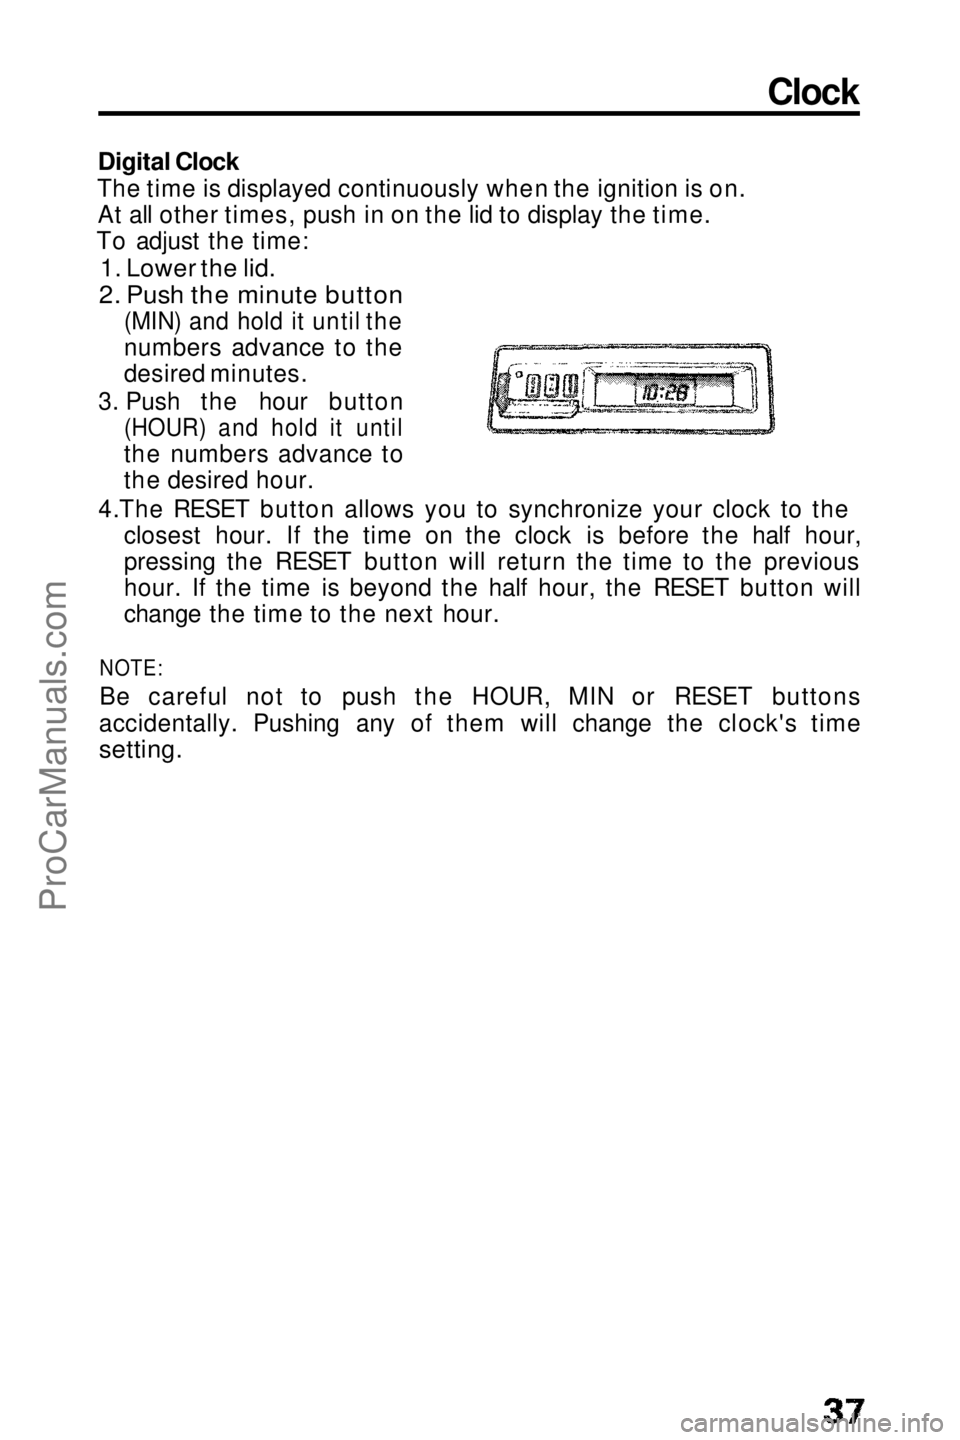
Digital Clock
The time is displayed continuously when the ignition is on. At all other times, push in on the lid to display the time.
To adjust the time:
1. Lower the lid.
2. Push the minute button
(MIN) and hold it until the
numbers advance to the
desired minutes.
3. Push the hour button
(HOUR) and hold it until
the numbers advance to
the desired hour.
4.The RESET button allows you to synchronize your clock to the closest hour. If the time on the clock is before the half hour,
pressing the RESET button will return the time to the previous
hour. If the time is beyond the half hour, the RESET button will
change the time to the next hour.
NOTE:
Be careful not to push the HOUR, MIN or RESET buttons
accidentally. Pushing any of them will change the clock's time
setting.ProCarManuals.comMain Menu t s
Page 49 of 143

Seek Tuning
Each time you push this button up or down, the tuner will
automatically seek the next higher or lower frequency station. Preset Station Selection
1 .Select AM or FM band by depressing the Band Selector. Find the station you want by Manual Tuning or Seek Tuning.
Press and hold one of the Preset Buttons.
2. In a few seconds, a beep will sound and the light in the button will
3. come on. The station is now preset in the memory. You may preset 1 AM and 1 FM station per button.
(total, 6 of each on the 2.0 S and 2.0 Si models and 8 of each on
the Si model).
4. You can tune to a preset station by pushing its corresponding preset button.
NOTE: On the Si model
The Auto Preset button must be off before the Preset Station Selection can be used. Auto Select Button (Si only)
If you are visiting a new broadcast area, you can quickly enter into
memory the stronger stations in that area by simply pushing the
Auto Select Button. The radio will then automatically scan the AM
and FM bands and temporarily memorize up to eight stations in each.
With the Auto Select Button on, these stations can then be tuned by pushing the preset buttons. Manually-preset stations remainmemorized for use when you return to your normal broadcast area,
but are only selectable with the Auto Select Button off. Stereo indicator
This lights up when an FM broadcast in stereo is being received. It will flash when the signal strength diminishes. If it flashes, good
stereo reception cannot be expected. Stereo reception is available
only for FM stereo broadcasts, not for AM stereo broadcasts.
(cont'd)ProCarManuals.comMain Menu t s
Page 52 of 143

Stereo Sound System (cont'd)
CLEAN Indicator Light
After 50 hours of cassette tape play, the light will come on as a reminder to clean the tape heads. If the light comes on and the tape
heads were not cleaned at the recommended 30 hours of usage (see maintenance section below), they should be cleaned immediately.
To reset, push the indicator for a minimum of five seconds until the light goes off.
Defective Tape Eject
The tape player includes a protection mechanism to automatically eject defective tapes (warped housing, loose label, faulty tape movement) immediately upon insertion, if a tape malfunctions while
in play, the tape direction will change back and forth and then e|ect
the cassette. Tapes ejected before play should be considered faulty and discarded; tapes ejected during play may only be unevenly
wound and could be re-usable if fully rewound, manually, outside the player.
NOTE:
The tape player may repeat cycle through the loading and unloading
motion several times in an effort to eject a faulty tape. During this
process the tape will either eject fully or rise to the loading level and
have to be pulled out manually. In either case, discard the tape; re-
use may damage the tape player.
Maintenance
The head in the cassette tape player can pick up dirt or tape
deposits each time a cassette is played. The result is low or "muddy" sound from one or both channels, as if the treble tone
control were turned all the way down. To prevent this, you should periodically clean the head with a commercially available cleaning
cassette.
As preventive maintenance, clean the head about every 30 hours of
use. If you wait until the head becomes very dirty (noticeably poor
sound), it may not be possible to remove all deposits with a simple
cleaning cassette.
The use of 120 minutes tape is not recommended.
CAUTION:
Storing cassettes out of their cases, or touching the magnetic
tape with your fingers will increase the amount of dirt that gets to
the tape head. Using low-quality "off-brand" tape will increase the
amount of tape deposits that get on the head. Both of these
practices may eventually lead to damage of the head and playing
mechanism.ProCarManuals.comMain Menu t s