CD player HONDA PRELUDE 1992 Owners Manual
[x] Cancel search | Manufacturer: HONDA, Model Year: 1992, Model line: PRELUDE, Model: HONDA PRELUDE 1992Pages: 225, PDF Size: 2.1 MB
Page 67 of 225
Comfort and Convenience Features
The heating and air conditioning* system in your car provides a com-
fortable driving environment in all
weather conditions.
The audio sound system is very
versatile. To get the most from thissystem, take the time to learn what
the controls do.
Some models have an anti-theft
system that requires a code
number to enable it.
* Air conditioner is optional on S
model.
Heating and Cooling...................... 68
What Each Control Does .......... 70
How to Use the System............. 71
Controlling Air Flow
Direction............................. .
71
Ventilation...............................
71
To Cool.................................... .
72
To Dehumidify and Defog
with
A/C...............................
73
To Heat.................................... 74
To Defrost............................... 74
To Turn Everything off ....... 74
Audio System (S)............................ 75
Adjusting the Sound.................. 76Operating the Radio.................. 77
Presetting.................................... 79
Radio Frequencies..................... 80Operating the Cassette
Player........................................ 81
Cassette Search Functions ...... 82 Audio Syste
m
(Si, SR)................... 84
Adjusting the Sound.................. 85
Operating the Radio.................. 86
Presetting.................................... 88
Radio Frequencies..................... 90
Operating the Cassette Player. 91
Cassette Search Functions....... 92
Caring for the Cassettes Player .. 94
Theft Protection............................. 95
Comfort and Convenience FeaturesProCarManuals.comMain Menu s t
Page 75 of 225
Audio System (S)
AM/FM/Cassette Stereo Audio System
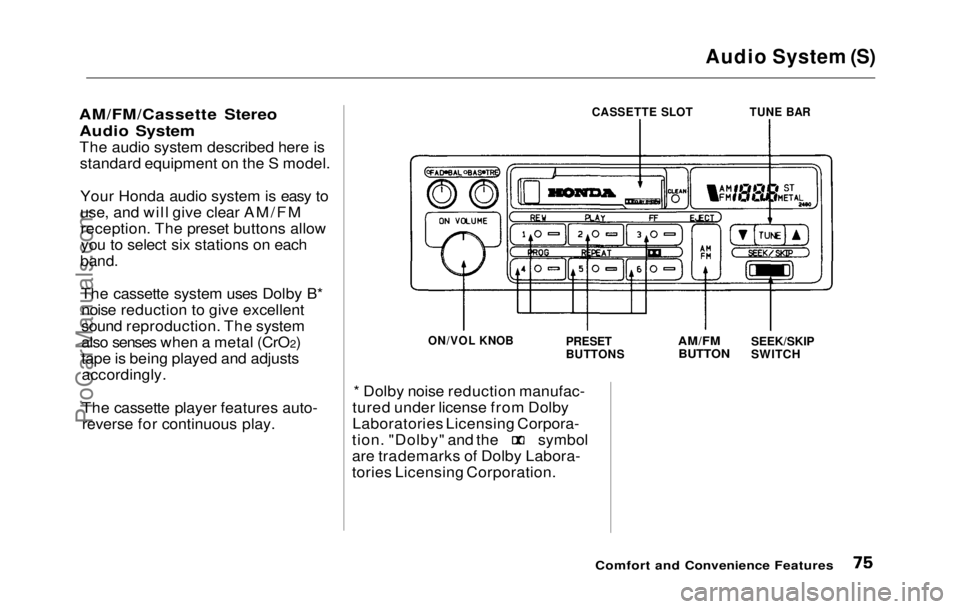
The audio system described here isstandard equipment on the S model.
Your Honda audio system is easy to
use, and will give clear AM/FMreception. The preset buttons allowyou to select six stations on each
band.
The cassette system uses Dolby B*noise reduction to give excellent
sound reproduction. The system
also senses when a metal (CrO 2)
tape is being played and adjusts accordingly.
The cassette player features auto-reverse for continuous play.
CASSETTE SLOT
TUNE BAR
ON/VOL KNOB
PRESET
BUTTONS
AM/FM
BUTTON
SEEK/SKIP
SWITCH
* Dolby noise reduction manufac-
tured under license from Dolby
Laboratories Licensing Corpora- tion. "Dolby" and the symbol
are trademarks of Dolby Labora-
tories Licensing Corporation.
Comfort and Convenience FeaturesProCarManuals.comMain Menu Table of Contents s t
Page 81 of 225
Audio System (S)
Operating the Cassette Player
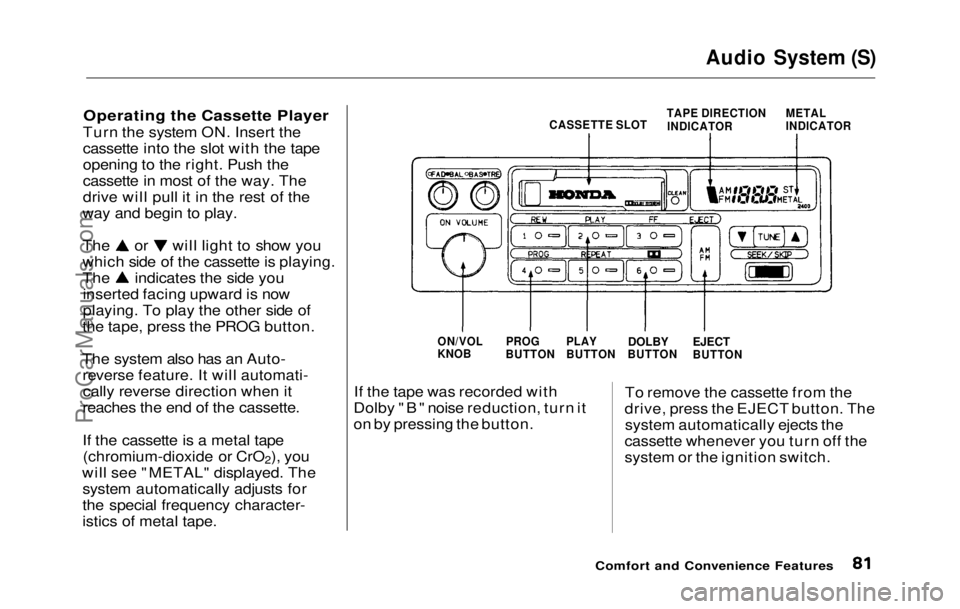
Turn the system ON. Insert the
cassette into the slot with the tape
opening to the right. Push the
cassette in most of the way. The
drive will pull it in the rest of the
way and begin to play. The or will light to show you
which side of the cassette is playing.
The indicates the side you
inserted facing upward is now
playing. To play the other side of
the tape, press the PROG button.
The system also has an Auto- reverse feature. It will automati-cally reverse direction when it
reaches the end of the cassette.
If the cassette is a metal tape (chromium-dioxide or CrO 2), you
will see "METAL" displayed . The
system automaticall y
adjusts for
the special frequency character-
istics of metal tape. If the tape was recorded with
Dolby "B" noise reduction, turn it
on by pressing the button. To remove the cassette from the
drive, press the EJECT button. The system automatically ejects the
cassette whenever you turn off the
system or the ignition switch.
Comfort and Convenience Features
METAL
INDICATOR
TAPE DIRECTION
INDICATOR
CASSETTE SLOT
EJECT
BUTTON
DOLBY
BUTTON
PLAY
BUTTON
PROG
BUTTON
ON/VOL
KNOBProCarManuals.comMain Menu Table of Contents s t
Page 91 of 225
Audio System (Si, SR)
Operating the Cassette Player
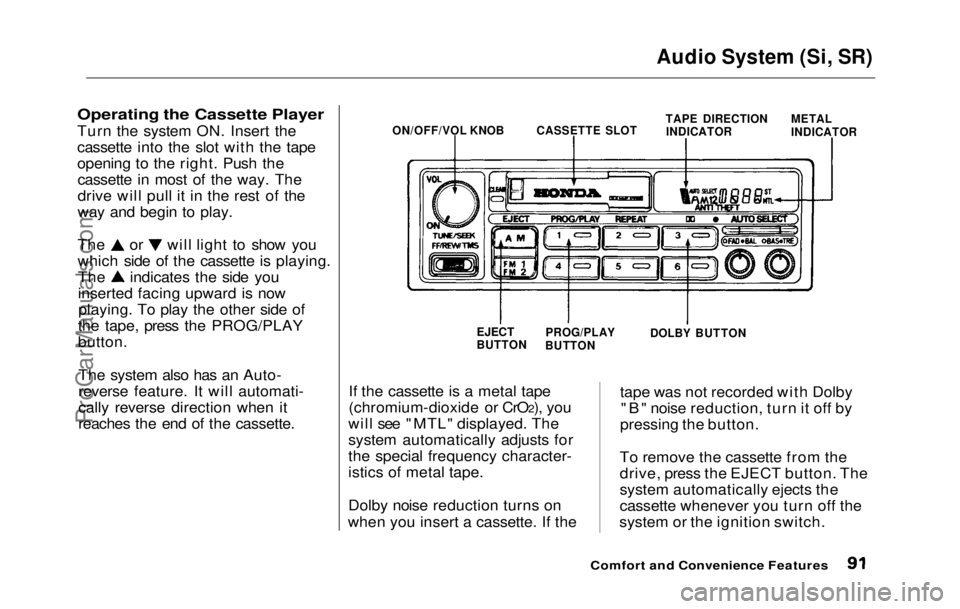
Turn the
system ON. Insert the
cassette into the slot with the tape
opening to the right. Push the cassette in most of the way. The
drive will pull it in the rest of the
way and begin to play. The or will light to show you
which side of the cassette is playing.
The indicates the side you
inserted facing upward is now
playing. To play the other side of
the tape, press the PROG/PLAY
button.
The system also has an Auto-
reverse feature. It will automati-
cally reverse direction when it
reaches the end of the cassette. If the cassette is a metal tape
(chromium-dioxide or CrO2), you
will see "MTL" displayed. The
system automatically adjusts for
the special frequency character-
istics of metal tape.
Dolby noise reduction turns on
when you insert a cassette. If the tape was not recorded with Dolby
"B" noise reduction, turn it off by
pressing the button.
To remove the cassette from the
drive, press the EJECT button. The
system automatically ejects the
cassette whenever you turn off the
system or the ignition switch.
Comfort and Convenience Features
ON/OFF/VOL KNOB
CASSETTE SLOT
TAPE DIRECTION
INDICATOR METAL
INDICATOR
EJECT
BUTTON PROG/PLAY
BUTTON DOLBY BUTTONProCarManuals.comMain Menu Table of Contents s t
Page 94 of 225
Caring for the Cassette Player
The cassette drive picks up dirt
and oxides whenever you play a
tape. This builds up over time and
causes the sound quality to degrade.
To prevent this, you should clean
the cassette drive after every 30
hours of use. Your dealer has a cleaning kit available for this
purpose.
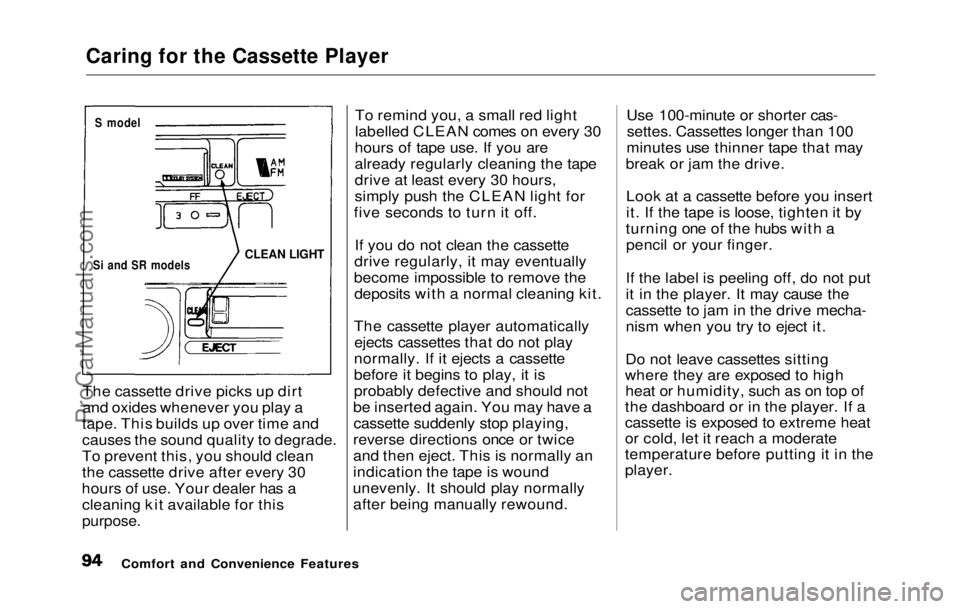
To remind you, a small red light
labelled CLEAN comes on every 30
hours of tape use. If you are
already regularly cleaning the tape
drive at least every 30 hours,
simply push the CLEAN light for
five seconds to turn it off.
If you do not clean the cassette
drive regularly, it may eventually
become impossible to remove the deposits with a normal cleaning kit.
The cassette player automatically ejects cassettes that do not play
normally. If it ejects a cassette
before it begins to play, it is
probably defective and should not
be inserted again. You may have a cassette suddenly stop playing,
reverse directions once or twice
and then eject. This is normally an
indication the tape is wound
unevenly. It should play normally after being manually rewound. Use 100-minute or shorter cas-
settes. Cassettes longer than 100
minutes use thinner tape that may
break or jam the drive.
Look at a cassette before you insert
it. If the tape is loose, tighten it by
turning one of the hubs with a pencil or your finger.
If the label is peeling off, do not put
it in the player. It may cause the
cassette to jam in the drive mecha-
nism when you try to eject it.
Do not leave cassettes sitting
where they are exposed to high heat or humidity, such as on top of
the dashboard or in the player. If a
cassette is exposed to extreme heat
or cold, let it reach a moderate
temperature before putting it in the
player.
Comfort and Convenience Features
S model
Si and SR models
CLEAN LIGHTProCarManuals.comMain Menu Table of Contents s t
Page 95 of 225

Theft Protection
Theft Protection is standard on the Si and Si 4WS models in the U. S.,
and the SR and SR 4WS models in
Canada.
Your audio system is protected by a code number. The system immedi-
ately disables itself whenever the
radio/player unit is disconnected
from the battery. To make it work again, you must enter a five-digit
code with the station Preset
buttons.
Your dealer should have given you
two copies of your audio system's
code number with your car. Keep one of these copies at home, and
the other in your wallet or a con- cealed place in the car. If your car's battery is discon-
nected or goes dead, the audio
system will disable itself. The next
time you turn on the radio you will
see "Code" in the frequency display.
Use the Preset buttons to enter the
five-digit code. If entered correctly,
the radio will start to play.
You will then have to store your
favorite stations in the Preset
buttons. Your original settings
were lost when power was discon-
nected.
Comfort and Convenience FeaturesProCarManuals.comMain Menu Table of Contents s t
Page 223 of 225
Index
Reminder Light and Beeper..... 33
Replacement.................................. 9
System Components.................... 6
Tether Attachment Points....... 21
Use During Pregnancy................ 8
Wearing a Lap/Shoulder Belt.... 7
Seats, Adjusting the....................... 51
Serial Number............................... 204
Service Intervals..........................
129
Service Manual............................
.
221
Service Station Procedures........ 100
Setting th
e
Clock............................ 63
Shifting The Automatic Transmission
..................................................
112
The 5- Speed
Transmission.....
111
Shift Leve
r
Position
Indicator...............................
36, 112
Side Marke r
Lights, Bulb
Replacement in.........................
166
Signaling Turns............................. .
41
Snow Tires.....................................
163
Solvent-type Cleaners................ .
176
Sound Syste
m
................................. 75
Spare Tire
Inflating .....................................
184
Specifications............................ 207
Spar
k Plugs, Replacing............... 150
Specifications Charts.................. 206
Speed Control.................................. 44
Speedometer.................................... 37
SRS Indicator........................... .
14, 34
START (Ignition Key Position)..
47
Starting th e
Engine......................
109
In Col
d
Weather
at High Altitude....................
110
With a Dea
d Battery................
191
Steam Comin
g
from Engine.......
193
Steering Whee
l
Adjustment.................................
. 43
Anti-theft Column Lock........... 47
Stereo Sound System..................... 75
Storing Your Car..........................
173
Sunroof............................................. 58
Closin
g Manually.....................
198
Operation.....................................
58
Supplementa
l Restraint System
Service Precautions................... 15
Servicing...................................... 14
SRS Indicator........................ 14, 34
System Components.................. 10
Technical Description............ .
209
Tachometer.....................................
37
Taillights
, Changing Bulbs in.... 169
Taking Care of the
Unexpected ...............................
183
Tape Player.................................... .
81
Technical Descriptions Anti-lock Brake System ......... 208Catalytic Converter................. 213
Emission Control Systems......
211
Four Whee l
Steering ............... 210
Supplemental Restraint
System....................................
209
Temperature Gauge..................... .
38
Tether Attachment Points...........
21
Time, Settin g
the ........................... 63
Tire Chains.................................... 163
Tire, How to Change a Flat........ 185
Tires................................................ 158
Air Pressure.............................. 158Checking Wear......................... 159
Compact Spare.......................... 184
DOT Tire Quality Grading..... 161
CONTINUEDProCarManuals.comMain Menu s t