audio HONDA PRELUDE 1998 Owner's Manual
[x] Cancel search | Manufacturer: HONDA, Model Year: 1998, Model line: PRELUDE, Model: HONDA PRELUDE 1998Pages: 278, PDF Size: 2.61 MB
Page 117 of 278
Audio System
Caring for the Cassette Player
The cassette player picks up dirt and oxides from the tape. This contami-
nation builds up over time and
causes the sound quality to degrade.
To prevent this, you should clean the player after every 30 hours of use.
Your dealer has a cleaning kit
available.
If you do not clean the cassette
player regularly, it may eventually
become impossible to remove the
contamination with a normal
cleaning kit.
The player automatically ejects
cassettes that do not play properly. If
it ejects a cassette before it begins to
play, it is probably defective and
should not be inserted again. You
may have a cassette suddenly stop
playing, reverse directions once or
twice and then eject. This is normally
an indication the tape is wound
unevenly. It should play after the
tape is manually rewound.
Use 100-minute or shorter cassettes.
Cassettes longer than that use
thinner tape that may break or jam
the drive.
Look at the cassette before you
insert it. If the tape is loose, tighten
it by turning a hub with a pencil or
your finger.
If the label is peeling off, remove it
from the cassette or it could cause the cassette to jam in the player.
Never try to insert a warped or
damaged cassette in the player.
When they are not in use, store cassettes in their cases to protect
them from dust and moisture. Never
place cassettes where they will be
exposed to direct sunlight, high heat,or high humidity. If a cassette is
exposed to extreme heat or cold, let
it reach a moderate temperature
before inserting it in the player.
Never try to insert foreign objects
into the cassette player.
Comfort and Convenience FeaturesProCarManuals.comMain Menu Table of Contents s t
Page 118 of 278

Audio System
Theft Protection
Your vehicle's audio system will disable itself if it is disconnected
from electrical power for any reason.
To make it work again, the user must enter a specific five-digit code
in the Preset buttons. Because thereare hundreds of number
combinations possible from five
digits, making the system work
without knowing the exact code is nearly impossible.
You should have received a card that lists your audio system's code
number and serial number. It is best
to store this card in a safe place athome. In addition, you should write
the audio system's serial number in
this Owner's Manual. If you should
happen to lose the card, you must obtain the code number from your
Honda dealer. To do this, you will
need the system's serial number. If your vehicle's battery is discon-
nected or goes dead, the audio system will disable itself. If this
happens, you will see "Code" in the
frequency display the next time you turn on the system. Use the Preset
buttons to enter the five-digit code. If it is entered correctly, the radio willstart playing.
If you make a mistake entering the code, do not start over or try to
correct your mistake. Complete the
five-digit sequence, then enter the correct code. You have three tries to
enter the correct code. If you are
unsuccessful in three attempts, youmust then leave the system on forone hour before trying again. You will have to store your favorite
stations in the Preset buttons after
the system begins working. Your original settings were lost when
power was disconnected.
Comfort and Convenience FeaturesProCarManuals.comMain Menu Table of Contents s t
Page 126 of 278
Accessories and Modifications
Modifying your vehicle, or installingsome non-Honda accessories, can
make your vehicle unsafe. Before
you make any modifications or add any accessories, be sure to read the
following information.
Accessories
Your dealer has Genuine Honda accessories that allow you to
personalize your vehicle. These accessories have been designed and
approved for your vehicle, and are
covered by warranty.
Non-Honda accessories are usually designed for universal applications.
Although aftermarket accessories may fit on your vehicle, they may not
meet factory specifications, and
could adversely affect your vehicle's
handling and stability. (See "Modifications" on the page 127 for
additional information.) When properly installed, car phones,
alarms, two-way radios, and low-
powered audio systems should notinterfere with your vehicle's
computer-controlled systems, such
as the SRS and anti-lock brake
system.
However, if electronic accessories
are improperly installed, or exceed
your vehicle's electrical system capacity, they can interfere with the operation of your vehicle, or even
cause the airbags to deploy.
Before installing any accessory:
Make sure the accessory does not
obscure any lights, or interfere
with proper vehicle operation or performance. Be sure electronic accessories do
not overload electrical circuits (see page 248 ). Have the installer contact your
Honda dealer for assistance before
installing any electronic accessory.
If possible, have your dealer inspect
the final installation.
Before Driving
Improper accessories or
modifications can affect your
vehicle's handling, stability and performance, and cause a
crash in which you can be hurt
or killed.
Follow all instructions in this
owner's manual regarding
accessories and modifications.ProCarManuals.comMain Menu Table of Contents s t
Page 191 of 278
Battery
If your vehicle's battery is discon-
nected or goes dead, the audio system will disable itself. The next
time you turn on the radio you will see "Code" in the frequency display.Use the Preset buttons to enter the
five-digit code (see page 117).
Charging the battery with the cables
connected can seriously damage your vehicle's electronic controls. Detach
the battery cables before connecting
the battery to a charger.
Maintenance
NOTICEProCarManuals.comMain Menu Table of Contents s t
Page 244 of 278
Fuses
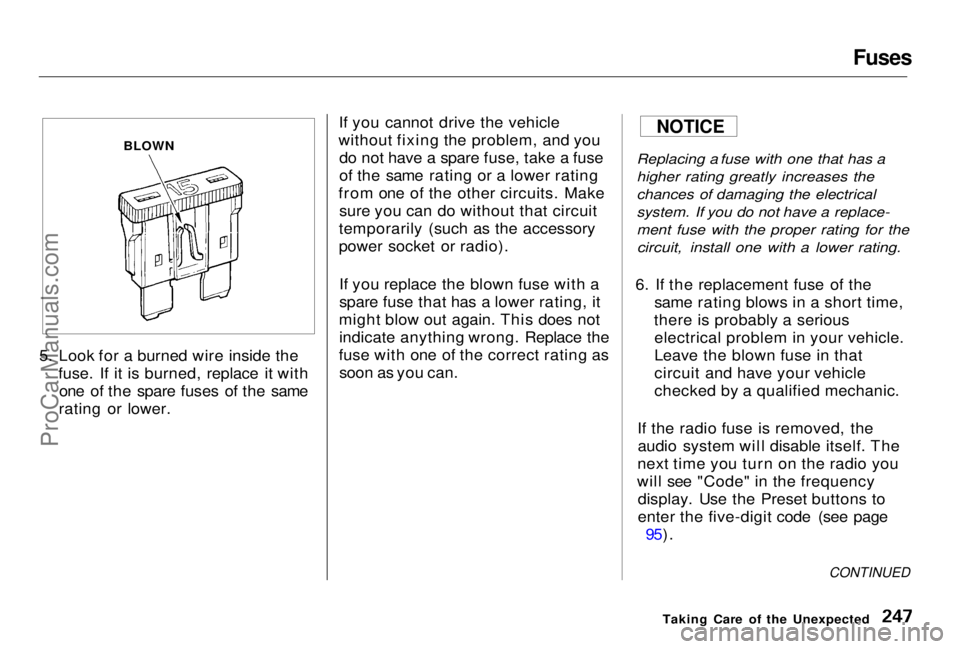
5. Look for a burned wire inside the fuse. If it is burned, replace it withone of the spare fuses of the same
rating or lower. If you cannot drive the vehicle
without fixing the problem, and you do not have a spare fuse, take a fuse
of the same rating or a lower rating
from one of the other circuits. Make sure you can do without that circuit
temporarily (such as the accessory
power socket or radio).
If you replace the blown fuse with a
spare fuse that has a lower rating, it
might blow out again. This does not indicate anything wrong. Replace the
fuse with one of the correct rating as soon as you can.
Replacing a fuse with one that has a
higher rating greatly increases the
chances of damaging the electrical
system. If you do not have a replace-
ment fuse with the proper rating for the
circuit, install one with a lower rating.
6. If the replacement fuse of the same rating blows in a short time,
there is probably a serious electrical problem in your vehicle.
Leave the blown fuse in that
circuit and have your vehicle
checked by a qualified mechanic.
If the radio fuse is removed, the audio system will disable itself. The
next time you turn on the radio you
will see "Code" in the frequency display. Use the Preset buttons to
enter the five-digit code (see page 95).
Taking Care of the Unexpected
CONTINUED
NOTICE
BLOWNProCarManuals.comMain Menu Table of Contents s t
Page 269 of 278
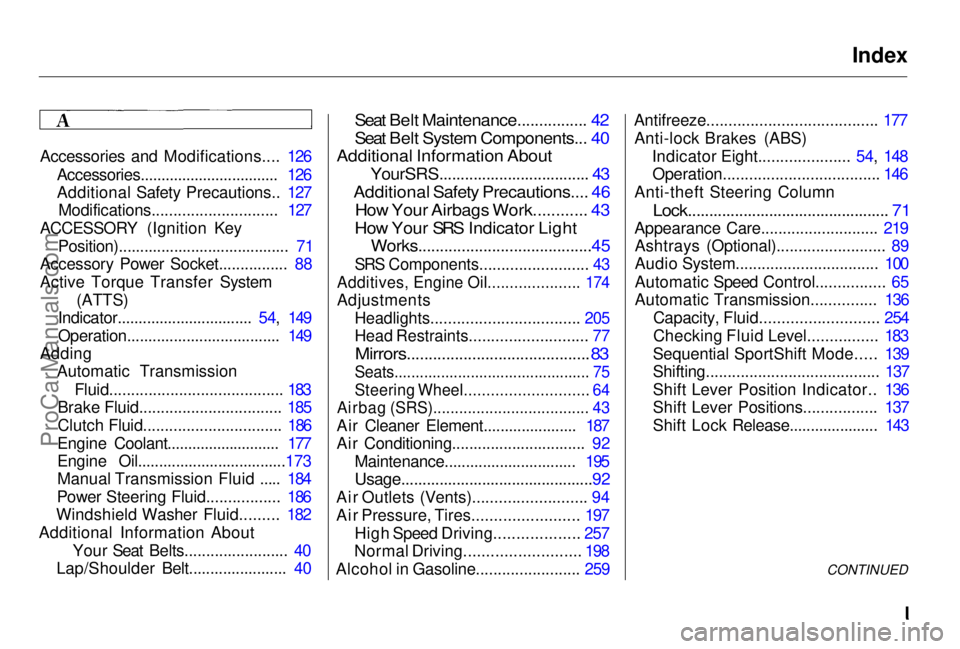
Index
Accessories and Modifications.... 126 Accessories................................. 126
Additional Safety Precautions.. 127Modifications............................. 127
ACCESSORY (Ignition Key Position)........................................ 71
Accessory Power Socket................ 88
Active Torque Transfer System
(ATTS)
Indicator................................ 54, 149
Operation.................................... 149
Adding Automatic Transmission
Fluid........................................ 183
Brake Fluid................................. 185
Clutch Fluid................................ 186
Engine Coolant........................... 177
Engine Oil...................................173
Manual Transmission Fluid ..... 184
Power Steering Fluid................. 186
Windshield Washer Fluid......... 182
Additional Information About Your Seat Belts........................ 40
Lap/Shoulder Belt....................... 40
Seat Belt Maintenance................ 42
Seat Belt System Components... 40
Additional Information About
YourSRS................................... 43
Additional Safety Precautions.... 46
How Your Airbags Work............ 43
How Your SRS Indicator Light
Works........................................45
SRS Components......................... 43
Additives, Engine Oil..................... 174
Adjustments
Headlights.................................. 205
Head Restraints........................... 77
Mirrors..........................................
83
Seats.............................................. 7 5
Steerin
g Wheel............................ 64
Airbag (SRS).................................... 43
Air Cleaner Element...................... 187
Air Conditioning............................... 92 Maintenance............................... 195
Usage.............................................92
Air Outlets (Vents).......................... 94
Air Pressure, Tires........................ 197 High Speed Driving................... 257
Normal Driving.......................... 198
Alcohol in Gasoline........................ 259 Antifreeze....................................... 177
Anti-lock Brakes (ABS) Indicator Eight..................... 54, 148Operation.................................... 146
Anti-theft Steering Column
Lock............................................... 71
Appearance Care........................... 219 Ashtrays (Optional)......................... 89
Audio System................................. 100
Automatic Speed Control................ 65
Automatic Transmission............... 136
Capacity, Fluid........................... 254
Checking Fluid Level................ 183
Sequential SportShift Mode..... 139
Shifting........................................ 137
Shift Lever Position Indicator.. 136
Shift Lever Positions................. 137
Shift Lock Release..................... 143
CONTINUEDProCarManuals.comMain Menu s t