light HONDA PRELUDE 1998 Owner's Manual
[x] Cancel search | Manufacturer: HONDA, Model Year: 1998, Model line: PRELUDE, Model: HONDA PRELUDE 1998Pages: 278, PDF Size: 2.61 MB
Page 67 of 278
Steering Wheel Controls
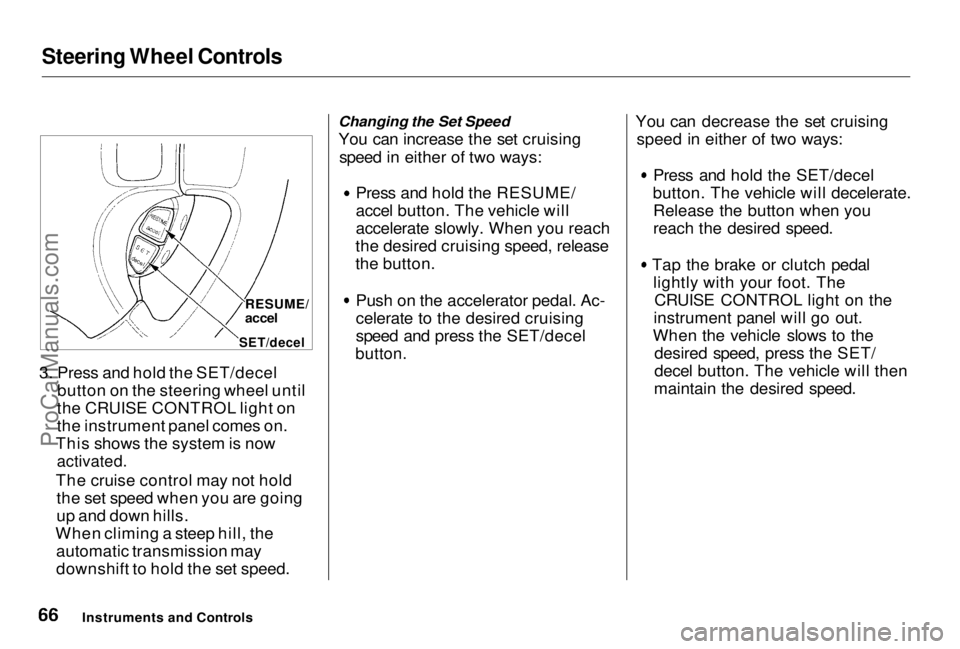
3. Press and hold the SET/decel button on the steering wheel until
the CRUISE CONTROL light on
the instrument panel comes on.
This shows the system is now
activated.
The cruise control may not hold the set speed when you are going
up and down hills.
When climing a steep hill, the automatic transmission may
downshift to hold the set speed. Changing the Set Speed
You can increase the set cruising
speed in either of two ways: Press and hold the RESUME/
accel button. The vehicle will
accelerate slowly. When you reach
the desired cruising speed, release
the button. Push on the accelerator pedal. Ac-
celerate to the desired cruising
speed and press the SET/decel
button.
You can decrease the set cruising
speed in either of two ways: Press and hold the SET/decel
button. The vehicle will decelerate. Release the button when you
reach the desired speed.
Tap the brake or clutch pedal lightly with your foot. TheCRUISE CONTROL light on the
instrument panel will go out.
When the vehicle slows to the desired speed, press the SET/
decel button. The vehicle will then
maintain the desired speed.
Instruments and Controls RESUME/
accel
SET/decelProCarManuals.comMain Menu Table of Contents s t
Page 68 of 278
Steering Wheel Controls
Even with the cruise control turned on, you can still use the accelerator
pedal to speed up for passing. After
completing the pass, take your foot
off the accelerator pedal. The vehicle
will return to the set cruising speed.
Resting your foot on the brake or
clutch pedal will cause the cruise
control to cancel.
Cancelling the Cruise Control
You can cancel the cruise control in
any of these ways:
Tap the brake or clutch pedal. Press the SET/decel and RE-
SUME/accel buttons at the same
time.
Press the Cruise Control Master
Switch.
When you tap the brake or clutch pedal, or press the SET and RE-SUME buttons at the same time, the
CRUISE CONTROL light on the
instrument panel will go out and the
vehicle will begin to slow down. You can use the accelerator pedal in the
normal way.
If you use the brake or clutch pedal
to cancel cruise control, the system
remembers the previously-set cruising speed. To return to that speed, accelerate to above 25 mph
(40 km/h) and press the RESUME/
accel button until the CRUISE CON-
TROL light comes on. The vehicle will accelerate to the same cruisingspeed as before.
If you cancel cruise control by
pressing the SET and RESUME
buttons at the same time, the previously-set cruising speed iserased. To use the cruise control,
accelerate to the desired cruisingspeed and press the SET/decel
button.
Pressing the Cruise Control Master
Switch turns the system completelyoff and erases the previous cruising
speed from memory. To use the
system again, refer to Using the
Cruise Control.
Instruments and ControlsProCarManuals.comMain Menu Table of Contents s t
Page 69 of 278
Keys and Locks
Keys
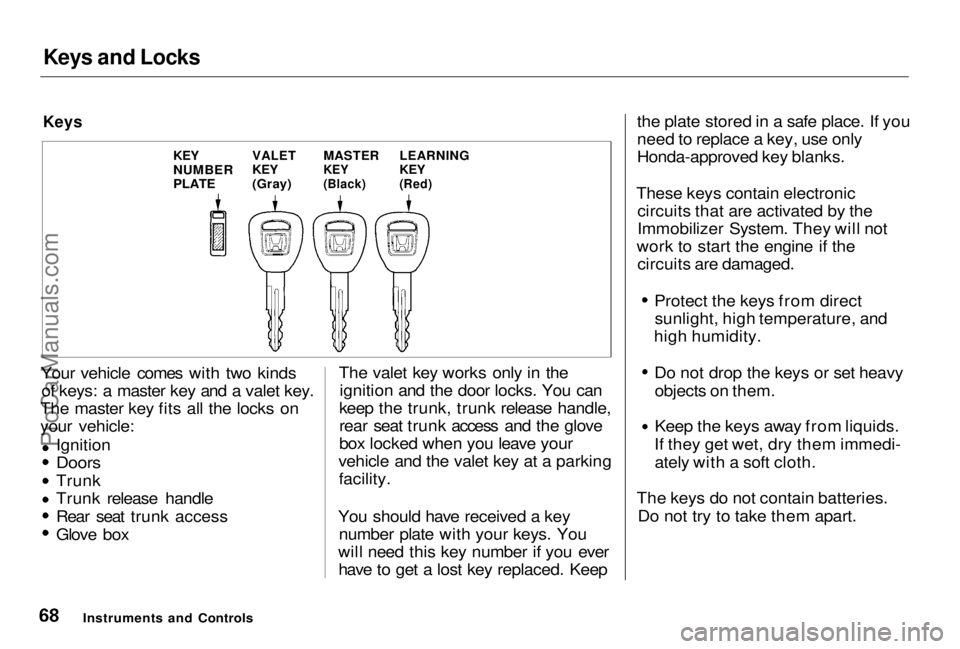
Your vehicle comes with two kinds of keys: a master key and a valet key.
The master key fits all the locks on
your vehicle:
Ignition
Doors
Trunk Trunk release handle
Rear seat trunk access
Glove box The valet key works only in the
ignition and the door locks. You can
keep the trunk, trunk release handle,
rear seat trunk access and the glove
box locked when you leave your
vehicle and the valet key at a parking facility.
You should have received a key number plate with your keys. You
will need this key number if you ever have to get a lost key replaced. Keep the plate stored in a safe place. If you
need to replace a key, use only
Honda-approved key blanks.
These keys contain electronic circuits that are activated by the
Immobilizer System. They will not
work to start the engine if the circuits are damaged. Protect the keys from direct
sunlight, high temperature, and
high humidity. Do not drop the keys or set heavy
objects on them. Keep the keys away from liquids.
If they get wet, dry them immedi- ately with a soft cloth.
The keys do not contain batteries. Do not try to take them apart.
Instruments and Controls
LEARNING
KEY
(Red)
MASTER
KEY
(Black)
VALET
KEY
(Gray)
KEY
NUMBER
PLATEProCarManuals.comMain Menu Table of Contents s t
Page 72 of 278
Keys and Locks
LOCK (0) — You can insert or
remove the key only in this position.
To switch from ACCESSORY to LOCK, you must push the key in
slightly as you turn it. If your vehicle
has an automatic transmission, it must also be in Park. The anti-theft
lock will lock the steering column
when you remove the key. If the front wheels are turned, the
anti-theft lock may sometimes make
it difficult to turn the key from
LOCK to ACCESSORY. Firmly turn
the steering wheel to the left or to
the right as you turn the key. ACCESSORY (I) — In this position,
you can operate the audio systemand the accessory power socket.
ON (II) — This is the normal key
position when driving. All features and accessories on the vehicle are
usable. Several of the lights on the
instrument panel come on as a test
when you turn the ignition switch
from ACCESSORY to ON (see page
51).
START (III) — Use this position
only to start the engine. The switch
returns to ON (II) when you let go of
the key.
The engine will not start if the Immobilizer System does not
recognize the key's coding (see page 69).
You will hear a reminder beeper if
you leave the key in the ignition switch in the LOCK (0) or
ACCESSORY (I) position and open the driver's door. Remove the key to
turn off the beeper.
Instruments and Controls
Removing the key from the
ignition switch while driving
locks the steering. This can
cause you to lose control.
Remove the key from the
ignition switch only when
parked.ProCarManuals.comMain Menu Table of Contents s t
Page 79 of 278
Seat Heaters
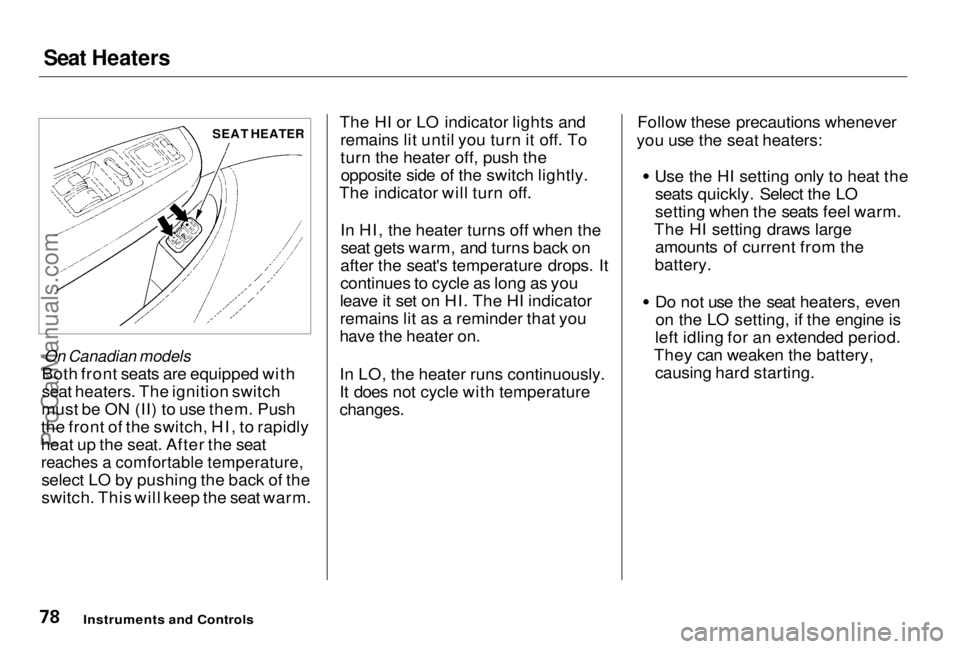
On Canadian models
Both front seats are equipped with
seat heaters. The ignition switch
must be ON (II) to use them. Push
the front of the switch, HI, to rapidly
heat up the seat. After the seat
reaches a comfortable temperature,
select LO by pushing the back of the
switch. This will keep the seat warm. The HI or LO indicator lights and
remains lit until you turn it off. To
turn the heater off, push theopposite side of the switch lightly.
The indicator will turn off.
In HI, the heater turns off when theseat gets warm, and turns back on
after the seat's temperature drops. It
continues to cycle as long as you
leave it set on HI. The HI indicator
remains lit as a reminder that you
have the heater on.
In LO, the heater runs continuously.
It does not cycle with temperature
changes.
Follow these precautions whenever
you use the seat heaters:
Use the HI setting only to heat theseats quickly. Select the LO
setting when the seats feel warm.
The HI setting draws large amounts of current from the
battery. Do not use the seat heaters, even
on the LO setting, if the engine is
left idling for an extended period.
They can weaken the battery, causing hard starting.
Instruments and Controls
SEAT HEATERProCarManuals.comMain Menu Table of Contents s t
Page 82 of 278

Power Windows
The master control panel also con- tains these extra features:
AUTO — To open the driver's window fully, push the window switch firmly down and release it.
The window automatically goes all the way down. To stop the window
from going all the way down, pull
back on the window switch briefly.
To open the driver's window only partially, push the window switchdown lightly and hold it. The window
will stop as soon as you release the
switch.
The AUTO function only works to lower the driver's window. To raise
the window, you must pull back on
the window switch and hold it until
the window reaches the desired
position.
The MAIN switch controls power to
the passenger's window. With thisswitch off, the passenger's window
cannot be raised or lowered. The
MAIN switch does not affect the driver's window. Keep the MAIN
switch off when you have children in
the vehicle so they do not injure themselves by operating the window
unintentionally.
The power window system has a key- off delay function. The windows will
still operate for up to ten minutes
after you turn off the ignition.
Opening either door cancels thedelay function. You must turn the
ignition ON (II) again before you can
raise or lower the windows.
Instruments and Controls
Closing a power window on a
child's hands or fingers can
cause serious injury.
Make sure your children are
away from the windows before
closing them.ProCarManuals.comMain Menu Table of Contents s t
Page 84 of 278
Mirrors
Keep the inside and outside mirrors
clean and adjusted for best visibility.
Be sure to adjust the mirrors before
you start driving.
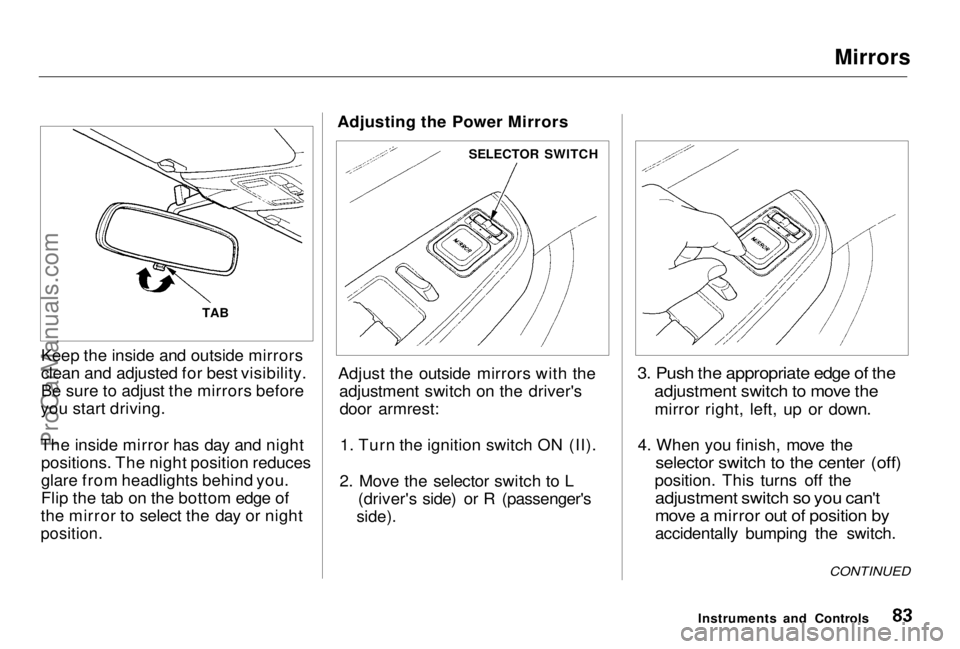
The inside mirror has day and night positions. The night position reduces
glare from headlights behind you.
Flip the tab on the bottom edge of
the mirror to select the day or night
position.
Adjusting the Power Mirrors
Adjust the outside mirrors with the adjustment switch on the driver'sdoor armrest:
1. Turn the ignition switch ON (II).
2. Move the selector switch to L (driver's side) or R (passenger's
side).
3. Push the appropriate edge of the
adjustment switch to move the
mirror right, left, up or down.
4. When you finish, move the
selector switch to the center (off)
position. This turns off the
adjustment switch so you can't
move a mirror out of position by
accidentally bumping the switch.
Instruments and Controls
TAB
SELECTOR SWITCH
CONTINUEDProCarManuals.comMain Menu Table of Contents s t
Page 85 of 278
Mirrors, Parking Brake
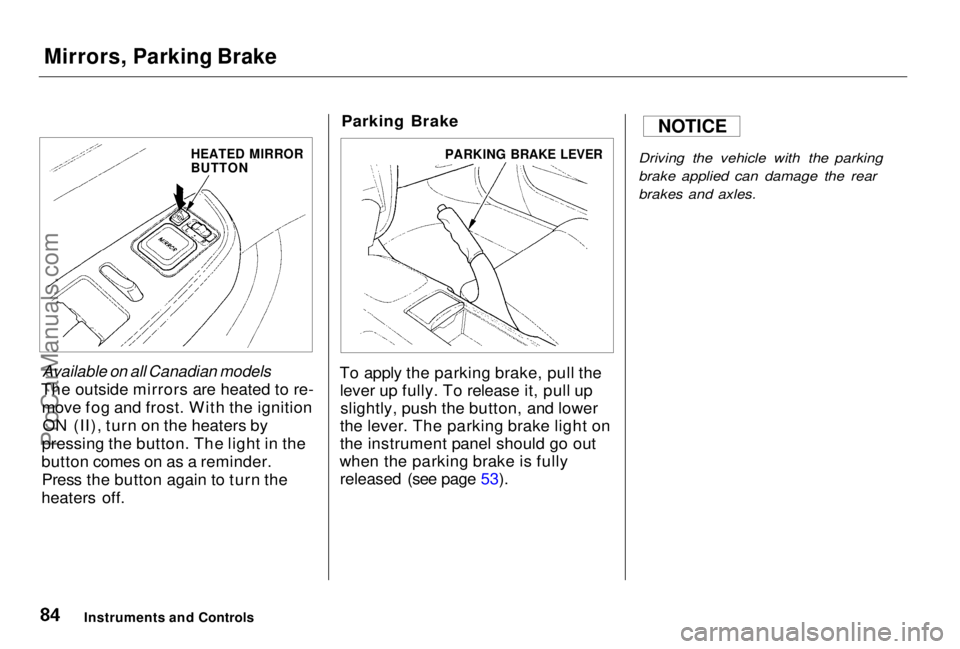
Available on all Canadian models
The outside mirrors are heated to re- move fog and frost. With the ignitionON (II), turn on the heaters by
pressing the button. The light in the
button comes on as a reminder. Press the button again to turn the
heaters off. Parking Brake
To apply the parking brake, pull the lever up fully. To release it, pull upslightly, push the button, and lower
the lever. The parking brake light on
the instrument panel should go out
when the parking brake is fully released (see page 53).
Driving the vehicle with the parking
brake applied can damage the rear
brakes and axles.
Instruments and Controls
NOTICE
HEATED MIRROR
BUTTON
PARKING BRAKE LEVERProCarManuals.comMain Menu Table of Contents s t
Page 89 of 278
Coin Box, Accessory Power Socket
Coin Box
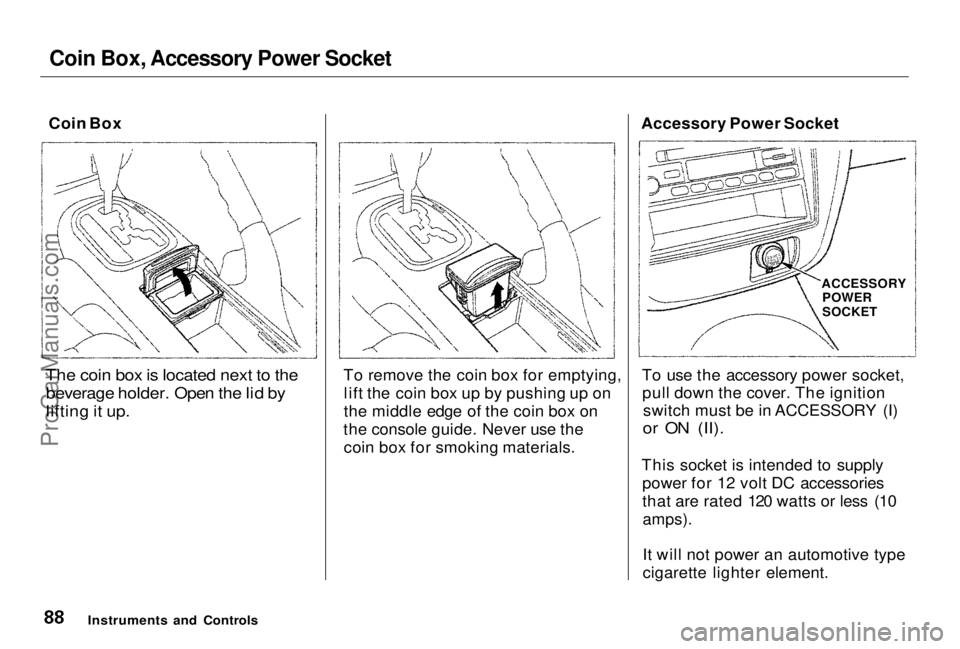
The coin box is located next to the beverage holder. Open the lid by
lifting it up.
To remove the coin box for emptying,
lift the coin box up by pushing up on
the middle edge of the coin box on
the console guide. Never use the coin box for smoking materials. Accessory Power Socket
To use the accessory power socket,pull down the cover. The ignition switch must be in ACCESSORY (I)
or ON (II).
This socket is intended to supply power for 12 volt DC accessories
that are rated 120 watts or less (10
amps).
It will not power an automotive type
cigarette lighter element.
Instruments and Controls
ACCESSORY
POWER
SOCKETProCarManuals.comMain Menu Table of Contents s t
Page 90 of 278
Ashtrays, Interior Lights
Ashtrays (Optional)
A front ashtray, which is available as an option, fits in the coin box.
Use the ashtray only for cigarettes,
cigars, and other smoking materials. To prevent a possible fire and damage
to your vehicle, don't put paper or
other things that can bum in the
ashtray.
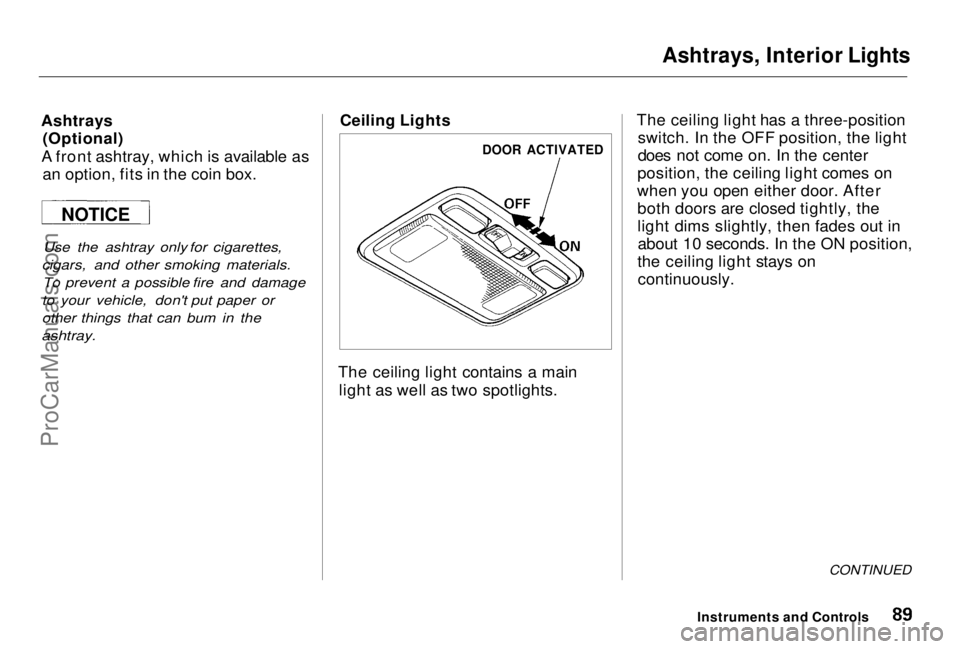
Ceiling Lights
The ceiling light contains a main light as well as two spotlights. The ceiling light has a three-position
switch. In the OFF position, the light
does not come on. In the center
position, the ceiling light comes on
when you open either door. After both doors are closed tightly, the
light dims slightly, then fades out inabout 10 seconds. In the ON position,
the ceiling light stays on continuously.
CONTINUED
Instruments and Controls
DOOR ACTIVATED
NOTICEProCarManuals.comMain Menu Table of Contents s t