coolant level HONDA PRELUDE 1998 Owners Manual
[x] Cancel search | Manufacturer: HONDA, Model Year: 1998, Model line: PRELUDE, Model: HONDA PRELUDE 1998Pages: 278, PDF Size: 2.61 MB
Page 58 of 278
Gauges
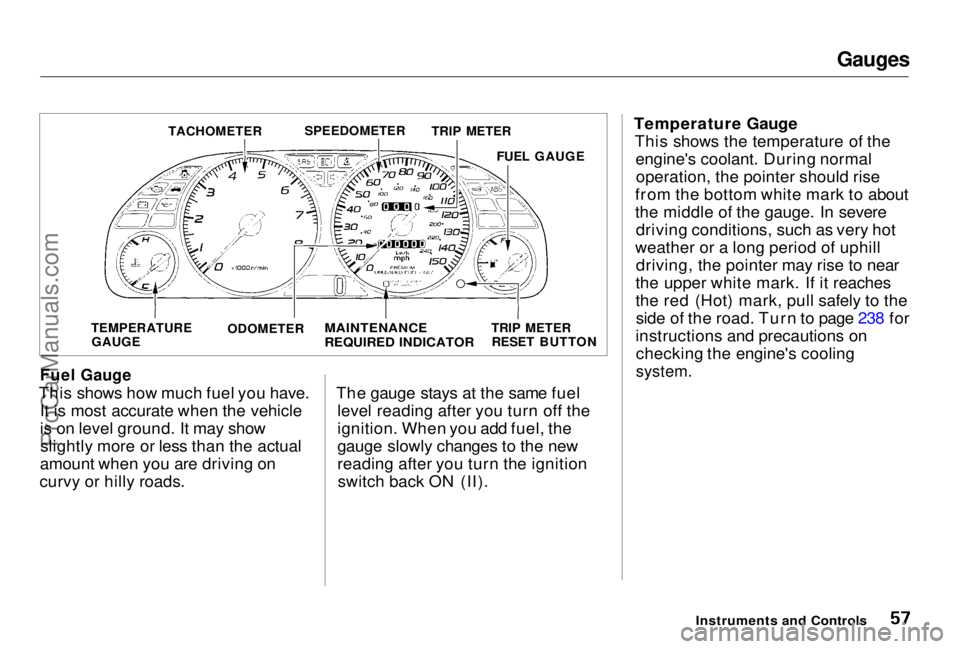
Fuel Gauge
This shows how much fuel you have. It is most accurate when the vehicle
is on level ground. It may showslightly more or less than the actual
amount when you are driving on
curvy or hilly roads. The gauge stays at the same fuel
level reading after you turn off the
ignition. When you add fuel, the
gauge slowly changes to the new
reading after you turn the ignitionswitch back ON (II). Temperature Gauge
This shows the temperature of theengine's coolant. During normaloperation, the pointer should rise
from the bottom white mark to about
the middle of the gauge. In severe driving conditions, such as very hot
weather or a long period of uphill driving, the pointer may rise to near
the upper white mark. If it reaches
the red (Hot) mark, pull safely to the side of the road. Turn to page 238 for
instructions and precautions on checking the engine's cooling
system.
Instruments and Controls
TACHOMETER
SPEEDOMETER
TRIP METER
FUEL GAUGE
TEMPERATURE GAUGE ODOMETER
MAINTENANCE
REQUIRED INDICATOR
TRIP METER
RESET BUTTONProCarManuals.comMain Menu Table of Contents s t
Page 119 of 278
Before Driving
Before you begin driving your Honda,
you should know what gasoline to use, and how to check the levels of
important fluids. You also need to
know how to properly store luggage or packages. The information in this
section will help you. If you plan to
add any accessories to your vehicle,
please read the information in this section first. Break-in Period.............................. 120
Gasoline.......................................... 120
Service Station Procedures .......... 121 Filling the Fuel Tank................. 121
Opening the Hood..................... 122 Oil Check................................ 123
Engine Coolant Check.......... 124
Fuel Economy................................ 125
Vehicle Condition...................... 125Driving Habits............................ 125
Accessories and Modifications.... 126 Accessories................................. 126
Modifications............................. 127
Additional Safety Precaution.... 127
Carrying Cargo.............................. 128 Load Limit.................................. 129Carrying Items in the Passenger Compartment......................... 129
Carrying Cargo in the Trunk or on a Roof Rack....................... 130
Before DrivingProCarManuals.comMain Menu s t
Page 124 of 278
Service Station Procedures
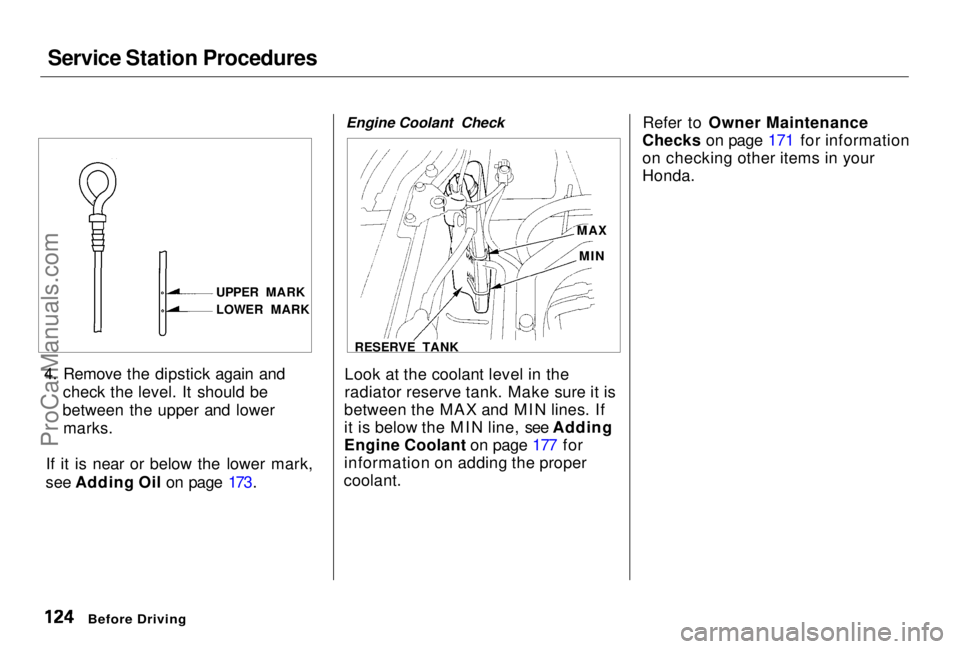
4. Remove the dipstick again and check the level. It should be
between the upper and lower marks.
If it is near or below the lower mark,
see Adding Oil on page 173. Engine Coolant Check
Look at the coolant level in the
radiator reserve tank. Make sure it is
between the MAX and MIN lines. If
it is below the MIN line, see Adding
Engine Coolant on page 177 for
information on adding the proper
coolant. Refer to Owner Maintenance
Checks on page 171 for information
on checking other items in your
Honda.
Before Driving
UPPER MARK
LOWER MARK
MAX
MIN
RESERVE TANKProCarManuals.comMain Menu Table of Contents s t
Page 170 of 278
Owner Maintenance Checks
You should check the following items at the specified intervals. If
you are unsure of how to perform any check, turn to the page given. Engine oil level — Check every
time you fill the fuel tank. See page 123. Engine coolant level — Check the
radiator reserve tank every time
you fill the fuel tank. See page 124.
Windshield washer fluid — Check
the level in the reservoir monthly.If weather conditions cause you to
use the washers frequently, check
the reservoir each time you stop
for fuel. See page 182. Automatic transmission — Check
the fluid level monthly. See page
183.
Brakes — Check the fluid level
monthly. See page 185. Tires — Check the tire pressure
monthly. Examine the tread for
wear and foreign objects. See page
197.
Lights — Check the operation of
the headlights, parking lights,
taillights, high-mount brake light,
turn signals, brake lights, and
license plate lights monthly. See
page 203.
MaintenanceProCarManuals.comMain Menu Table of Contents s t
Page 176 of 278
Cooling System
Adding Engine Coolant
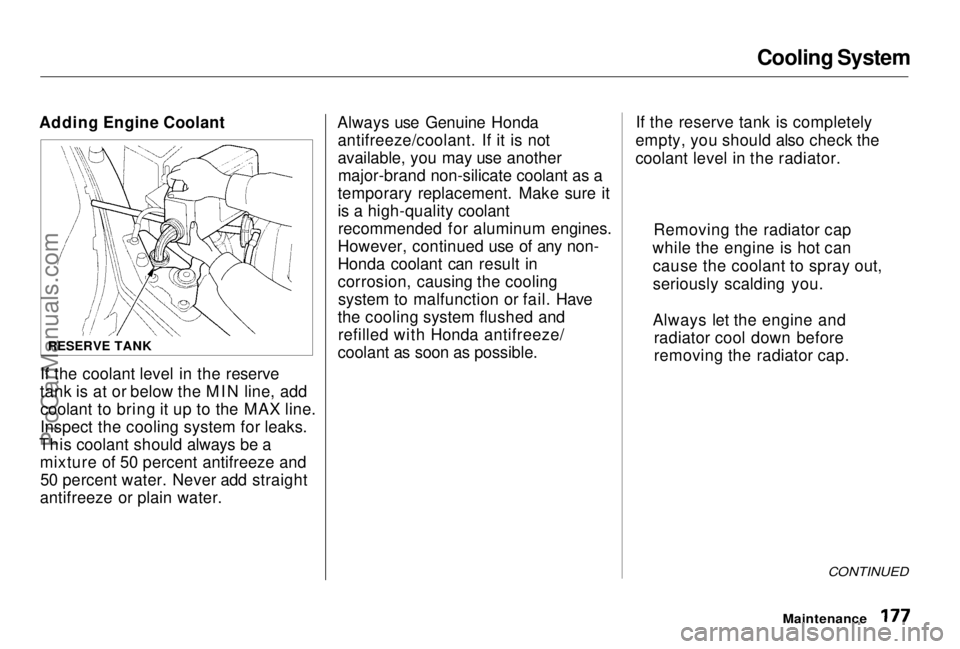
If the coolant level in the reserve
tank is at or below the MIN line, add coolant to bring it up to the MAX line.
Inspect the cooling system for leaks.
This coolant should always be a mixture of 50 percent antifreeze and50 percent water. Never add straight
antifreeze or plain water. Always use Genuine Honda
antifreeze/coolant. If it is not
available, you may use anothermajor-brand non-silicate coolant as a
temporary replacement. Make sure it
is a high-quality coolant recommended for aluminum engines.
However, continued use of any non-
Honda coolant can result in
corrosion, causing the cooling system to malfunction or fail. Have
the cooling system flushed and refilled with Honda antifreeze/
coolant as soon as possible. If the reserve tank is completely
empty, you should also check the
coolant level in the radiator.
CONTINUED
Maintenance
RESERVE TANK
Removing the radiator cap
while the engine is hot can cause the coolant to spray out,
seriously scalding you.
Always let the engine and radiator cool down before
removing the radiator cap.ProCarManuals.comMain Menu Table of Contents s t
Page 177 of 278
Cooling System
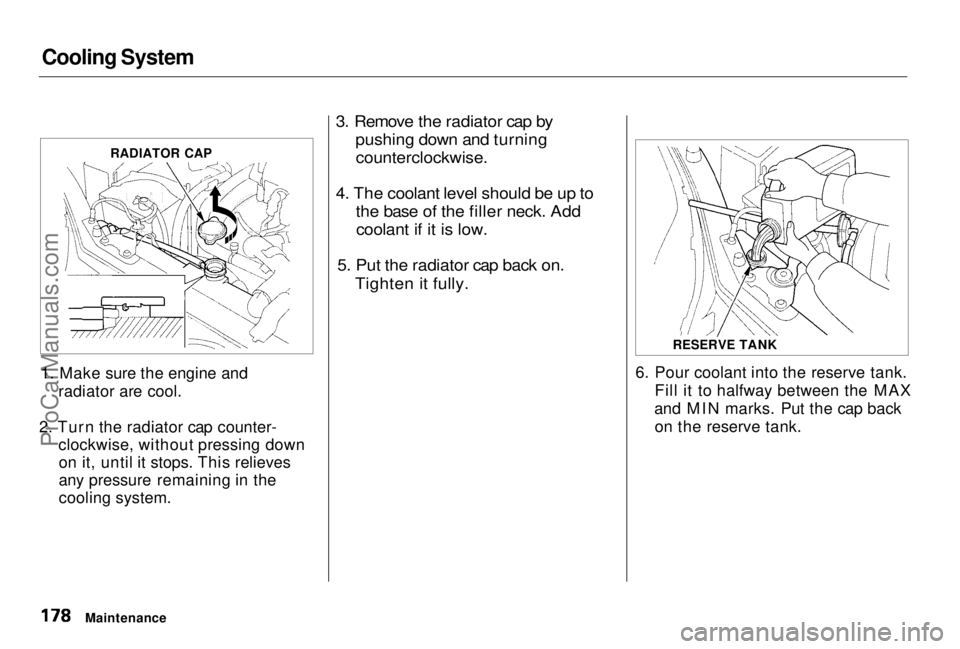
1. Make sure the engine and radiator are cool.
2. Turn the radiator cap counter- clockwise, without pressing downon it, until it stops. This relieves
any pressure remaining in the
cooling system.
3. Remove the radiator cap by
pushing down and turning
counterclockwise.
4. The coolant level should be up to the base of the filler neck. Addcoolant if it is low.
5. Put the radiator cap back on. Tighten it fully.
6. Pour coolant into the reserve tank.Fill it to halfway between the MAX
and MIN marks. Put the cap back on the reserve tank.
Maintenance RADIATOR CAP
RESERVE TANKProCarManuals.comMain Menu Table of Contents s t
Page 180 of 278
Cooling System
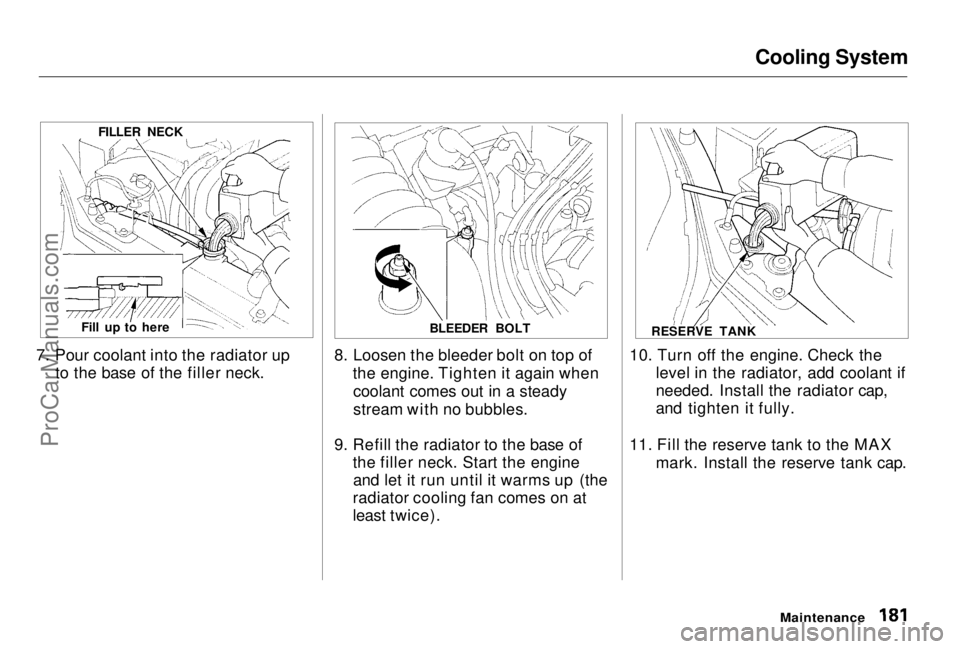
7. Pour coolant into the radiator up to the base of the filler neck. 8. Loosen the bleeder bolt on top of
the engine. Tighten it again whencoolant comes out in a steady
stream with no bubbles.
9. Refill the radiator to the base of the filler neck. Start the engineand let it run until it warms up (the
radiator cooling fan comes on at
least twice). 10. Turn off the engine. Check the
level in the radiator, add coolant if
needed. Install the radiator cap,
and tighten it fully.
11. Fill the reserve tank to the MAX mark. Install the reserve tank cap.
Maintenance
FILLER NECK
RESERVE TANK
BLEEDER BOLT
Fill up to hereProCarManuals.comMain Menu Table of Contents s t
Page 236 of 278
If Your Engine Overheats
6. Look for any obvious coolant leaks, such as a split radiator hose.
Everything is still extremely hot, so use caution. If you find a leak, it
must be repaired before you continue driving (see Towing on
page 250).
7. If you don't find an obvious leak, check the coolant level in the
radiator reserve tank (see page 124). If the level is below the
MIN mark, add coolant to halfway
between the MIN and MAX marks.
8. If there was no coolant in the reserve tank, you may also have to
add coolant to the radiator. Let the
engine cool down until the pointer
reaches the middle of the tempera-
ture gauge, or lower, before check-
ing the radiator. 9. Using gloves or a large heavy
cloth, turn the radiator cap
counterclockwise, without pushingdown, to the first stop. This
releases any remaining pressure in
the cooling system. After the pressure releases, push down on
the cap and turn it until it comesoff. 10. Start the engine and set the
temperature control lever to
maximum. Add coolant to the
radiator up to the base of the filler
neck. If you do not have the
proper coolant mixture available,
you can add plain water.
Remember to have the cooling
system drained and refilled with
the proper mixture as soon as you
can.
11. Put the radiator cap back on tightly. Run the engine and watch
the temperature gauge. If it goes
back to the red mark, the engine
needs repair. (See Towing on
page 250.)
12. If the temperature stays normal, check the coolant level in the
radiator reserve tank. If it has
gone down, add coolant to the
MAX mark. Put the cap back on
tightly.
Taking Care of the Unexpected
Removing the radiator cap
while the engine is hot can
cause the coolant to spray out,
seriously scalding you.
Always let the engine and radiator cool down before
removing the radiator cap.ProCarManuals.comMain Menu Table of Contents s t
Page 269 of 278
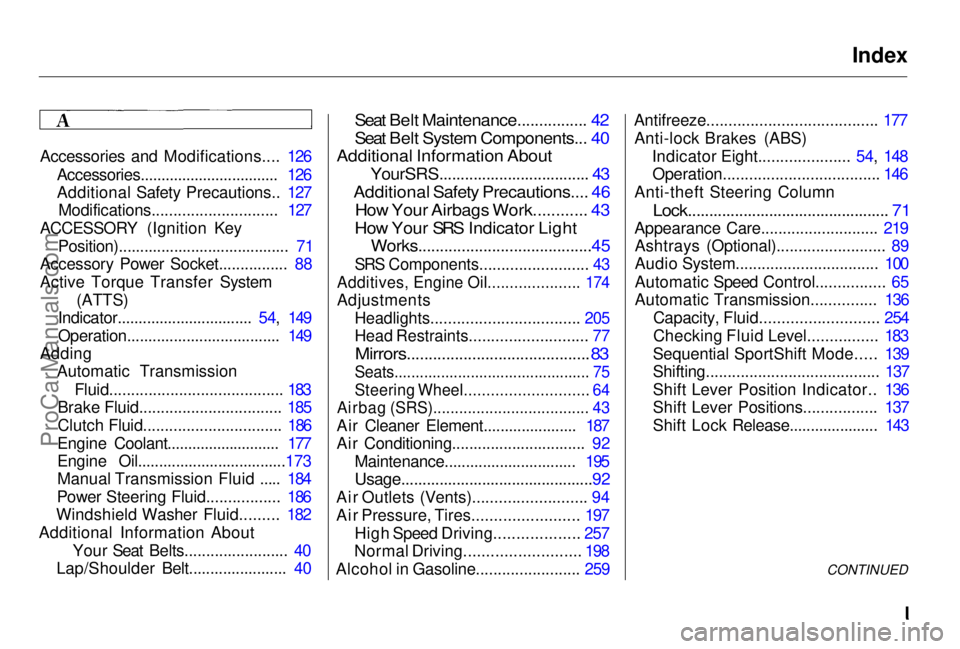
Index
Accessories and Modifications.... 126 Accessories................................. 126
Additional Safety Precautions.. 127Modifications............................. 127
ACCESSORY (Ignition Key Position)........................................ 71
Accessory Power Socket................ 88
Active Torque Transfer System
(ATTS)
Indicator................................ 54, 149
Operation.................................... 149
Adding Automatic Transmission
Fluid........................................ 183
Brake Fluid................................. 185
Clutch Fluid................................ 186
Engine Coolant........................... 177
Engine Oil...................................173
Manual Transmission Fluid ..... 184
Power Steering Fluid................. 186
Windshield Washer Fluid......... 182
Additional Information About Your Seat Belts........................ 40
Lap/Shoulder Belt....................... 40
Seat Belt Maintenance................ 42
Seat Belt System Components... 40
Additional Information About
YourSRS................................... 43
Additional Safety Precautions.... 46
How Your Airbags Work............ 43
How Your SRS Indicator Light
Works........................................45
SRS Components......................... 43
Additives, Engine Oil..................... 174
Adjustments
Headlights.................................. 205
Head Restraints........................... 77
Mirrors..........................................
83
Seats.............................................. 7 5
Steerin
g Wheel............................ 64
Airbag (SRS).................................... 43
Air Cleaner Element...................... 187
Air Conditioning............................... 92 Maintenance............................... 195
Usage.............................................92
Air Outlets (Vents).......................... 94
Air Pressure, Tires........................ 197 High Speed Driving................... 257
Normal Driving.......................... 198
Alcohol in Gasoline........................ 259 Antifreeze....................................... 177
Anti-lock Brakes (ABS) Indicator Eight..................... 54, 148Operation.................................... 146
Anti-theft Steering Column
Lock............................................... 71
Appearance Care........................... 219 Ashtrays (Optional)......................... 89
Audio System................................. 100
Automatic Speed Control................ 65
Automatic Transmission............... 136
Capacity, Fluid........................... 254
Checking Fluid Level................ 183
Sequential SportShift Mode..... 139
Shifting........................................ 137
Shift Lever Position Indicator.. 136
Shift Lever Positions................. 137
Shift Lock Release..................... 143
CONTINUEDProCarManuals.comMain Menu s t
Page 272 of 278
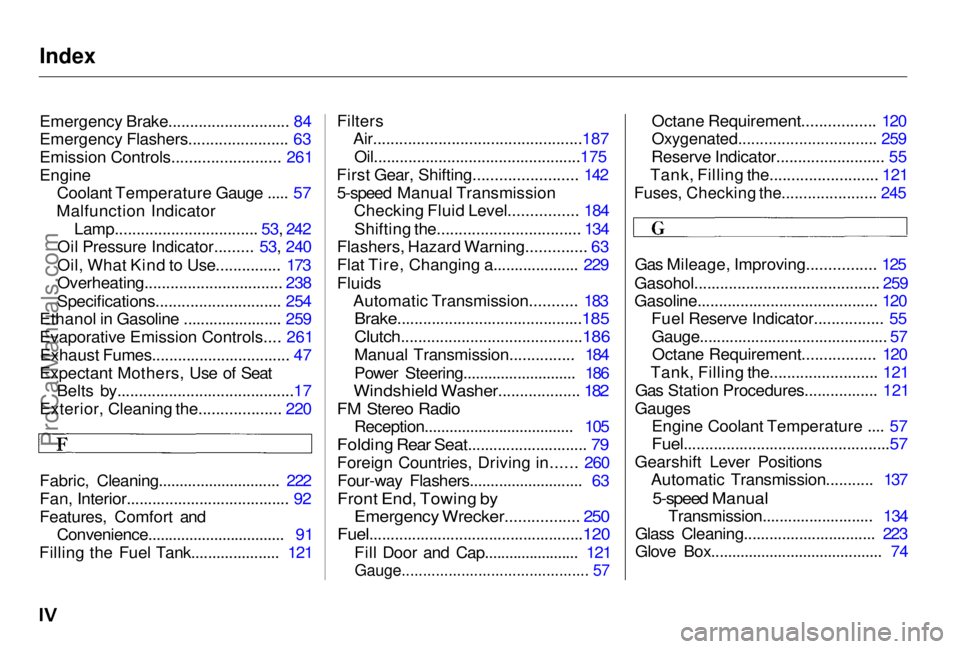
Index
Emergency Brake............................ 84
Emergency Flashers....................... 63
Emission Controls......................... 261
Engine
Coolant Temperature Gauge ..... 57
Malfunction Indicator Lamp................................. 53, 242
Oil Pressure Indicator......... 53, 240
Oil, What Kind to Use............... 173
Overheating................................ 238
Specifications............................. 254
Ethanol in Gasoline ....................... 259
Evaporative Emission Controls.... 261
Exhaust Fumes................................ 47
Expectant Mothers, Use of Seat Belts by.........................................17
Exterior, Cleaning the................... 220
Fabric, Cleaning............................. 222
Fan, Interior...................................... 92
Features, Comfort and Convenience................................. 91
Filling the Fuel Tank..................... 121 Filters
Air................................................187
Oil................................................175
First Gear, Shifting........................ 142 5-speed Manual Transmission Checking Fluid Level................ 184
Shifting the................................. 134
Flashers, Hazard Warning.............. 63
Flat Tire, Changing a.................... 229
Fluids Automatic Transmission........... 183
Brake...........................................185
Clutch..........................................186
Manual Transmission............... 184
Power Steering........................... 186
Windshield Washer................... 182
FM Stereo Radio
Reception.................................... 105
Folding Rear Seat............................ 79
Foreign Countries, Driving in...... 260 Four-way Flashers........................... 63
Front End, Towing by
Emergency Wrecker................. 250
Fuel..................................................120
Fill Door and Cap....................... 121
Gauge............................................ 57
Octane Requirement................. 120
Oxygenated................................ 259
Reserve Indicator......................... 55
Tank, Filling the......................... 121
Fuses, Checking the...................... 245
Gas Mileage, Improving................ 125
Gasohol........................................... 259
Gasoline.......................................... 120 Fuel Reserve Indicator................ 55
Gauge............................................ 57Octane Requirement................. 120
Tank, Filling the......................... 121
Gas Station Procedures................. 121
Gauges
Engine Coolant Temperature .... 57
Fuel................................................57
Gearshift Lever Positions Automatic Transmission........... 137
5-speed Manual
Transmission.......................... 134
Glass Cleaning............................... 223
Glove Box......................................... 74ProCarManuals.comMain Menu s t