low beam HONDA PRELUDE 1998 Owners Manual
[x] Cancel search | Manufacturer: HONDA, Model Year: 1998, Model line: PRELUDE, Model: HONDA PRELUDE 1998Pages: 278, PDF Size: 2.61 MB
Page 52 of 278
Indicator Lights
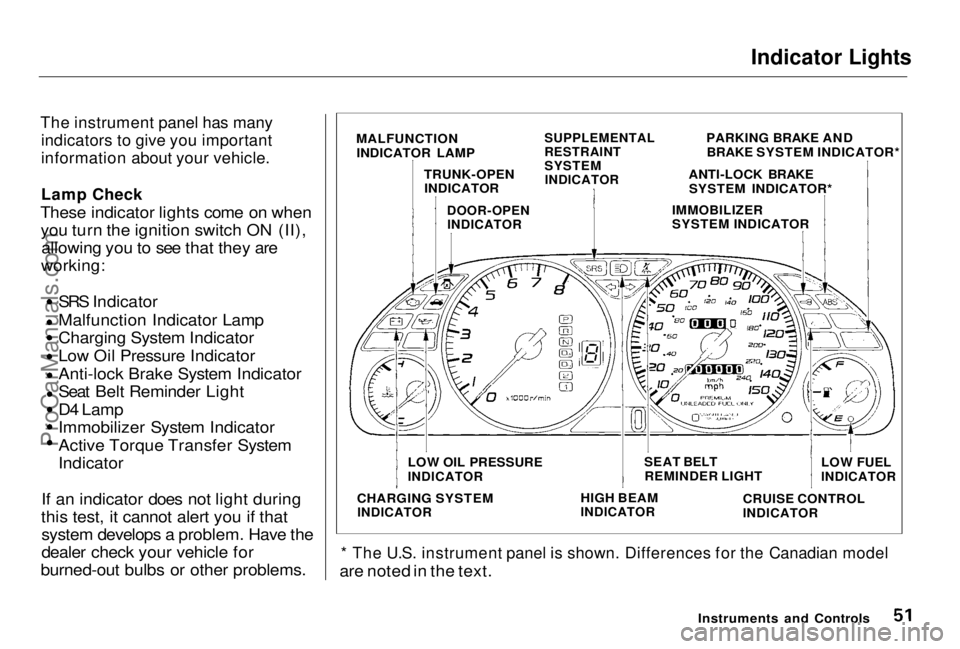
The instrument panel has many indicators to give you important
information about your vehicle.
Lamp Chec
k
These indicator lights come on when you turn the ignition switch ON (II), allowin
g you to see that they are
working:
SRS
Indicator
Malfunction Indicator Lamp
Charging System Indicator Low Oil Pressure Indicator
Anti-lock Brake System Indicator
Seat Belt Reminder Light
D4 Lamp
Immobilizer System Indicator
Active Torque Transfer
System
Indicator
If an
indicator does not light during
this test, it cannot alert you if that system
develops a problem. Have the
dealer check your vehicle for
burned-ou
t bulbs or other problems.
* The
U.S. instrument panel is shown. Differences for the Canadian model
are
noted in the text.
Instruments
and Controls
MALFUNCTION
INDICATOR LAM
P
TRUNK-OPEN INDICATOR
SUPPLEMENTAL
RESTRAINT
SYSTEM
INDICATOR
DOOR-OPEN
INDICATOR
PARKING BRAKE AND
BRAKE SYSTEM INDICATOR*
ANTI-LOCK BRAKE SYSTEM INDICATOR*
IMMOBILIZER
SYSTEM INDICATOR
LOW OIL PRESSURE
INDICATOR
SEAT BELT
REMINDER LIGHT LOW
FUEL
INDICATOR
CHARGING SYSTEM
INDICATOR
HIGH
BEAM
INDICATOR
CRUISE CONTRO L
INDICATOR
ProCarManuals.comMain Menu Table of Contents s t
Page 53 of 278
Indicator Lights
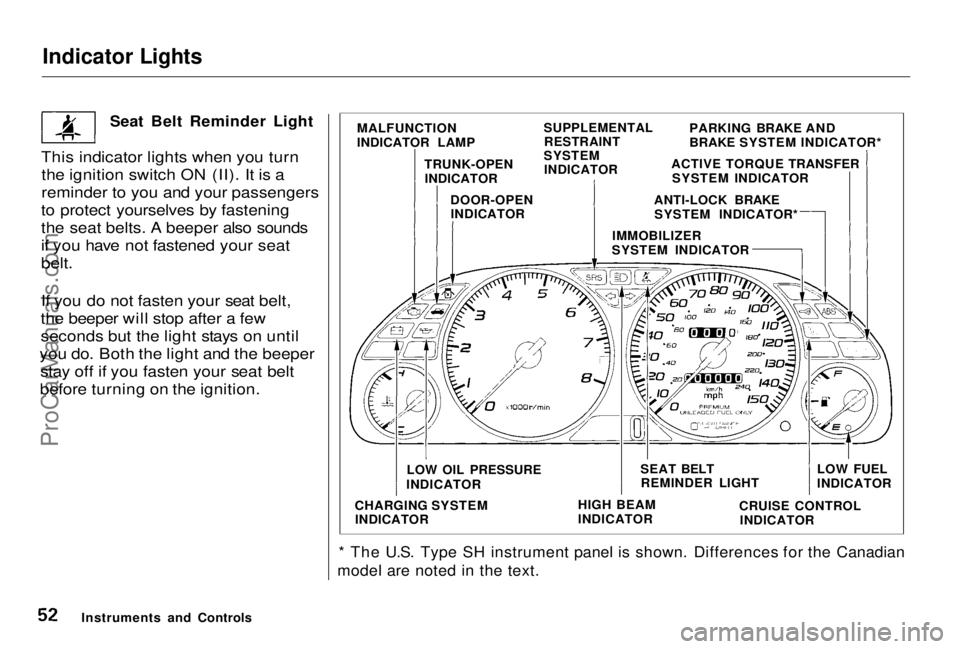
Seat Belt Reminder Light
This indicator lights when you turn the ignition switch ON (II). It is a
reminder to you and your passengers
to protect yourselves by fastening
the seat belts. A beeper also sounds
if you have not fastened your seat
belt.
If you do not fasten your seat belt,
the beeper will stop after a few
seconds but the light stays on until
you do. Both the light and the beeper stay off if you fasten your seat belt
before turning on the ignition.
* The U.S. Type SH instrument panel is shown. Differences for the Canadian
model are noted in the text.
Instruments and Controls MALFUNCTION
INDICATOR LAMP
SUPPLEMENTAL
RESTRAINT
SYSTEM INDICATOR
TRUNK-OPEN
INDICATOR
DOOR-OPENINDICATOR PARKING BRAKE AND
BRAKE SYSTEM INDICATOR*
ACTIVE TORQUE TRANSFER SYSTEM INDICATOR
ANTI-LOCK BRAKE SYSTEM INDICATOR*
IMMOBILIZER
SYSTEM INDICATOR
LOW OIL PRESSURE
INDICATOR
CHARGING SYSTEM INDICATOR SEAT BELT
REMINDER LIGHT
HIGH BEAM
INDICATOR LOW FUEL
INDICATOR
CRUISE CONTROL INDICATORProCarManuals.comMain Menu Table of Contents s t
Page 56 of 278
Indicator Lights
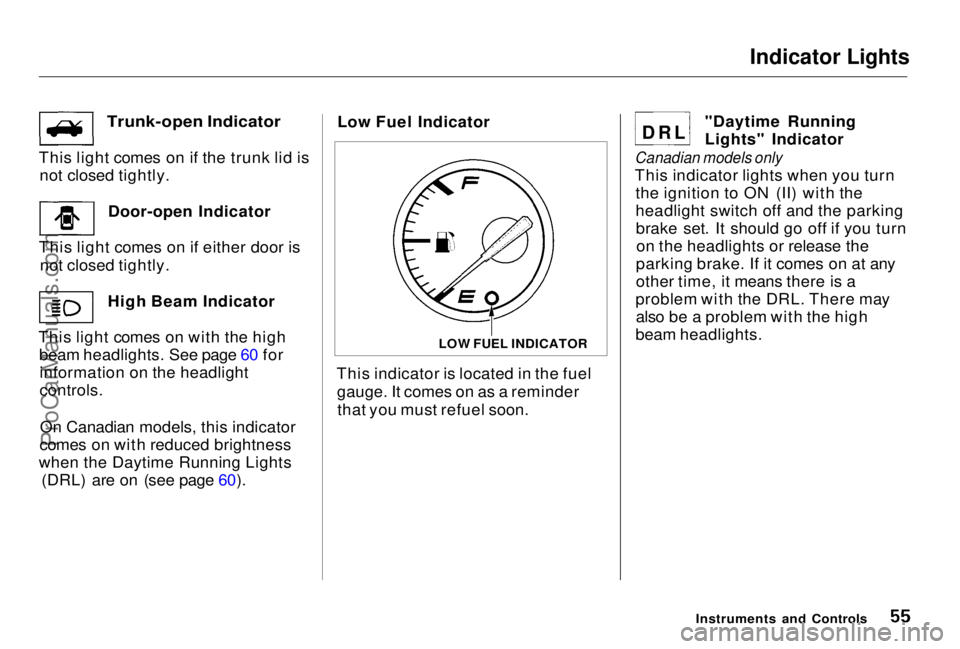
Trunk-open Indicator
This light comes on if the trunk lid is not closed tightly.
Door-open Indicator
This light comes on if either door is not closed tightly.
High Beam Indicator
This light comes on with the high beam headlights. See page 60 forinformation on the headlight
controls.
On Canadian models, this indicator
comes on with reduced brightness
when the Daytime Running Lights (DRL) are on (see page 60). Low Fuel Indicator
This indicator is located in the fuel gauge. It comes on as a reminderthat you must refuel soon. "Daytime Running
Lights" Indicator
Canadian models only
This indicator lights when you turn the ignition to ON (II) with the
headlight switch off and the parkingbrake set. It should go off if you turnon the headlights or release the
parking brake. If it comes on at any
other time, it means there is a
problem with the DRL. There may also be a problem with the high
beam headlights.
Instruments and Controls
D
R
L
LOW FUEL INDICATORProCarManuals.comMain Menu Table of Contents s t
Page 60 of 278
Controls Near the Steering Wheel
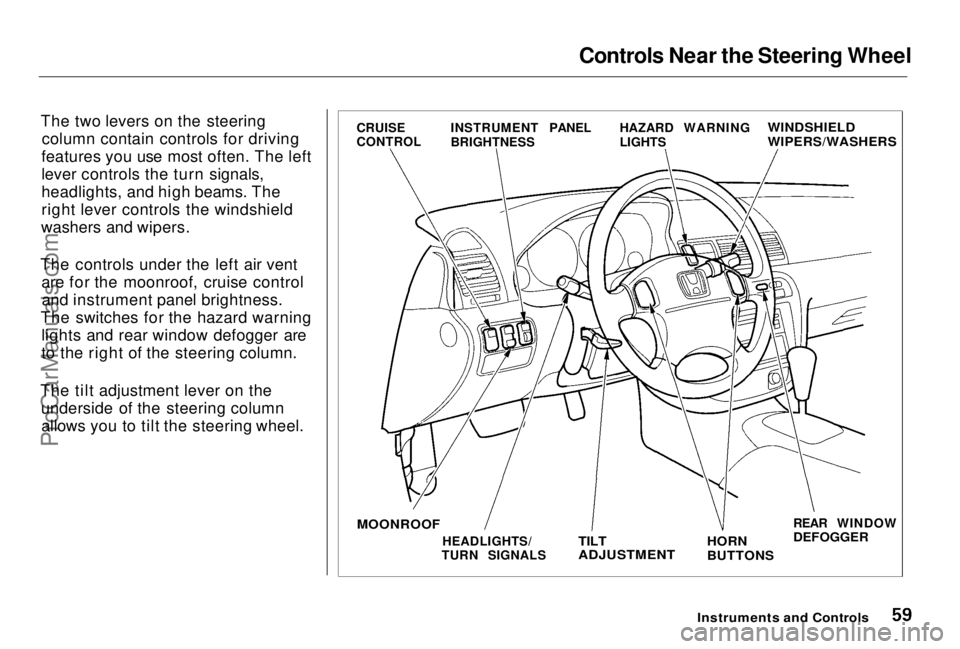
The two levers on the steering column contain controls for driving
features you use most often. The left
lever controls the turn signals,
headlights, and high beams. The
right lever controls the windshield
washers and wipers.
The controls under the left air vent are for the moonroof, cruise controland instrument panel brightness.
The switches for the hazard warning lights and rear window defogger are
to the right of the steering column.
The tilt adjustment lever on the underside of the steering columnallows you to tilt the steering wheel.
Instruments and Controls
CRUISE
CONTROL
INSTRUMENT PANEL
BRIGHTNESS HAZARD WARNING
LIGHTS
WINDSHIELD
WIPERS/WASHERS
REAR WINDOW
DEFOGGER
HORN
BUTTONS
TILT
ADJUSTMENT
HEADLIGHTS/
TURN SIGNALS
MOONROOFProCarManuals.comMain Menu Table of Contents s t
Page 61 of 278
Controls Near the Steering Wheel
Headlights
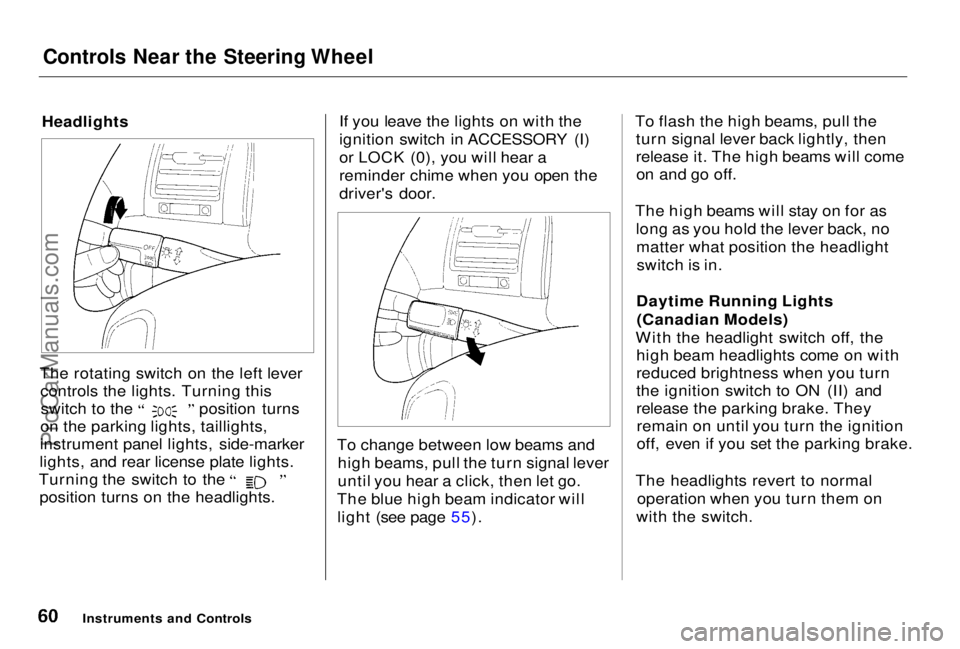
The rotating switch on the left lever controls the lights. Turning this switch to the position turns
on the parking lights, taillights,
instrument panel lights, side-marker
lights, and rear license plate lights. Turning the switch to the
position turns on the headlights. If you leave the lights on with the
ignition switch in ACCESSORY (I)
or LOCK (0), you will hear a
reminder chime when you open the
driver's door.
To change between low beams and high beams, pull the turn signal lever
until you hear a click, then let go.
The blue high beam indicator will light (see page 55). To flash the high beams, pull the
turn signal lever back lightly, then
release it. The high beams will comeon and go off.
The high beams will stay on for as long as you hold the lever back, nomatter what position the headlightswitch is in.
Daytime Running Lights (Canadian Models)
With the headlight switch off, the high beam headlights come on with
reduced brightness when you turn
the ignition switch to ON (II) and
release the parking brake. Theyremain on until you turn the ignition
off, even if you set the parking brake.
The headlights revert to normal operation when you turn them on
with the switch.
Instruments and ControlsProCarManuals.comMain Menu Table of Contents s t
Page 202 of 278
Lights
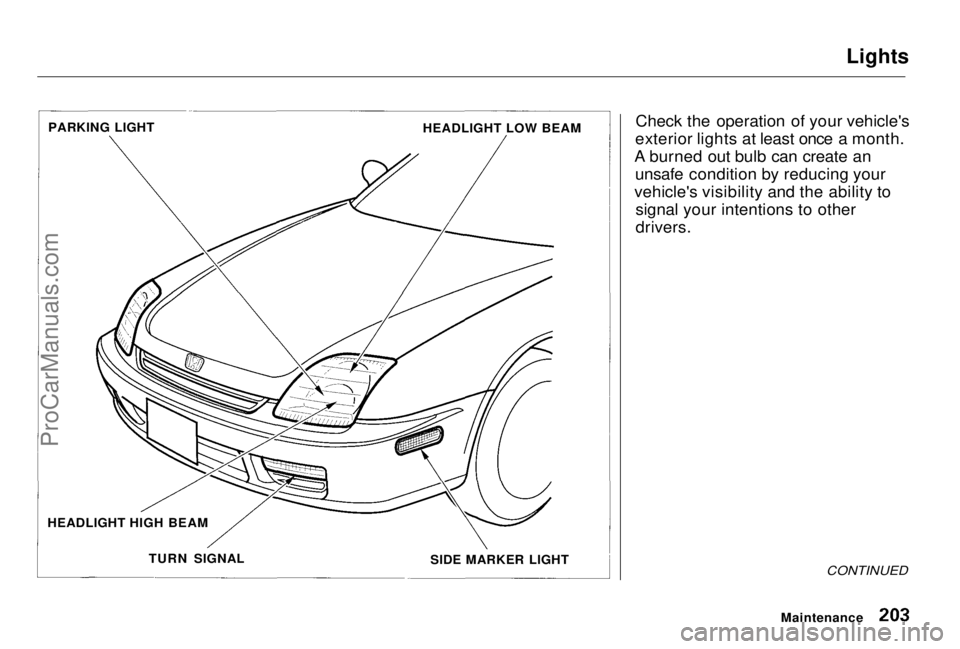
Check the operation of your vehicle's
exterior lights at least once a month.
A burned out bulb can create an unsafe condition by reducing your
vehicle's visibility and the ability to signal your intentions to other
drivers.
CONTINUED
Maintenance
PARKING LIGHT
HEADLIGHT LOW BEAM
SIDE MARKER LIGHT
HEADLIGHT HIGH BEAM
TURN SIGNALProCarManuals.comMain Menu Table of Contents s t
Page 203 of 278
Lights
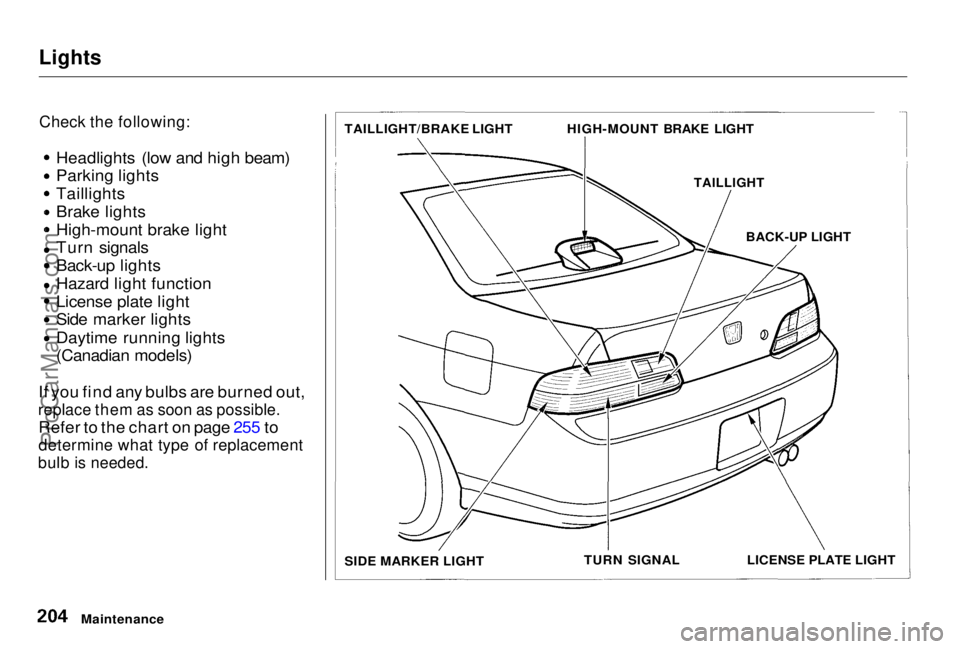
Check the following:
Headlights (low and high beam)
Parking lights Taillights
Brake lights
High-mount brake light
Turn signals
Back-up lights
Hazard light function
License plate light
Side marker lights
Daytime running lights
(Canadian models)
If you find any bulbs are burned out,
replace them as soon as possible.
Refer to the chart on page 255 to
determine what type of replacement
bulb is needed.
Maintenance TAILLIGHT/BRAKE LIGHT
HIGH-MOUNT BRAKE LIGHT
TAILLIGHT
BACK-UP LIGHT
LICENSE PLATE LIGHT
TURN SIGNAL
SIDE MARKER LIGHTProCarManuals.comMain Menu Table of Contents s t
Page 273 of 278
Index
Halogen Headlight Bulbs.............. 206
Hazard Warning Flashers............... 63
Headlights
Aiming......................................... 205
Daytime Running Lights............. 60
High Beam Indicator................... 60
High Beams, Turning on............ 60
Low Beams, Turning on ............. 60
Reminder Chime.......................... 60
Replacing Halogen Bulbs ......... 206
Turning on.................................... 60
Head Restraints............................... 77
Heating and Cooling........................ 92
High Altitude, Starting at.............. 133
High-Low Beam Switch .................. 60
High-mount Brake Light............... 213
Hood, Opening the ........................ 122
Horn................................................... 59
Hot Coolant, Warning About........ 177
Hydraulic Clutch............................ 186
Hydroplaning.................................. 151 Identification Number, Vehicle.... 252
If Your Car Has to be Towed....... 250
Ignition Keys............................................... 68
Switch............................................ 70
Timing Control System............. 262
Immobilizer System......................... 69
Indicator Lights, Instrument Panel.............................................. 51
Infant Restraint................................ 19 Inflation, Proper Tire ....................
197
High Speed
Driving................... 257
Normal Driving.......................... 198
Inside Mirror.................................... 83
Inspection, Tire.............................. 198
Instrument Panel............................. 50
Instrument Panel Brightness......... 61
Interior Cleaning............................ 222
Interior Lights.................................. 89
Introduction.........................................
i
Jacking up
the Car......................... 231
Jack, Tire........................................ 230
Jump Starting................................. 236
Keys................................................... 68
Label, Certification........................ 252
Lane Change, Signaling.................. 61
Lap/Shoulder Belts......................... 40Leaking of Exhaust into Car.......... 47
Learning Key.................................... 69
Lights Bulb Replacement..................... 206
Indicator........................................ 51
Parking.......................................... 60
Turn Signal................................... 61
Loading Cargo................................ 128
LOCK (Ignition Key Position)....... 71
CONTINUEDProCarManuals.comMain Menu s t