CD player HONDA PRELUDE 2000 Owner's Manual (in English)
[x] Cancel search | Manufacturer: HONDA, Model Year: 2000, Model line: PRELUDE, Model: HONDA PRELUDE 2000Pages: 293, PDF Size: 3.43 MB
Page 100 of 293
Comfor
t an d Convenienc e Feature s
The heating and air conditioning systems in your Honda provide a
comfortable driving environment in
all weather conditions.
The standard audio system has many features. This section de-scribes those features and how to
use them. (If you selected an optional audio system, refer to the
operating instructions that came
with it.)
Your Honda has an anti-theft audio system that requires a code number
to enable it.
Heating and Cooling........................
98
What Each Control Does............ 9
8
How to Use the System............. 100
To Turn Everything Off ...........
10 5
Audio System.................................
106
AM/FM/CD Audio System.....
10 6
Operating the Radio..................
106
Adjusting the Sound.................. 10
9
Audio System Lighting............. 110
Radio
Frequencies..................... 110
Radio Reception.........................
110
Operating the CD Player.......... 11
2
Operating the CD Changer...... 114
Protecting Compact Discs........ 116 CD Player Error Indications..... 117
CD Changer Error
Indications.............................. 118
Operating the Cassette
Player......................................
119
Tape Search Functions............. 12
0
Caring for the Cassette
Player......................................
12
2
Theft Protection ........................ 12
3
Comfor
t an d Convenienc e Feature s
Page 115 of 293
Audi
o Syste m
Operatin g th e C D Playe r
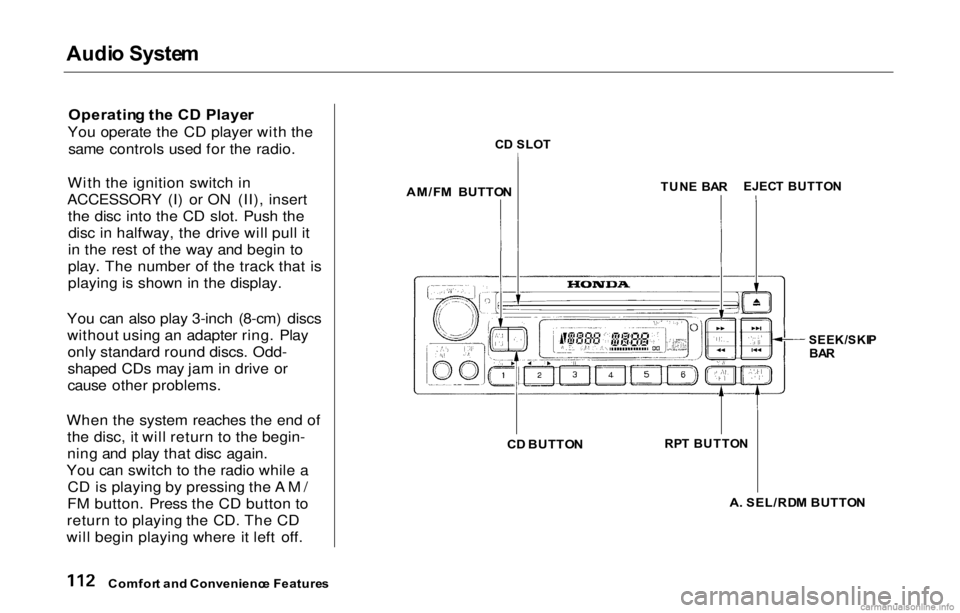
You operate the CD player with the same controls used for the radio.
With the ignition switch in
ACCESSORY (I) or ON (II), insert the disc into the CD slot. Push thedisc in halfway, the drive will pull it
in the rest of the way and begin to
play. The number of the track that is
playing is shown in the display.
You can also play 3-inch (8-cm) discs without using an adapter ring. Playonly standard round discs. Odd-
shaped CDs may jam in drive or
cause other problems.
When the system reaches the end of the disc, it will return to the begin-
ning and play that disc again.
You can switch to the radio while a CD is playing by pressing the AM/
FM button. Press the CD button to
return to playing the CD. The CD
will begin playing where it left off.
C
D SLO T
AM/F M BUTTO N
TUN
E BA R
SEEK/SKIP
BA R
C D BUTTO N
A. SEL/RD M BUTTO N
Comfor t an d Convenienc e Feature s
RP
T BUTTO N
EJEC
T BUTTO N
Page 116 of 293
Audi
o Syste m
If you turn the system off while a CD
is playing, either with the PWR/VOL
knob or by turning off the ignition,
the disc will stay in the drive. When
you turn the system back on, the CD
will begin playing where it left off.
Press the eject button to remove the
disc from the drive.
If you eject the disc, but do not
remove it from the slot, the system
will automatically reload the disc
after 15 seconds and put the CD
player in pause mode. To begin
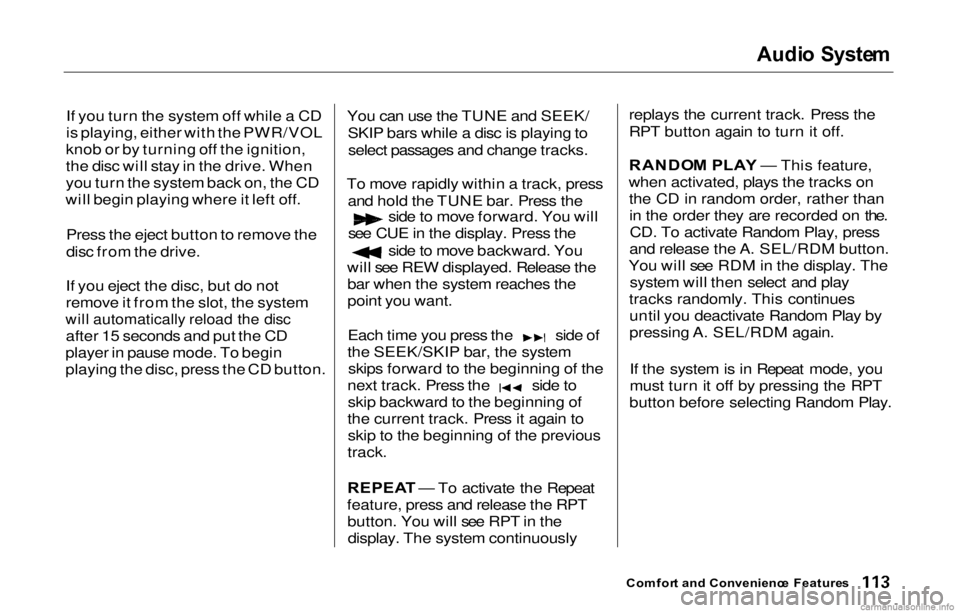
playing the disc, press the CD button. You can use the TUNE and SEEK/
SKIP bars while a disc is playing toselect passages and change tracks.
To move rapidly within a track, press and hold the TUNE bar. Press the side to move forward. You will
see CUE in the display. Press the side to move backward. You
will see REW displayed. Release the bar when the system reaches the
point you want. Each time you press the side of
the SEEK/SKIP bar, the system skips forward to the beginning of the next track. Press the side to
skip backward to the beginning of
the current track. Press it again to skip to the beginning of the previous
track.
REPEA T — To activate the Repeat
feature, press and release the RPT button. You will see RPT in thedisplay. The system continuously replays the current track. Press the
RPT button again to turn it off.
RANDO
M PLA Y — This feature,
when activated, plays the tracks on the CD in random order, rather thanin the order they are recorded on the.CD. To activate Random Play, press
and release the A. SEL/RDM button.
You will see RDM in the display. The system will then select and play
tracks randomly. This continues until you deactivate Random Play by
pressing A. SEL/RDM again.
If the system is in Repeat mode, you
must turn it off by pressing the RPT
button before selecting Random Play.
Comfor t an d Convenienc e Feature s
Page 117 of 293
Audi
o Syste m
Operatin g th e C D Change r
(Optional )
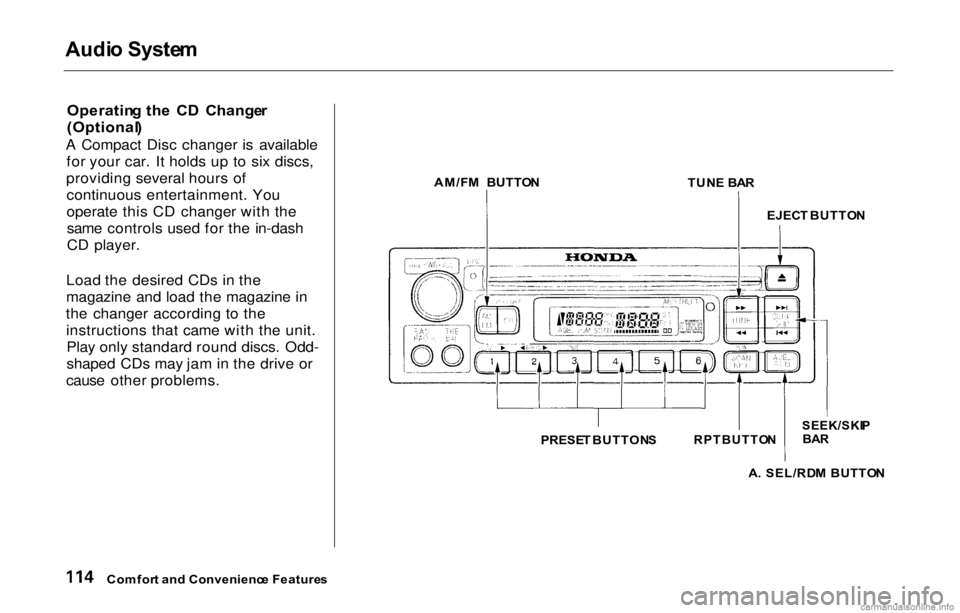
A Compact Disc changer is available for your car. It holds up to six discs,
providing several hours of continuous entertainment. You
operate this CD changer with thesame controls used for the in-dash
CD player.
Load the desired CDs in the
magazine and load the magazine in
the changer according to the instructions that came with the unit.Play only standard round discs. Odd-
shaped CDs may jam in the drive or
cause other problems. AM/F
M BUTTO N
TUNE BA R
A . SEL/RD M BUTTO N
Comfor t an d Convenienc e Feature s EJEC
T BUTTO N
PRESE T BUTTON S
RPTBUTTO
N
SEEK/SKI
P
BA R
Page 118 of 293
Audi
o Syste m
To select the CD changer, press the CD button. The disc and track
numbers will be displayed.
To select a different disc, press the appropriate preset button (1 — 6). If
you select an empty slot in the magazine, the changer will, after
finding that slot empty, try to load
the CD in the next slot. This continues until it finds a CD to load
and play.
If you load a CD in the in-dash player
while the changer is playing a CD,
the system will stop the changer and begin playing the in-dash CD. Toselect the changer again, press the
CD button. Play will begin where it
left off. Use the CD button to switch between the player and the changer. If you eject the in-dash CD while it is
playing, the system will automatically
switch to the CD changer and begin
play where it left off. If there are no CDs in the changer, the display will
flash. You will have to select another mode (AM or FM) with the button.
When you switch back to CD mode,
the system selects the same unit (in- dash or changer) that was playing
when you switched out of CD mode.
To use the SKIP, REPEAT, and RANDOM functions, refer to the in-
dash player operating instructions.
Comfort an d Convenienc e Feature s
Page 119 of 293
Audi
o Syste m
Protectin g Compac t Disc s
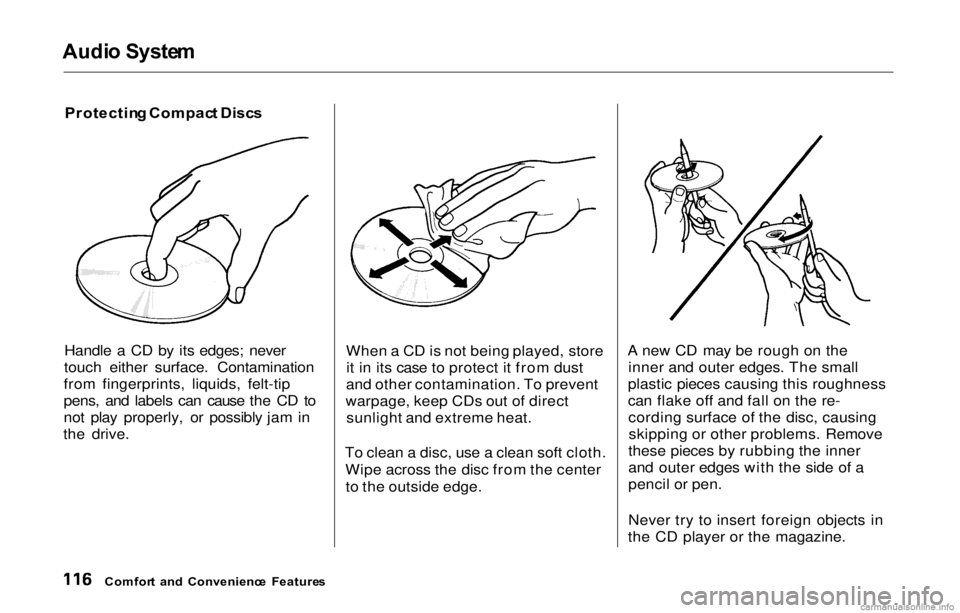
Handle a CD by its edges; never
touch either surface. Contamination
from fingerprints, liquids, felt-tip
pens, and labels can cause the CD to
not play properly, or possibly jam in
the drive. When a CD is not being played, store
it in its case to protect it from dust
and other contamination. To prevent
warpage, keep CDs out of direct sunlight and extreme heat.
To clean a disc, use a clean soft cloth. Wipe across the disc from the centerto the outside edge. A new CD may be rough on the
inner and outer edges. The small
plastic pieces causing this roughness
can flake off and fall on the re- cording surface of the disc, causingskipping or other problems. Remove
these pieces by rubbing the inner
and outer edges with the side of a
pencil or pen.
Never try to insert foreign objects in
the CD player or the magazine.
Comfor t an d Convenienc e Feature s
Page 120 of 293
Audi
o Syste m
C D Playe r Erro r Indication s
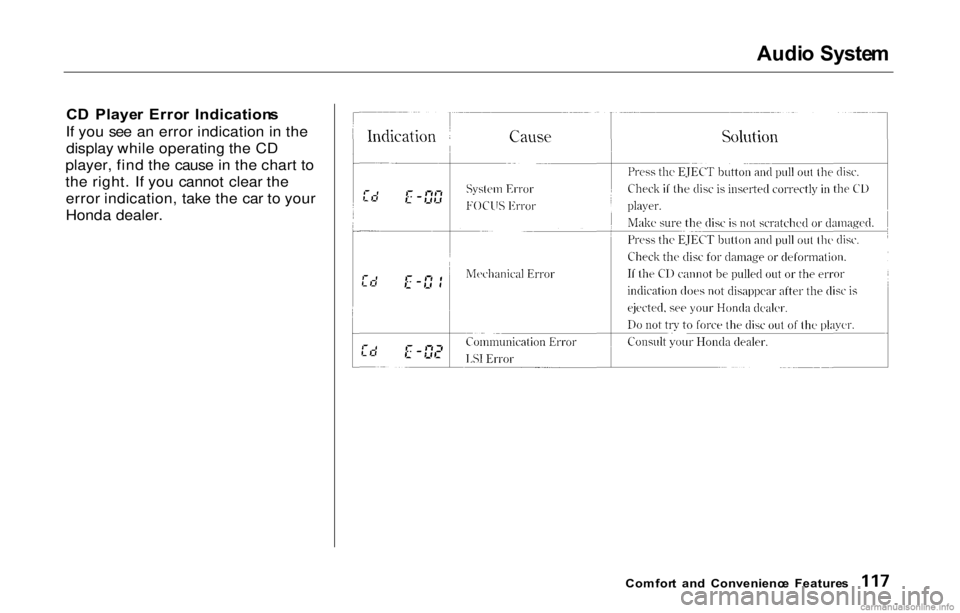
If you see an error indication in the display while operating the CD
player, find the cause in the chart to
the right. If you cannot clear the error indication, take the car to your
Honda dealer.
Comfort an d Convenienc e Feature s
Page 123 of 293
Audi
o Syste m
The tape direction indicator will light to show you which side of the cassette is playing. The indicates
the side you inserted facing upward
is now playing. If you want to play
the other side, press the PROG
button.
Dolby B noise reduction turns on
when you insert a cassette. If the tape was not recorded with Dolby B
noise reduction, turn it off by
pressing the NR button.
Dolby remains off until you turn it on
by pressing the button again.
When the system reaches the end of the tape, it will automatically reverse direction and play the other side. If
you want to remove the cassette
from the drive, press the EJECT
button on the cassette player. If you turn the system off while a
tape is playing, either with the PWR/
VOL knob or by turning off the ignition, the cassette will remain in
the drive. When you turn the system
back on, the cassette player will be in pause mode. To begin playing, press
the PLAY button.
To switch to the radio or CD player while a tape is playing, press the
AM/FM, or CD button. To change back to the cassette player, push theCD button.
Tap
e Searc h Function s
With a cassette playing, you can use the FF, REW, SKIP, or REPEAT
function to find a desired program.
FF/RE W — Fast Forward and
Rewind move the tape rapidly. Press and release the side of the
TUNE bar to fast forward the tape, or the side to rewind. You will
see FF or REW flashing in the
display. To stop fast forward or
rewind, press either side of the
TUNE bar or the PLAY button. If the system reaches the end of the tape
while in fast forward or rewind, it automatically stops that function,
reverses direction, and begins to play.
Comfor t an d Convenienc e Feature s
Page 125 of 293
Audi
o Syste m
Carin g fo r th e Cassett e Playe r
The cassette player picks up dirt and oxides from the tape. This contami-
nation builds up over time and
causes the sound quality to degrade.
To prevent this, you should clean the player after every 30 hours of use.
Your dealer has a cleaning kit
available.
If you do not clean the cassette
player regularly, it may eventually
become impossible to remove the
contamination with a normal
cleaning kit.
Use 100-minute or shorter cassettes. Cassettes longer than that use
thinner tape that may break or jam
the drive. Look at the cassette before you
insert it. If the tape is loose, tighten
it by turning a hub with a pencil or
your finger.
If the label is peeling off, remove it
from the cassette or it could cause the cassette to jam in the player.
Never try to insert a warped ordamaged cassette in the player.
When they are not in use, store cassettes in their cases to protect
them from dust and moisture. Never
place cassettes where they will be exposed to direct sunlight, high heat,
or high humidity. If a cassette is
exposed to extreme heat or cold, let
it reach a moderate temperature
before inserting it in the player.
Never try to insert foreign objects
into the cassette player.
If you see the error indication
on the display, press
the EJECT button and remove the
cassette from the unit. Make sure
the tape is not damaged. If the
cassette will not eject or the error
indication stays on after the cassette
ejects, take the car to your Honda
dealer.
Comfor t an d Convenienc e Feature s
Page 285 of 293
Inde
x
Battery Charging SystemIndicator............................ 55, 249
Jump Starting............................. 244 Maintenance............................... 198
Specifications............................. 265
Before Driving............................... 125
Belts, Seat........................................... 8
Beverage Holder.............................. 91
Body Repair.................................... 233
Brakes
Anti-lock System (ABS)............ 154
Break-in, New Linings .............. 126
Fluid............................................ 193
Light, Burned-out....................... 219
Parking..........................................89
System Indicator.......................... 55
Wear Indicators......................... 153
Brakes, ABS Operation.................................... 154
System Indicator.................. 56, 156
Braking System.............................. 153
Break-in, New Car......................... 126
Brightness Control, Instruments... 63 Brights, Headlights......................... 62
Bulb Replacement
Back-up Lights........................... 219
Brake Lights............................... 219
Ceiling Lights............................. 223
Courtesy Lights......................... 223
Front Parking Lights................. 216
Front Side Marker Lights......... 217
Headlights.................................. 214
High-mount Brake Light.......... 221
License Plate Light.................... 222
Rear Side Marker Lights.......... 219
Specifications............................. 265
Trunk Light................................ 224
Turn Signal Lights..................... 218
Bulbs, Halogen............................... 214
Cables, Jump Starting With.......... 244
Capacities Chart............................. 264
Carbon Monoxide Hazard.............. 49
Cargo, Loading............................... 135
Cassette Player
Care............................................. 122
Operation.................................... 119
CAUTION, Explanation of ............... ii
CD Changer.................................... 114
CD Player........................................ 112
Certification Label......................... 262
Chains............................................. 210
Change Oil How to......................................... 183
When to....................................... 172
Changing a Flat Tire..................... 237
Changing Engine Coolant............. 187
Charging System Indicator .... 55, 249
Checking Automatic Transmission
Fluid........................................ 191
Battery Condition...................... 198
Brake Fluid................................. 193 Clutch Fluid................................ 194
Drive Belts.................................. 204
Engine Coolant........................... 131
Engine Oil................................... 130
Fuses...........................................254
Manual Transmission Fluid ..... 192
Power Steering Fluid................. 194
Checklist, Before Driving............. 140
Child Safety...................................... 21
Cleaner, Air.................................... 195