brakes HONDA PRELUDE 2000 Owner's Manual (in English)
[x] Cancel search | Manufacturer: HONDA, Model Year: 2000, Model line: PRELUDE, Model: HONDA PRELUDE 2000Pages: 293, PDF Size: 3.43 MB
Page 58 of 293
Indicator Light s
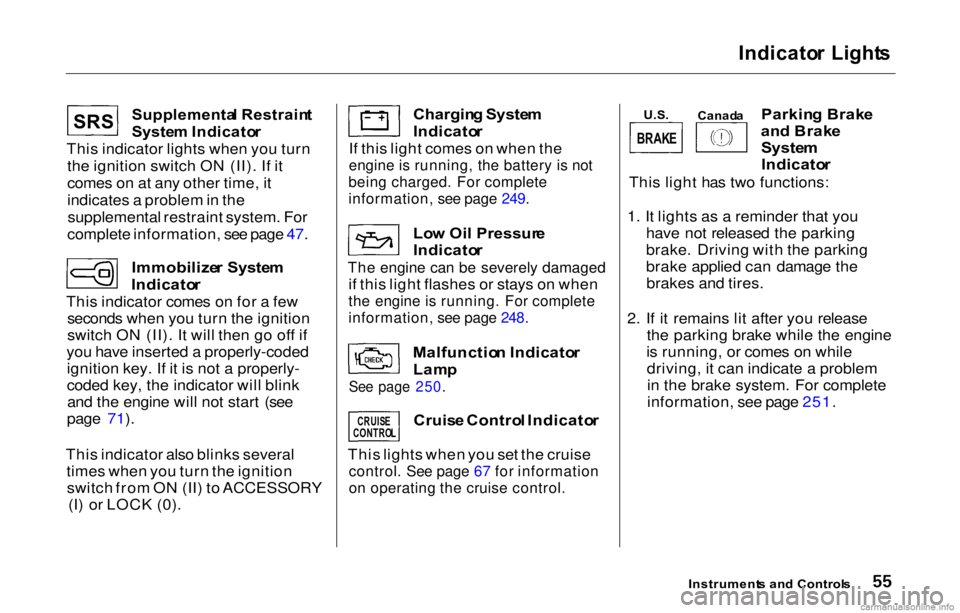
Supplementa l Restrain t
System Indicato r
This indicator lights when you turn
the ignition switch ON (II). If it
comes on at any other time, it
indicates a problem in thesupplemental restraint system. For
complete information, see page 47.
Immobilize r Syste m
Indicato r
This indicator comes on for a few seconds when you turn the ignition
switch ON (II). It will then go off if
you have inserted a properly-coded ignition key. If it is not a properly-
coded key, the indicator will blinkand the engine will not start (see
page 71).
This indicator also blinks several times when you turn the ignitionswitch from ON (II) to ACCESSORY (I) or LOCK (0). Chargin
g Syste m
Indicato r
If this light comes on when the
engine is running, the battery is not
being charged. For complete
information, see page 249.
Lo w Oi l Pressur e
Indicato r
The engine can be severely damaged
if this light flashes or stays on when
the engine is running. For complete
information, see page 248.
Malfunctio n Indicato r
Lam p
See page 250.
Cruis e Contro l Indicato r
This lights when you set the cruise
control. See page 67 for information
on operating the cruise control.
Parkin g Brak e
an d Brak e
System
Indicato r
This light has two functions:
1. It lights as a reminder that you have not released the parking
brake. Driving with the parking
brake applied can damage thebrakes and tires.
2. If it remains lit after you release the parking brake while the engine
is running, or comes on while driving, it can indicate a problemin the brake system. For complete
information, see page 251.
Instrument s an d Control s
SRS
CRUISE
CONTRO L
U.S. Canad a
BRAKE
Page 71 of 293
Steerin
g Whee l Control s
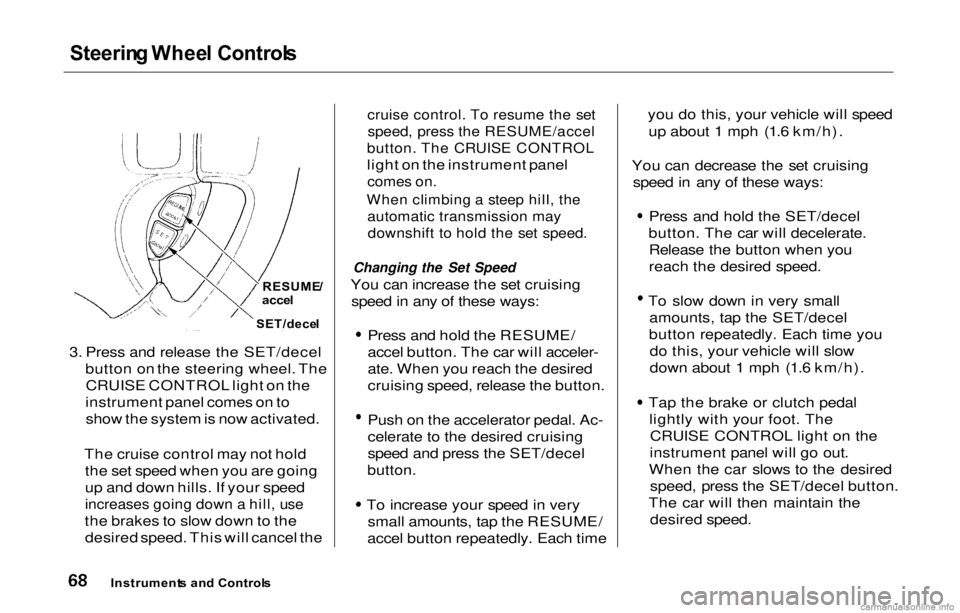
3. Press and release the SET/decel button on the steering wheel. TheCRUISE CONTROL light on the
instrument panel comes on to show the system is now activated.
The cruise control may not hold the set speed when you are going
up and down hills. If your speed
increases going down a hill, use
the brakes to slow down to the desired speed. This will cancel the
cruise control. To resume the set
speed, press the RESUME/accel
button. The CRUISE CONTROL
light on the instrument panel
comes on.
When climbing a steep hill, the
automatic transmission may
downshift to hold the set speed.
Changing the Set Speed
You can increase the set cruising speed in any of these ways: Press and hold the RESUME/
accel button. The car will acceler-
ate. When you reach the desired
cruising speed, release the button.
Push on the accelerator pedal. Ac-
celerate to the desired cruising
speed and press the SET/decel
button.
To increase your speed in very
small amounts, tap the RESUME/
accel button repeatedly. Each time you do this, your vehicle will speed
up about 1 mph (1.6 km/h).
You can decrease the set cruising speed in any of these ways: Press and hold the SET/decel
button. The car will decelerate. Release the button when you
reach the desired speed. To slow down in very small
amounts, tap the SET/decel
button repeatedly. Each time you do this, your vehicle will slow
down about 1 mph (1.6 km/h).
Tap the brake or clutch pedal lightly with your foot. TheCRUISE CONTROL light on the
instrument panel will go out.
When the car slows to the desired speed, press the SET/decel button.
The car will then maintain the desired speed.
Instrument s an d Control s
RESUME
/
acce l
SET/dece l
Page 92 of 293
Mirrors
, Parkin g Brake
Available on all Canadian models
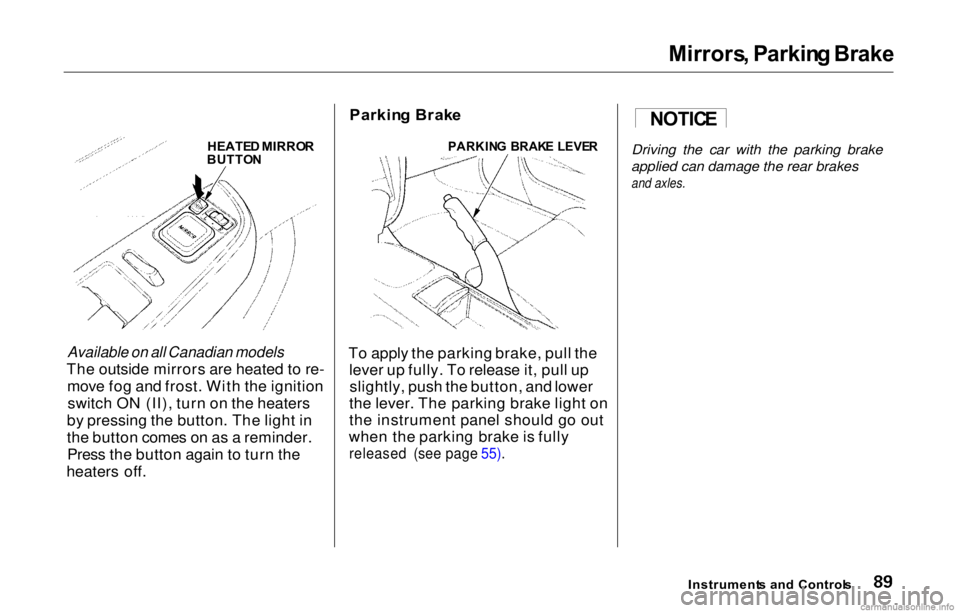
The outside mirrors are heated to re- move fog and frost. With the ignitionswitch ON (II), turn on the heaters
by pressing the button. The light in
the button comes on as a reminder. Press the button again to turn the
heaters off. Parkin
g Brak e
To apply the parking brake, pull the lever up fully. To release it, pull upslightly, push the button, and lower
the lever. The parking brake light on
the instrument panel should go out
when the parking brake is fully
released (see page 55).
Instruments an d Control s
Driving the car with the parking brake
applied can damage the rear brakes
and axles.
HEATE
D MIRRO R
BUTTO N
PARKIN
G BRAK E LEVE R NOTIC
E
Page 129 of 293

Break-i
n Period , Gasolin e
Break-i n Perio d
Help assure your car's future
reliability and performance by paying
extra attention to how you drive
during the first 600 miles (1,000 km).
During this period: Avoid full-throttle starts and rapid
acceleration.
Avoid hard braking. New brakes need to be broken-in by moderate
use for the first 200 miles (300
km).
You shoul
d follow these
same re-
commendations with an overhauled
or exchanged engine, or when the
brakes are relined.
Gasolin
e
Your Honda is designed to operate on premium unleaded gasoline with a
pump octane number of 91 or higher.
If you are unable to find premium
unleaded gasoline, you may substi-
tute an unleaded regular gasoline.
The engine will compensate for the lower octane, but you may notice aslight decrease in power as a result.
We recommend gasolines containing detergent additives that help prevent
fuel system and engine deposits.
Using gasoline containing lead willdamage your car's emissions In Canada, some gasolines contain
an octane-enhancing additive called
MMT. If you use such gasolines,
your emission control system performance may deteriorate andthe Malfunction Indicator Lamp on
your instrument panel may turn on. If this happens, contact yourauthorized Honda dealer for service.
Befor e Drivin g
Page 137 of 293

Accessorie
s an d Modification s
Modification s
Do not remove any original
equipment or modify your car in any
way that would alter its design or operation. This could make your car
unsafe and illegal to drive.
For example, do not make any
modifications that would change the
ride height of your car, or install
wheels and tires with a different overall diameter.
Such modifications can adversely
affect handling, and interfere with
the operation of the car's anti-lock brakes and other systems. In addition, any modifications that
decrease ground clearance increase
the chance of undercarriage parts striking a curb, speed bump, or other
raised object, which could cause
your airbags to deploy.
Do not modify your steering wheelor any other part of your
Supplemental Restraint System.
Modifications could make the
system ineffective. Additiona
l Safet y Precautio n
Do not attach or place objects on the
airbag covers. Any object attached to
or placed on the covers marked "SRS
AIRBAG," in the center of the steering wheel and on top of the
dashboard, could interfere with the
proper operation of the airbags. Or, if the airbags inflate, the objects
could be propelled inside the car and
hurt someone.
Befor e Drivin g
Page 142 of 293

Drivin
g
This section gives you tips on starting the engine under various
conditions, and how to operate the 5-speed manual and automatic
transmissions. It also includes important information on parking
your car, the braking system, and
facts you need if you are planning to
tow a trailer.
Preparing to Drive......................... 140
Starting the Engine........................ 141
Starting in Cold Weatherat High Altitude..................... 141
5-speed Manual Transmission..... 14
2
Recommended Shift Points...... 143
Engine
Speed Limiter ............... 143
Automatic Transmission............... 144 Shift Lever Position Indicator.. 144
Shift Lever Positions................. 145
Engine Speed Limiter............... 150Shift Lock Release..................... 151
Parking............................................ 152
The Braking System...................... 153 Brake Wear Indicators.............. 153
Brake System Design................ 154
Anti-lock Brakes........................ 154 Important Safety
Reminders.......................... 155
ABS Indicator......................... 156
Active Torque Transfer System .. 157 Driving in Bad Weather................ 158
Towing a Trailer............................ 160
Driving
Page 145 of 293
5-spee
d Manua l Transmissio n
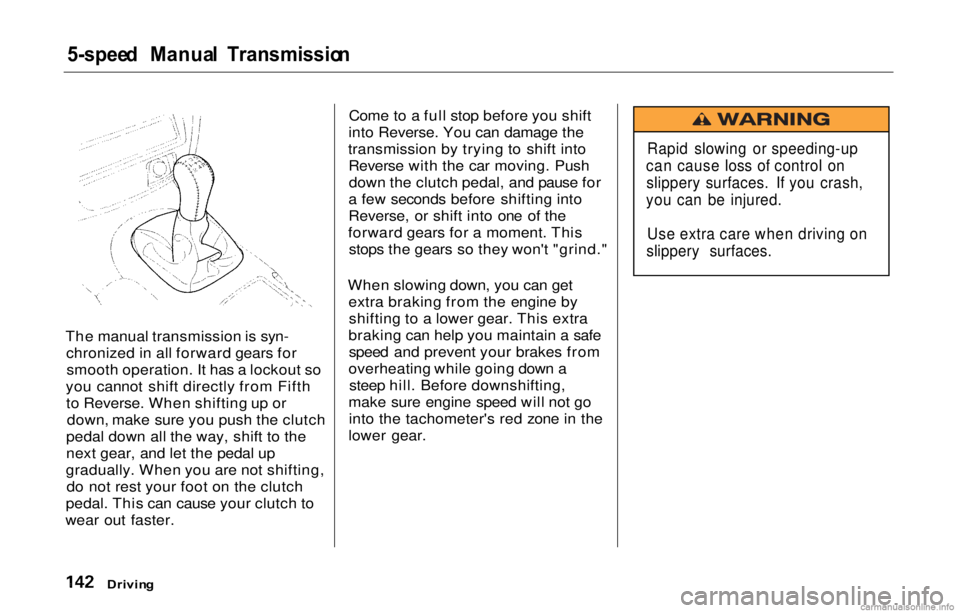
The manual transmission is syn- chronized in all forward gears forsmooth operation. It has a lockout so
you cannot shift directly from Fifth to Reverse. When shifting up or down, make sure you push the clutch
pedal down all the way, shift to the
next gear, and let the pedal up
gradually. When you are not shifting, do not rest your foot on the clutch
pedal. This can cause your clutch to
wear out faster. Come to a full stop before you shift
into Reverse. You can damage the
transmission by trying to shift into Reverse with the car moving. Pushdown the clutch pedal, and pause for
a few seconds before shifting into
Reverse, or shift into one of the
forward gears for a moment. This stops the gears so they won't "grind."
When slowing down, you can get extra braking from the engine byshifting to a lower gear. This extra
braking can help you maintain a safe speed and prevent your brakes from
overheating while going down a steep hill. Before downshifting,
make sure engine speed will not go into the tachometer's red zone in the
lower gear.
Drivin g
Rapid slowing or speeding-up
can cause loss of control on slippery surfaces. If you crash,
you can be injured.
Use extra care when driving on
slippery surfaces.
Page 155 of 293

Parkin
g
Always use the parking brake when you park your car. The indicator onthe instrument panel shows that the
parking brake is not fully released; itdoes not indicate that the parking
brake is firmly set. Make sure the
parking brake is set firmly or your car may roll if it is parked on an
incline.
If your car has an automatic
transmission, set the parking brake
before you put the transmission in Park. This keeps the car from
moving and putting pressure on the
parking mechanism in the
transmission — making it easier to
move the shift lever out of Park
when you want to drive away. If the car is facing uphill, turn the
front wheels away from the curb. If
you have a manual transmission, put it in first gear.
If the car is facing downhill, turn the
front wheels toward the curb. If you
have a manual transmission, put it in reverse gear.
Make sure the parking brake is fully
released before driving away.
Driving with the parking brake
partially set can overheat or damage
the rear brakes. Parkin
g Tip s
• Make sure the moonroof and the windows are closed.
Turn off the lights. Place any packages, valuables, etc.,
in the trunk or take them with you.
Lock the doors with the key or the
remote transmitter. Never park over dry leaves, tall
grass, or other flammable materials. The three way catalytic
converter gets very hot, and could
cause these materials to catch on
fire.
Drivin g
Page 156 of 293

Th
e Brakin g Syste m
Your Honda is equipped with disc brakes at all four wheels. A powerassist helps reduce the effort needed
on the brake pedal. The ABS helps
you retain steering control when
braking very hard.
Put your foot on the brake pedal only
when you intend to brake. Resting
your foot on the pedal keeps the
brakes applied lightly, causing them
to build up heat. Heat build-up can
reduce how well your brakes work. It also keeps your brake lights on all
the time, confusing drivers behind
you.
Constant application of the brakes
when going down a long hill builds up heat and reduces their effective-
ness. Use the engine to assist the
brakes by downshifting to a lower
gear and taking your foot off the accelerator pedal.
Check your brakes after driving
through deep water. Apply the
brakes moderately to see if they feel normal. If not, apply them gently and
frequently until they do. Since a
longer distance is needed to stop
with wet brakes, be extra cautious and alert in your driving. Brak
e Wea r Indicator s
All four brakes have audible brake wear indicators.
When the brake pads need replacing,
you will hear a distinctive metallic "screeching" sound when you apply
the brakes. If you do not have the
brake pads replaced, they will begin screeching all the time.
Your brakes may sometimes squeal or squeak when you apply them
lightly. Do not confuse this with the
brake wear indicators. They make a
very audible "screeching."
Driving
Page 157 of 293
Th
e Brakin g Syste m
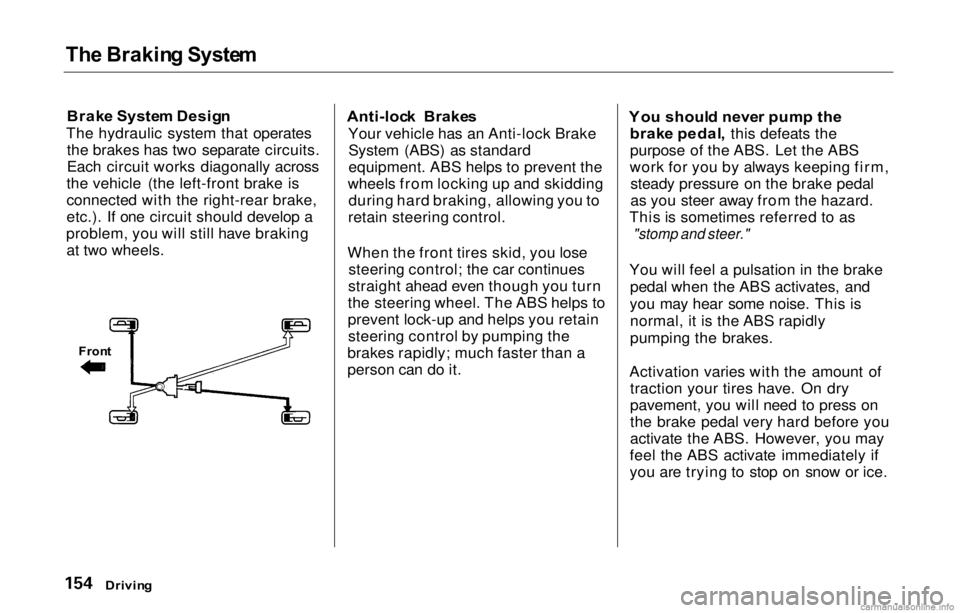
Brak e Syste m Desig n
The hydraulic system that operates the brakes has two separate circuits.
Each circuit works diagonally across
the vehicle (the left-front brake is
connected with the right-rear brake,
etc.). If one circuit should develop a
problem, you will still have braking at two wheels. Anti-loc
k Brake s
Your vehicle has an Anti-lock Brake System (ABS) as standard
equipment. ABS helps to prevent the
wheels from locking up and skidding during hard braking, allowing you to
retain steering control.
When the front tires skid, you lose steering control; the car continues
straight ahead even though you turn
the steering wheel. The ABS helps to
prevent lock-up and helps you retain steering control by pumping the
brakes rapidly; much faster than a
person can do it. Yo
u shoul d neve r pum p th e
brak e pedal , this defeats the
purpose of the ABS. Let the ABS
work for you by always keeping firm, steady pressure on the brake pedal
as you steer away from the hazard.
This is sometimes referred to as
"stomp and steer."
You will feel a pulsation in the brake pedal when the ABS activates, and
you may hear some noise. This is normal, it is the ABS rapidly
pumping the brakes.
Activation varies with the amount of traction your tires have. On dry
pavement, you will need to press on
the brake pedal very hard before you
activate the ABS. However, you may
feel the ABS activate immediately if
you are trying to stop on snow or ice.
Drivin g
Fron
t