HONDA RIDGELINE 2007 1.G Service Manual
Manufacturer: HONDA, Model Year: 2007, Model line: RIDGELINE, Model: HONDA RIDGELINE 2007 1.GPages: 331, PDF Size: 5.45 MB
Page 41 of 331
CONT INUED
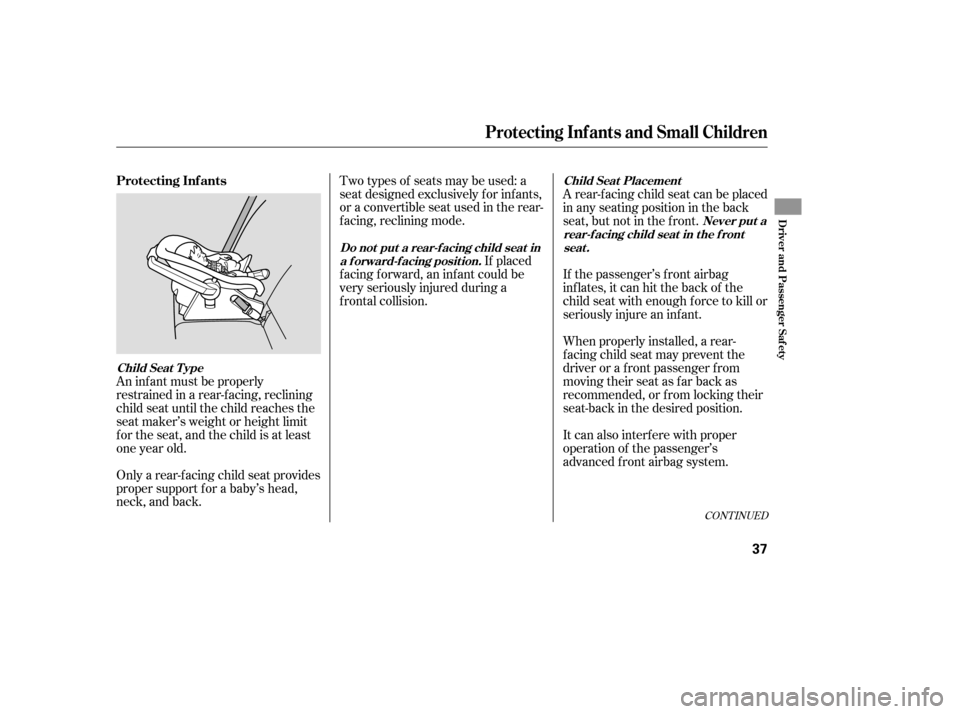
An inf ant must be properly
restrained in a rear-f acing, reclining
child seat until the child reaches the
seat maker’s weight or height limit
f or the seat, and the child is at least
one year old.
Only a rear-f acing child seat provides
proper support f or a baby’s head,
neck, and back.Two types of seats may be used: a
seat designed exclusively f or inf ants,
or a convertible seat used in the rear-
f acing, reclining mode.
If placed
f acing f orward, an inf ant could be
very seriously injured during a
f rontal collision. A rear-f acing child seat can be placed
in any seating position in the back
seat, but not in the f ront.
If the passenger’s front airbag
inflates, it can hit the back of the
child seat with enough f orce to kill or
seriously injure an inf ant.
When properly installed, a rear-
f acing child seat may prevent the
driver or a f ront passenger f rom
moving their seat as far back as
recommended, or f rom locking their
seat-back in the desired position.
It can also interf ere with proper
operation of the passenger’s
advanced front airbag system.
Protecting Inf ants
Child Seat T ype
Do not put a rear-f acing child seat in
a f orward-f acing position. Never put a
rear-f acing child seat in t he f ront seat .
Child Seat Placement
Protecting Inf ants and Small Children
Driver and Passenger Saf ety
37
Page 42 of 331
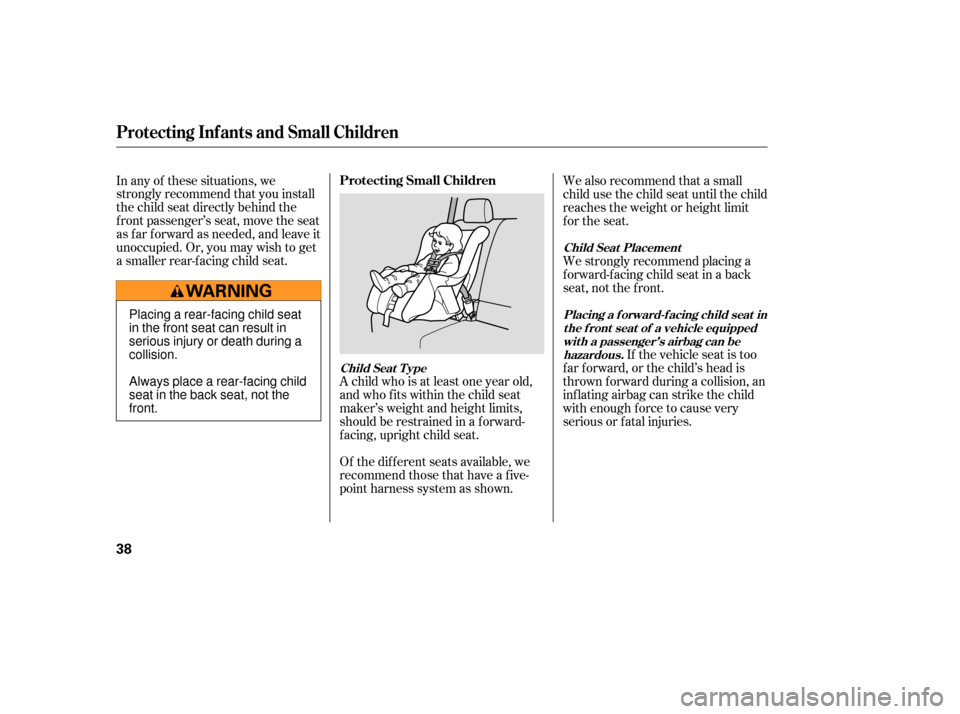
Of the different seats available, we
recommend those that have a f ive-
point harness system as shown.
In any of these situations, we
strongly recommend that you install
the child seat directly behind the
f ront passenger’s seat, move the seat
as far forward as needed, and leave it
unoccupied. Or, you may wish to get
a smaller rear-f acing child seat.
A child who is at least one year old,
and who fits within the child seat
maker’s weight and height limits,
should be restrained in a f orward-
f acing, upright child seat. If the vehicle seat is too
f ar f orward, or the child’s head is
thrown f orward during a collision, an
inf lating airbag can strike the child
with enough force to cause very
serious or fatal injuries. We strongly recommend placing a
forward-facing child seat in a back
seat, not the f ront. We also recommend that a small
child use the child seat until the child
reaches the weight or height limit
for the seat.
Protecting Inf ants and Small Children
Protecting Small Children
Child Seat T ype Placing a f orward-f acing child seat in
the f ront seat of a vehicle equippedwith a passenger’s airbag can behazardous.
Child Seat Placement
38
Placing a rear-facing child seat
in the front seat can result in
serious injury or death during a
collision.
Always place a rear-facing child
seat in the back seat, not the
front.
Page 43 of 331
Since LATCH-compatible child seats
are easier to install and reduce the
possibility of improper installation,
we recommend selecting this style.
We also recommend selecting a
LATCH-compatible seat with a rigid,
rather than a flexible, anchor (see
page ). In
seating positions and vehicles not
equipped with LATCH, a LATCH-
compatible child seat can be installed
using a seat belt.
Whatever type of seat you choose, to
provide proper pro tection, a child
seat should meet three
requirements:
Look for FMVSS
213 or CMVSS 213 on the box.
Rear-facing for infa nts, forward-
facing for small children.
When
buying a child seat, you need
to choose either a conventional child
seat, or one designed for use with
the lower anchors and tethers for
children (LATCH) system.
Conventional child seats must be
secured to a vehicle with a seat belt,
whereas LATCH-compatible seats
are secured by atta ching the seat to
hardware built into each rear seating
position in the back seat.
If
it is necessary to put a fo rward-
facing child seat in the front, move
the vehicle seat as far to the rear as
possible, and be sure the child seat is
firmly secured to the vehicle and the
child is properly strapped in the seat.
Ev
en with advanced front airbags
that automatically turn the
passenger’s front airbag off (see
page ), a back seat is the saf est
place f or a small child.
1.
2.
41
29
CONT INUED
Protecting Inf ants and Small Children, Selecting a Child Seat
Selecting a Child Seat
T he child seat should meet U.S. or
Canadian Mot or Vehicle Saf et ySt andard 213.
T he child seat should be of theproper type and size to f it the child.
Driver and Passenger Saf ety
39
Placing a forward-facing child
seat in the front seat can result
in serious injury or death if the
front airbag inflates.
Ifyoumustplaceaforward-
facing child seat in front, move
the vehicle seat as far back as
possible, and properly restrain
the child.
Page 44 of 331
Af ter selecting a proper child seat
and a good place to install the seat,
there are three main steps in
installing the seat:All child seats must be
secured to the vehicle with the lap
part of a lap/shoulder belt or with
the LATCH (lower anchors and
tethers for children) system. A
child whose seat is not properly
secured to the vehicle can be
endangered in a crash.
Af ter installing a child
seat, push and pull the seat
f orward and f rom side-to-side to
verify that it is secure.
A child seat secured with a seat belt
should be installed as f irmly as
possible. However, it does not need
to be ‘‘rock solid.’’ Some side-to-side movement can be expected and
should not reduce the child seat’s
ef f ectiveness.
If the child seat is not secure, try
installing it in a dif f erent seating
position, or use a dif f erent style of
child seat that can be f irmly secured.
Bef ore purchasing a conventional
child seat, or using a previously
purchased one, we recommend that
you test the seat in the specif ic
vehicle seating position or positions
where the seat will be used.
Make sure the child is properly
strappedinthechildseat
according to the child seat maker’s
instructions. A child who is not
properly secured in a child seat
can be seriously injured in a crash.
The f ollowing pages provide
guidelines on how to properly install
a child seat. A f orward-f acing child
seat is used in all examples, but the
instructions are the same f or rear-
f acing child seats.
3.
1.
2.3.
Selecting a Child Seat, Installing a Child Seat
Installing a Child Seat
Properly secure t he child seat t o
the vehicle.
Make sure t he child seat is f irmlysecured.
T he child seat should f it the
vehicle seat ing posit ion (orposit ions) where it will be used.
Secure the child in the child seat.
40
Page 45 of 331
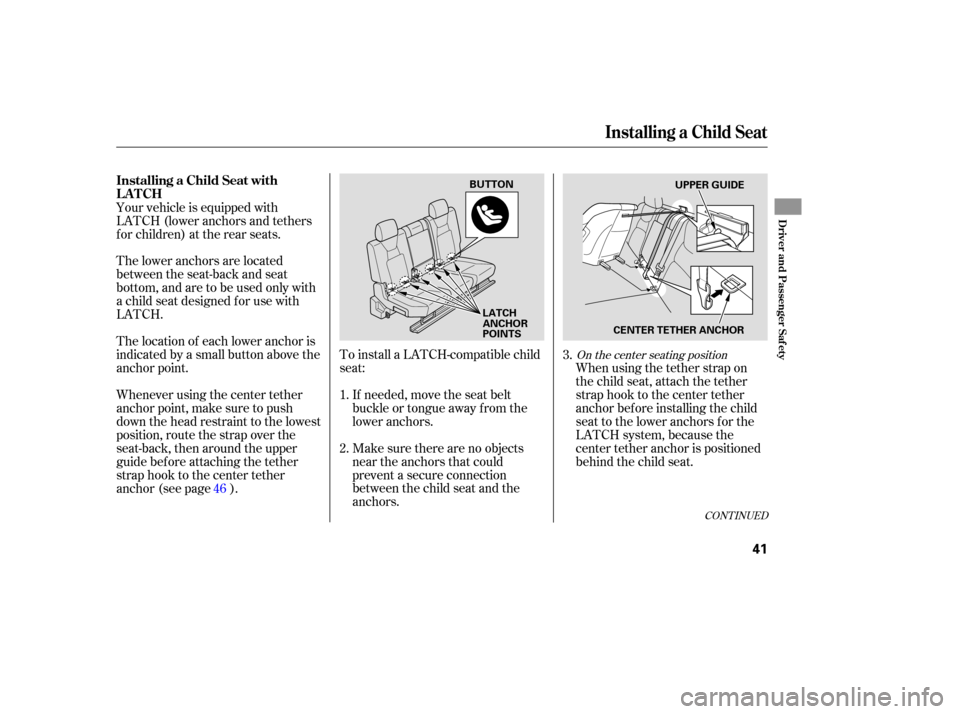
To install a LATCH-compatible child
seat:
Make sure there are no objects
near the anchors that could
prevent a secure connection
between the child seat and the
anchors. When
using the tether strap on
the child seat, attach the tether
strap hook to the center tether
anchor before installing the child
seat to the lower anchors for the
LATCH system, because the
center tether anchor is positioned
behind the child seat.
If
needed, move the seat belt
buckle or tongue away from the
lower anchors.
Your
vehicle is equipped with
LATCH (lower anchors and tethers
for children) at the rear seats.
The lower anchors are located
between the seat-back and seat
bottom, and are to be used only with
a child seat designed for use with
LATCH.
The location of each lower anchor is
indicated by a small button above the
an chor point.
Whenever using the center tether
anchor point, make sure to push
down the head restraint to the lowest
position, route the strap over the
seat-back, then around the upper
guide bef ore attaching the tether
strap hook to the center tether
anchor (see page ). 1.
2.3.
46
CONT INUED
On the center seating position
Installing a Child Seat
Installing a Child Seat with
LATCH
Driver and Passenger Saf ety
41
BUTTON UPPERGUIDE
CENTER TETHER ANCHOR
LATCH
ANCHOR
POINTS
Page 46 of 331
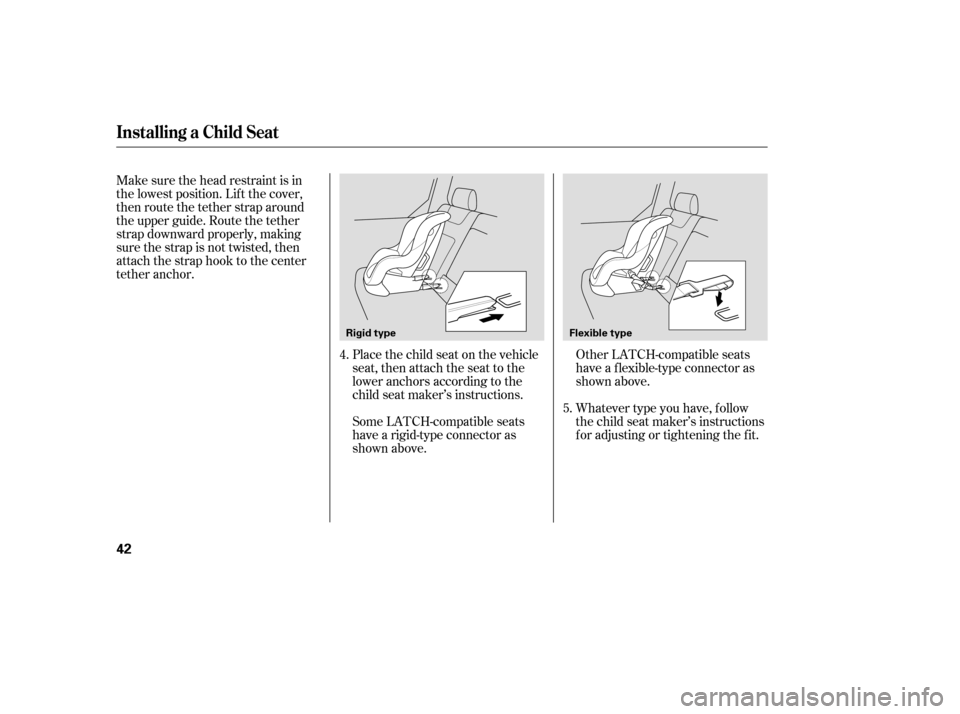
Make sure the head restraint is in
the lowest position. Lif t the cover,
then route the tether strap around
the upper guide. Route the tether
strap downward properly, making
sure the strap is not twisted, then
attach the strap hook to the center
tether anchor.Place the child seat on the vehicle
seat, then attach the seat to the
lower anchors according to the
child seat maker’s instructions.
Some LATCH-compatible seats
have a rigid-type connector as
shown above.Other LATCH-compatible seats
have a f lexible-type connector as
shown above.
Whatever type you have, f ollow
the child seat maker’s instructions
f or adjusting or tightening the f it.
5.
4.
Installing a Child Seat
42
Flexible type
Rigid type
Page 47 of 331
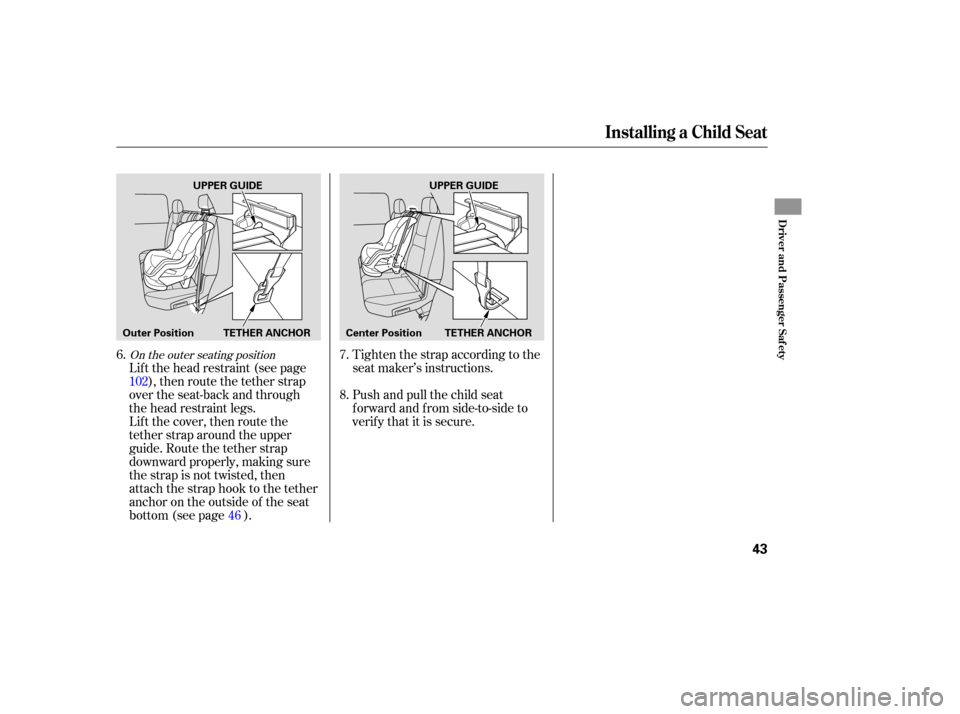
Lift the head restraint (see page
), then route the tether strap
over the seat-back and through
the head restraint legs.
Lift the cover, then route the
tether strap around the upper
guide. Route the tether strap
downward properly, making sure
the strap is not twisted, then
attach the strap hook to the tether
an chor on the outside of the seat
bottom (see page ). Push and pull the child seat
f orward and f rom side-to-side to
verify that it is secure. Tighten the strap according to the
seat maker’s instructions.
6.
7.
8.
102
46
On the outer seating position
Installing a Child Seat
Driver and Passenger Saf ety
43
UPPERGUIDE
Outer Position UPPER
GUIDE
Center Position TETHER ANCHOR
TETHER ANCHOR
Page 48 of 331
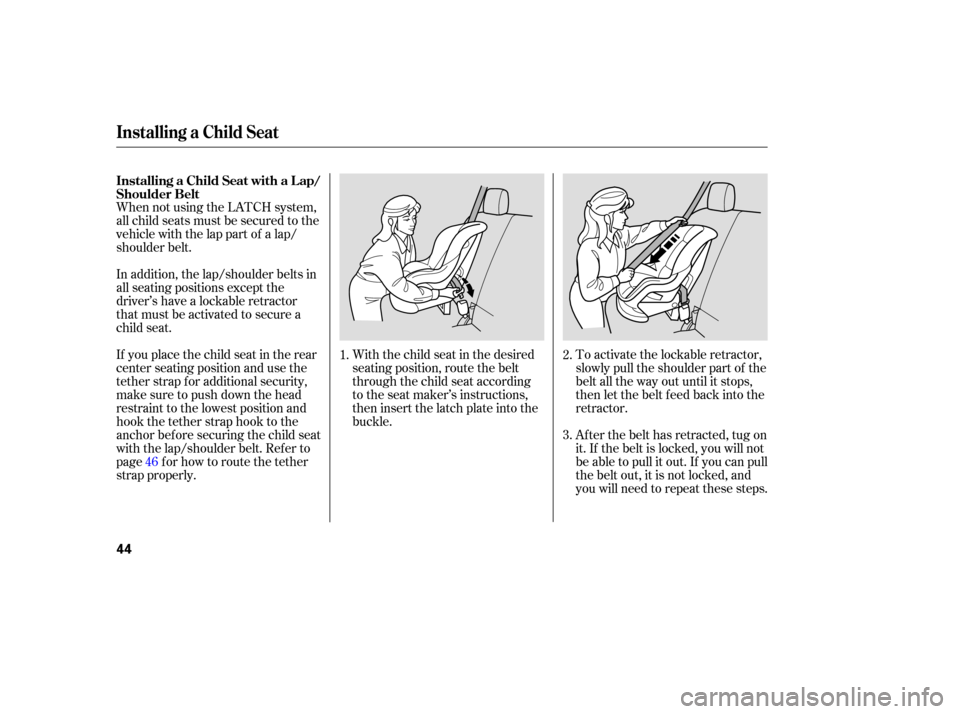
When not using the LATCH system,
all child seats must be secured to the
vehicle with the lap part of a lap/
shoulder belt.
With the child seat in the desired
seating position, route the belt
th rough the child seat according
to the seat maker’s instructions,
then insert the latch plate into the
buckl e. To
activate the lockable retractor,
slowly pull the shoulder part of the
belt all the way out until it stops,
th en let the belt feed back into the
retractor.
After the belt has retracted, tug on
it. If the belt is locked, you will not
be able to pull it out. If you can pull
thebeltout,itisnotlocked,and
you will need to repeat these steps.
In
addition, the lap/shoulder belts in
all seating positions except the
driver’s have a lockable retractor
that must be activated to secure a
child seat.
If you place the child seat in the rear
center seating position and use the
tether strap for additional security,
make sure to push down the head
restraint to the lowest position and
hook the tether strap hook to the
anchor bef ore securing the child seat
with the lap/shoulder belt. Refer to
page for how to route the tether
strap properly. 1.
2.
3.
46
Installing a Child Seat with a L ap/
Shoulder Belt
Installing a Child Seat
44
Page 49 of 331
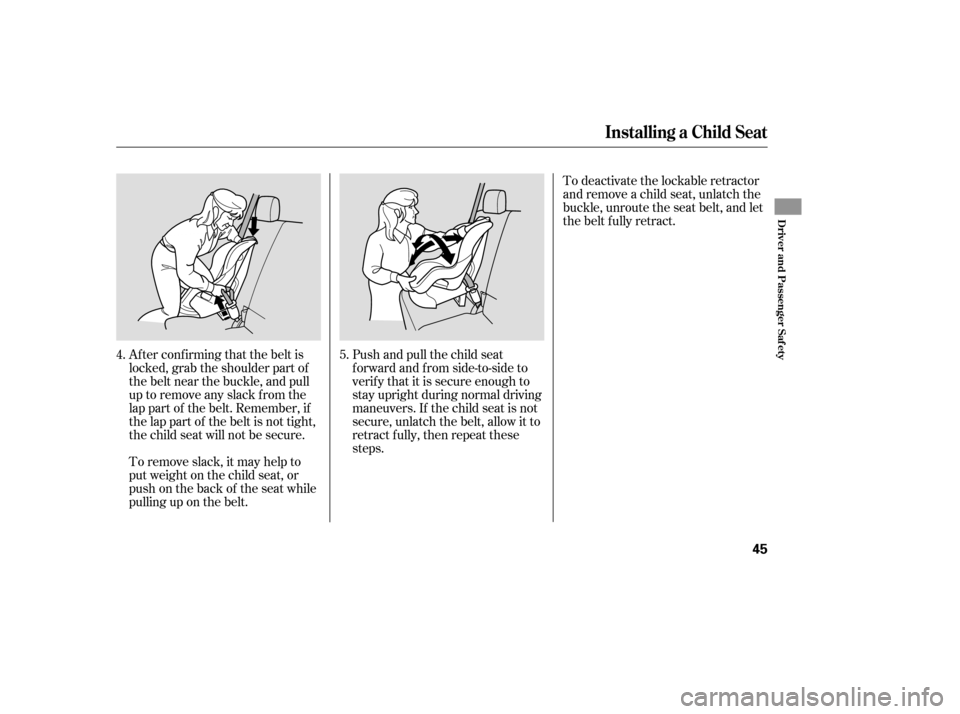
Af ter conf irming that the belt is
locked, grab the shoulder part of
the belt near the buckle, and pull
up to remove any slack from the
lap part of the belt. Remember, if
the lap part of the belt is not tight,
the child seat will not be secure.Push and pull the child seat
f orward and f rom side-to-side to
verify that it is secure enough to
stay upright during normal driving
maneuvers. If the child seat is not
secure, unlatch the belt, allow it to
retract f ully, then repeat these
steps.
To remove slack, it may help to
putweightonthechildseat,or
push on the back of the seat while
pulling up on the belt. To deactivate the lockable retractor
and remove a child seat, unlatch the
buckle, unroute the seat belt, and let
the belt fully retract.
4. 5.
Installing a Child Seat
Driver and Passenger Saf ety
45
Page 50 of 331
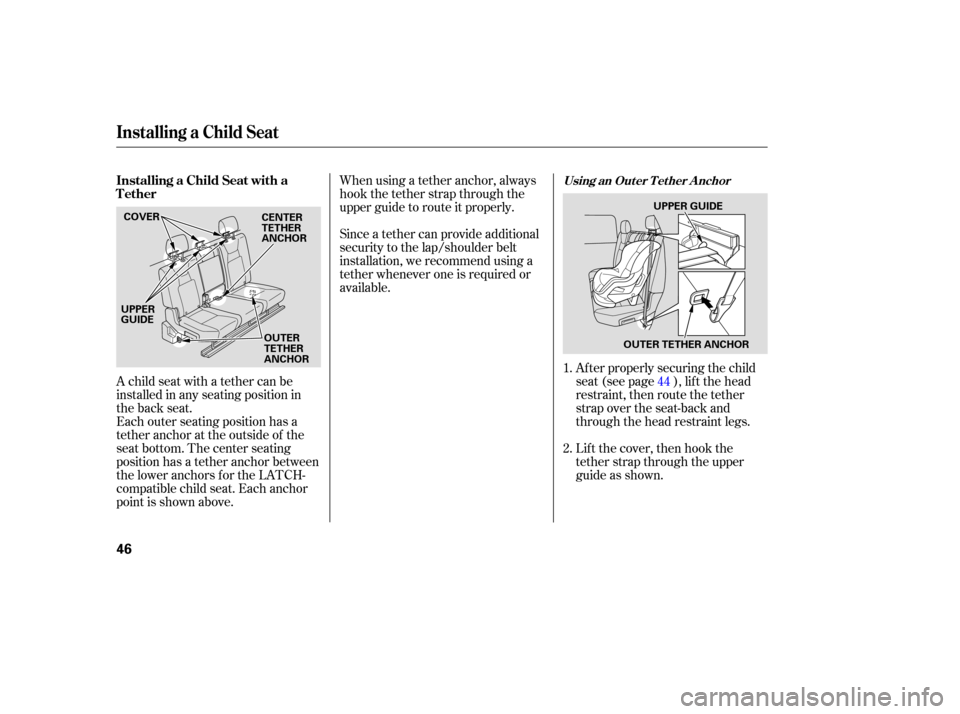
When using a tether anchor, always
hook the tether strap through the
upper guide to route it properly.
Since a teth er can pro vide additional
security to the lap/shoulder belt
installation, we recommend using a
te ther whenever one is required or
available.
Each outer seating position has a
tether anchor at the outside of the
seat bottom. The center seating
position has a tether anchor between
the lower anchors for the LATCH-
compatible child seat. Each anchor
point is shown above. Lift
the cover, then hook the
tether strap through the upper
guide as shown. Af ter properly securing the child
seat (see page ), lif t the head
restraint, then route the tether
strap over the seat-back and
through the head restraint legs.
A child seat with a tether can be
installed in any seating position in
the back seat. 1.
2.44
Installing a Child Seat
Installing a Child Seat with a
TetherUsing an Out er T et her A nchor
46
COVER
UPPER
GUIDE UPPER
GUIDE
CENTER
TETHER
ANCHOR
OUTER
TETHER
ANCHOR OUTER TETHER ANCHOR