key HONDA RIDGELINE 2017 2.G Owners Manual
[x] Cancel search | Manufacturer: HONDA, Model Year: 2017, Model line: RIDGELINE, Model: HONDA RIDGELINE 2017 2.GPages: 606, PDF Size: 13.21 MB
Page 58 of 606
Continued57
uuChild Safety uSafety of Infants and Small Children
Safe DrivingMost child seats are LATCH-compatible (L ower Anchors and Tethers for CHildren).
Some have a rigid-type connector while others have a flexible-type connector. Both
are equally easy to use. Some existing and previously owned child seats can only be
installed using the seat belt. Whichever type you choose, follow the child seat
manufacturer’s use and care instructions including recommended expiration dates
as well as the instructions in this manual . Proper installation is key to maximizing
your child’s safety.
In seating positions and vehicles not equipped with LATCH, a LATCH compatible
child seat can be installed using the seat belt and a top tether for added security.
This is because all child seats are required to be designed so that they can be secured
with the seat belt. In additi on, the child seat manufacturer may advise that a seat
belt be used to attach a LATCH-compatib le seat once a child reaches a specified
weight. Please read the child seat ow ner’s manual for proper installation
instructions.
■Important consideration when selecting a child seat
Make sure the child seat meets the following thr ee requirements:
• The child seat is the correct type and size for the child.
• The child seat is the correct type for the seating position.
• The child seat is compliant with Federa l Motor Vehicle Safety Standard 213 or
Canadian Motor Vehicle Safety Standard 213.
■Selecting a Child Seat1 Selecting a Child Seat
Installation of a LATCH-co mpatible child seat is
simple.
LATCH-compatible child s eats have been developed
to simplify the installati on process and reduce the
likelihood of injuries caused by incorrect installation.
Page 80 of 606
79
uuIndicators u
Continued
Instrument Panel
IndicatorNameOn/BlinkingExplanationMessage
Lights On
Indicator●Comes on whenever the light
switch is on, or in AUTO when
the exterior lights are on.●If you set the power mode to VEHICLE OFF
(LOCK) while the lights are on, a chime sounds
when the driver’s door is opened.
—
Auto high-beam
Indicator*
●Comes on for a few seconds
when you set the power mode to
ON, then goes off.
●Comes on when all the operating
conditions of the Auto high-
beam are met.
2Auto High-Beam (High Beam Support
System)* P. 149—
Fog Light
Indicator*
●Comes on when the fog lights
are on.
——
Immobilizer
System Indicator
●Comes on briefly when you set
the power mode to ON, then
goes off.
●Comes on if the immobilizer
system cannot recognize the key
information.
●Blinks - You cannot start the engine. Set the
power mode to VEHICL E OFF (LOCK), then
select the ON mode again.
●Repeatedly blinks - The system may be
malfunctioning. Have your vehicle checked by
a dealer.
●Do not attempt to alter this system or add
other devices to it. Electrical problems can
occur.
—
* Not available on all models
Page 82 of 606
81
uuIndicators u
Continued
Instrument Panel
IndicatorNameOn/BlinkingExplanationMessage
Smart Entry
System Indicator
●Comes on for a few seconds
when you set the power mode to
ON, then goes off.
●Comes on as soon as a problem is
detected in the smart entry
system
* or keyless starting
system.
●Have your vehicle checked by a dealer.
All-wheel drive
( AWD ) Indicator*
●Comes on for a few seconds
when you set the power mode to
ON, then goes off.
●Comes on if there is a problem
with the AWD system.
●Blinks when the differential
temperature is too high.
●Stays on constantly - The engine drives
the front wheels only in this state. Have your
vehicle checked by a dealer.
●Blinks while driving - Stop in a safe place,
change to
(P, and idle the engine until the
indicator goes off. If the indicator does not
stop blinking, take your vehicle to a dealer.
2 i-VTM4 (Intelligent Variable Torque
Management)-4 ® System* P. 465
*
* Not available on all models
Page 93 of 606
92
uuIndicators uMulti-Information Display Warn ing and Information Messages
Instrument Panel
MessageConditionExplanation
●Appears after the driver’s door is opened when the
power mode is in ACCESSORY.●Press the ENGINE START/STOP button twice with your
foot off the brake pedal to change the power mode to
VEHICLE OFF (LOCK).
●Appears when you close the door with the power mode
is in ON without the smar t entry remote inside the
vehicle.●Disappears when you bring the smart entry remote back
inside the vehicle and close the door.
2 Smart Entry Remote Reminder P. 142
●Appears when the smart entry remote battery becomes
weak.●Replace the battery as soon as possible.
2Replacing the Button Battery P. 541
●Appears if the smart entry remote battery is too weak to
start the engine or the key is not within operating range
to start the engine.
The beeper sounds six times.●Bring the smart entry remote in front of the ENGINE
START/STOP button.
2 If the Smart Entry Remote Battery is Weak P. 563
●Appears three seconds after the To Start, Hold
Remote Near Start Button , then To Start Engine
messages appeared sequentially.●Unless you bring the smart en try remote in front of the
ENGINE START/STOP button, this message does not
appear.
2 If the Smart Entry Remote Battery is Weak P. 563
Page 108 of 606
107
Controls
This chapter explains how to operate the various controls necessary for driving.
Clock.................................................. 108
Locking and Unlocking the Doors Key Types and Functions .................. 109
Low Smart Entry Remote Signal Strength... 111
Locking/Unlocking the Doors from the Outside .......................................... 112
Locking/Unlocking the Doors from the
Inside ............................................. 119
Childproof Door Locks ..................... 121
Auto Door Locking/Unlocking .......... 122
Opening and Closing the Tailgate ... 126
Opening and Closing the Trunk ....... 128
Security System
Immobilizer System .......................... 131
Security System Alarm ...................... 131
Opening and Closing the Windows .... 134
Opening and Closing the Moonroof*... 138Operating the Switches Around the Steering Wheel ENGINE START/STOP Button............. 140
Turn Signals ..................................... 143
Light Switches.................................. 144
Fog Lights
*...................................... 147
Daytime Running Lights ................... 148
Auto High-Beam (H igh Beam Support
System)
*........................................ 149
Wipers and Washers ........................ 152
Rear Defogger/Heat ed Door Mirror
*
Button ........................................... 154 Heated Windshield Button ............... 154
Brightness Control ........................... 155
Driving Position Memory System
*.... 156
Adjusting the Steering Wheel .......... 158
Adjusting the Mirrors Interior Rearview Mirror ................... 159
Power Door Mirrors ......................... 160
Adjusting the Seats .......................... 161
Interior Lights/Convenience Items
Interior Lights .................................. 169
Interior Convenience Items .............. 171
In-Bed Convenience Items................ 182
Climate Control System
*.................. 186
Heating and Cooling System*......... 193
Canadian models
* Not available on all models
Page 110 of 606
109Continued
Controls
Locking and Unlocking the Doors
Key Types and Functions
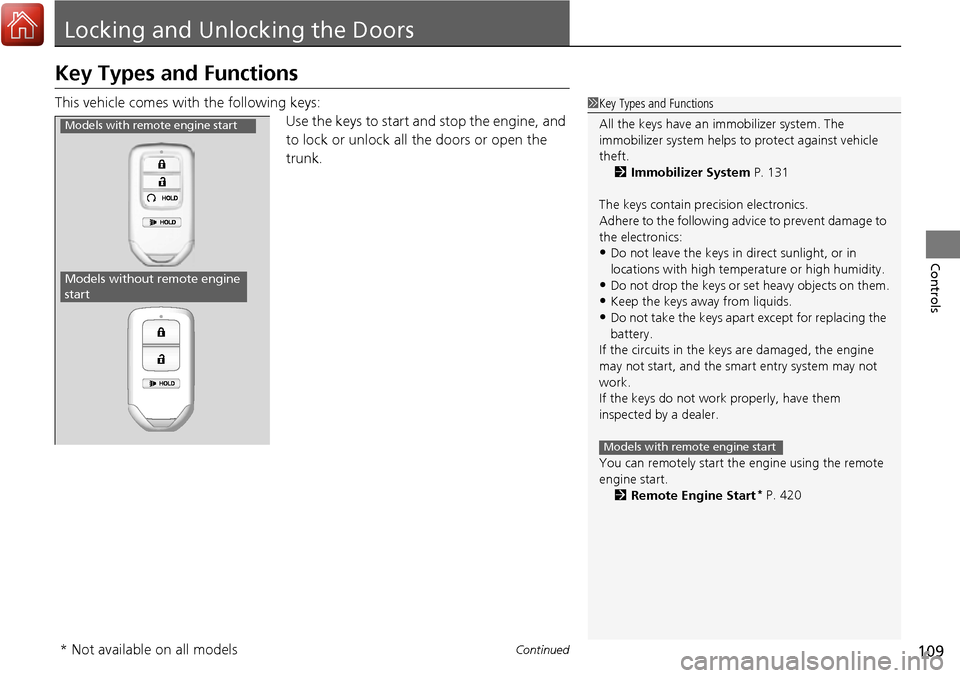
This vehicle comes with the following keys:
Use the keys to start and stop the engine, and
to lock or unlock all the doors or open the
trunk.1Key Types and Functions
All the keys have an immobilizer system. The
immobilizer system helps to protect against vehicle
theft. 2 Immobilizer System P. 131
The keys contain precision electronics.
Adhere to the following advi ce to prevent damage to
the electronics:
•Do not leave the keys in direct sunlight, or in
locations with high temperature or high humidity.
•Do not drop the keys or set heavy objects on them.
•Keep the keys away from liquids.
•Do not take the keys apart except for replacing the
battery.
If the circuits in the keys are damaged, the engine
may not start, and the smart entry system may not
work.
If the keys do not work properly, have them
inspected by a dealer.
You can remotely start the engine using the remote
engine start.
2 Remote Engine Start
* P. 420
Models with remote engine start
Models with remote engine start
Models without remote engine
start
* Not available on all models
Page 111 of 606
uuLocking and Unlocking the Doors uKey Types and Functions
110
Controls
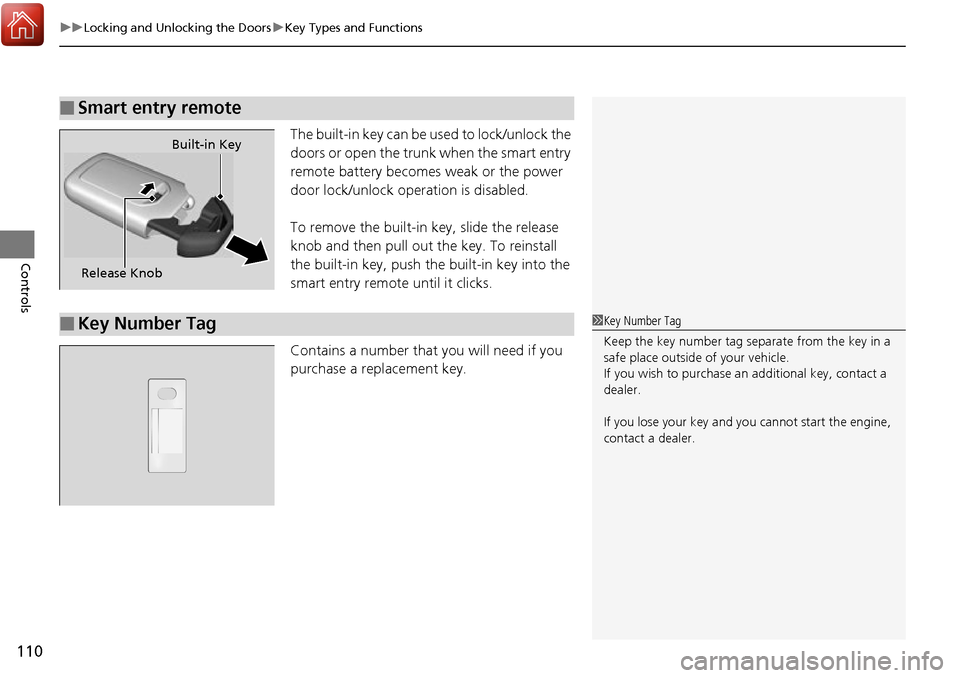
The built-in key can be us ed to lock/unlock the
doors or open the trunk when the smart entry
remote battery becomes weak or the power
door lock/unlock operation is disabled.
To remove the built-in key, slide the release
knob and then pull out the key. To reinstall
the built-in key, push th e built-in key into the
smart entry remote until it clicks.
Contains a number that you will need if you
purchase a replacement key.
■Smart entry remote
Release Knob Built-in Key
■Key Number Tag1
Key Number Tag
Keep the key number tag separate from the key in a
safe place outside of your vehicle.
If you wish to purchase an additional key, contact a
dealer.
If you lose your key and you cannot start the engine,
contact a dealer.
Page 118 of 606
Continued117
uuLocking and Unlocking the Doors uLocking/Unlocking the Doors from the Outside
Controls
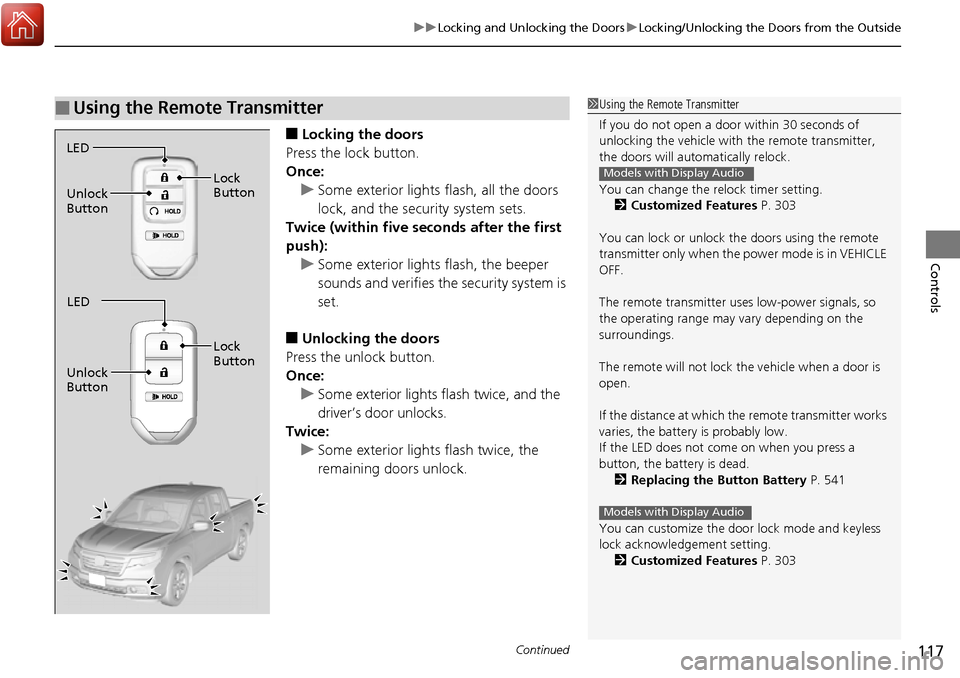
■Locking the doors
Press the lock button.
Once: u Some exterior lights flash, all the doors
lock, and the security system sets.
Twice (within five se conds after the first
push): u Some exterior lights flash, the beeper
sounds and verifies the security system is
set.
■Unlocking the doors
Press the unlock button.
Once: u Some exterior lights flash twice, and the
driver’s door unlocks.
Twice:
u Some exterior light s flash twice, the
remaining doors unlock.
■Using the Remote Transmitter1 Using the Remote Transmitter
If you do not open a door within 30 seconds of
unlocking the vehicle with the remote transmitter,
the doors will auto matically relock.
You can change the relock timer setting. 2 Customized Features P. 303
You can lock or unlock the doors using the remote
transmitter only when the power mode is in VEHICLE
OFF.
The remote transmitter us es low-power signals, so
the operating range may vary depending on the
surroundings.
The remote will not lock th e vehicle when a door is
open.
If the distance at which the remote transmitter works
varies, the batter y is probably low.
If the LED does not come on when you press a
button, the battery is dead.
2 Replacing the Button Battery P. 541
You can customize the door lock mode and keyless
lock acknowledge ment setting.
2 Customized Features P. 303
Models with Display Audio
Models with Display Audio
LED
Unlock
Button Lock
Button
LED
Unlock
Button Lock
Button
Page 119 of 606
uuLocking and Unlocking the Doors uLocking/Unlocking the Doors from the Outside
118
Controls
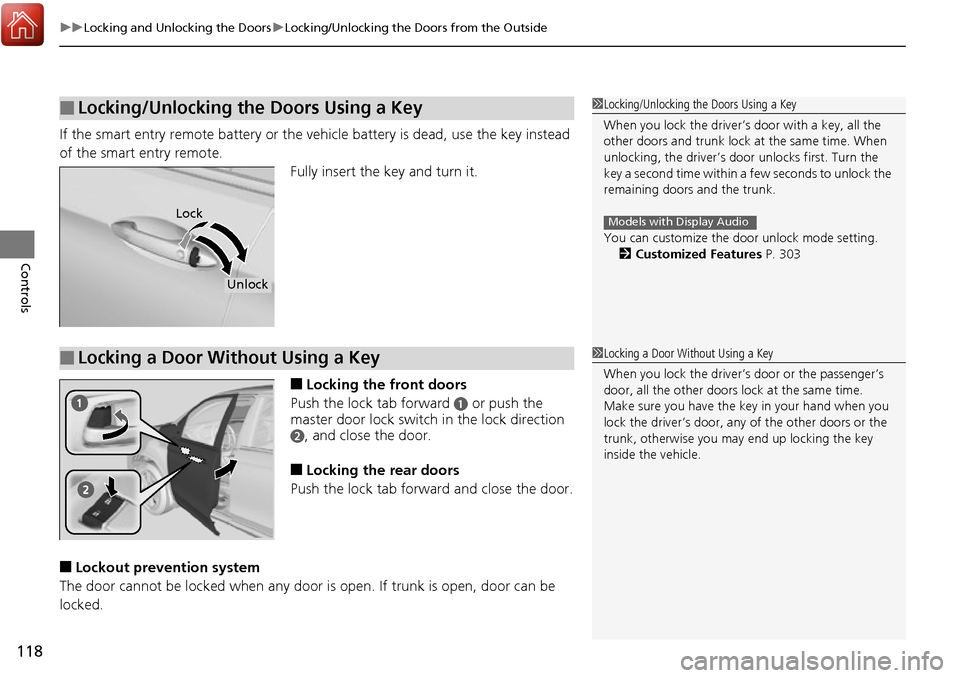
If the smart entry remote battery or the ve hicle battery is dead, use the key instead
of the smart entry remote. Fully insert the key and turn it.
■Locking the front doors
Push the lock tab forward
a or push the
master door lock switch in the lock direction
b, and close the door.
■Locking the rear doors
Push the lock tab forward and close the door.
■Lockout prevention system
The door cannot be locked when any door is open. If trunk is open, door can be
locked.
■Locking/Unlocking the Doors Using a Key1 Locking/Unlocking the Doors Using a Key
When you lock the driver’s door with a key, all the
other doors and trunk lock at the same time. When
unlocking, the driver’s door unlocks first. Turn the
key a second time within a few seconds to unlock the
remaining doors and the trunk.
You can customize the door unlock mode setting. 2 Customized Features P. 303
Models with Display AudioLock
Unlock
■Locking a Door Without Using a Key1Locking a Door Without Using a Key
When you lock the driver’s door or the passenger’s
door, all the other doors lock at the same time.
Make sure you have the key in your hand when you
lock the driver’s door, any of the other doors or the
trunk, otherwise you may end up locking the key
inside the vehicle.
Page 129 of 606
128
Controls
Opening and Closing the Trunk
Precautions for Opening/Closing the Trunk
■Opening the trunk
Open the trunk all the way. u If it is not fully opened, the trunk lid may begin to close under its own weight.
■Closing the trunk
Keep the trunk lid clos ed while driving to:
u Avoid possible damage.
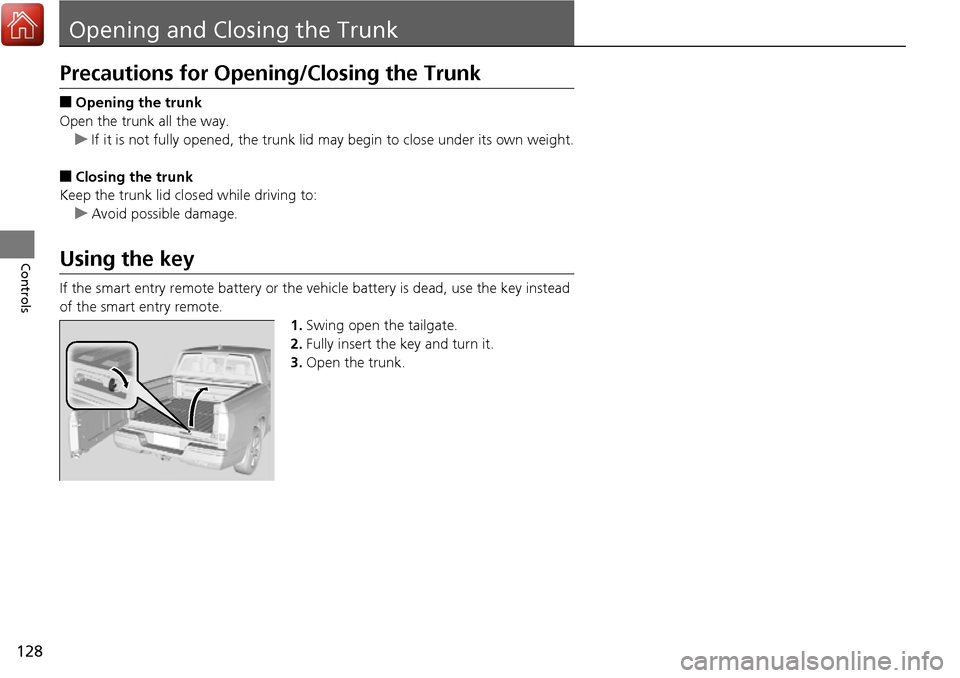
Using the key
If the smart entry remote battery or the ve hicle battery is dead, use the key instead
of the smart entry remote. 1.Swing open the tailgate.
2. Fully insert the key and turn it.
3. Open the trunk.