trunk release HONDA RIDGELINE 2017 2.G Owners Manual
[x] Cancel search | Manufacturer: HONDA, Model Year: 2017, Model line: RIDGELINE, Model: HONDA RIDGELINE 2017 2.GPages: 606, PDF Size: 13.21 MB
Page 7 of 606
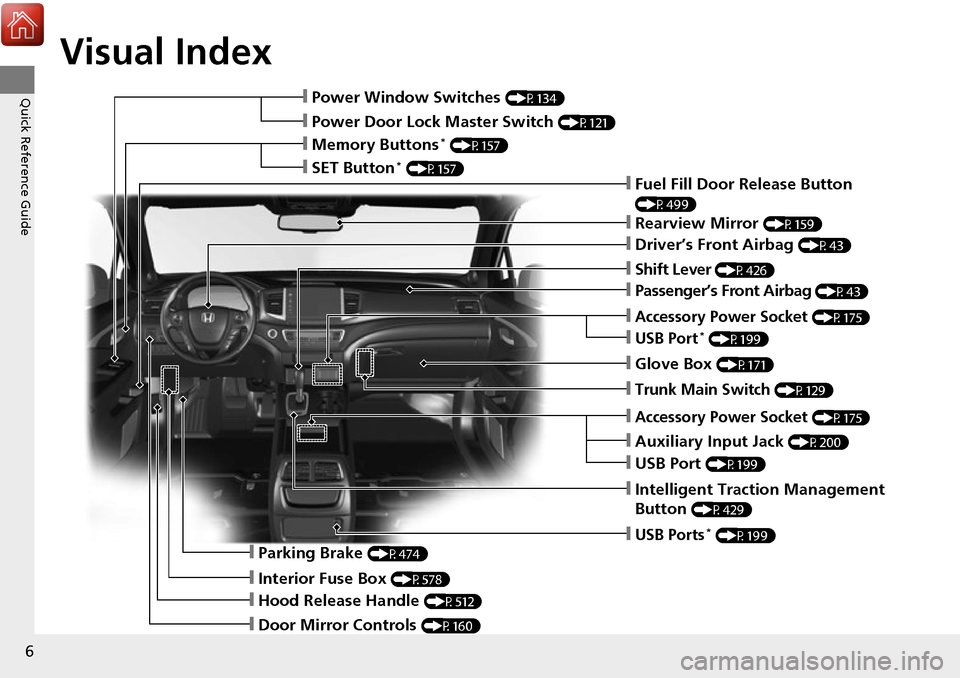
Visual Index
6
Quick Reference Guide❙Power Window Switches (P134)
❙Power Door Lock Master Switch (P121)
❙Memory Buttons* (P157)
❙SET Button* (P157)
❙Fuel Fill Door Release Button
(P499)
❙Rearview Mirror (P159)
❙Driver’s Front Airbag (P43)
❙Shift Lever (P426)
❙Glove Box (P171)
❙Auxiliary Input Jack (P200)
❙Intelligent Traction Management
Button
(P429)
❙Parking Brake (P474)
❙Interior Fuse Box (P578)
❙Hood Release Handle (P512)
❙Door Mirror Controls (P160)
❙USB Ports* (P199)
❙Accessory Power Socket (P175)
❙USB Port (P199)
❙Trunk Main Switch (P129)
❙Accessory Power Socket (P175)
❙USB Port* (P199)
❙Passenger’s Front Airbag (P43)
Page 15 of 606
14
Quick Reference Guide
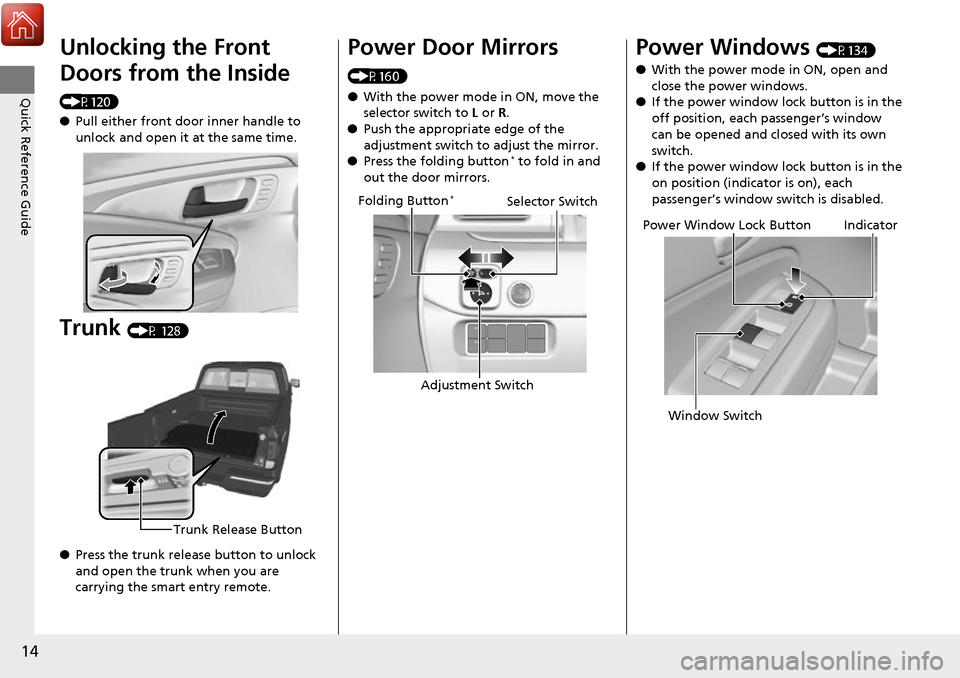
Unlocking the Front
Doors from the Inside
(P120)
●Pull either front door inner handle to
unlock and open it at the same time.
Trunk (P 128)
● Press the trunk release button to unlock
and open the trunk when you are
carrying the smart entry remote.
Trunk Release Button
Power Door Mirrors
(P160)
● With the power mode in ON, move the
selector switch to L or R.
● Push the appropriate edge of the
adjustment switch to adjust the mirror.
● Press the folding button
* to fold in and
out the door mirrors.
Selector Switch
Adjustment Switch
Folding Button*
Power Windows (P134)
● With the power mode in ON, open and
close the power windows.
● If the power window lock button is in the
off position, each passenger’s window
can be opened and closed with its own
switch.
● If the power window lock button is in the
on position (indicator is on), each
passenger’s window switch is disabled.
Power Window Lock Button
Window SwitchIndicator
Page 111 of 606
uuLocking and Unlocking the Doors uKey Types and Functions
110
Controls
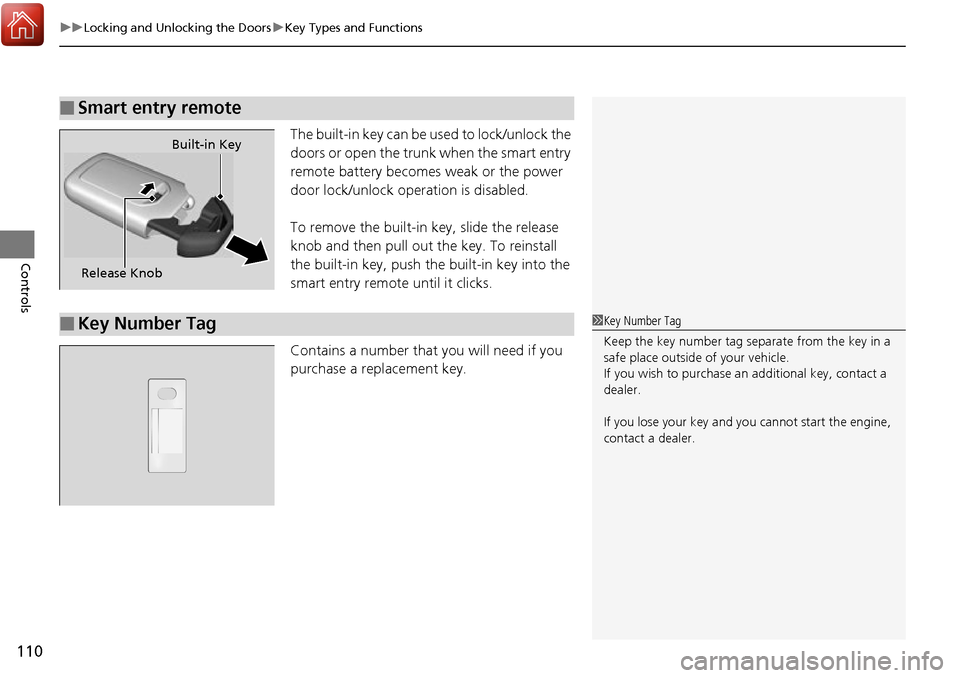
The built-in key can be us ed to lock/unlock the
doors or open the trunk when the smart entry
remote battery becomes weak or the power
door lock/unlock operation is disabled.
To remove the built-in key, slide the release
knob and then pull out the key. To reinstall
the built-in key, push th e built-in key into the
smart entry remote until it clicks.
Contains a number that you will need if you
purchase a replacement key.
■Smart entry remote
Release Knob Built-in Key
■Key Number Tag1
Key Number Tag
Keep the key number tag separate from the key in a
safe place outside of your vehicle.
If you wish to purchase an additional key, contact a
dealer.
If you lose your key and you cannot start the engine,
contact a dealer.
Page 113 of 606
112
uuLocking and Unlocking the Doors uLocking/Unlocking the Doors from the Outside
Controls
Locking/Unlocking the Doors from the Outside
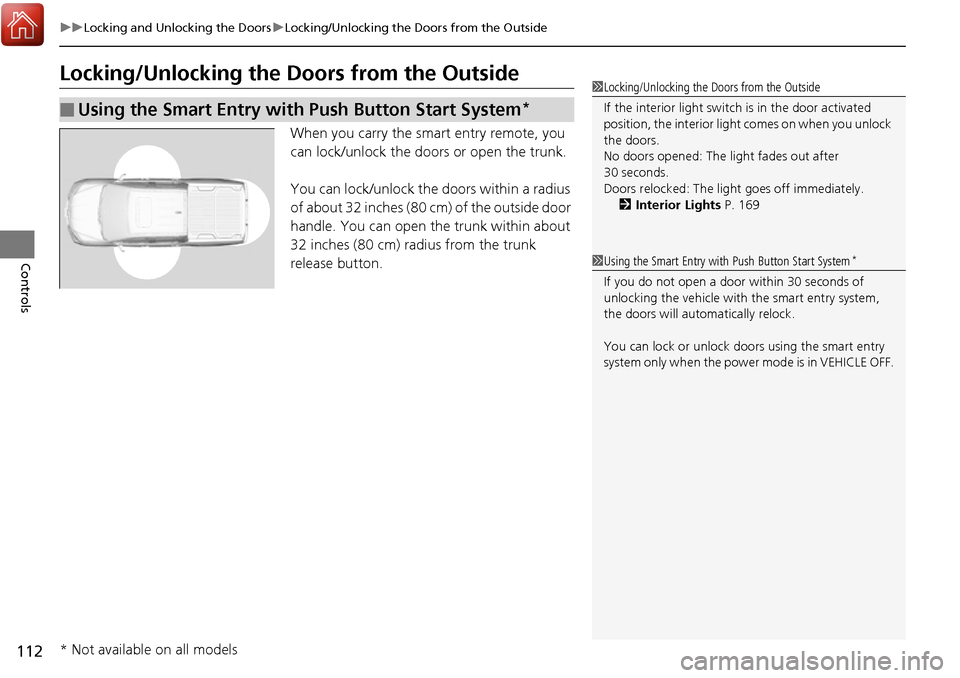
When you carry the smart entry remote, you
can lock/unlock the doors or open the trunk.
You can lock/unlock the doors within a radius
of about 32 inches (80 cm) of the outside door
handle. You can open the trunk within about
32 inches (80 cm) radius from the trunk
release button.
■Using the Smart Entry with Push Button Start System*
1 Locking/Unlocking the Doors from the Outside
If the interior light switch is in the door activated
position, the interior light comes on when you unlock
the doors.
No doors opened: The li ght fades out after
30 seconds.
Doors relocked: The light goes off immediately.
2 Interior Lights P. 169
1Using the Smart Entry with Push Button Start System*
If you do not open a door within 30 seconds of
unlocking the vehicle with the smart entry system,
the doors will auto matically relock.
You can lock or unlock doors using the smart entry
system only when the power mode is in VEHICLE OFF.
* Not available on all models
Page 115 of 606
uuLocking and Unlocking the Doors uLocking/Unlocking the Doors from the Outside
114
Controls
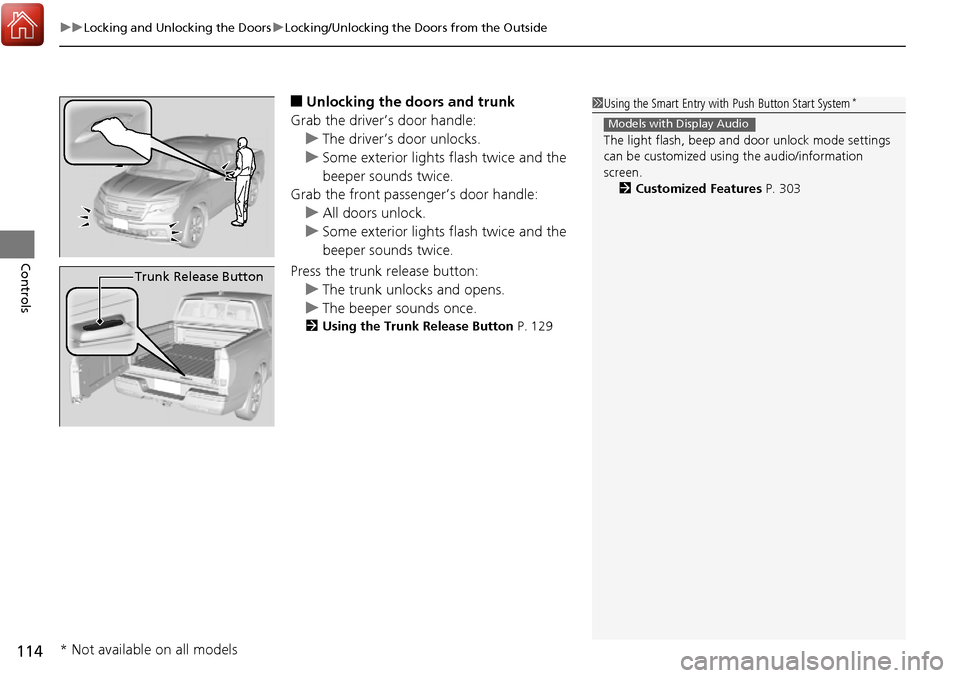
■Unlocking the doors and trunk
Grab the driver’s door handle: u The driver’s door unlocks.
u Some exterior lights flash twice and the
beeper sounds twice.
Grab the front passenger’s door handle:
u All doors unlock.
u Some exterior lights flash twice and the
beeper sounds twice.
Press the trunk release button: u The trunk unlocks and opens.
u The beeper sounds once.
2 Using the Trunk Release Button P. 129
1Using the Smart Entry with Push Button Start System*
The light flash, beep and door unlock mode settings
can be customized using the audio/information
screen. 2 Customized Features P. 303
Models with Display Audio
Trunk Release Button
* Not available on all models
Page 130 of 606
129
uuOpening and Closing the Trunk uUsing the Trunk Release Button
Controls
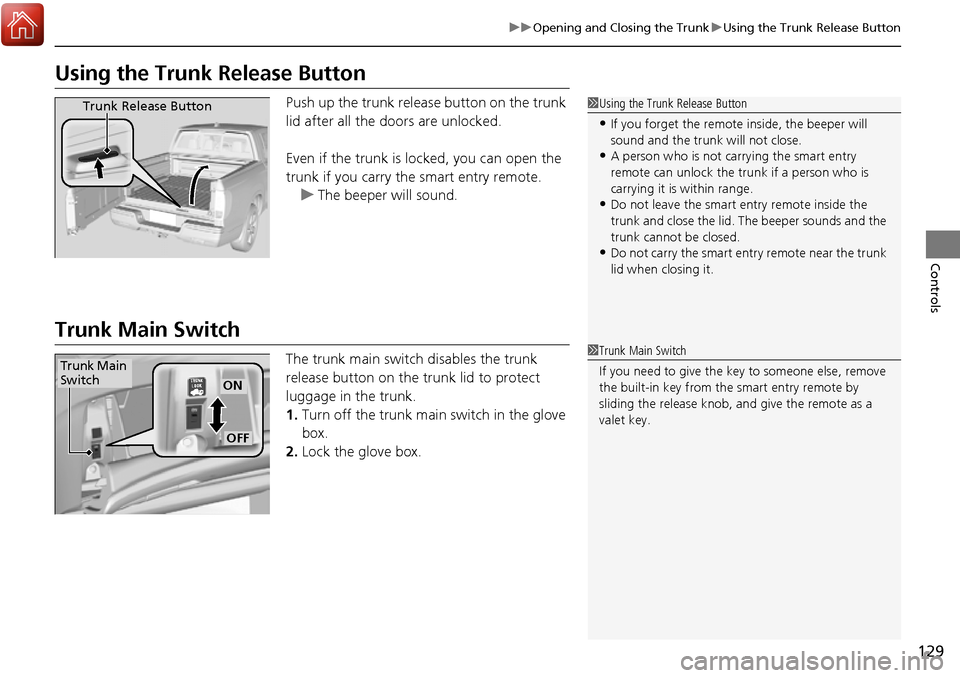
Using the Trunk Release Button
Push up the trunk releas e button on the trunk
lid after all the doors are unlocked.
Even if the trunk is locked, you can open the
trunk if you carry the smart entry remote. u The beeper will sound.
Trunk Main Switch
The trunk main switch disables the trunk
release button on the trunk lid to protect
luggage in the trunk.
1.Turn off the trunk main switch in the glove
box.
2. Lock the glove box.
1Using the Trunk Release Button
•If you forget the remote inside, the beeper will
sound and the trunk will not close.
•A person who is not carrying the smart entry
remote can unlock the tr unk if a person who is
carrying it is within range.
•Do not leave the smart entry remote inside the
trunk and close the lid. The beeper sounds and the
trunk cannot be closed.
•Do not carry the smart entry remote near the trunk
lid when closing it.
Trunk Release Button
1 Trunk Main Switch
If you need to give the ke y to someone else, remove
the built-in key from the smart entry remote by
sliding the release knob, and give the remote as a
valet key.
ON
OFF
Trunk Main
Switch
Page 131 of 606
130
uuOpening and Closing the Trunk uEmergency Trunk Opener
Controls
Emergency Trunk Opener
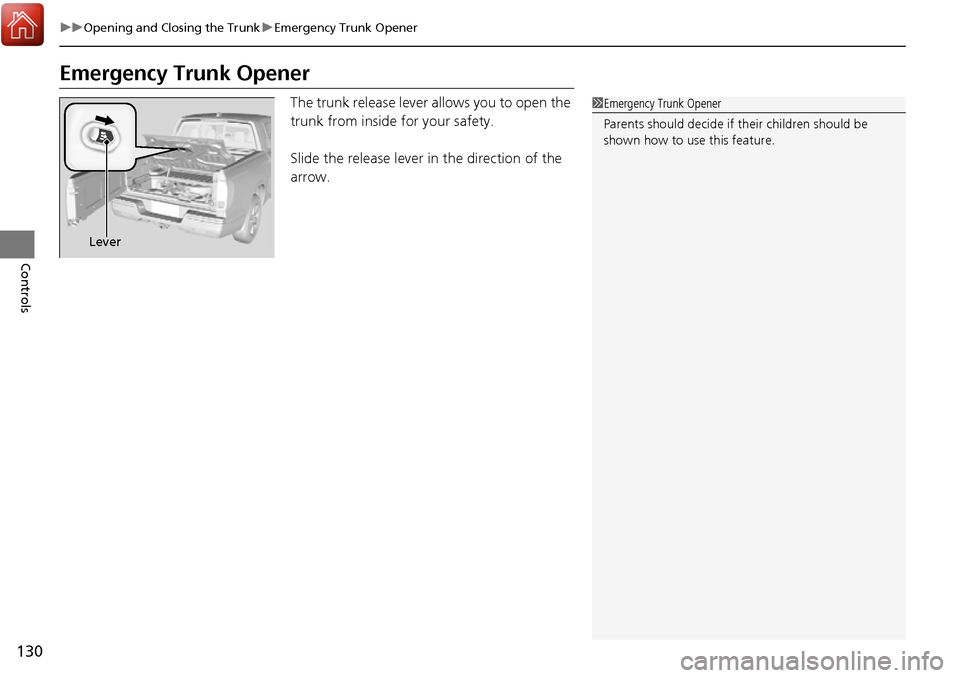
The trunk release lever allows you to open the
trunk from inside for your safety.
Slide the release lever in the direction of the
arrow.1Emergency Trunk Opener
Parents should deci de if their children should be
shown how to use this feature.
Lever
Page 133 of 606
uuSecurity System uSecurity System Alarm
132
Controls
■To deactivate the security system alarm
Unlock the vehicle using the key, remote transmitter, or smart entry with push
button start system. The system, along with the horn and fl ashing lights, is
deactivated.
■Setting the security system alarm
The security system alarm automatically sets when the following conditions have
been met:
• The power mode is set to VEHICLE OFF (LOCK).
• The hood and trunk are closed.
• All doors are locked from outside with the key, remote transmitter, or smart entry
system.
■When the security system alarm sets
The security system alarm indicator in the instrument panel blinks. When the
blinking interval changes after about 15 se conds, the security system alarm is set.
■To cancel the security system alarm
The security system alarm is canceled when the vehicle is unlocked using the key,
remote transmitter, smart entry system, or th e power mode is set to ON. The security
system alarm indicator goe s off at the same time.
1Security System Alarm
Do not set the security system alarm when someone
is in the vehicle or a window is open. The system can
accidentally activate when:
•Unlocking the door with the lock tab.•Opening the trunk with the trunk release or the
emergency trunk opener.
•Opening the hood with the hood release.•Moving the shift lever out of ( P.
If the battery goes dead after you have set the
security system alarm, the security alarm may go off
once the battery is re charged or replaced.
If this occurs, deactivate the security system alarm by
unlocking a door using the ke y, remote transmitter,
or smart entry system.
Page 560 of 606
Continued559
uuIf a Tire Goes Flat uChanging a Flat Tire
Handling the Unexpected
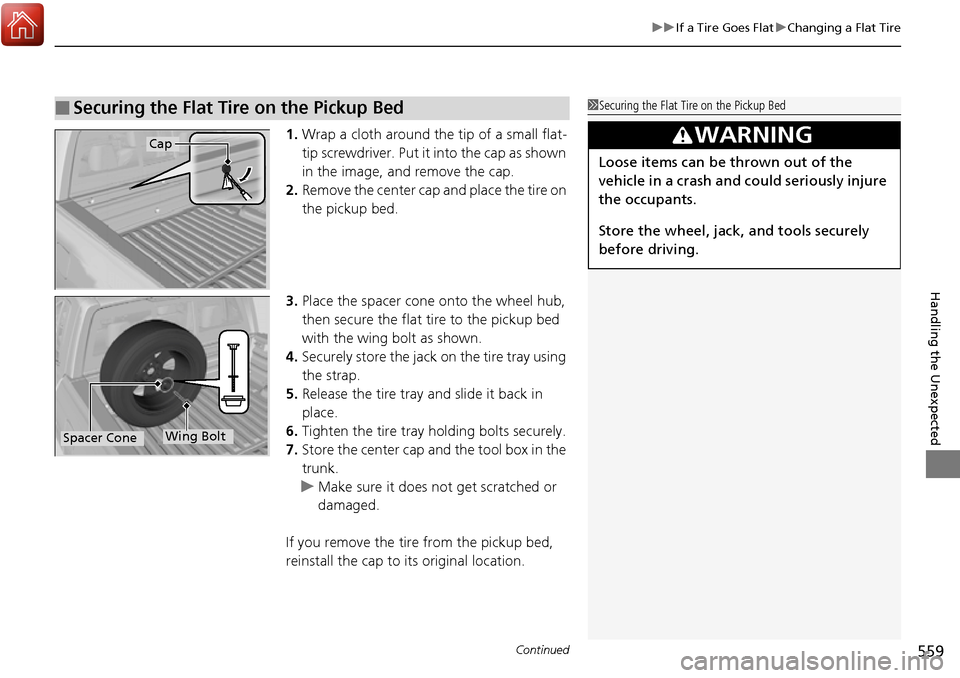
1. Wrap a cloth around the tip of a small flat-
tip screwdriver. Put it into the cap as shown
in the image, and remove the cap.
2. Remove the center cap and place the tire on
the pickup bed.
3. Place the spacer cone onto the wheel hub,
then secure the flat tire to the pickup bed
with the wing bolt as shown.
4. Securely store the jack on the tire tray using
the strap.
5. Release the tire tray and slide it back in
place.
6. Tighten the tire tray holding bolts securely.
7. Store the center cap and the tool box in the
trunk.
u Make sure it does not get scratched or
damaged.
If you remove the tire from the pickup bed,
reinstall the cap to its original location.
■Securing the Flat Tire on the Pickup Bed1 Securing the Flat Tire on the Pickup Bed
3WARNING
Loose items can be thrown out of the
vehicle in a crash and could seriously injure
the occupants.
Store the wheel, jack, and tools securely
before driving.
Cap
Wing BoltSpacer Cone
Page 583 of 606
582
Handling the Unexpected
Refueling
Refueling From a Portable Fuel Container
If you have run out of fuel and need to refuel your vehicle from a portable fuel
container, use the funnel provided with your vehicle.1.Turn off the engine.
2. Press the fuel fill door release button.
u The fuel fill door opens.
3. Open the trunk and pull out the tire tray
with the handles.
2 Getting Ready to Replace the Flat Tire
P. 554
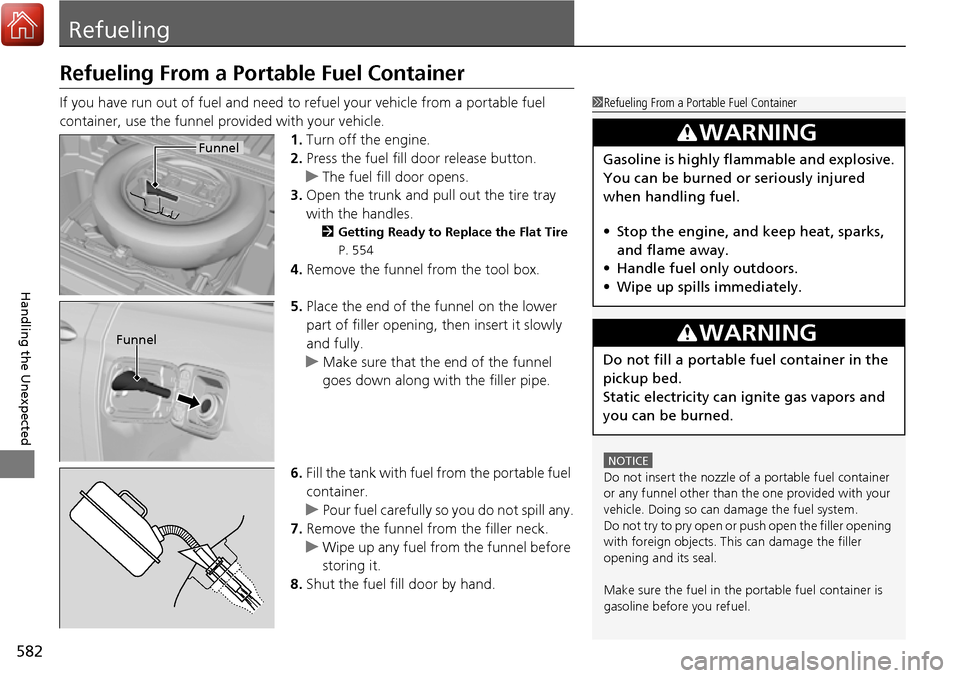
4. Remove the funnel from the tool box.
5. Place the end of the funnel on the lower
part of filler opening, then insert it slowly
and fully.
u Make sure that the end of the funnel
goes down along with the filler pipe.
6. Fill the tank with fuel from the portable fuel
container.
u Pour fuel carefully so you do not spill any.
7. Remove the funnel from the filler neck.
u Wipe up any fuel from the funnel before
storing it.
8. Shut the fuel fill door by hand.
1Refueling From a Portable Fuel Container
NOTICE
Do not insert the nozzle of a portable fuel container
or any funnel other than the one provided with your
vehicle. Doing so can damage the fuel system.
Do not try to pry open or push open the filler opening
with foreign objects. This can damage the filler
opening and its seal.
Make sure the fuel in the portable fuel container is
gasoline before you refuel.
3WARNING
Gasoline is highly flammable and explosive.
You can be burned or seriously injured
when handling fuel.
• Stop the engine, and keep heat, sparks,
and flame away.
• Handle fuel only outdoors.
• Wipe up spills immediately.
3WARNING
Do not fill a portable fuel container in the
pickup bed.
Static electricity can ignite gas vapors and
you can be burned.
Funnel
Funnel